In the digital age, a printer is often an indispensable piece of technology, bridging the gap between our digital creations and the tangible world. Whether you’re a student printing assignments, a professional churning out reports, or an artist bringing your designs to life, a functional printer is key. However, the seamless operation of your printer hinges on a crucial, often overlooked, component: the device driver. This article will guide you through the process of installing and managing printer device drivers, ensuring your printer is always ready to perform when you need it most.
Understanding the Role of Printer Device Drivers
At its core, a device driver acts as a translator between your operating system (like Windows or macOS) and your printer hardware. Think of it as a universal language interpreter. Your operating system speaks a general language of commands, while each printer model has its own unique dialect of instructions it understands. The device driver is the intermediary that converts the operating system’s general commands into specific instructions that your printer can execute.
Without the correct driver, your operating system might not recognize your printer at all, or it might only offer very basic functionality, severely limiting your printing options. This can lead to issues like:
- Printer not detected: Your computer simply doesn’t see the printer as a connected device.
- “Print” option greyed out: You can’t initiate a print job.
- Incorrect formatting: Text and images appear distorted or misplaced on the printed page.
- Limited features: You can’t access advanced settings like duplex printing, specific paper types, or high-resolution output.
- Error messages: Cryptic codes and warnings that leave you scratching your head.
Therefore, understanding and properly installing device drivers is fundamental to a smooth and efficient printing experience. It’s a vital piece of the puzzle in the broader realm of Tech, specifically within Software and Tutorials.
Identifying Your Printer’s Needs: The First Step
Before you can install a driver, you need to know exactly what you’re looking for. This involves identifying two key pieces of information:
1. Your Printer Model
This is usually the most straightforward part. The model name and number are almost always prominently displayed on the printer itself, typically on the front, top, or back panel. It might be something like “HP DeskJet 3755,” “Canon PIXMA TS3320,” or “Epson EcoTank ET-2760.”
2. Your Operating System
Your operating system is the software that manages your computer’s hardware and software resources. The driver you download must be compatible with your specific operating system version and architecture.
- Windows: You’ll need to know if you’re running Windows 10, Windows 11, or an older version. Additionally, you need to know if your system is 32-bit or 64-bit. You can usually find this information by going to Settings > System > About. Look for “System type” under “Device specifications.”
- macOS: Identify your macOS version (e.g., macOS Ventura, Monterey, Big Sur). You can find this by clicking the Apple logo in the top-left corner of your screen and selecting “About This Mac.”
- Linux: Linux distributions can vary. Knowing your specific distribution (e.g., Ubuntu, Fedora, Debian) and its version is crucial.
Once you have these two pieces of information, you’re ready to find the correct driver.
Obtaining the Correct Printer Driver
There are several reliable methods for acquiring the appropriate device driver for your printer. It’s generally recommended to use official sources to avoid malware or incompatible software.
Method 1: Using the Manufacturer’s Website (Recommended)
This is the most common and highly recommended method. Printer manufacturers provide dedicated support sections on their websites where you can download the latest drivers and software for their products.
- Navigate to the Manufacturer’s Support Page: Open your web browser and go to the official website of your printer’s manufacturer (e.g., hp.com, canon.com, epson.com, brother.com). Look for a “Support,” “Downloads,” or “Drivers” section.
- Enter Your Printer Model: You’ll typically find a search bar where you can type in your printer’s model name and number.
- Select Your Operating System: Once your printer is identified, you’ll be presented with a list of available downloads. Crucially, select your specific operating system (Windows 10 64-bit, macOS Ventura, etc.) from the dropdown menu or list.
- Download the Driver/Software Package: You’ll usually find a “Driver” or “Full Software and Driver Package” option. It’s often best to download the full package as it usually includes not just the basic driver but also utility software that can enhance your printing experience and aid in troubleshooting. Some manufacturers might offer just a basic driver, which is fine if you only need core functionality.
- Save the File: Save the downloaded file to a location you can easily find, such as your Desktop or Downloads folder.
Why this is recommended: Manufacturer websites always host the most up-to-date, officially tested, and compatible drivers. They also often provide helpful documentation and troubleshooting guides. This aligns with the Tech category, focusing on Software and Tutorials.
Method 2: Using Your Operating System’s Built-in Tools
Both Windows and macOS have built-in utilities that can often automatically detect and install drivers for new hardware.
For Windows:
- Connect Your Printer: If your printer is not yet connected, do so via USB or network.
- Windows Update: Windows Update can sometimes automatically find and install the correct driver when it detects new hardware. Ensure Windows Update is enabled and check for updates.
- Add a Printer Manually:
- Go to Settings > Bluetooth & devices > Printers & scanners.
- Click “Add device.”
- Windows will scan for available printers. If it finds yours, select it and click “Add device.”
- If your printer isn’t found automatically, click “Add manually.”
- Follow the on-screen prompts. You may be given options to let Windows search for a driver, or to select a driver from a list. If your printer is listed, choose it. If not, you might need to point Windows to the driver file you downloaded manually from the manufacturer’s website.
For macOS:
- Connect Your Printer: Connect your printer to your Mac via USB or ensure it’s on the same network.
- Add Printer:
- Go to System Settings (or System Preferences) > Printers & Scanners.
- Click the “Add Printer, Scanner, or Fax…” button (or the ‘+’ button).
- Your Mac will scan for available printers. Select your printer from the list.
- macOS usually automatically selects the correct driver (often referred to as “Use”). If it doesn’t, you can click the “Use” dropdown menu and select “Select Software…” to manually choose the driver if it’s already installed, or if you’ve downloaded it from the manufacturer.
Note: While convenient, these built-in tools might not always install the latest driver version or the full software suite. They are excellent for getting basic printing functionality up and running quickly.
Method 3: Using the Installation CD/DVD (Less Common Now)
Many printers used to come with an installation CD or DVD. If your printer came with one, you can insert it into your computer’s optical drive and follow the on-screen instructions.
Caution: Drivers on older CDs can be outdated. If you use this method, it’s still a good idea to visit the manufacturer’s website afterward to check for newer driver versions. Many modern printers no longer include physical media.
Installing the Printer Driver: A Step-by-Step Guide
Once you’ve downloaded the driver file (most likely a .exe file for Windows or a .dmg file for macOS), the installation process is generally straightforward.
For Windows:
- Locate the Downloaded File: Go to the folder where you saved the driver installer (e.g., your Downloads folder).
- Run the Installer: Double-click the downloaded file. You might see a security warning; click “Run” or “Yes” to proceed.
- Follow the On-Screen Prompts: The installer will guide you through the process. This typically involves:
- Accepting License Agreements: Read and agree to the terms and conditions.
- Choosing Installation Type: You might have options like “Typical,” “Express,” or “Custom.” “Typical” or “Express” usually installs the recommended software and drivers. “Custom” allows you to choose specific components. For most users, the default option is best.
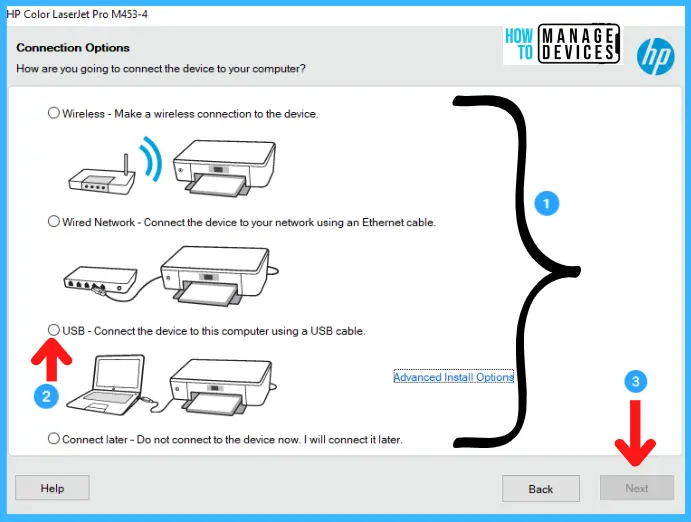
- Connection Type: You’ll be asked how your printer is connected (USB, Wi-Fi, Ethernet). Select the correct option.
- Detecting the Printer: The installer will often try to find your printer on the network or via USB. Ensure your printer is powered on and connected at this stage.
- Installation Progress: Wait for the installation to complete. This can take a few minutes.
- Restart (if prompted): Some installations may require you to restart your computer.
For macOS:
- Locate the Downloaded File: Find the
.dmgfile you downloaded. - Open the Disk Image: Double-click the
.dmgfile. This will mount a virtual disk image, and a new window will open. - Run the Installer Package: Inside the window, you’ll usually find an installer package (often with a
.pkgextension). Double-click this file. - Follow the On-Screen Prompts: Similar to Windows, the macOS installer will guide you through:
- Introduction and License: Read through the information and agree to the license.
- Installation Type: Choose where to install (usually your main hard drive).
- Installation Process: The installer will copy the necessary files.
- Add Printer (if not already done): macOS might prompt you to add the printer at this stage, or you might do it separately through System Settings as described earlier.
Troubleshooting Common Printer Driver Issues
Even with the best intentions, you might encounter problems. Here are some common issues and how to resolve them:
Printer Not Responding After Driver Installation
- Check Connections: Ensure your printer is powered on and all cables (USB, Ethernet) are securely connected. If it’s a wireless printer, verify its Wi-Fi connection.
- Restart Everything: A simple restart of your computer and your printer can often resolve temporary glitches.
- Check Print Queue: Sometimes, a stuck print job can prevent new ones from processing. In Windows, go to Settings > Bluetooth & devices > Printers & scanners, select your printer, and click “Open print queue.” In macOS, go to Printers & Scanners, select your printer, and click “Print Queue.” Cancel any pending jobs.
- Firewall/Antivirus: Your security software might be blocking the connection. Temporarily disable your firewall or antivirus to see if that resolves the issue. If it does, you’ll need to configure your security software to allow the printer and its driver to communicate.
Incorrect Printer Selected or Default Printer Issues
- Set as Default: If you have multiple printers, ensure the correct one is set as the default. In Windows: Settings > Bluetooth & devices > Printers & scanners, select your printer, and choose “Set as default.” In macOS: System Settings > Printers & Scanners, and set the default printer under the “Default printer” dropdown.
- Check Application Settings: Some applications allow you to choose a specific printer for that particular document, overriding the system default.
Driver Update Issues
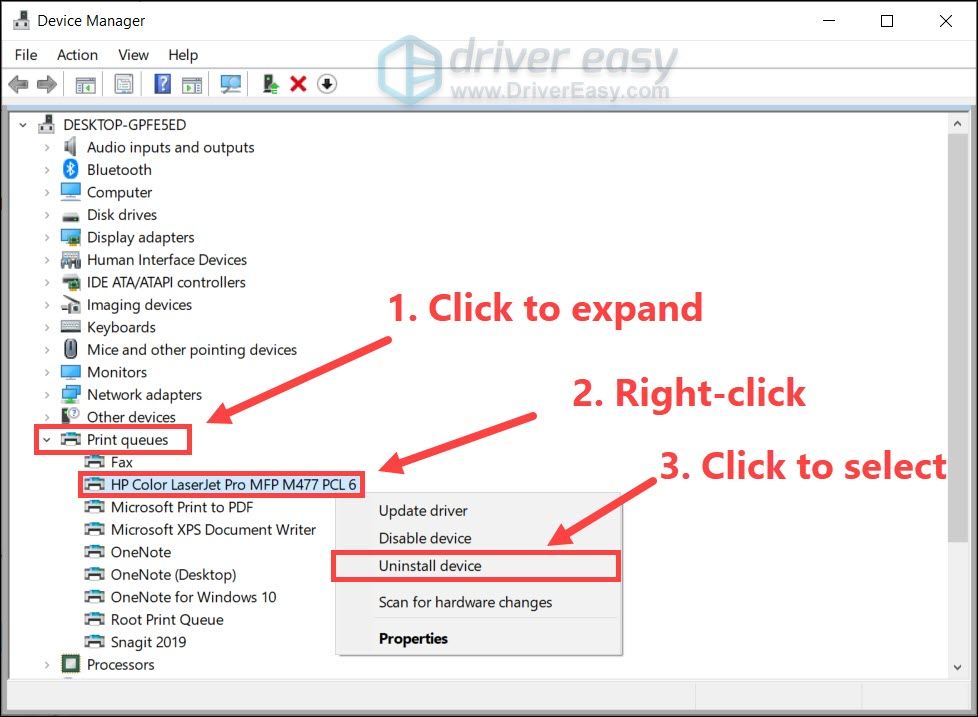
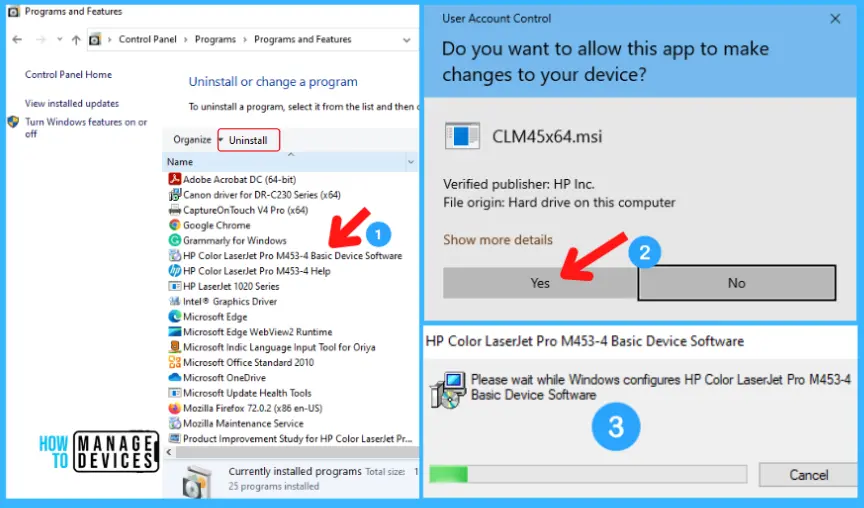
- Reinstall the Driver: If you suspect the driver is corrupted or outdated, uninstall the current driver and then reinstall the latest version from the manufacturer’s website.
- Windows: Go to Settings > Apps > Apps & features, find your printer software, and uninstall it. Then, manually remove the printer from Printers & scanners before reinstalling.
- macOS: Go to System Settings > Printers & Scanners, select the printer, and click the “-” button to remove it. Then, reinstall the driver package.
- Windows Troubleshooter: Windows has a built-in “Printer Troubleshooter” that can automatically detect and fix many common printing problems.
Beyond the Basic Installation: Printer Software and Maintenance
Installing the driver is often just the first step in ensuring optimal printer performance. Most driver packages include additional software that offers:
- Printer Status Monitoring: Check ink/toner levels, paper status, and any error messages.
- Scanning Utilities: If your printer is an all-in-one, these tools allow you to scan documents and images.
- Printing Preferences/Settings: Access advanced options for print quality, paper handling, color management, and more.
- Troubleshooting Tools: Built-in diagnostics to help you resolve issues.
Regularly checking the manufacturer’s website for driver updates is also a good practice. Companies release updates to improve performance, fix bugs, and enhance compatibility with new operating system versions. This proactive approach to managing your printer’s Software is a key aspect of good Tech maintenance.
In conclusion, understanding and correctly installing device drivers for your printer is a fundamental skill for anyone who relies on printing. By following these steps, you can ensure your printer functions flawlessly, translating your digital ideas into physical reality without a hitch.
aViewFromTheCave is a participant in the Amazon Services LLC Associates Program, an affiliate advertising program designed to provide a means for sites to earn advertising fees by advertising and linking to Amazon.com. Amazon, the Amazon logo, AmazonSupply, and the AmazonSupply logo are trademarks of Amazon.com, Inc. or its affiliates. As an Amazon Associate we earn affiliate commissions from qualifying purchases.