The ubiquitous nature of technology in our daily lives extends to our vehicles, and one of the most impactful additions you can make is a dash cam. Beyond just capturing scenic drives, dash cams serve as invaluable witnesses in the event of an accident, a crucial tool for disputing false claims, and even a deterrent against potential carjackings or vandalism. For those seeking comprehensive protection, installing both a front and rear dash cam system offers unparalleled coverage. This guide will walk you through the process, demystifying the installation and ensuring you harness the full potential of this vital piece of automotive tech.
Understanding Your Dash Cam System
Before diving into the physical installation, it’s essential to understand the components of a typical front and rear dash cam setup. While specific models may vary, most systems consist of a primary front-facing camera unit, a secondary rear-facing camera, and a central control unit or power cable that connects them. Some advanced systems integrate both cameras into a single unit with a wide-angle lens that can capture both directions, while others offer two distinct cameras that communicate wirelessly or via a cable.
Key Components to Familiarize Yourself With:
- Front Camera: This is your primary recording device, typically mounted near the rearview mirror. It captures video of the road ahead, including traffic, road signs, and potential incidents.
- Rear Camera: This smaller camera is designed to be mounted on the rear windshield or near the license plate. It records everything happening behind your vehicle, offering a complete 360-degree view.
- Power Cable: This cable connects the dash cam system to your car’s power source. Most commonly, this is the cigarette lighter socket or a fuse box.
- Mounting Hardware: This usually includes adhesive pads, suction cups, or clips to secure the cameras to your windshield or other surfaces.
- Rear Camera Cable (if applicable): For wired dual-camera systems, a cable will run from the front unit to the rear camera, allowing for data and power transfer.
- Memory Card: This is where your video footage is stored. Ensure you have a high-quality, high-speed microSD card compatible with your dash cam.
The evolution of dash cam technology has been rapid, with modern units offering features like high-definition recording (1080p, 1440p, or even 4K), wide dynamic range (WDR) for better performance in challenging lighting conditions, GPS logging for speed and location tracking, and even parking mode for continuous recording when the vehicle is off. When selecting your system, consider these features and how they align with your safety priorities.
Choosing the Right Dash Cam for Your Needs
The market is flooded with dash cam options, making the selection process seem daunting. However, by focusing on a few key aspects, you can narrow down your choices effectively.
Factors to Consider When Purchasing:
- Resolution and Frame Rate: For clear, usable footage, aim for at least 1080p resolution. A higher frame rate (e.g., 60fps) can provide smoother video, especially for capturing fast-moving objects.
- Field of View (FOV): A wider FOV means the camera captures more of the scene. For front cameras, 140-170 degrees is generally recommended. Rear cameras may have a slightly narrower FOV, but still need to capture a significant portion of the rear.
- Low-Light Performance: This is crucial for night driving. Look for dash cams with good low-light sensors and features like WDR or infrared (IR) night vision.
- Parking Mode: This feature allows the dash cam to record even when the engine is off, typically triggered by motion or impact. It’s a valuable security feature for deterring theft or documenting parking lot incidents.
- Storage Capacity: Dash cams record continuously, so you’ll need a sufficiently large microSD card (32GB, 64GB, or 128GB are common) to store a decent amount of footage. Consider cards specifically designed for dash cam use, as they are built for the constant read/write cycles.
- Ease of Installation and Connectivity: Some systems are designed for plug-and-play simplicity, while others may require more advanced wiring. If you’re not comfortable with car electronics, opt for a user-friendly option.
- Brand Reputation and Reviews: Research brands and read user reviews to gauge reliability and customer support.
When it comes to front and rear setups, you have a few options:
- Dual-Channel Systems: These are integrated units with two lenses (one front, one rear) that record simultaneously. They often share a single power source and memory card, simplifying installation.
- Separate Front and Rear Cameras: You can purchase a front dash cam and a separate rear dash cam that communicate wirelessly or via a cable. This offers more flexibility in placement and can sometimes lead to higher quality individual recordings.
- All-in-One Wide-Angle Cameras: Some single units boast extremely wide lenses capable of capturing both front and rear views simultaneously. While convenient, the quality of the rear recording might be compromised compared to a dedicated rear camera.
For this guide, we will focus on a common dual-channel system or a system with separate front and rear cameras that are wired together, as these offer the most comprehensive and reliable recording.
Preparing for Installation
Before you begin the physical installation process, a little preparation goes a long way. Gathering your tools, understanding your vehicle’s interior, and planning your cable routing will make the job smoother and more efficient.
Essential Tools and Materials:
- Your Dash Cam System: Ensure all components are present and accounted for.
- MicroSD Card: Pre-format it in your dash cam if possible (check your manual).
- Trim Removal Tools: These plastic tools are essential for safely prying away interior panels without scratching or damaging your car’s dashboard or trim.
- Wire Tucking Tool (or a credit card/sturdy piece of plastic): For neatly tucking wires behind trim panels.
- Wire Strippers and Crimpers (if hardwiring): If you choose to hardwire your dash cam for a cleaner look and parking mode functionality, these tools will be necessary.
- Electrical Tape: For securing connections and insulating wires.
- Zip Ties: For tidying up excess cable length.
- Screwdriver Set: You might need a few different sizes for any panels that require screws.
- Owner’s Manual for Your Vehicle: Crucial for identifying fuse box locations and understanding your car’s electrical system.
- A Clean Cloth: To wipe down surfaces where you’ll be mounting the cameras.
Planning Your Installation Strategy:
- Power Source Location: Decide how you will power your dash cam.
- Cigarette Lighter Socket: This is the easiest option, requiring minimal installation. The cable will simply plug into the socket. However, it may leave a visible wire.
- Fuse Box (Hardwiring): This offers a cleaner, more integrated look. You’ll need to identify a “switched” fuse (one that only powers on when the ignition is on) and potentially a “constant” fuse (for parking mode). Consult your car’s manual and potentially online forums for your specific vehicle model.
- Camera Placement:
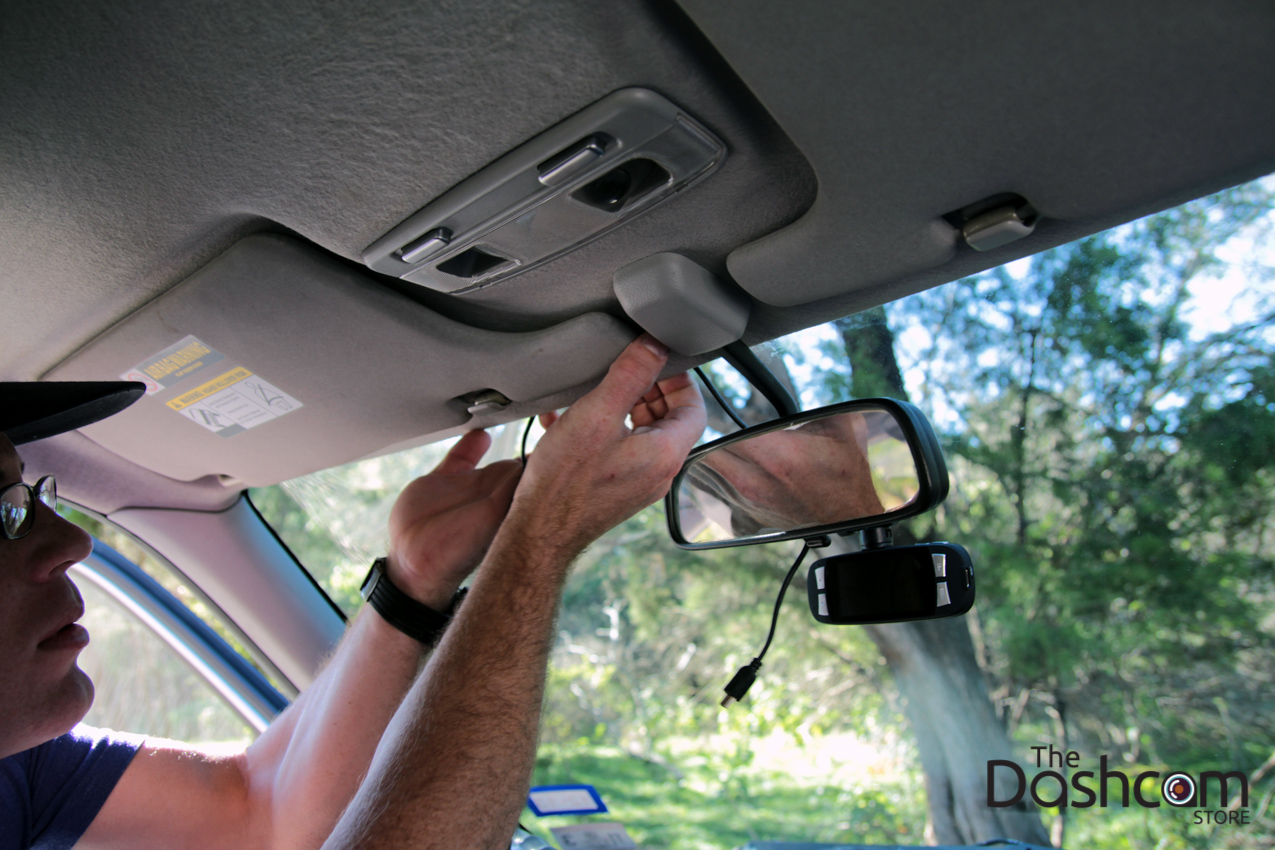
- Front Camera: Most people mount this near the top of the windshield, just below the rearview mirror. This provides an unobstructed view and keeps the camera out of the driver’s direct line of sight. Ensure it doesn’t interfere with any sensors or rain sensors.
- Rear Camera: For wired systems, this will be connected to the front unit. You can mount it on the inside of the rear windshield, near the top, similar to the front camera, or on the lower portion, near the license plate. If mounting externally, ensure it’s waterproof and securely attached.
- Cable Routing: The goal is to hide all cables as much as possible to maintain a clean interior and prevent them from dangling or interfering with your driving. Plan to route cables along the edges of the headliner, behind trim panels, and down pillars.
Taking the time to plan will save you frustration during the installation and result in a professional-looking setup.
Installing the Front Dash Cam
The front dash cam is usually the first component you’ll install, serving as the central hub for many dual-channel systems.
Mounting the Front Camera:
- Clean the Windshield: Use a clean cloth and a glass cleaner to thoroughly clean the area where you intend to mount the camera. Any dust or grime can affect the adhesive’s grip.
- Attach the Mount: Most dash cams come with either an adhesive mount or a suction cup.
- Adhesive Mount: Peel off the protective backing from the adhesive pad and firmly press the mount onto the windshield in your chosen location. Hold it in place for about 30 seconds to ensure a strong bond.
- Suction Cup Mount: Wet the suction cup slightly and press it firmly against the windshield. Then, flip the lever to create a vacuum seal.
- Connect the Camera: Slide or clip the dash cam unit onto the mount.
- Test Placement: Before permanently securing any cables, plug in the power cable and turn on your car to ensure the camera powers up and displays an image. You can adjust the camera’s angle at this stage.
Connecting Power and Routing Cables:
- Cigarette Lighter Socket Method:
- Plug the power adapter into your car’s cigarette lighter socket.
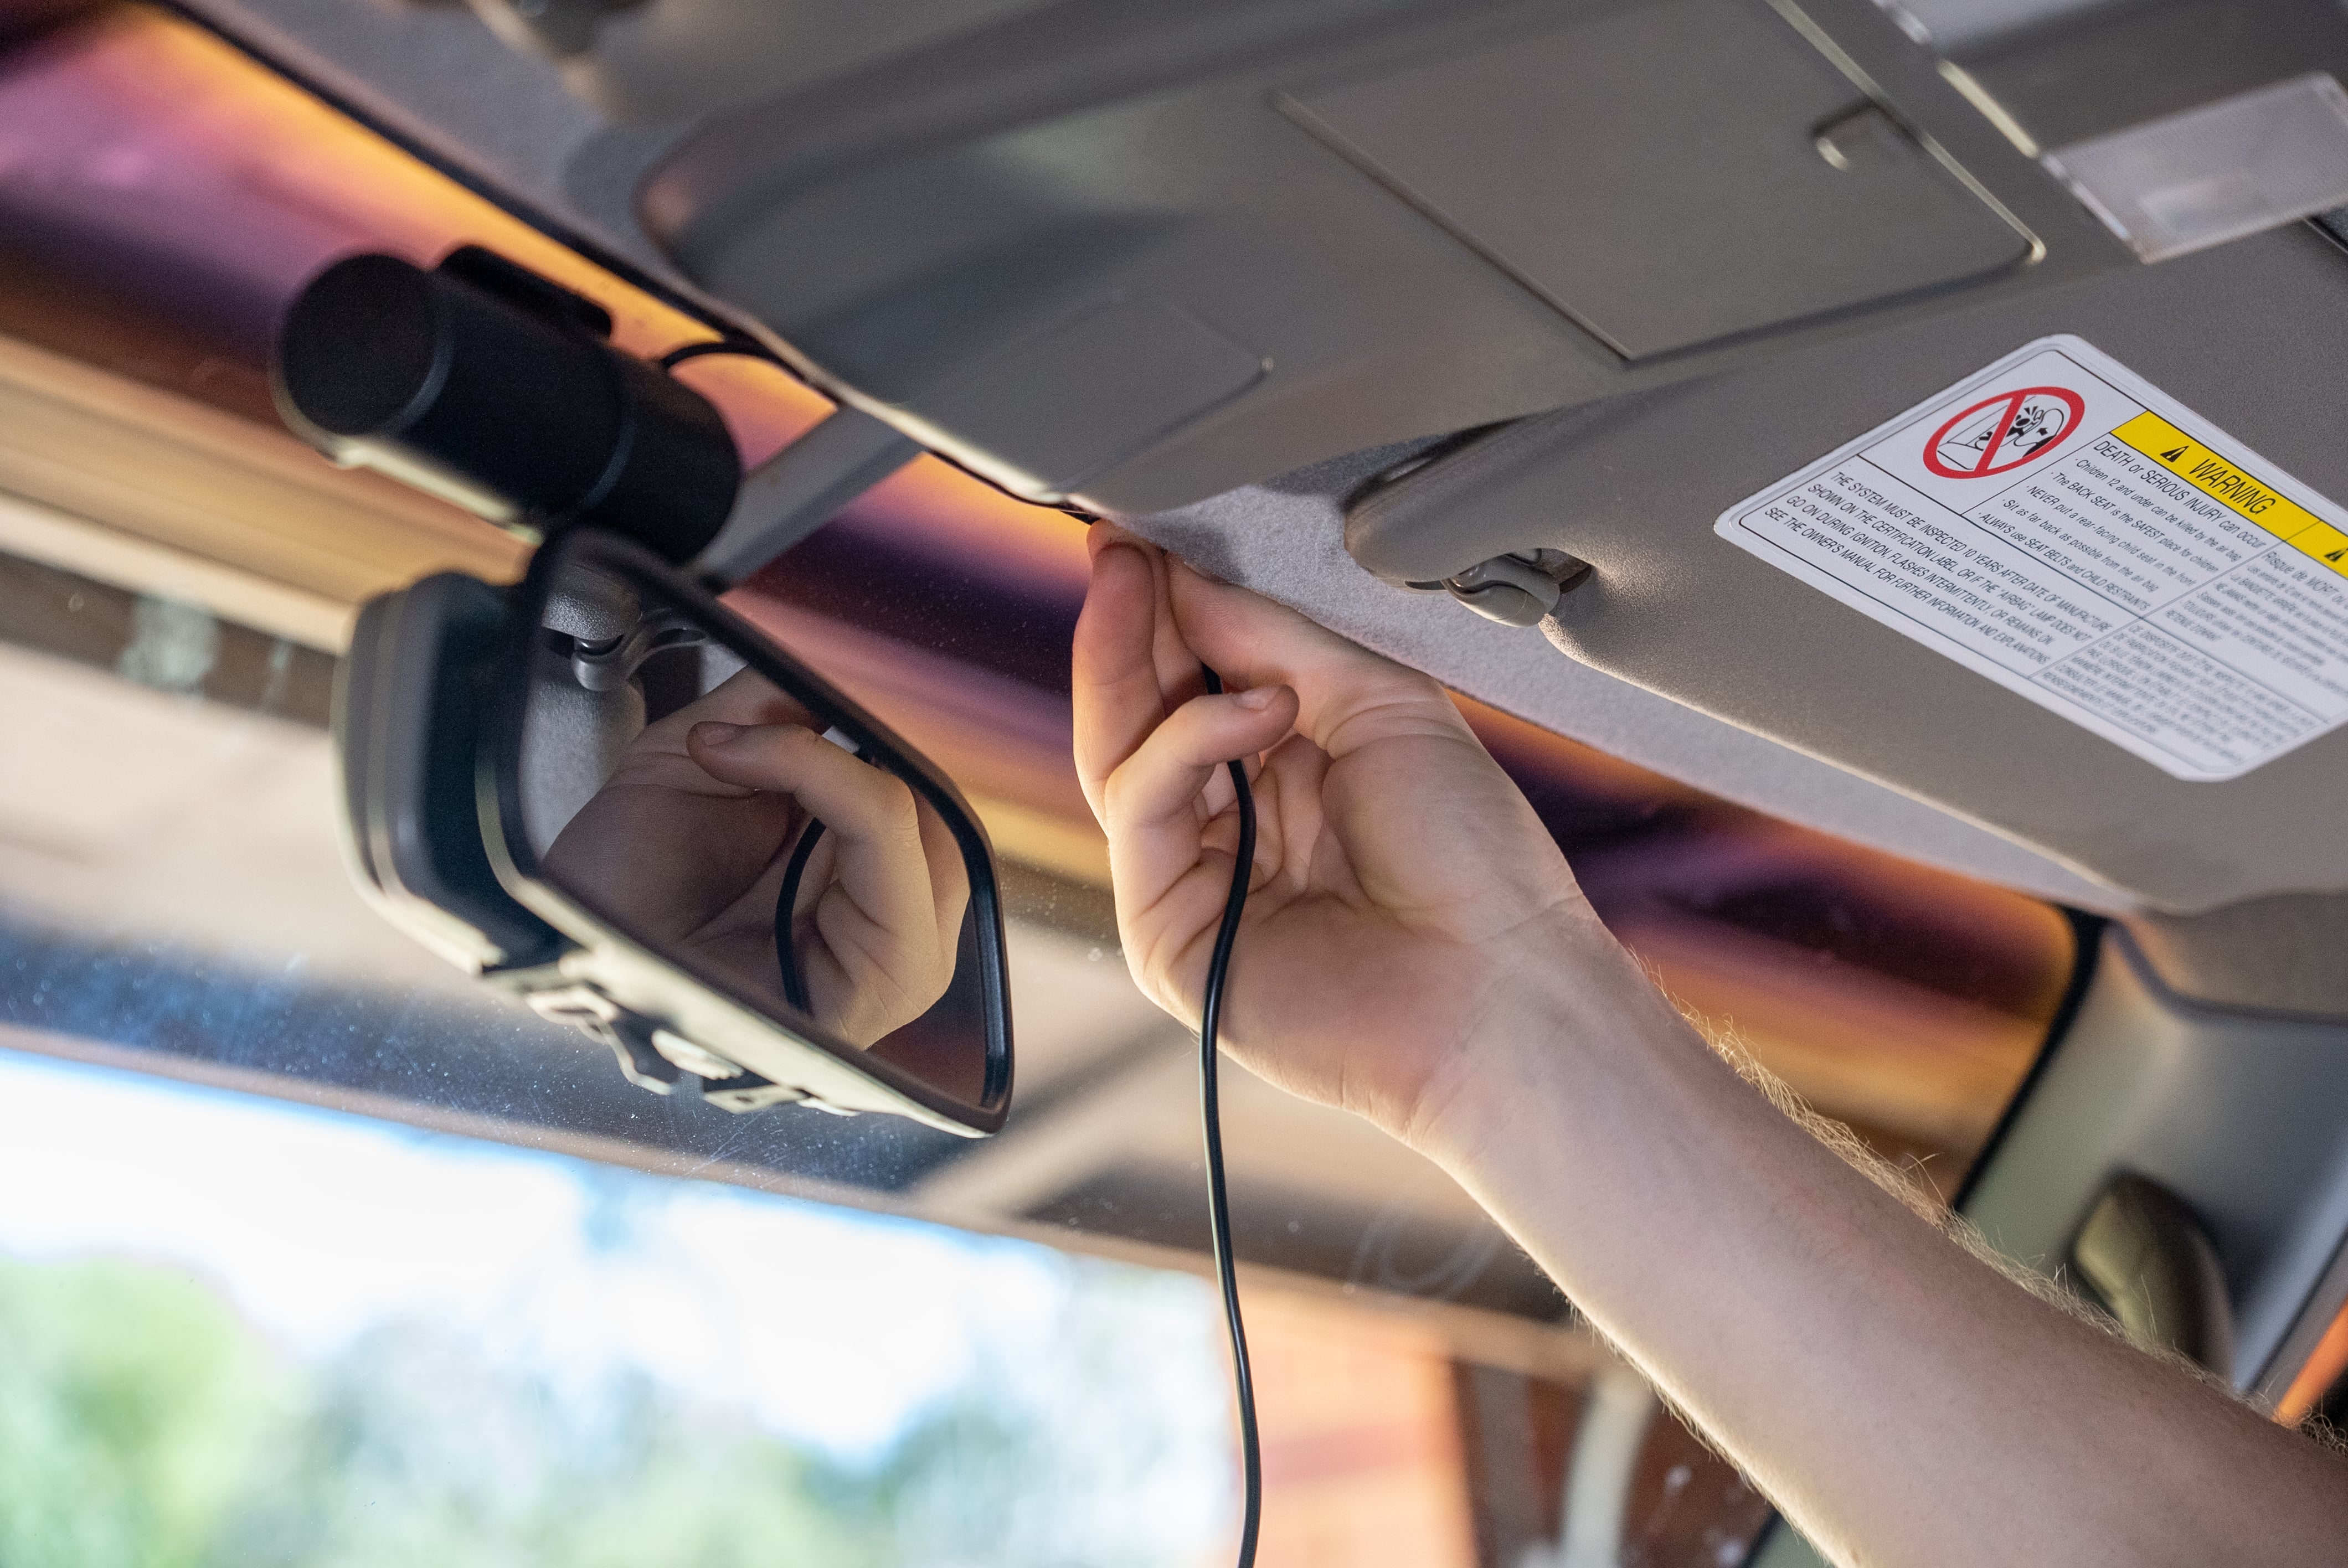
- Route the power cable discreetly along the edges of your dashboard and headliner. Use your trim removal tools to gently pry open small sections of the trim and tuck the wire behind them. Work your way towards the camera.
- Secure the cable with small pieces of electrical tape or zip ties as needed to keep it from sagging.
- Fuse Box (Hardwiring) Method: This is a more advanced installation and requires a bit more technical know-how.
- Locate Fuse Box: Consult your car’s owner’s manual to find the fuse box location (often under the dashboard or in the engine bay).
- Identify Fuses: You’ll need to identify a “switched” fuse (e.g., for the radio, cigarette lighter) that powers off when the ignition is off, and potentially a “constant” fuse (e.g., for hazard lights, dome lights) if you want parking mode. Use a fuse tester or multimeter to confirm.
- Install Fuse Tap (Add-a-Circuit): This allows you to tap into an existing fuse slot without compromising the original circuit. Insert the original fuse into the lower slot of the fuse tap and a new fuse (usually provided with the dash cam) into the upper slot.
- Connect Power Wire: Connect the positive wire from your dash cam’s power adapter to the fuse tap.
- Ground Wire: Connect the ground wire from the power adapter to a bare metal screw or bolt chassis point in your car.
- Route Wires: Carefully route the power and ground wires behind trim panels, along the headliner, and down to the fuse box. Use zip ties to keep them tidy.
- Secure Connections: Ensure all connections are secure and insulated with electrical tape.
- Test: Before reassembling panels, turn on your ignition to ensure the dash cam powers on. Then, turn it off to confirm it powers down (or stays on if you’ve wired for parking mode).
Remember to tuck any excess cable neatly and avoid routes that could be pinched when closing doors or moving the steering wheel.
Installing the Rear Dash Cam
The rear dash cam installation can be slightly more involved, especially with wired systems, due to the need to run a cable from the front of the car to the back.
Mounting the Rear Camera:
- Clean the Rear Windshield: Just like the front, thoroughly clean the interior surface of your rear windshield where you’ll mount the camera.
- Attach the Mount: Use the provided adhesive mount or suction cup to secure the rear camera.
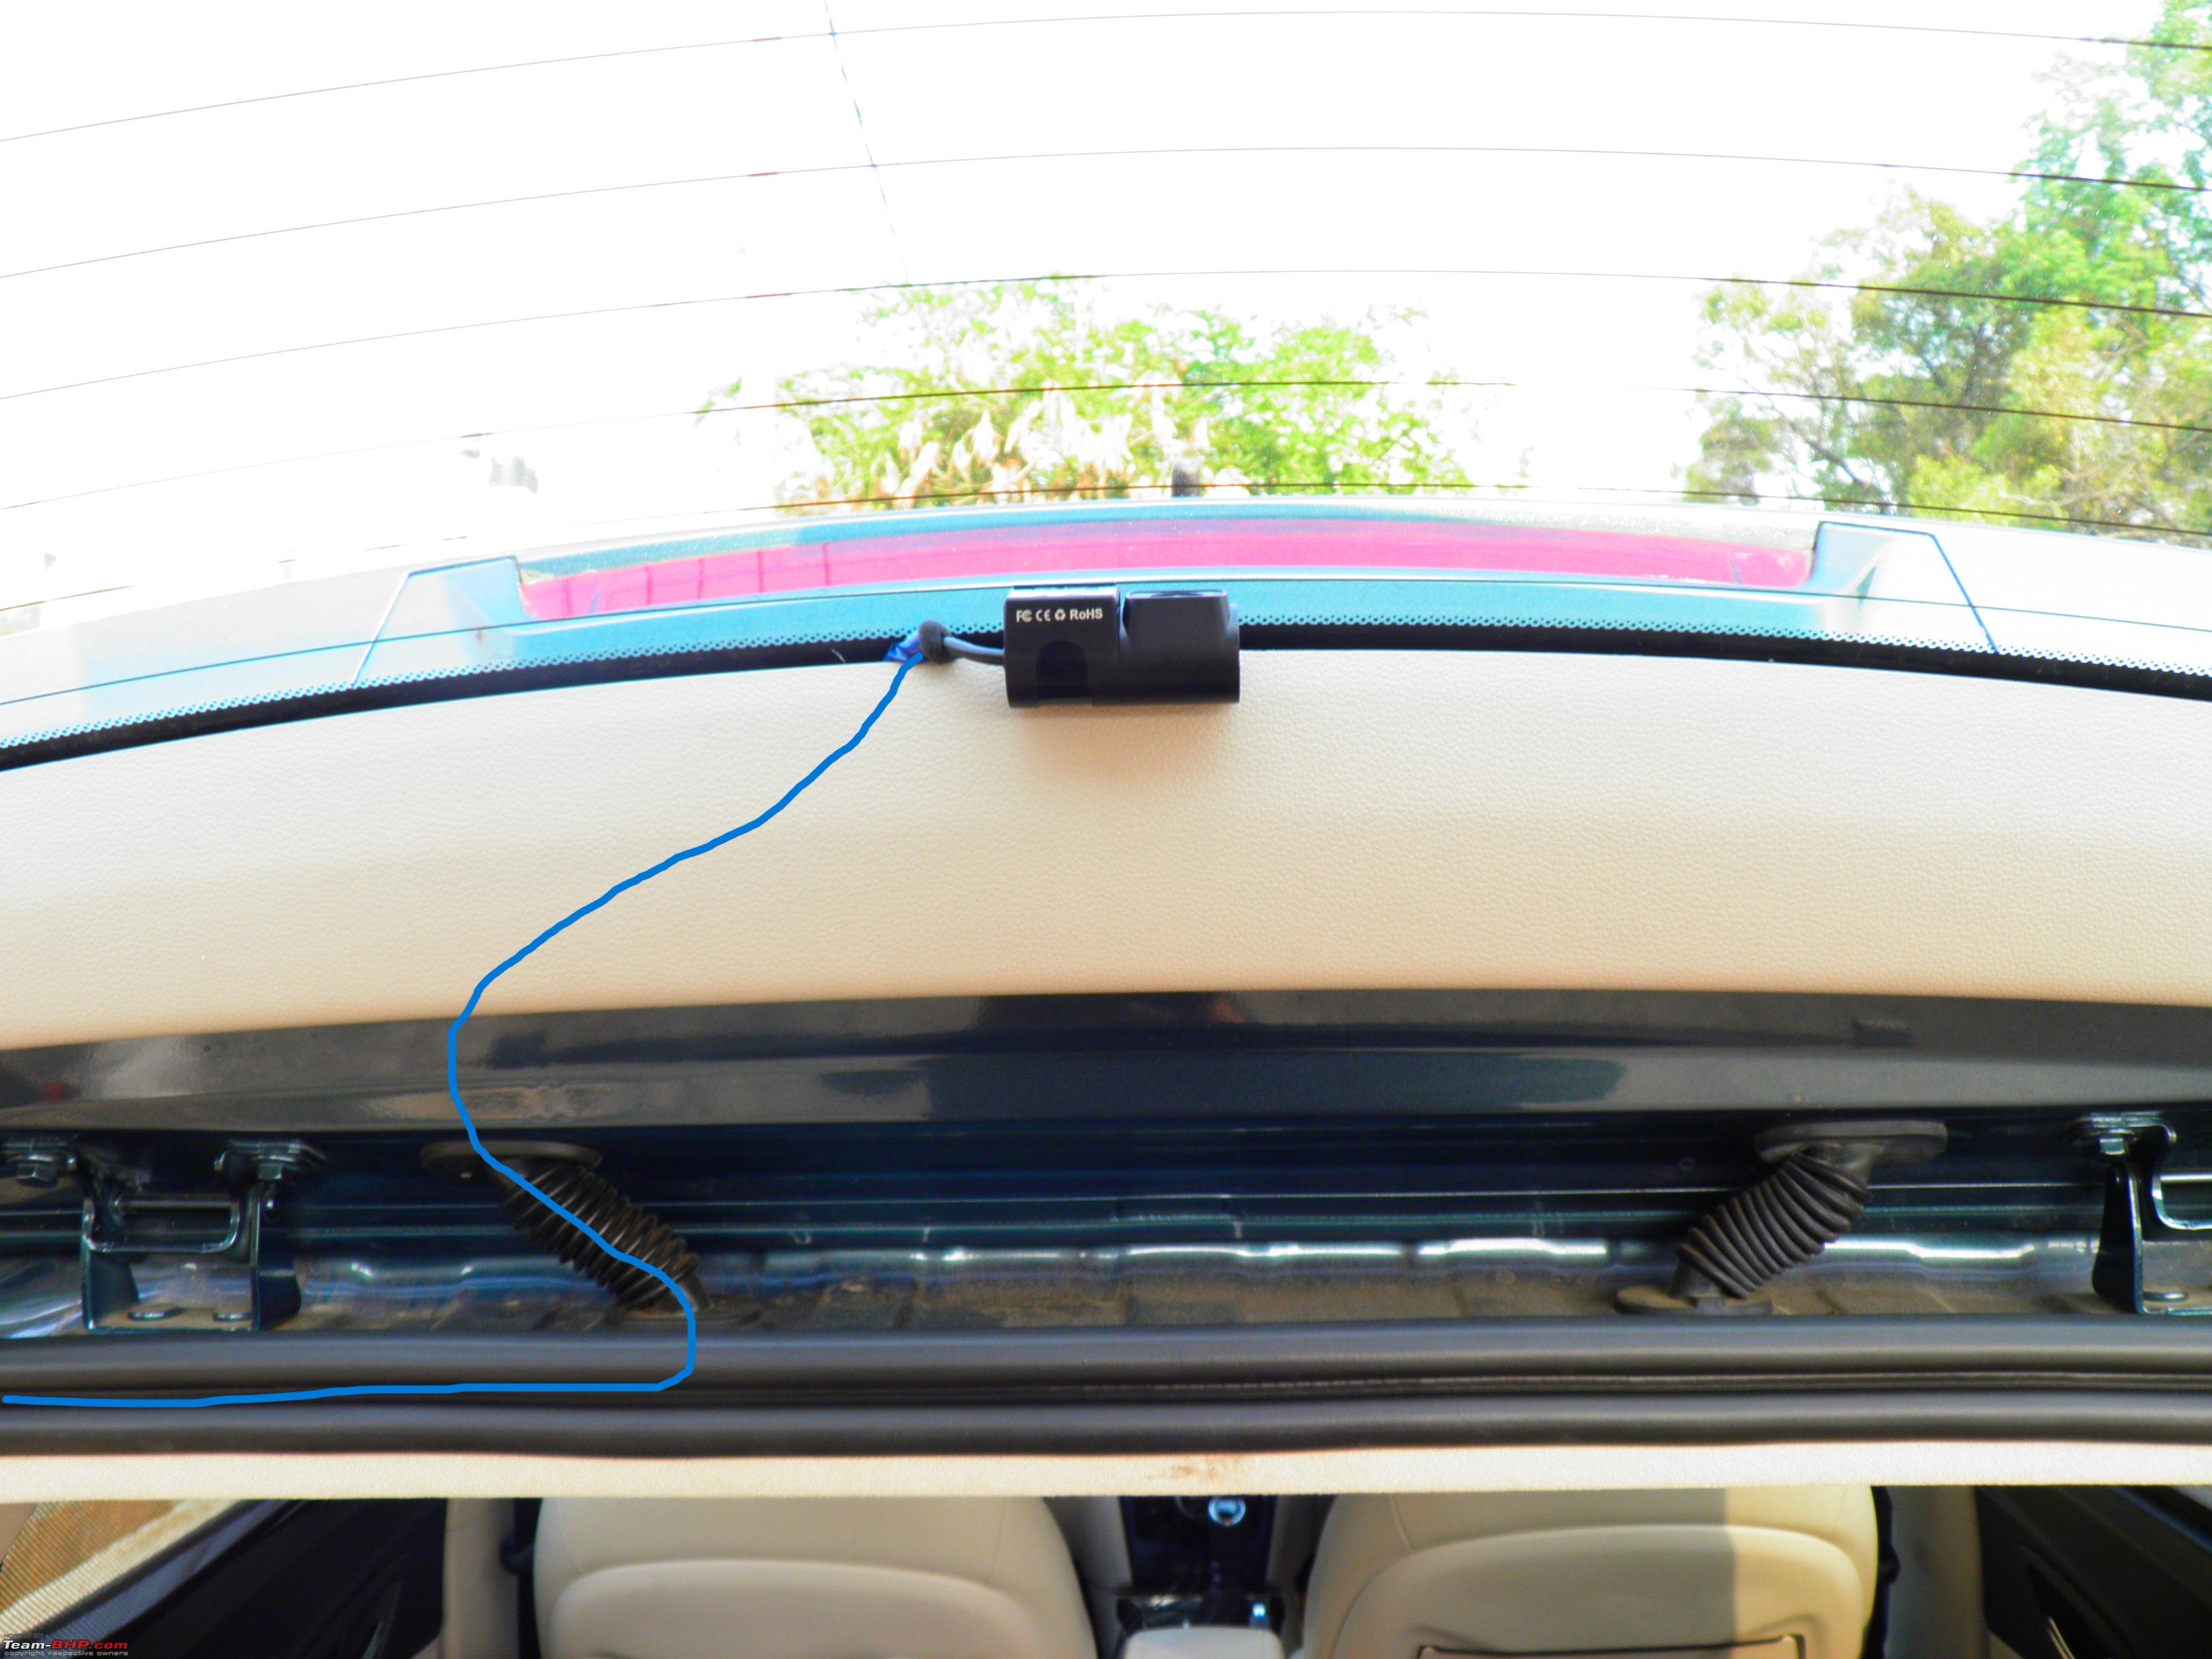
- Windshield Mount: Position it near the top of the windshield, ideally in a central location for an unobstructed view. Be mindful of any defrosting elements or tinting that might interfere with the camera’s view or the mount’s adhesion.
- License Plate Mount (Less Common): Some systems offer an option to mount the rear camera near the license plate, usually externally. Ensure this is a weather-proof unit and securely fastened.
- Connect the Camera: Attach the rear camera to its mount.
Routing the Rear Camera Cable:
This is where patience and careful routing are crucial.
- Route from Front to Back: You need to run the cable connecting the front and rear cameras. The most common and neatest method is to route it along the headliner.
- Start at the Front: If you have a wired system, connect the rear camera cable to the front dash cam unit first (or ensure it’s ready to connect).
- Along the Headliner: Use your trim removal tools to gently pull down the edge of the headliner near the windshield. Tuck the cable into the gap. Work your way along the roof, going over the doors and B-pillars (the pillars between the front and rear doors).
- Through Pillars: You may need to carefully pry open sections of the B-pillar trim to route the cable. Be gentle to avoid breaking clips. Some vehicles have channels specifically designed for running wires.
- To the Rear: Continue routing the cable along the headliner towards the rear windshield.
- Connect to Rear Camera: Once the cable reaches the rear windshield, connect it to the rear camera unit.
- Tidy Up: Use zip ties to bundle any excess cable length and ensure it’s not dangling anywhere it could be a hazard. Secure the cable to existing car wiring or structural elements where possible.
Important Considerations for Rear Camera Cable Routing:
- Avoid Pinching: Ensure the cable is not pinched when doors are closed or when the rear hatch or trunk is opened.
- Airbags: Be very cautious when routing cables near airbags. Consult your vehicle’s manual or professional resources to understand airbag locations.
- Interference: While less common, try to keep the rear camera cable away from other electrical wiring if possible to minimize the risk of interference.
Once the rear camera is mounted and wired, connect it to the front unit and power it up to test.
Testing and Finalizing Your Installation
With both cameras physically installed and cables routed, the final step is to test the system and ensure everything is functioning correctly.
Testing the System:
- Power On: Start your vehicle’s engine. Your dash cam system should power on automatically.
- Check Both Cameras: Look at the display on your front dash cam (or its dedicated app/screen). You should see live feeds from both the front and rear cameras.
- Record a Test Clip: Manually start a recording on your dash cam. Drive around for a few minutes, observing both front and rear views.
- Review Footage: Stop the recording and review the captured video. Check for:
- Clarity: Is the video clear and sharp for both cameras?
- Coverage: Do both cameras capture the intended areas?
- Audio (if applicable): Is the audio clear? Some systems allow you to disable audio recording for privacy.
- Gaps in Recording: Ensure there are no interruptions in the video footage.
- Parking Mode (if applicable): If you’ve set up parking mode, turn off the engine and wait for the system to enter parking mode. You can test this by lightly bumping the car or by placing an object in front of the camera to trigger recording.
- GPS Logging (if applicable): If your dash cam has GPS, check if it’s accurately logging your speed and location. You can often view this data within the dash cam’s app or playback software.
Final Touches and Maintenance:
- Secure Loose Cables: Double-check all routed cables for any slack or potential to come loose. Use more zip ties or electrical tape if necessary.
- Reassemble Trim: Once you’re satisfied with the cable routing and functionality, carefully reassemble any trim panels you removed.
- Update Firmware: Check the dash cam manufacturer’s website for any available firmware updates. These can often improve performance or add new features.
- Regular Checks: Periodically check your dash cam system to ensure it’s still recording correctly. Wipe the camera lenses clean to maintain optimal video quality.
- Memory Card Management: Your dash cam will continuously overwrite old footage. Ensure you have a system for backing up important recordings if needed. Many dash cams offer Wi-Fi connectivity to transfer footage to your smartphone.
Installing a front and rear dash cam system is a proactive step towards enhancing your safety and peace of mind on the road. By following these steps, you can confidently set up your system and enjoy the benefits of comprehensive video surveillance for your vehicle. Remember that a well-installed dash cam is not just a gadget; it’s an investment in your security and a valuable tool for navigating the complexities of modern driving.
aViewFromTheCave is a participant in the Amazon Services LLC Associates Program, an affiliate advertising program designed to provide a means for sites to earn advertising fees by advertising and linking to Amazon.com. Amazon, the Amazon logo, AmazonSupply, and the AmazonSupply logo are trademarks of Amazon.com, Inc. or its affiliates. As an Amazon Associate we earn affiliate commissions from qualifying purchases.