
In the vast digital landscape, where visual communication reigns supreme, typography plays a pivotal role in shaping perceptions, conveying messages, and establishing identity. From captivating marketing campaigns to professional documents and engaging user interfaces, the right font can transform ordinary text into an impactful visual statement. Dafont.com stands as a treasure trove for font enthusiasts, offering an extensive collection of free fonts that can inject personality and flair into any project. However, simply downloading a font is only the first step; proper installation is crucial to unlock its potential across your applications.

This comprehensive guide will demystify the process of installing Dafonts across major operating systems – Windows, macOS, and Linux – ensuring you can effortlessly integrate these creative assets into your digital toolkit. We’ll delve into best practices for discovering and downloading fonts safely, explore their strategic importance for branding and user experience, and provide practical tips for managing your font library and troubleshooting common issues. Whether you’re a designer looking to enhance your portfolio, a marketer refining your brand’s voice, or simply someone who appreciates beautiful text, mastering font installation is a fundamental skill that underpins digital creativity and professionalism.
The Strategic Advantage of Custom Fonts in the Digital Age
Beyond mere aesthetics, the fonts you choose wield significant power, influencing how your audience perceives your message, brand, and overall digital presence. Integrating custom fonts from platforms like Dafont.com is not just about making things look pretty; it’s a strategic move with tangible benefits across technology, branding, and even financial outcomes.
Branding, Aesthetics, and Professional Presence
In today’s competitive digital environment, a distinctive visual identity is paramount for personal branding, corporate identity, and effective marketing. Typography is a cornerstone of this identity, acting as a non-verbal communicator that conveys personality, values, and professionalism. A well-chosen custom font can instantly differentiate your brand from competitors, making your logos, websites, social media graphics, and print materials instantly recognizable and memorable.
For businesses, custom fonts are integral to consistent brand messaging, fostering trust and loyalty among consumers. Think of iconic brands whose chosen typefaces are as recognizable as their logos – this is the power of strategic typography. For freelancers and small businesses, leveraging free, high-quality fonts from Dafont allows them to achieve a polished, professional look without the prohibitive costs associated with proprietary typefaces, directly impacting their budget and client perception. This strategic choice influences marketing effectiveness, which in turn can translate into better engagement and ultimately, revenue. It’s an investment in perceived value that often costs nothing but time.
Enhancing User Experience and Readability
Beyond branding, the practical application of custom fonts significantly impacts the user experience (UX) and the overall readability of your digital content. The goal of any digital interface or piece of content is to effectively communicate information, and typography is the primary vehicle for this. A font that is legible, appropriately sized, and aesthetically pleasing can make a profound difference in how users interact with your website, app, or document.
Poor font choices, on the other hand, can lead to frustration, eye strain, and ultimately, user abandonment. Custom fonts allow designers and content creators to select typefaces specifically optimized for different contexts – a crisp sans-serif for body text on a website, an elegant serif for a printed brochure, or a playful script for a children’s book. By enhancing readability and visual hierarchy, custom fonts contribute to a more intuitive and enjoyable user experience. This focus on user-centric design, a core tenet of modern technology, ensures that your content is not just seen, but genuinely understood and appreciated, boosting engagement and retention.
Mastering Dafont.com: Discovery, Downloads, and Digital Security
Before you can install any custom font, you first need to find and download it. Dafont.com has earned its reputation as a premier destination for free fonts due to its vast collection and intuitive categorization. However, navigating any third-party resource requires a mindful approach, especially concerning licensing and digital security.
Navigating Dafont for the Perfect Typeface
Dafont.com boasts an incredibly diverse library, categorized to help users quickly pinpoint the style they need. The website’s interface is straightforward, featuring categories like “Fancy,” “Foreign Look,” “Techno,” “Gothic,” “Basic,” “Script,” and “Dingbats,” each with numerous subcategories. This granular classification allows you to explore fonts based on a specific aesthetic or project requirement. You can also browse by theme, author, or search directly if you have a name in mind.
A particularly useful feature is the ability to preview text in any font before downloading. By typing a custom phrase into the preview box, you can instantly see how your desired text will look, helping you determine if the font suits your needs without the hassle of repeated downloads and installations. This interactive preview saves time and ensures you make informed decisions, streamlining your creative workflow and boosting productivity – a clear win for the “Tech” aspect of digital tools.
Responsible Downloads: Licensing and Security
While Dafont offers a wealth of free fonts, it’s crucial to understand the nuances of font licensing. Many fonts are “100% Free” for personal use, meaning you can use them for non-commercial projects like personal websites, school assignments, or family invitations without restriction. However, for commercial use – anything intended to generate income, such as company logos, product packaging, marketing materials for a business, or client work – you typically need to purchase a commercial license from the font designer.
Dafont clearly indicates the licensing terms on each font’s page (e.g., “100% Free,” “Free for personal use,” “Donationware”). Always check these terms carefully, especially if your project has a potential for commercial application. Misusing a font without the proper license can lead to legal issues, which can be costly and detrimental to your brand’s reputation. This due diligence is critical for ethical design practices and protecting your “Money” and “Brand” interests.
Furthermore, always prioritize digital security. While Dafont is a reputable source, it’s good practice to ensure your operating system and antivirus software are up-to-date. Fonts are typically downloaded as .zip archives containing .ttf (TrueType Font) or .otf (OpenType Font) files. Once downloaded, extract the contents of the ZIP file to access the font files themselves. Avoid downloading fonts from unofficial or suspicious websites, as they could potentially contain malware. By being vigilant about licensing and security, you protect both your digital assets and your professional standing.
Step-by-Step Font Installation Across Major Platforms
Once you’ve safely downloaded and unzipped your chosen font, the installation process is relatively straightforward across different operating systems. While the exact steps vary slightly, the underlying principle remains the same: placing the font file in a location where your operating system and applications can access it.
Installing Dafonts on Windows
Windows users have a couple of easy methods for installing fonts, making the process quick and efficient.
- Extract the Font Files: Locate the downloaded ZIP file, right-click it, and select “Extract All…” Choose a destination, such as your Downloads folder, and click “Extract.” This will create a new folder containing the
.ttfor.otffont files. - Method 1: Quick Install (Recommended for single fonts):
- Navigate into the extracted folder.
- Right-click on the
.ttfor.otffont file. - Select “Install” from the context menu. Windows will automatically install the font. If prompted by User Account Control, click “Yes.”
- Method 2: Using the Fonts Folder (For multiple fonts or advanced management):
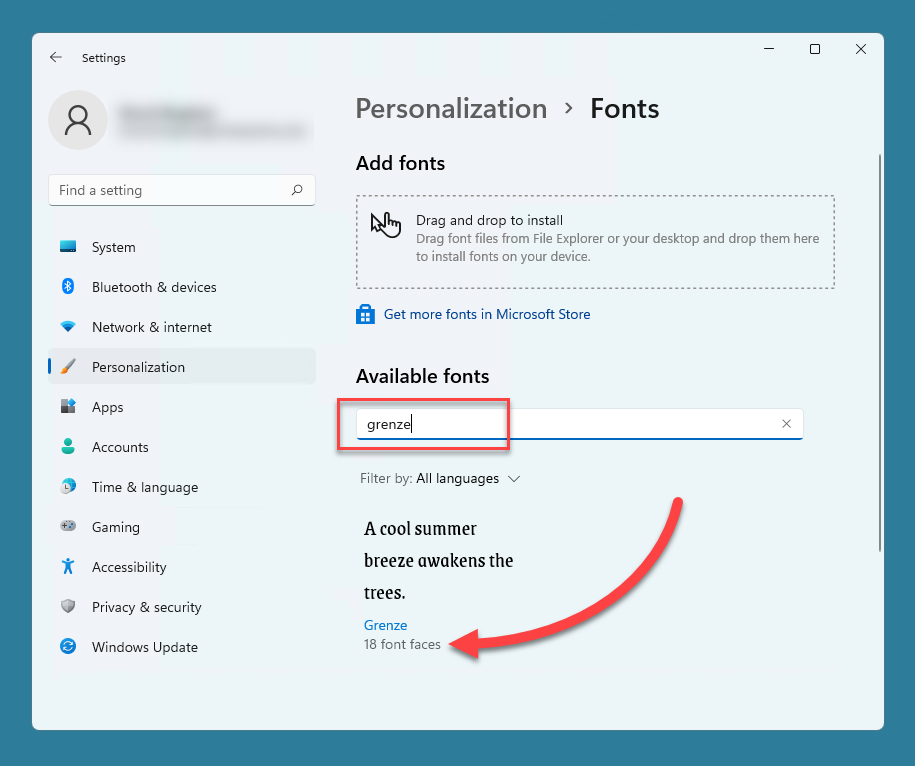
- Open the “Control Panel” (search for it in the Start Menu) or go to “Settings” > “Personalization” > “Fonts” (on Windows 10/11).
- If using Control Panel, ensure “View by” is set to “Large icons” or “Small icons,” then click “Fonts.”
- Simply drag and drop the
.ttfor.otffont files from their extracted folder directly into the “Fonts” window. Windows will install them automatically. - Alternatively, in the “Fonts” settings (Windows 10/11), you can click “Browse for fonts” or drag and drop files directly into the designated area.
After installation, the fonts will be available in most applications that support custom fonts. You may need to restart certain applications (like Microsoft Word, Photoshop, or your web browser) for the new fonts to appear in their font lists.
Installing Dafonts on macOS
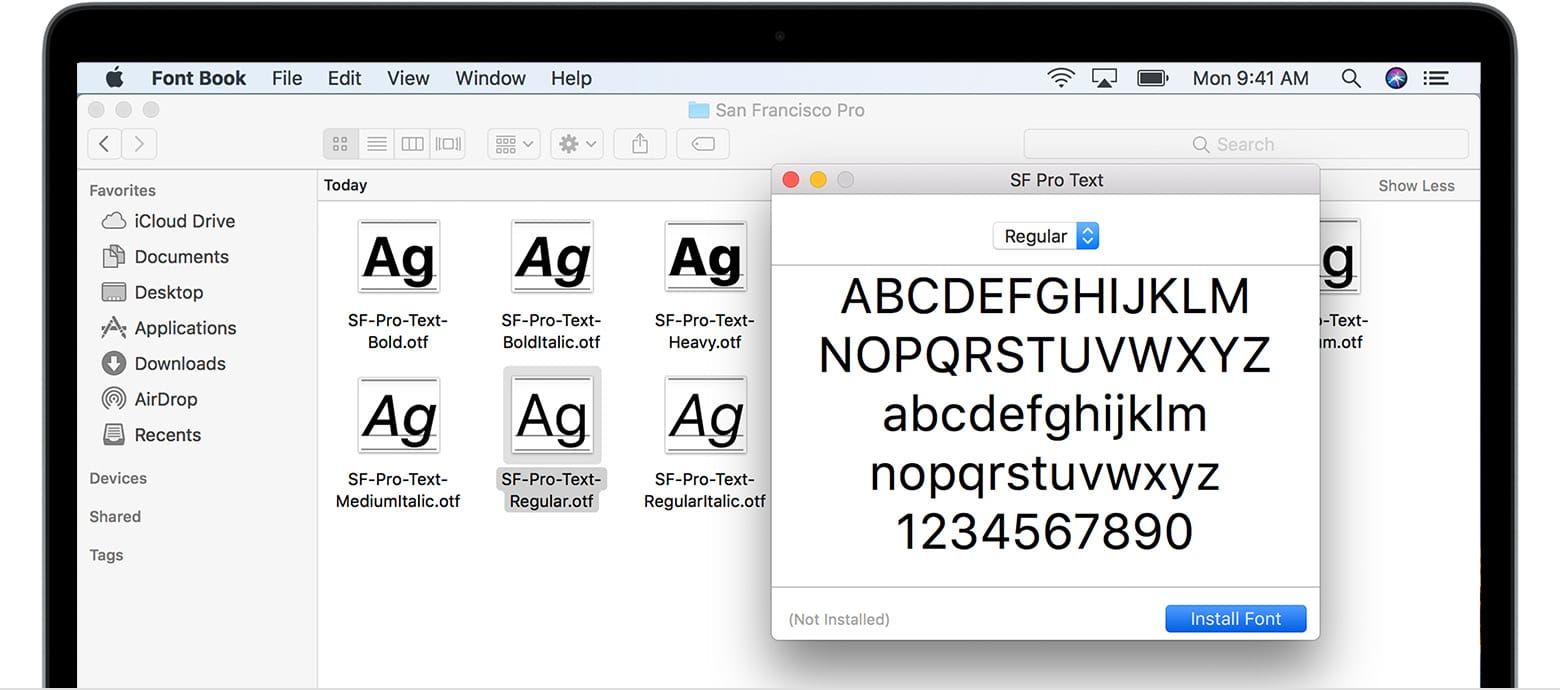
Installing fonts on a Mac is equally intuitive, primarily utilizing the built-in Font Book application.
- Extract the Font Files: Double-click the downloaded ZIP file. macOS’s built-in archive utility will automatically extract the contents into a new folder in the same location.
- Method 1: Double-Click Install (Recommended for single fonts):
- Navigate into the extracted folder and double-click the
.ttfor.otffont file. - This action will open the font in Font Book, displaying a preview.
- Click the “Install Font” button at the bottom of the Font Book window.
- Font Book will then perform a quick validation check (useful for identifying corrupted files) and install the font.
- Navigate into the extracted folder and double-click the
- Method 2: Drag and Drop to Font Book (For multiple fonts or advanced management):
- Open Font Book (found in Applications/Utilities, or search via Spotlight).
- Drag and drop one or more
.ttfor.otffont files directly from their folder into the Font Book window. You can drag them onto “All Fonts” or a specific collection if you have one set up. - Font Book will install the fonts and validate them.
Once installed, your new Dafonts will be accessible in all macOS applications that utilize the system’s font library, such as Pages, Keynote, Adobe Creative Suite, and more. Remember to restart any open applications to refresh their font lists.
Installing Dafonts on Linux
Linux offers flexibility, and font installation methods can vary slightly depending on your distribution and desktop environment (e.g., GNOME, KDE, XFCE). However, the most common and universally applicable method involves placing the font files in a specific directory.
- Extract the Font Files: Locate the downloaded ZIP file. Right-click and choose “Extract Here” or use a command-line tool like
unzip your_font.zipin your terminal. - Create a Personal Fonts Directory: Open your file manager (e.g., Nautilus for GNOME, Dolphin for KDE). Navigate to your home directory (
~). If it doesn’t already exist, create a new folder named.fonts(note the leading dot, which makes it a hidden folder). You might need to enable “Show Hidden Files” in your file manager’s view options. - Copy Font Files: Copy the extracted
.ttfor.otffont files into the newly created~/.fontsdirectory. - Update Font Cache: For the system to recognize the new fonts, you often need to refresh the font cache. Open a terminal (Ctrl+Alt+T) and enter the command:
bash

fc-cache -fv
Press Enter. This command forces a rebuild of the font information cache, ensuring your applications can find the new fonts.
Your new Dafonts should now be available in Linux applications like LibreOffice, GIMP, Inkscape, and others. As with Windows and macOS, a restart of applications may be necessary to see the newly installed fonts.
Using Custom Fonts on Mobile Devices (iOS/Android) – A Different Approach
Direct, system-wide font installation on mobile operating systems like iOS and Android is generally not as straightforward or common as on desktop platforms. Mobile OSes are typically more locked down, and users usually cannot add custom fonts to the entire system in the same way.
Instead, custom fonts on mobile devices are often implemented through specific applications that have built-in font support (e.g., graphic design apps like Canva, Procreate, or certain word processors). Some apps allow you to import font files directly into their environment. For iOS, there are third-party font management apps that work by installing configuration profiles, but these are less common for average users and might be limited in scope. For most general mobile usage, custom fonts are primarily accessed within dedicated creative or productivity apps rather than becoming universally available across the device’s operating system.
Integrating, Managing, and Troubleshooting Your Font Library
Installing fonts is just one part of the journey. To truly leverage their power and maintain a healthy system, it’s essential to understand how to use them effectively, manage your growing collection, and troubleshoot any issues that may arise.
Activating Your New Fonts in Applications
After successful installation, your new Dafonts should appear in the font selection menus of compatible applications. These include:
- Word Processors: Microsoft Word, Google Docs (if using a system-installed font syncing with desktop client), LibreOffice Writer, Pages.
- Design Software: Adobe Photoshop, Illustrator, InDesign, Affinity Designer, GIMP, Inkscape.
- Presentation Software: PowerPoint, Keynote, Google Slides.
- Video Editing Software: Adobe Premiere Pro, DaVinci Resolve, Final Cut Pro.
Important Note: For new fonts to appear, you almost always need to restart any applications that were open during the installation process. Applications typically load their font lists when they launch, so a restart is necessary to refresh this list and include your newly added typefaces. If a font still doesn’t appear after restarting, double-check your installation steps.
Best Practices for Font Management and Productivity
As your font library grows, efficient management becomes critical for maintaining system performance and boosting your productivity.
- Avoid Overload: While it’s tempting to install every beautiful font you find, installing too many fonts can slow down your system and applications, especially during startup. Only install fonts you frequently use or for active projects.
- Utilize Font Managers: Both macOS (Font Book) and Windows (Fonts Settings) offer basic font management tools. For professional users, third-party font managers (e.g., FontBase, Suitcase Fusion, Adobe Fonts) offer advanced features like font activation/deactivation, categorization, and previewing, helping you organize your collection and prevent system clutter. This aligns directly with the “Productivity” aspect of the “Tech” theme.
- Organize Your Downloads: Keep your downloaded ZIP files and extracted font files organized in a dedicated folder on your hard drive. This makes it easy to reinstall fonts if needed or to transfer them to a new computer (respecting licensing terms).
Common Installation Issues and Solutions
Even with careful installation, you might occasionally encounter issues. Here are some common problems and their solutions:
- Font Not Appearing in Application:
- Solution: Ensure you’ve restarted the application after installation. If it’s still missing, verify the font is correctly installed in your operating system’s font folder (e.g.,
C:WindowsFontsfor Windows, or Font Book for macOS).
- Solution: Ensure you’ve restarted the application after installation. If it’s still missing, verify the font is correctly installed in your operating system’s font folder (e.g.,
- Corrupted Font File:
- Symptom: The font might install but appear as garbled text, or Font Book (macOS) might flag it during validation.
- Solution: Delete the corrupted font and download it again from Dafont.com. Sometimes, downloads can be incomplete or damaged.
- System Performance Issues:
- Symptom: Applications opening slowly, general system lag.
- Solution: You might have too many fonts installed. Use a font manager to deactivate unused fonts or uninstall those you no longer need.
- Licensing Concerns:
- Symptom: Uncertainty about whether you can use a font for a commercial project.
- Solution: Always re-check the licensing information on Dafont.com for each specific font. When in doubt, contact the font designer directly or opt for fonts explicitly marked as “100% Free for Commercial Use.” This protects your “Brand” and “Money” from potential legal disputes.
Conclusion
Installing fonts from Dafont.com is a straightforward process that unlocks a world of creative possibilities for your digital projects. By following the simple, step-by-step instructions for Windows, macOS, and Linux, you can effortlessly integrate custom typefaces into your system, ready for use in a wide array of applications.
Understanding the strategic value of typography goes beyond mere installation. Custom fonts are powerful tools that significantly impact your Tech workflow by enhancing readability and user experience, elevate your Brand by establishing a distinctive visual identity, and can even influence your Money by adding professional polish to commercial endeavors and design services. By paying attention to licensing, practicing good font management, and knowing how to troubleshoot, you ensure a seamless and productive experience. So, go forth, explore Dafont’s extensive collection, and empower your digital content with the perfect typeface, transforming your ideas into visually compelling realities.
aViewFromTheCave is a participant in the Amazon Services LLC Associates Program, an affiliate advertising program designed to provide a means for sites to earn advertising fees by advertising and linking to Amazon.com. Amazon, the Amazon logo, AmazonSupply, and the AmazonSupply logo are trademarks of Amazon.com, Inc. or its affiliates. As an Amazon Associate we earn affiliate commissions from qualifying purchases.