
The Central Processing Unit (CPU) is often referred to as the “brain” of your computer. It’s the powerhouse that executes instructions, processes data, and keeps all your applications running smoothly. Whether you’re building a new PC from scratch, upgrading an aging system, or simply replacing a faulty component, correctly installing the CPU is one of the most critical steps in the entire process. A properly seated and cooled CPU ensures optimal performance, stability, and longevity for your system, directly impacting everything from your daily productivity to your gaming experiences.
For many, the thought of handling delicate computer components can be daunting. However, with the right knowledge, tools, and a methodical approach, installing a CPU is a surprisingly straightforward task that can be accomplished by anyone, regardless of their technical expertise. This comprehensive guide will walk you through every step, demystifying the process and empowering you to take control of your hardware. Beyond the technical ‘how-to,’ we’ll also explore why this DIY skill is valuable, touching upon the financial savings, the personal brand it builds, and the deeper understanding it provides of your technology. Embracing the world of hardware installation not only grants you a powerful, customized machine but also deepens your connection with the technology that drives our modern world, aligning perfectly with the core principles of tech literacy and smart financial management.
The Essentials: Before You Begin Your CPU Installation Journey
Before you even think about touching your precious hardware, preparation is paramount. Rushing into the installation process without the right tools or a clear understanding of compatibility can lead to costly mistakes. This initial phase is about ensuring you have everything you need, understanding the nuances of your components, and setting up a secure environment. It’s where attention to detail prevents headaches down the line, safeguarding your investment and streamlining the entire process.
Gathering Your Arsenal: Tools and Components for Success
Having the right equipment at your fingertips makes the installation process significantly smoother and safer. Think of it as preparing your digital toolkit.
- Your New CPU: Naturally, this is the star of the show. Ensure it’s the correct model and generation you intended to purchase.
- Compatible Motherboard: The motherboard socket must match your CPU’s socket type (e.g., LGA1700, AM5). This is non-negotiable for compatibility. Check your motherboard manual or the manufacturer’s website for specific CPU support lists.
- CPU Cooler: This is absolutely essential for dissipating heat from the CPU. Depending on your CPU’s thermal design power (TDP) and your performance needs, this could be a stock cooler, an aftermarket air cooler, or an All-in-One (AIO) liquid cooler. Most CPUs come with a stock cooler, but for higher performance or overclocking, an aftermarket solution is recommended.
- Thermal Paste: This conductive compound fills microscopic gaps between the CPU’s integrated heat spreader (IHS) and the cooler’s base, vastly improving heat transfer. Many new coolers come with pre-applied thermal paste or a small tube included. If not, purchase a reputable brand.
- Phillips Head Screwdriver: A magnetic tip can be very helpful for tiny screws, but ensure it’s not overly magnetized as this can potentially affect sensitive electronics (though modern components are quite resilient).
- Anti-static Wrist Strap (Recommended): This simple device grounds you, preventing static electricity from damaging sensitive components. While often overlooked, it’s a small investment in digital security for your hardware.
- Cleaning Supplies: Isopropyl alcohol (90%+) and lint-free cloths or coffee filters are crucial if you need to remove old thermal paste or clean surfaces.
- Motherboard Manual: Your motherboard’s manual is an invaluable resource. It will show you the exact location of the CPU socket, cooler mounting points, and various headers.
Investing in quality tools, even simple ones like a good screwdriver, contributes to a more efficient and less frustrating build experience. This is part of smart tech investment, ensuring your effort yields maximum value.
Preparing Your Workspace: Safety First for Your Tech Investment
A clean, organized, and static-free environment is critical. This isn’t just about tidiness; it’s about protecting your valuable components.
- Clean, Flat Surface: Work on a large, stable, and clean surface, preferably a wooden or non-conductive table. Avoid working on carpet, which is a major generator of static electricity.
- Good Lighting: Ensure your workspace is well-lit to clearly see the small details and alignment markers.
- Static Discharge: Before touching any components, discharge any static electricity from your body. The most effective way is by wearing an anti-static wrist strap, connected to an unpainted metal object like your PC case (after it’s plugged into the wall, but switched off, for grounding). If you don’t have one, frequently touch a grounded metal object before handling parts.
- Component Unboxing: Only unbox the CPU and motherboard when you are ready to install them. Keep them in their anti-static bags until needed.
This meticulous preparation isn’t just about safety; it’s about fostering productivity and precision. A well-prepared workspace minimizes errors, saving time and preventing potential damage that could lead to unexpected costs, directly impacting your personal finance.
Understanding CPU Compatibility: A Crucial First Step for Smart Tech Decisions
Before buying anything, you must understand the concept of compatibility, especially between your CPU and motherboard. This knowledge is fundamental for anyone looking to make informed tech purchases or even give advice on tech trends.
- Socket Type: CPUs have a specific “socket type” (e.g., Intel’s LGA 1700, AMD’s AM5) that must match the socket on your motherboard. A CPU designed for one socket will not fit into another.
- Chipset: The motherboard’s chipset also dictates which generations and models of CPUs it supports. Newer CPUs often require newer chipsets, even if the socket type looks the same (e.g., an older motherboard might have an LGA1151 socket but won’t support a 9th Gen Intel CPU without a specific chipset).
- BIOS/UEFI Version: Sometimes, a motherboard might support a newer CPU with the correct socket and chipset, but only after a BIOS/UEFI update. Always check the motherboard manufacturer’s CPU support list and recommended BIOS version for your specific CPU model.
Ignoring compatibility can lead to frustrating returns, wasted time, and unnecessary expenditure. This emphasis on understanding hardware specifics is a cornerstone of smart investing in technology, ensuring that every component you purchase contributes to a functional and efficient system rather than becoming a costly paperweight.
The Installation Process: A Step-by-Step Guide to CPU Integration
With your workspace prepped and all components at the ready, it’s time for the main event: installing the CPU. This segment guides you through the intricate yet manageable steps of correctly seating your processor, applying thermal paste, and securing the cooler. Each step requires patience and precision, ensuring the “brain” of your system is perfectly integrated for optimal performance and longevity.
Unboxing and Unlocking: Preparing the Motherboard Socket
The CPU socket on your motherboard is a delicate piece of engineering designed for precision. Handle it with care.
- Place Motherboard: Lay your motherboard flat on your prepared workspace, ideally inside the PC case or on its anti-static bag, if not yet mounted in the case.
- Locate CPU Socket: Identify the CPU socket, usually a square or rectangular component in the center of the motherboard.
- Open the Retention Mechanism: Most modern sockets (both Intel’s LGA and AMD’s AM4/AM5) have a metal load plate and a securing lever.
- For Intel LGA Sockets: Push the small lever located on the side of the socket down and out to release it. Lift the lever fully, which will also lift the metal load plate that covers the socket. You’ll often see a plastic protective cover in place – leave this until just before you drop the CPU in.
- For AMD AM4/AM5 Sockets (PGA for AM4, LGA for AM5): For AM4 (PGA), lift the small metal lever located on the side of the socket to a 90-degree angle. This loosens the pin-gripping mechanism inside. For AM5 (LGA), it’s similar to Intel’s LGA process – lift the lever and then the load plate.
- Remove Protective Cover (Intel LGA & AMD AM5): For LGA sockets (Intel and AMD AM5), the plastic protective cover will often pop off naturally when you lift the load plate. If not, carefully remove it, being mindful not to touch the delicate pins inside the socket. For AMD AM4 (PGA), there typically isn’t a plastic cover inside the socket.
Remember, the pins on the motherboard socket (LGA) or the CPU itself (PGA) are incredibly fragile. Avoid touching them or dropping anything onto them. This initial step is about creating a clear, open space for your CPU, laying the groundwork for a successful installation.
Placing the Processor: Precision is Key, Force is Forbidden
This is the most critical step. The CPU must be perfectly aligned and gently placed into the socket.
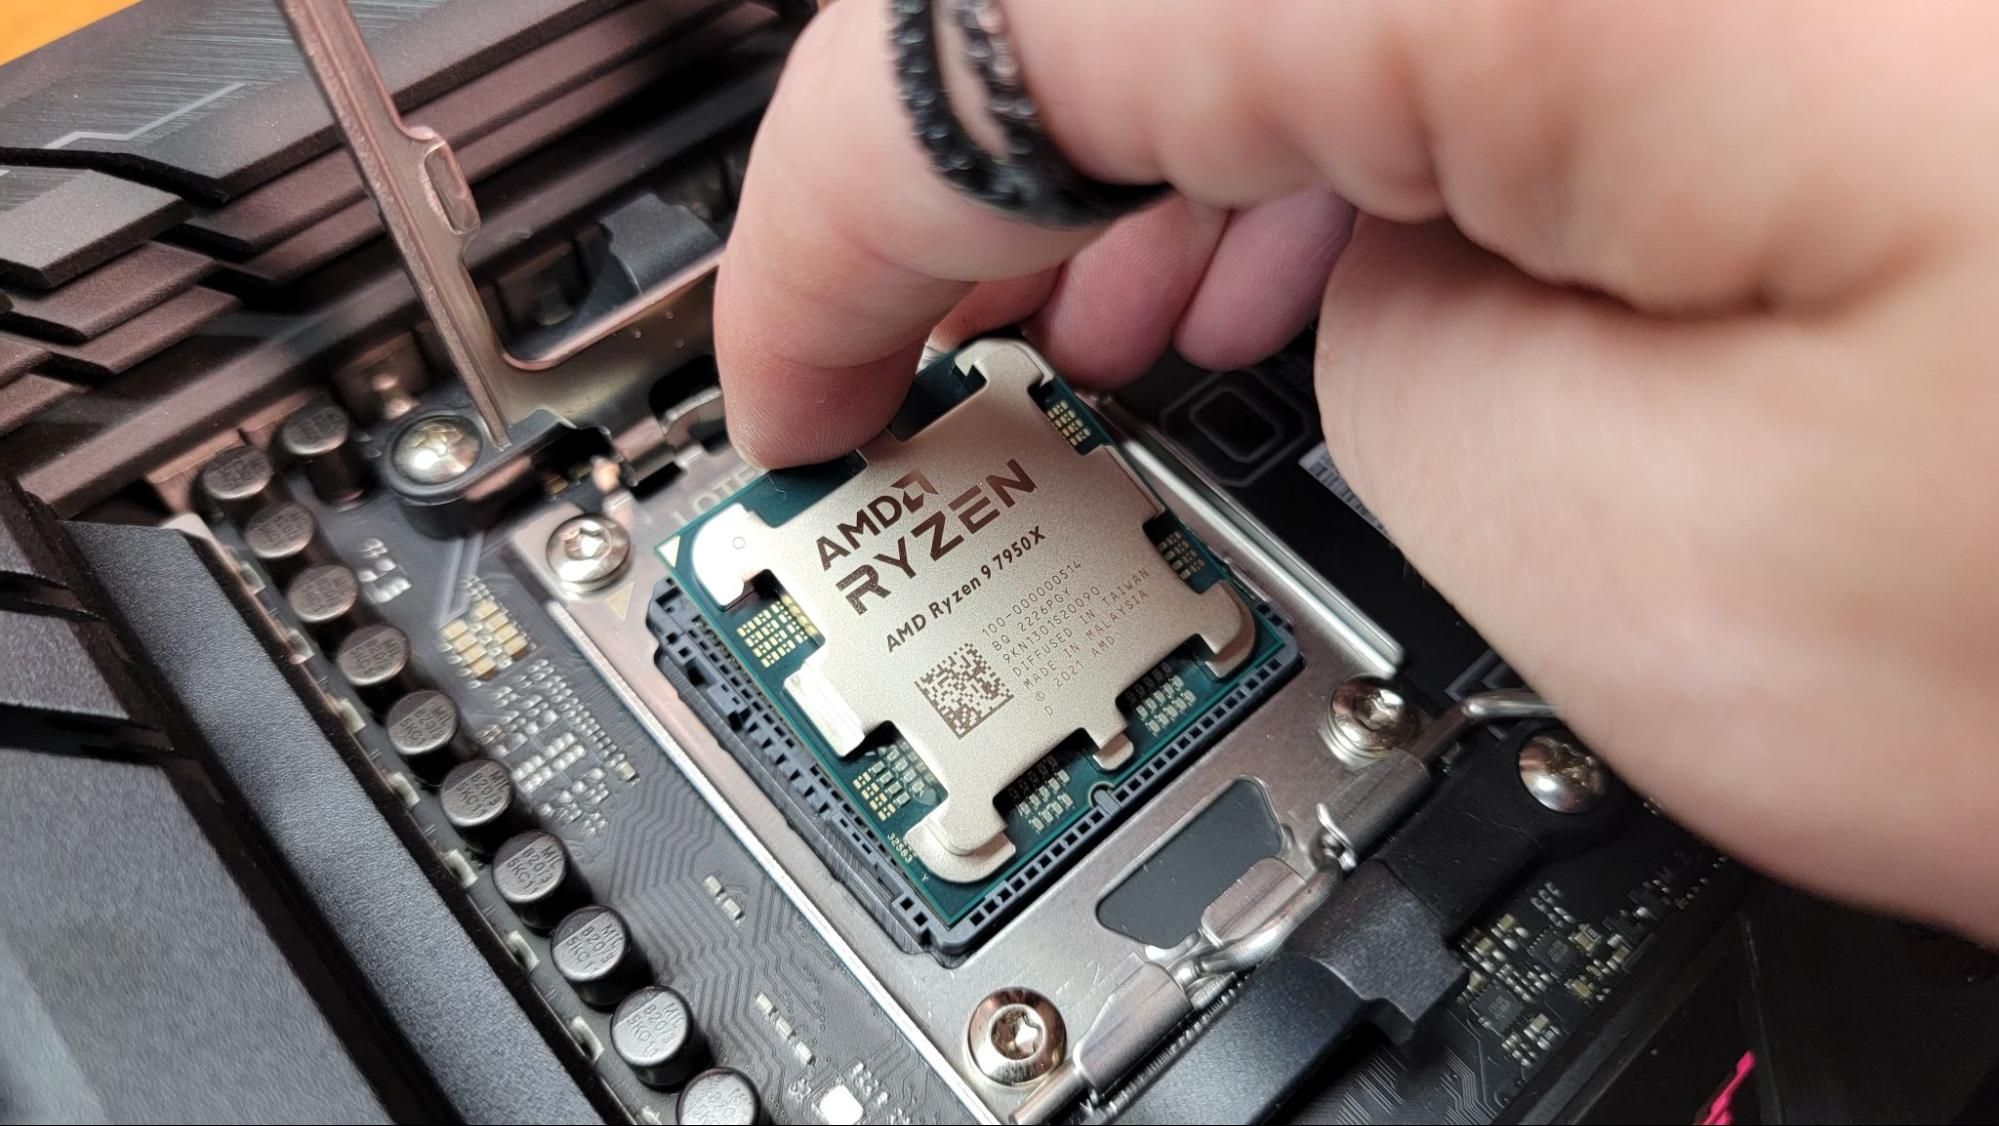
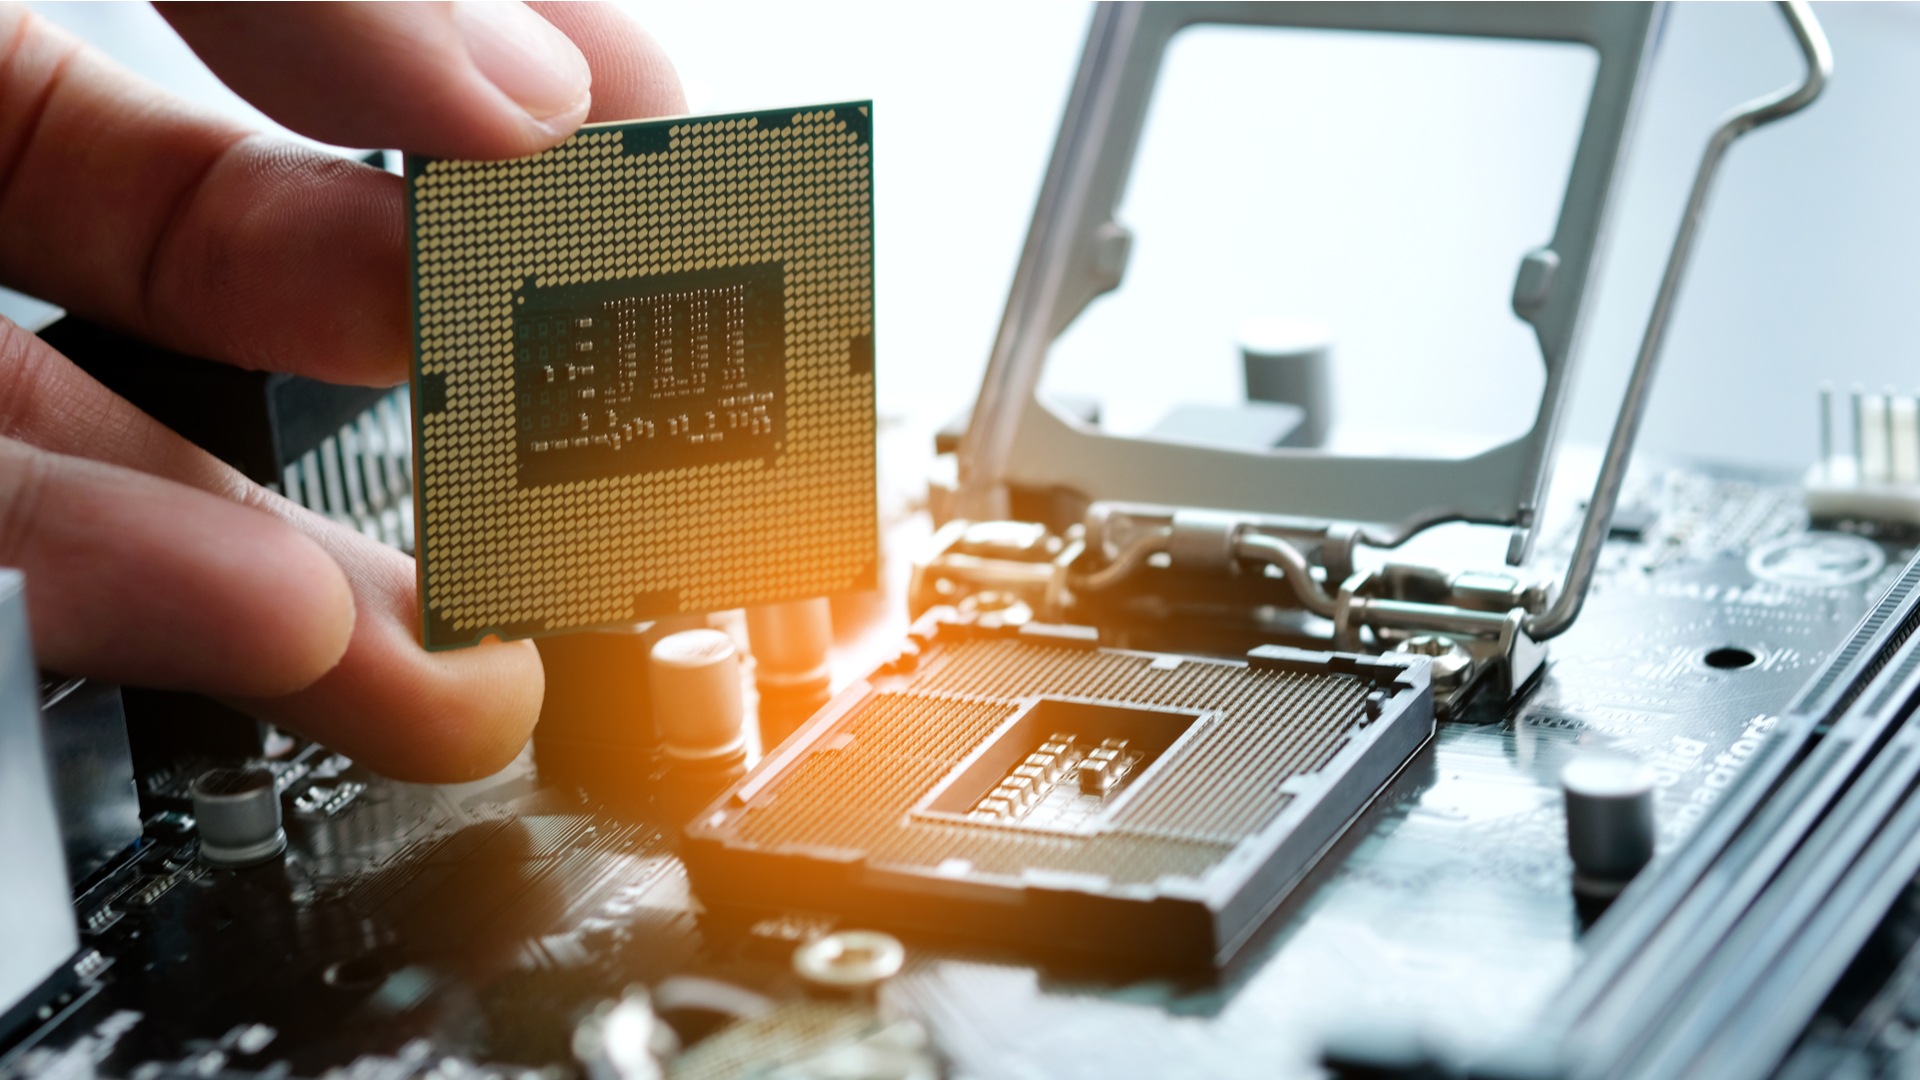
- Unpack CPU: Carefully remove your CPU from its packaging, holding it by the edges to avoid touching the gold contacts (Intel LGA) or the pins (AMD PGA) on the underside.
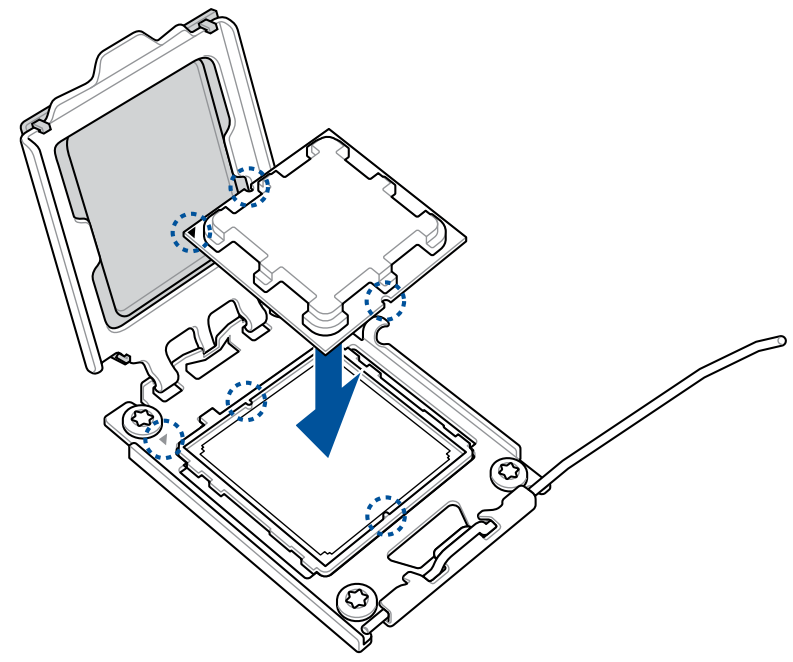
- Identify Alignment Markers: Both the CPU and the socket have alignment markers.
- For Intel LGA CPUs: Look for a small gold arrow or triangle on one corner of the CPU. Match this with a corresponding arrow or triangle on the CPU socket itself. There are also usually two “notches” on the sides of the CPU that align with small protrusions on the socket.
- For AMD AM4 (PGA) CPUs: Look for a gold triangle on one corner of the CPU. Align this with the triangle etched onto the socket.
- For AMD AM5 (LGA) CPUs: Similar to Intel, align the gold triangle on the CPU with the one on the socket, and match the side notches.
- Gently Place the CPU: Hold the CPU directly above the socket, matching the alignment markers. Slowly and gently lower the CPU straight down into the socket. Do NOT apply any force. The CPU should fall into place under its own weight with almost no resistance.
- If it doesn’t drop in easily, DO NOT force it. Remove the CPU, double-check the alignment markers, and try again. Forcing it will bend pins, potentially destroying your CPU or motherboard, resulting in a significant financial loss and a setback in your tech journey.
- Secure the CPU (Intel LGA & AMD AM5): Once the CPU is perfectly seated, lower the metal load plate over the CPU, ensuring it’s properly aligned. Then, push the retention lever back down and under the small hook to secure it. This requires a bit of firm pressure, which is normal. The plastic protective cover (if it remained) will often pop off at this point.
- Secure the CPU (AMD AM4 PGA): Once the CPU is seated, gently push the metal lever back down and into its original locked position. This secures the pins in the socket.
Successfully placing the CPU is a moment of triumph. It signifies that the most delicate part of the installation is complete, moving you closer to firing up your new or upgraded system.
Securing the CPU and Applying Thermal Paste: Optimizing Heat Transfer
With the CPU locked in, the next crucial step is ensuring efficient heat transfer to the cooler. This involves applying thermal paste.
- Inspect CPU Surface: Ensure the top surface of the CPU (the Integrated Heat Spreader or IHS) is clean and free of dust or fingerprints. If necessary, clean it with isopropyl alcohol and a lint-free cloth.
- Apply Thermal Paste: There are several methods, but the most common and effective for most users is the “pea-sized dot” method:
- Squeeze a small, pea-sized (about 4-5mm diameter) dot of thermal paste directly onto the center of the CPU’s IHS.
- Do NOT spread it. The pressure from the CPU cooler when it’s installed will naturally spread the paste into a thin, even layer.
- If your cooler has pre-applied thermal paste: You can skip this step, but ensure the pre-applied paste is not smudged or contaminated. If it is, clean it off and apply your own.
Thermal paste is often underestimated but vital. Without it, the microscopic air gaps between the CPU and cooler would act as an insulator, causing rapid overheating and potential damage.
Installing the CPU Cooler: The Final Touch of Hardware Integration
The CPU cooler is the last major component to install on the motherboard. Its primary job is to keep your CPU cool under load.
- Read Cooler Instructions: CPU coolers vary wildly in their mounting mechanisms. Always refer to your specific cooler’s instruction manual. It will detail the correct brackets, screws, and process for your CPU socket type.
- Mount Backplate (If Applicable): Many aftermarket coolers require a backplate to be installed on the underside of the motherboard. Align it and secure it with the provided standoffs.
- Position Cooler: Carefully lower the CPU cooler onto the CPU, aligning the mounting holes on the cooler’s base with the standoffs or mounting points around the socket.
- Secure Cooler:
- For Screws: Tighten the screws in a diagonal pattern (e.g., top-left, bottom-right, top-right, bottom-left) gradually. Don’t fully tighten one screw before moving to the next; instead, turn each screw a few times, then move to the next, until all are snug. This ensures even pressure distribution over the CPU.
- For Clips: If your cooler uses clips, follow the manual to properly engage them.
- Connect Fan Header: Locate the “CPU_FAN” header on your motherboard (check the manual). Plug the CPU cooler’s fan cable into this header. This is crucial for the fan to receive power and for the motherboard to monitor and control its speed. If your cooler has multiple fans or an RGB cable, connect those according to the cooler’s manual and motherboard’s available headers.
Double-check that the cooler is firmly seated and doesn’t wobble. A properly installed cooler will ensure optimal thermal performance, directly contributing to the CPU’s lifespan and the system’s overall stability – a key aspect of maximizing your tech investment.
Post-Installation and Beyond: Verifying Your Work and Preparing for the Future
You’ve successfully installed your CPU and cooler! But the journey doesn’t end there. The final steps involve verifying your installation, understanding potential issues, and appreciating the broader implications of your newfound hardware skills. This is where your meticulous work translates into a fully functional system, and where you start to see the returns on your investment in time and effort.
First Boot and BIOS Check: Ensuring Success and Stability
The moment of truth arrives when you power on your system for the first time after CPU installation.
- Visual Inspection: Before hitting the power button, take one last look. Is the CPU cooler securely mounted? Is the CPU fan cable plugged into the “CPU_FAN” header? Are there any loose wires?
- Power On: Connect your power supply, monitor, keyboard, and mouse. Press the power button.
- Observe for POST (Power-On Self-Test):
- Listen for a single beep (if your motherboard has a speaker connected) – this usually indicates a successful POST.
- Look for output on your monitor. You should see the motherboard’s splash screen or enter the BIOS/UEFI menu.
- If there’s no display or multiple beeps, refer to your motherboard manual for error codes.
- Enter BIOS/UEFI: Press the designated key (usually DEL, F2, F10, or F12) during startup to enter your motherboard’s BIOS/UEFI.
- Verify CPU Recognition: Within the BIOS/UEFI, navigate to the main or system information section. Confirm that your CPU is correctly recognized by name and speed. Check the CPU temperature readings to ensure they are within normal idle ranges (typically 30-45°C).
A successful first boot and correct recognition of your CPU in the BIOS are strong indicators that your installation was flawless. This confirms the digital security of your components and the integrity of your build, setting the stage for further system setup.
Troubleshooting Common Issues: When Things Go Wrong
Even with the most careful installation, problems can occasionally arise. Knowing how to troubleshoot can save you time and potential repair costs.
- No Display / No POST:
- Re-check all power connections: Ensure the 24-pin ATX power cable and the 4/8-pin CPU power cable are firmly seated on the motherboard.
- Reseat the CPU: Carefully remove the CPU and reinstall it, paying extra attention to alignment.
- Reseat RAM: Improperly seated RAM is a common cause of no POST. Try one stick at a time in the recommended slot.
- Check cooler mounting: An improperly mounted cooler can cause the CPU to overheat instantly, triggering a shutdown or preventing POST.
- CPU Overheating:
- Check thermal paste: Was enough applied? Too much? Was it spread correctly (if applicable)?
- Check cooler fan: Is the fan spinning? Is it connected to the CPU_FAN header? Are there any obstructions?
- Ensure even pressure: The cooler must be mounted with even pressure across the CPU’s surface.
- System Instability / Random Crashes:
- While not always CPU-related, an improperly installed CPU or cooler can cause instability.
- Monitor CPU temperatures under load. If they spike, re-check your cooler installation and thermal paste.
Troubleshooting is a crucial skill in tech. It not only saves you money by avoiding professional repairs but also deepens your understanding of how hardware interacts, making you a more capable and self-reliant tech user.
Why DIY Matters: Beyond Just Building a PC
Installing a CPU is more than just a technical procedure; it’s an empowering act that ripples into various aspects of your tech journey, personal finance, and even your brand identity within the digital sphere. Embracing the DIY approach offers tangible benefits that extend far beyond the immediate task.
Empowering Your Tech Journey: Skills, Savings, and Understanding
The decision to install your own CPU, or even build an entire PC, is a significant step towards self-reliance in the tech world.
- Valuable Skills: You gain hands-on experience with intricate hardware, understanding the mechanics and interdependencies of computer components. This knowledge is invaluable for future upgrades, repairs, and general tech troubleshooting. It moves you from a passive consumer to an active participant in your technology.
- Significant Savings: Hiring a professional to build or upgrade your PC can be expensive. By doing it yourself, you save on labor costs, directing those funds towards better components or other personal finance goals. Furthermore, understanding hardware allows you to make more informed purchasing decisions, opting for value-for-money components that precisely meet your needs rather than overpaying for features you don’t use.
- Deeper Understanding: You develop a deeper appreciation for the engineering behind modern computing. This insight can help you stay current with technology trends, evaluate gadget reviews more critically, and even inspire you to delve into other areas like software development or AI tools, as you now grasp the foundational hardware on which they operate. This knowledge is an investment in your intellectual capital, complementing any online income ventures or side hustles that rely on computing power.
The Brand of You: Personalizing Your Setup and Tech Identity
In an increasingly digital world, your tech choices and capabilities contribute to your personal brand.
- Customization and Personalization: Building your own PC allows for unparalleled customization. You choose every component, from the CPU to the case aesthetics, creating a machine that perfectly reflects your needs, preferences, and personality. This bespoke approach fosters a unique setup that stands out from generic, mass-produced systems.
- Tech Savvy Identity: Successfully assembling your own computer speaks volumes about your capabilities. It marks you as someone who understands technology beyond just its interface, someone who is hands-on, resourceful, and capable of tackling complex tasks. This builds a credible personal brand, especially valuable if you operate in tech-related fields, offer tutorials, or engage in online communities.
- Inspiration and Reputation: Your custom-built PC can serve as a testament to your passion for technology, inspiring others and enhancing your reputation among peers. It’s a tangible representation of your engagement with the latest tech trends and your commitment to digital literacy. This level of engagement can even extend into a “corporate identity” if you eventually start a small business providing tech services or custom builds.
Future-Proofing and Upgradability: Smart Tech Investments
The ability to install a CPU opens doors to smarter, more sustainable tech habits.
- Extending PC Lifespan: Knowing how to upgrade components like a CPU or GPU means you can extend the useful life of your computer significantly. Instead of replacing an entire system when it slows down, you can selectively upgrade key parts, which is a much more cost-effective strategy. This aligns perfectly with sound personal finance principles, maximizing the return on your initial investment.
- Strategic Investing: You learn to view your PC as a modular investment. Rather than buying into the hype of entirely new systems every few years, you can strategically invest in individual component upgrades that offer the most performance gain for your money. This is a form of smart financial planning applied to technology.
- Adapting to Future Needs: As technology evolves and your personal or professional needs change, the flexibility to upgrade your hardware ensures your system can adapt. Whether it’s adding more processing power for demanding software, increasing storage for creative projects, or enhancing graphics for new games, your DIY skills give you the power to evolve with technology without constant, large expenditures. This adaptability is a key aspect of “future-proofing” your tech assets.
In conclusion, the act of installing a CPU is far more than a simple technical procedure. It’s an entry point into a deeper understanding of technology, a pathway to significant financial savings, and an opportunity to build a personal brand around your tech competence. By taking the reins of your hardware, you not only ensure the optimal performance of your system but also empower yourself with invaluable skills that will serve you well in our ever-evolving digital landscape. Embrace the challenge, enjoy the process, and revel in the satisfaction of building something powerful with your own hands.
aViewFromTheCave is a participant in the Amazon Services LLC Associates Program, an affiliate advertising program designed to provide a means for sites to earn advertising fees by advertising and linking to Amazon.com. Amazon, the Amazon logo, AmazonSupply, and the AmazonSupply logo are trademarks of Amazon.com, Inc. or its affiliates. As an Amazon Associate we earn affiliate commissions from qualifying purchases.