In an increasingly connected world, the reliability of our home and office networks is paramount. From streaming high-definition content and powering smart home devices to ensuring stable internet access for remote work, the underlying cabling infrastructure plays a critical, often overlooked, role. While fiber optics and wireless technologies dominate conversations about future connectivity, the humble coaxial cable remains a stalwart for television signals, broadband internet, and even security camera systems in countless households and businesses worldwide.
Mastering the skill of installing coaxial cable ends isn’t just a technical know-how; it’s a practical empowerment that intersects directly with the core themes of technology, financial prudence, and even personal branding through the meticulous upkeep of your digital environment. For the tech-savvy individual, it’s about optimizing performance and understanding the physical layer of their network. For the budget-conscious, it’s about significant savings on professional installation and troubleshooting. And for anyone who values efficiency and reliability, a perfectly terminated coaxial cable means fewer headaches, less downtime, and a smoother digital experience.
This comprehensive guide will walk you through every step of installing coaxial cable ends, ensuring you achieve professional-grade connections every time. We’ll delve into the essential tools, demystify the process, and offer invaluable tips to help you avoid common pitfalls. By the end, you’ll not only know how to install coaxial cable ends but also understand why each step is crucial for optimal performance, saving you time, money, and frustration.
Understanding Coaxial Cables and Their Enduring Importance
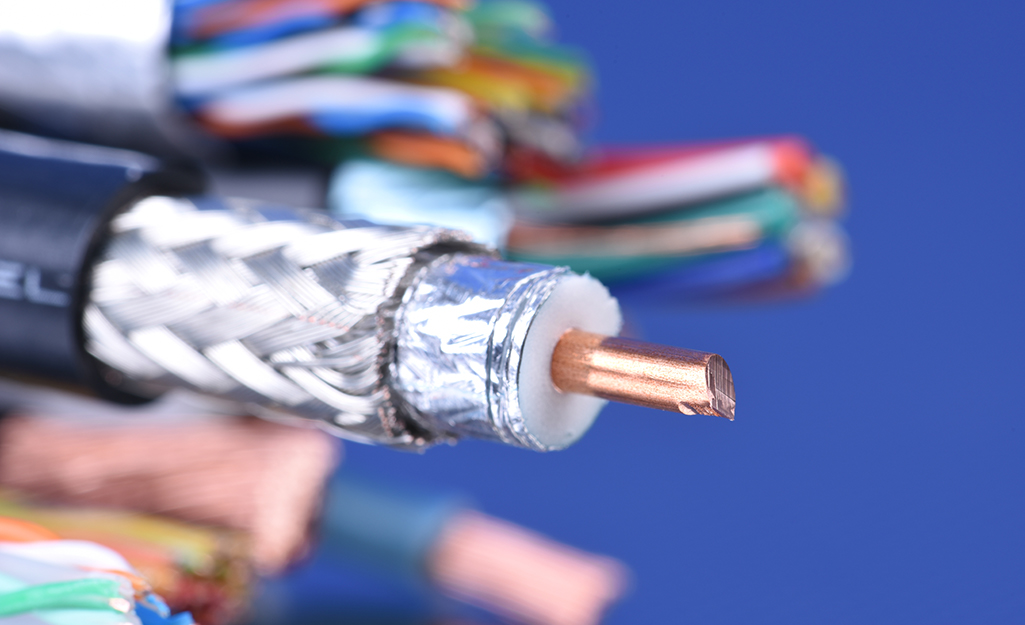
Before diving into the practicalities of installation, it’s beneficial to understand what a coaxial cable is and why it remains relevant in today’s tech landscape. Coaxial cable, often shortened to “coax,” is a type of electrical cable consisting of an inner conductor surrounded by a concentric conducting shield, with the two separated by a dielectric insulating material. The entire assembly is usually protected by an outer insulating jacket. This unique design allows coaxial cables to transmit high-frequency electrical signals with minimal signal loss and interference from external electromagnetic fields.
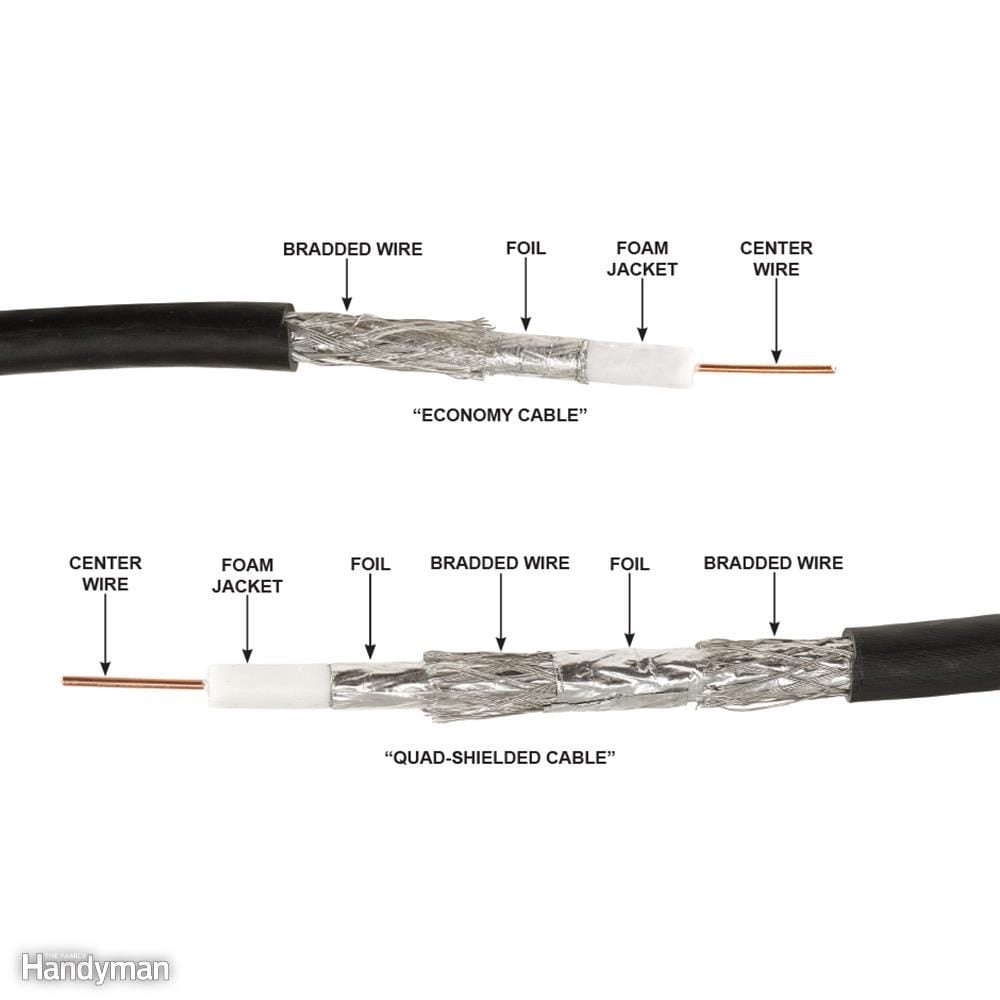
Common types you’ll encounter are RG6 and RG59. RG6 cables are thicker and have better shielding, making them ideal for high-bandwidth applications like cable internet and high-definition television over longer runs. RG59, while thinner and more flexible, is generally suited for lower-frequency applications or shorter distances, often found in older CCTV systems. Choosing the correct cable type and, consequently, the correct connector, is the first critical step in ensuring a robust connection.
Despite the rise of Wi-Fi and fiber optics, coaxial cable systems are deeply embedded in infrastructure, from the last mile of internet delivery to internal home entertainment networks. Learning to properly terminate these cables means you’re equipped to manage and troubleshoot a significant part of your digital life, ensuring everything from your smart TV to your internet router maintains a pristine signal. This DIY capability translates directly into avoiding costly service calls and empowering you with control over your home’s technological backbone.
Essential Tools for a Flawless Coaxial Connection
Just as a master craftsman relies on precise tools, achieving a perfect coaxial cable termination requires the right equipment. Investing in quality tools is not merely an expense; it’s a wise financial decision that pays dividends in reliability, efficiency, and the sheer satisfaction of a job well done. Poor tools can lead to frustrating inconsistencies, signal degradation, and ultimately, more work and potential equipment damage.
Here’s a breakdown of the indispensable gear you’ll need:
The Right Coaxial Cable Stripper
This is arguably the most critical tool for installing coaxial cable ends. A specialized coaxial cable stripper is designed to precisely cut through the outer jacket, shield, and dielectric to expose the center conductor to specific, pre-determined lengths. This precision is paramount. Generic utility knives or wire cutters simply won’t suffice and will invariably lead to an improper strip, resulting in signal loss, shorts, or poor connections.
Look for a stripper that can handle both RG6 and RG59 cables, often with adjustable blades or interchangeable cassettes. A good stripper will have two or three blades that make simultaneous cuts, ensuring that the inner conductor, dielectric, and outer braid are exposed at the exact dimensions required for a standard F-connector. This precision saves time, eliminates guesswork, and drastically reduces the chances of errors that lead to costly troubleshooting.
Compression Tool vs. Crimp Tool
Once the cable is stripped and the connector is in place, you need a tool to secure the F-connector to the cable. There are primarily two types: crimp tools and compression tools.
- Crimp Tools: These tools use a die to “crimp” a metal ring around the cable’s jacket and the connector, creating a mechanical bond. While older and often more affordable, crimped connections can be susceptible to environmental factors, loosening over time, and potential signal loss, especially in outdoor applications. They might be acceptable for very temporary or low-stakes indoor uses, but they generally offer less durability and reliability.
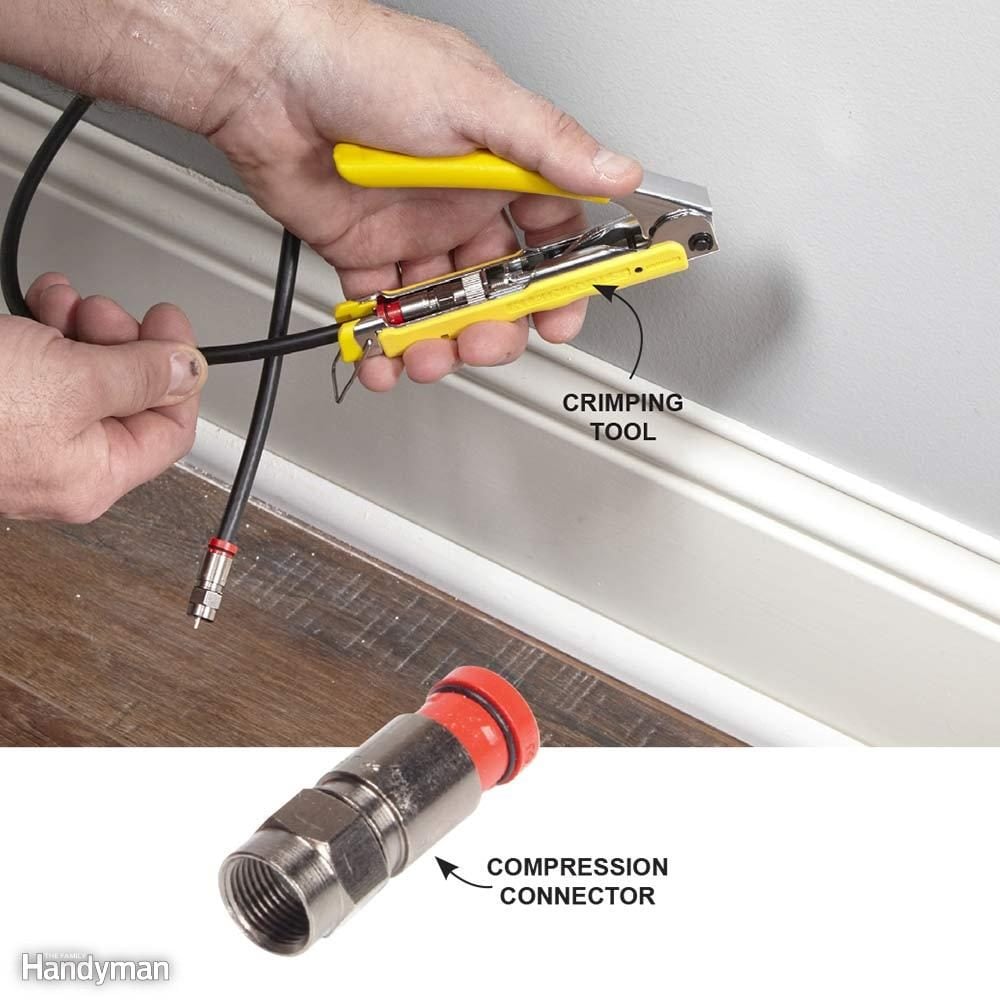
- Compression Tools: These are the industry standard for professional-grade coaxial cable terminations. A compression tool works by compressing the F-connector onto the cable with uniform pressure, creating a watertight, 360-degree seal that is incredibly robust and resistant to pull-out and environmental degradation. This superior mechanical and electrical connection significantly reduces signal loss and ingress/egress of noise. For anyone serious about long-term reliability for their internet, TV, or security systems, investing in a quality compression tool is non-negotiable. It’s a prime example of how a slightly higher upfront cost for a quality tool translates into immense long-term savings by preventing signal issues and potential technician visits.
Ensure your chosen compression tool is compatible with the type of F-connectors you plan to use (e.g., standard, universal, or specific brand connectors).
Other Indispensable Gear
- Cable Cutters: A pair of sharp, sturdy cable cutters designed for coaxial cable is essential for making clean, square cuts. A ragged or angled cut can make stripping and connector attachment difficult.
- F-Connectors: These are the actual connectors that attach to the coaxial cable ends. Ensure you purchase the correct type (RG6 or RG59) for your cable and that they are designed for compression (if using a compression tool). High-quality connectors often feature weather-sealing for outdoor applications, further enhancing durability and signal integrity.
- Continuity Tester (Optional but Recommended): A simple and inexpensive continuity tester can be a lifesaver. After installation, it allows you to verify that the center conductor makes contact with the connector and, crucially, that there are no shorts between the center conductor and the shield. This immediate feedback helps you identify and rectify issues before connecting valuable equipment, saving time and preventing potential damage. For those who prioritize a seamless digital experience, this quick diagnostic step is invaluable.
- Safety Glasses: Always a good idea when cutting or working with tools, even for seemingly simple tasks.
Step-by-Step Guide to Installing Coaxial Cable Ends
With your tools ready, let’s walk through the installation process. Precision and attention to detail at each stage are crucial for a robust and reliable connection. Rushing or cutting corners here will almost certainly lead to signal problems later, undermining the very purpose of your efforts.
1. Prepare the Cable for Stripping
Begin by measuring the desired length of your coaxial cable. Use your cable cutters to make a clean, square cut. Avoid crushing the cable, as this can deform the internal structure and affect signal integrity. A clean, straight cut ensures that the cable stripper can perform its job accurately and that the connector sits flush against the cable jacket. This initial cut sets the foundation for the entire termination process.
2. Master the Art of Stripping
This is where the specialized coaxial cable stripper shines.
- Insert the Cable: Open your cable stripper and insert the freshly cut end of the coaxial cable into the designated slot. Ensure the cable is pushed firmly against the internal stop to achieve the correct stripping length. Different strippers might have slightly different mechanisms, but the principle is the same: alignment is key.
- Rotate and Remove: Once the cable is properly seated, rotate the stripper several full turns around the cable. Most strippers require 2-4 rotations until you feel the blades cut through the jacket and dielectric.
- Examine the Strip: Carefully remove the cable from the stripper. You should see a perfectly segmented strip:
- A clean cut through the outer jacket, exposing the braided shield underneath.
- A section where the braid and foil shield are removed, exposing the white dielectric.
- A final, shorter section where the dielectric is removed, exposing the bare copper center conductor.
- The typical measurements are often around 1/4 inch of exposed center conductor, followed by 1/4 inch of dielectric and braid/foil, with the outer jacket neatly cut. Refer to your connector’s instructions for exact recommended lengths, though most strippers are calibrated to industry standards.
- Fold Back the Braid: Gently fold the braided shield wires back over the outer jacket. Ensure no stray strands of braid are touching the center conductor, as this will cause a short circuit and immediate signal failure. A clean braid fold ensures a proper ground connection when the connector is applied.
3. Attach the F-Connector Securely
This step requires a delicate touch to avoid damaging the exposed components.
- Align the Connector: Take your F-connector and carefully align it with the stripped end of the cable. The center conductor should slide into the central pin of the connector.
- Push On Firmly: Push the F-connector onto the cable until the white dielectric material is flush with the base of the connector’s center pin (the part where the copper conductor emerges). You might need to twist slightly while pushing to help it seat properly.
- Verify Center Conductor Protrusion: The center conductor should protrude slightly (typically 1/16 to 1/8 inch or 2-3 mm) beyond the tip of the F-connector. If it’s too short, it won’t make proper contact. If it’s too long, it risks bending or shorting. If it’s not protruding correctly, gently pull the connector off, check your strip again (you may need to re-strip if the dielectric wasn’t fully removed around the center conductor), and re-attach. Crucially, ensure no strands of the folded-back braid are pinched or pushed forward in a way that could contact the center pin.
4. Crimp or Compress for a Professional Finish
Now it’s time to permanently secure the connector.
- Prepare the Tool: Open your compression or crimp tool. Most compression tools have a rotating head or adjustable depth settings to accommodate different connector lengths. Ensure it’s set correctly for your F-connector type.
- Insert the Connector: Place the F-connector, with the cable attached, into the tool’s cradle. The body of the connector should be fully seated within the tool’s compression mechanism.
- Activate the Tool: Squeeze the handles of the compression tool firmly and steadily until the tool’s mechanism cycles completely. For compression tools, you’ll feel a definite “click” or stop when the connector is fully compressed onto the cable. For crimp tools, the handles will typically meet.
- Inspect the Connection: Remove the cable and connector from the tool. Visually inspect the connection. The connector should be tightly seated against the cable jacket with no gaps. The F-connector’s barrel should be fully compressed or crimped, creating a solid, secure bond. Give it a gentle tug; it should not move or pull off. A perfectly compressed connection is practically part of the cable itself, a testament to proper installation and the right tools.
5. Test Your Connection
Never skip this final step! It takes seconds and can save hours of frustration later.
- Use a Continuity Tester: Attach the continuity tester to both ends of the newly terminated cable. A good tester will indicate continuity (meaning the center conductor is connected) and, crucially, the absence of a short circuit (meaning the center conductor is not touching the shield).
- Connect to a Device: If you don’t have a tester, connect the cable to a device (like a TV or modem) and verify that you’re receiving a clear signal or internet connection.
- Troubleshooting: If the test fails (e.g., no signal, or the tester indicates a short), meticulously re-examine the connection. The most common issues are a short circuit due to stray braid strands touching the center conductor, or the center conductor not protruding enough to make proper contact. You may need to cut off the connector and re-strip the cable, paying extra attention to the braiding and center conductor length.
Common Pitfalls and Troubleshooting Tips
Even with the best intentions, issues can arise. Understanding common problems and how to troubleshoot them will save you immense time and prevent repeat work, reinforcing the financial benefits of DIY expertise.
Avoiding Signal Loss and Interference
The primary goal of a well-installed coaxial cable is to maintain signal integrity. Signal loss (attenuation) and interference (noise) are the enemies of clear pictures and stable internet.
- Improper Stripping: The most frequent cause of issues. If the center conductor is too short, it won’t make a good connection. If it’s too long, it can bend or short out. If the braid isn’t folded back cleanly, stray strands can cause a short. Invest in a quality stripper and always double-check your strip.
- Loose Connections: A connector that isn’t fully compressed or crimped can lead to signal leakage (both in and out), causing intermittent issues, “snowy” pictures, or dropped internet connections. This is why a compression tool is superior.
- Damaged Cable: Kinking, bending at sharp angles, or crushing the coaxial cable can damage its internal structure, leading to signal loss. Always handle the cable with care, especially during installation.
- Environmental Factors: For outdoor runs, unprotected connections can suffer from water ingress, leading to corrosion and signal degradation. Use weather-sealed connectors and, if necessary, weatherproofing tape or boots. This is crucial for long-term reliability and avoiding costly outdoor cable replacement.
- Too Many Splits: Each splitter you add to a coaxial line introduces signal loss. Over-splitting can weaken the signal below usable levels. Only use splitters when absolutely necessary and opt for high-quality, professional-grade splitters.
What to Do When Things Go Wrong
- No Signal/Continuity Tester Indicates Short: This almost always points to a short circuit.
- Immediately disconnect the cable from any active devices.
- Carefully remove the F-connector using cable cutters (you’ll sacrifice the connector).
- Re-examine the stripped cable end. Is there any stray braid touching the center conductor? Did you strip the dielectric cleanly around the center conductor?
- Re-strip and re-terminate, paying extreme attention to cleaning up any stray braid wires and ensuring the center conductor is perfectly isolated.
- Intermittent Signal/Poor Picture Quality: This could be signal loss or interference.
- Check all connections along the entire run – at the wall plate, splitters, and the device itself. Even factory-installed ends can loosen over time.
- Verify the cable isn’t kinked or damaged anywhere.
- If possible, try a shorter, known-good cable segment to isolate if the issue is with your new connection or elsewhere in the system.
- Consider replacing your F-connectors with high-quality compression types if you used crimp connectors previously, especially for critical applications like internet.
Conclusion: Empowering Your Digital World Through DIY Excellence
Installing coaxial cable ends is a foundational skill that bridges the gap between basic DIY and essential technological maintenance. By following this comprehensive guide, you’ve not only learned a practical skill but also gained a deeper understanding of the physical components that underpin much of our digital connectivity.
This mastery translates directly into significant advantages:
- Technological Empowerment: You gain the ability to troubleshoot, upgrade, and customize your home or office network with confidence, ensuring optimal performance for your gadgets, streaming services, and internet access. This knowledge makes you a more self-reliant and capable tech user, aligning perfectly with the ethos of staying ahead in technology.
- Financial Savings: Avoiding professional installation fees, minimizing service calls for signal issues, and extending the life of your cabling infrastructure represent tangible savings. Investing a little in the right tools and learning the proper techniques is a smart financial strategy that yields long-term returns.
- Enhanced Reliability: A perfectly installed coaxial cable end means a stable, high-quality signal. This translates into uninterrupted entertainment, reliable internet for work and communication, and peace of mind knowing your connections are robust and secure.
So, roll up your sleeves, gather your tools, and embark on this rewarding DIY journey. The ability to craft a perfect coaxial cable connection is more than just a technical trick; it’s an investment in the reliability and efficiency of your personal and professional digital life. You’re not just installing cable ends; you’re building a more connected, stable, and cost-effective future for your home or business.
aViewFromTheCave is a participant in the Amazon Services LLC Associates Program, an affiliate advertising program designed to provide a means for sites to earn advertising fees by advertising and linking to Amazon.com. Amazon, the Amazon logo, AmazonSupply, and the AmazonSupply logo are trademarks of Amazon.com, Inc. or its affiliates. As an Amazon Associate we earn affiliate commissions from qualifying purchases.