In the landscape of Linux distributions, Ubuntu stands as the most popular choice for both developers and casual users due to its balance of user-friendliness and powerful terminal capabilities. While Ubuntu comes pre-packaged with the open-source Mozilla Firefox, many users prefer Google Chrome for its seamless integration with the Google ecosystem, its robust developer tools, and its high-performance V8 JavaScript engine.
For those transitioning from Windows or macOS, the process of installing software on a Linux-based system might seem daunting at first. However, Ubuntu offers multiple avenues for software installation, ranging from intuitive graphical interfaces to efficient command-line operations. This guide provides a detailed walkthrough of how to install, manage, and optimize Google Chrome on Ubuntu, ensuring a smooth browsing experience tailored to your workflow.
Understanding the Google Chrome Ecosystem on Linux
Before diving into the installation steps, it is essential to understand why Google Chrome remains a top choice for Linux users despite the presence of Firefox and the open-source Chromium browser.
The Difference Between Chromium and Chrome
Ubuntu users often encounter “Chromium” in the official repositories. Chromium is the open-source project that serves as the foundation for Google Chrome. While they share the same rendering engine, Google Chrome includes proprietary components such as a built-in PDF viewer, print preview, and, most importantly, the automatic update mechanism and Google account synchronization. For users who rely on Google Workspace, Chrome offers a more polished and integrated experience.
Performance and Compatibility
Google Chrome is renowned for its speed. Its ability to handle complex web applications and heavy JavaScript loads makes it an indispensable tool for web developers and power users. Furthermore, because Chrome dominates the global browser market share, web developers often optimize their sites for Chrome first, ensuring maximum compatibility for the end-user.
Security Features
Google invests heavily in the security architecture of Chrome. Features like sandboxing, where each tab is isolated from the rest of the system, and “Safe Browsing,” which warns users about malicious websites, provide an extra layer of protection. On Ubuntu, these features work in tandem with the Linux kernel’s security modules to create a highly secure browsing environment.
Method 1: Installing Google Chrome via the Graphical User Interface (GUI)
For users who prefer a visual approach similar to installing software on Windows or macOS, the GUI method is the most straightforward. This method involves downloading a Debian package (.deb) and using Ubuntu’s built-in software management tools.
Step 1: Downloading the Official Installer
To begin, open your existing browser (Firefox) and navigate to the official Google Chrome download page. The website will automatically detect that you are running a Linux distribution. Click the “Download Chrome” button. A prompt will appear asking you to select your download package. Ensure that you select the 64-bit .deb (For Debian/Ubuntu) option. Once selected, click “Accept and Install” to save the file to your Downloads folder.
Step 2: Utilizing the Ubuntu Software Center
Once the download is complete, navigate to your Downloads folder. Right-click on the downloaded .deb file and select “Open with Software Install.” This will launch the Ubuntu Software Center (or the “Software Install” application). You will see a description of the browser and an “Install” button. Click it, enter your administrative password when prompted, and the system will handle the installation of the browser and all necessary dependencies.
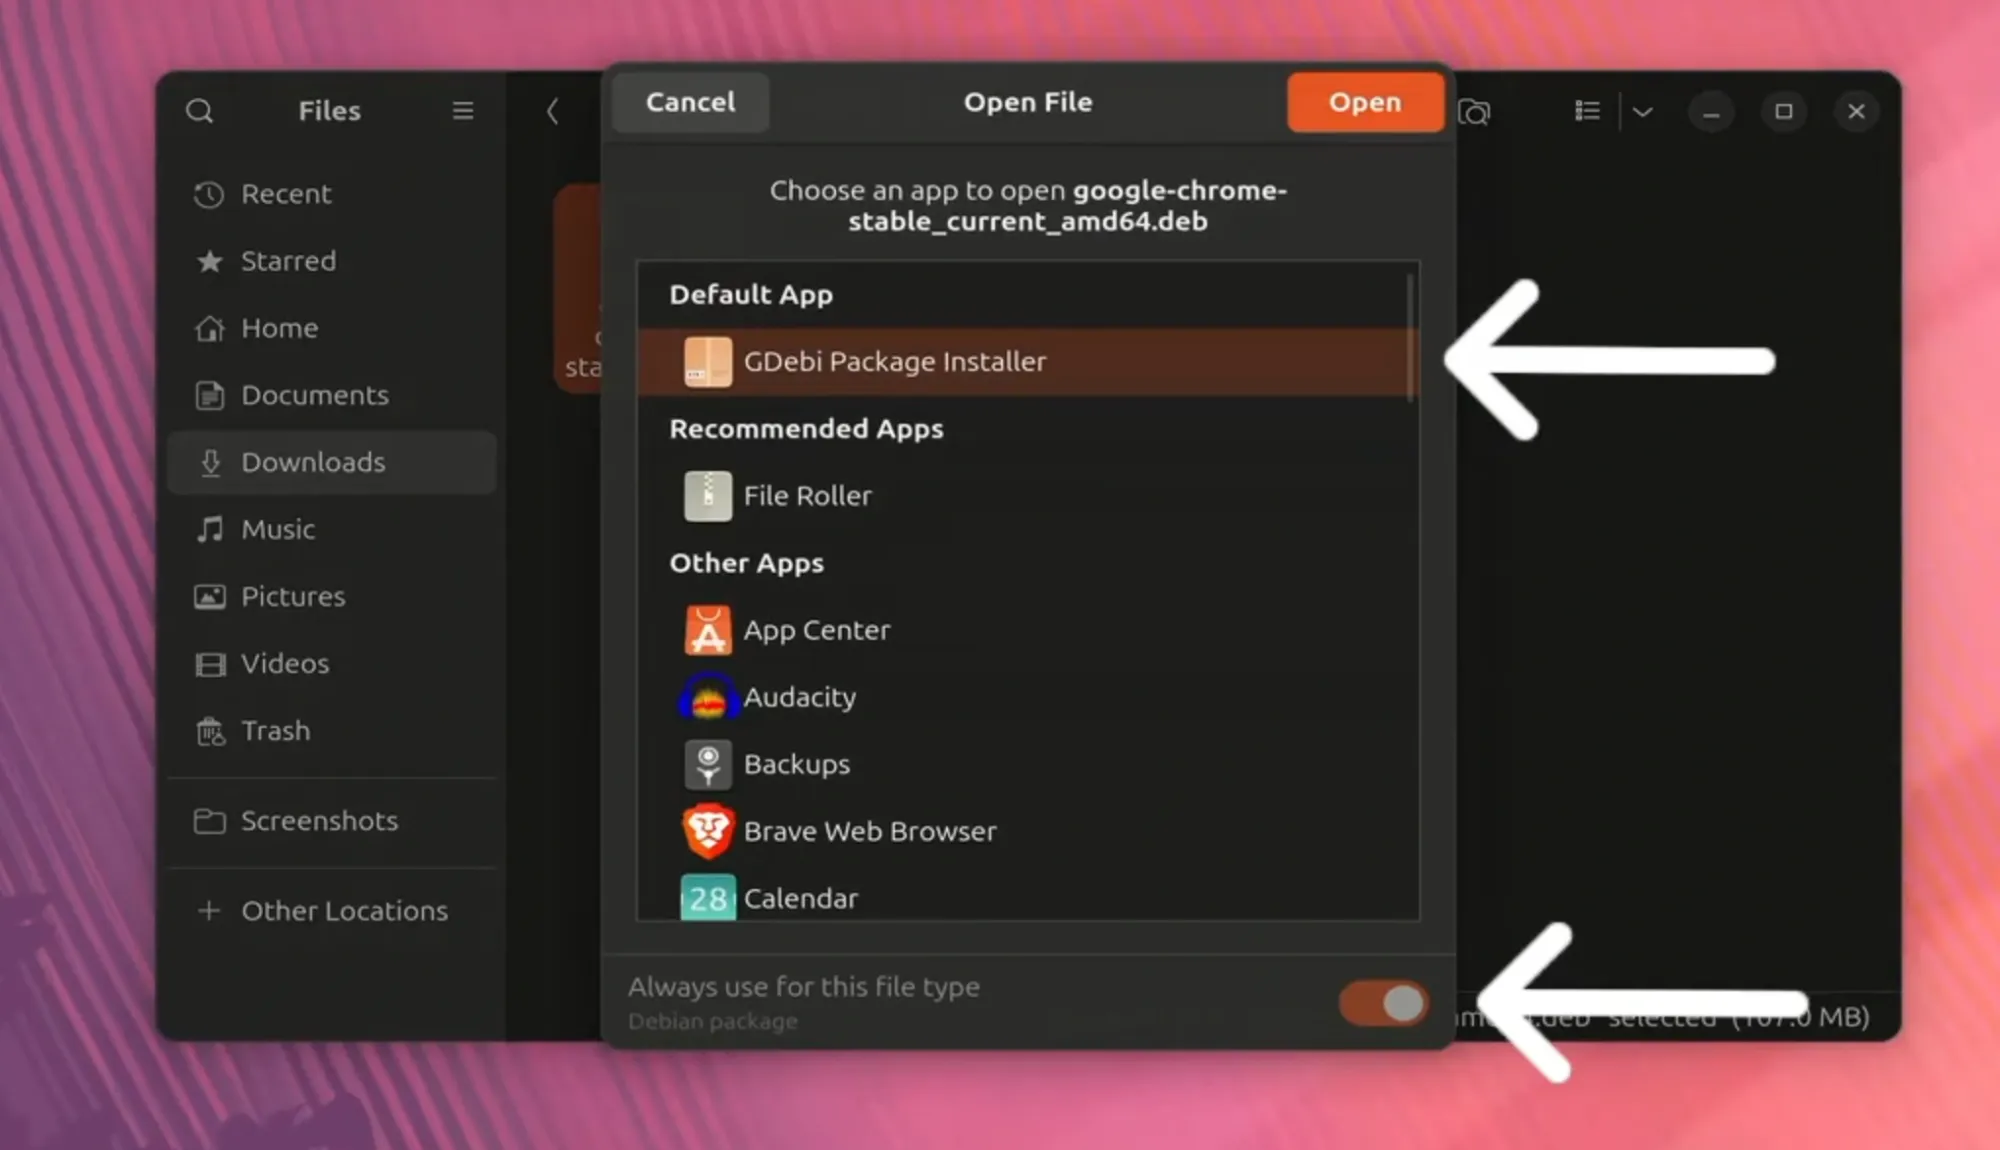
Step 3: Using GDebi for Enhanced Dependency Management
While the default Software Center works for most, some users prefer a lightweight tool called GDebi. GDebi is particularly efficient at resolving dependency issues that might occur during manual installations. If you choose this route, you can install GDebi via the terminal (sudo apt install gdebi), then right-click your Chrome .deb file and select “Open with GDebi Package Installer.” Click “Install Package,” and the process will conclude smoothly.
Method 2: Installing Google Chrome via the Terminal
For many Linux enthusiasts, the terminal is the preferred method for software installation. It is faster, provides real-time feedback, and allows for automation. Installing Chrome via the command line involves fetching the package directly from Google’s servers and using the package manager to execute the installation.
Fetching the Package with wget
First, open your terminal (Ctrl+Alt+T). You will use the wget command to download the latest stable version of Google Chrome. Enter the following command:
wget https://dl.google.com/linux/direct/google-chrome-stable_current_amd64.deb
This command tells the system to reach out to Google’s repository and download the specific .deb file directly into your current working directory.
Executing the Installation with apt
Once the download is finished, you need to install the package. In older versions of Ubuntu, users often used dpkg. However, using apt is now the recommended practice because it automatically manages dependencies. Run the following command:
sudo apt install ./google-chrome-stable_current_amd64.deb

The ./ is crucial as it tells the system to look for the file in the current directory rather than searching the online repositories. Provide your password, and the installation will proceed.
Verifying and Launching
After the process completes, you can verify the installation by checking the version of Chrome:
google-chrome --version
To launch the browser directly from the terminal, simply type google-chrome &. The & symbol allows the browser to run in the background, keeping your terminal window available for other tasks.
Managing and Updating Google Chrome on Ubuntu
One of the advantages of installing the official Google Chrome .deb package is that it automatically adds the Google repository to your system’s software sources. This ensures that Chrome stays updated alongside your other system software.
Automatic Updates through APT
Unlike the Windows version of Chrome, which updates itself silently in the background, Chrome on Ubuntu is updated via the standard apt update cycle. When you run your regular system updates:
sudo apt update && sudo apt upgrade
Ubuntu will check Google’s servers for any new versions of Chrome and install them automatically. This keeps your browser secure without requiring manual downloads for every new release.
Switching Between Stable, Beta, and Unstable Channels
For developers who need to test their applications against upcoming browser features, Google offers Beta and Unstable (Dev) channels for Linux. You can install these alongside the stable version.
- Beta: Provides a preview of features coming to the stable release.
- Unstable: Updated weekly, containing the latest experimental features.
These can be installed via the terminal by replacingstablewithbetaorunstablein the installation commands.
Uninstalling Google Chrome
If you ever need to remove Google Chrome from your system, the process is simple. Use the following command in the terminal:
sudo apt remove google-chrome-stable
If you wish to remove the configuration files as well, use purge instead of remove:
sudo apt purge google-chrome-stable
Optimizing Google Chrome for the Ubuntu Environment
Once Chrome is installed, a few optimizations can help it feel more integrated with the Ubuntu desktop environment (GNOME) and ensure it runs efficiently.
Enabling Hardware Acceleration
Chrome can be resource-intensive, especially regarding RAM and CPU usage. To alleviate this, ensure that hardware acceleration is enabled. Navigate to chrome://settings/system and toggle “Use graphics acceleration when available.” This offloads rendering tasks to your GPU, leading to smoother scrolling and better video playback.
Customizing the Window Borders
By default, Chrome may use its own window border style which can look out of place on Ubuntu. To make it match the GTK theme of your OS, right-click on the empty space in the tab bar and select “Use System Title Bar and Borders.” This gives Chrome the standard Ubuntu window controls (Minimize, Maximize, Close) and a more native look.
Managing Extensions and Background Processes
Chrome’s greatest strength is its extension library, but too many extensions can slow down your system. Use the built-in Task Manager (Shift+Esc within Chrome) to identify which tabs or extensions are consuming the most memory. Additionally, go to Settings > System and disable “Continue running background apps when Google Chrome is closed” if you want to free up system resources immediately after closing the browser window.

Conclusion
Installing Google Chrome on Ubuntu is a fundamental task that bridges the gap between the power of Linux and the familiarity of the world’s most popular browser. Whether you choose the user-friendly GUI method or the efficient Terminal approach, you gain access to a tool that is essential for modern web navigation, professional development, and digital security. By following the maintenance and optimization steps outlined in this guide, you can ensure that Google Chrome remains a fast, reliable, and integrated component of your Ubuntu workstation.
aViewFromTheCave is a participant in the Amazon Services LLC Associates Program, an affiliate advertising program designed to provide a means for sites to earn advertising fees by advertising and linking to Amazon.com. Amazon, the Amazon logo, AmazonSupply, and the AmazonSupply logo are trademarks of Amazon.com, Inc. or its affiliates. As an Amazon Associate we earn affiliate commissions from qualifying purchases.