
In the dynamic landscape of digital technology, the browser serves as our primary gateway to the internet, influencing everything from our daily workflows to our leisure activities. For MacBook users, while Safari offers a tightly integrated experience within the Apple ecosystem, the allure of Google Chrome, with its vast array of features, extensive customization options, and powerful cross-platform synchronization capabilities, often proves irresistible. Whether you’re a seasoned professional juggling multiple online projects, a student leveraging web-based tools for research, or simply someone who appreciates a fast, reliable, and versatile browsing experience, installing Chrome on your MacBook can unlock new levels of productivity and streamline your digital life.
This comprehensive guide will walk you through the entire process, from understanding why Chrome might be the right choice for you, to the step-by-step installation, post-setup optimization, and essential troubleshooting tips. We’ll delve into how Chrome integrates with the broader tech ecosystem, its impact on personal branding through tailored digital experiences, and even touch upon how a robust browser can facilitate financial management and online endeavors. By the end of this article, you’ll not only have Chrome successfully running on your MacBook but also a deeper understanding of how to leverage its full potential.
Why Choose Google Chrome for Your MacBook? Unpacking the Benefits
Before we dive into the installation mechanics, it’s worth exploring why millions of users worldwide, including a significant portion of the MacBook community, opt for Google Chrome. While macOS comes pre-installed with Safari, Chrome offers a distinct set of advantages that cater to diverse user needs, aligning perfectly with the varied topics of Tech, Brand, and Money that define our platform.
Speed, Performance, and Google’s Ecosystem Integration
One of Chrome’s most lauded attributes is its performance. Engineered by Google, a company at the forefront of technological innovation, Chrome is optimized for speed and efficiency, often leading to quicker page loads and smoother navigation, even with multiple tabs open. This efficiency is crucial for anyone engaged in fast-paced online work or research. Furthermore, for users deeply embedded in the Google ecosystem – utilizing Gmail, Google Drive, Google Docs, YouTube, and other services – Chrome offers unparalleled integration. Signing into Chrome automatically logs you into these services, creating a seamless and unified online experience that enhances productivity. This tight integration ensures that your digital brand, from professional communications to collaborative projects, remains consistent and easily accessible.
The Power of Extensions and Customization
Perhaps the most compelling reason to choose Chrome is its vast Chrome Web Store, home to tens of thousands of extensions. These mini-applications can transform your browser into a powerhouse of productivity, security, and entertainment. From ad blockers and password managers to grammar checkers, screenshot tools, and specialized extensions for developers or designers, the possibilities are virtually limitless. For individuals building an online business or managing personal finances, extensions for currency conversion, expense tracking, or even e-commerce analytics can be invaluable tools. This level of customization allows users to tailor their browsing experience to their precise needs, effectively creating a personalized digital workspace that reflects their unique brand and operational requirements.
Cross-Device Synchronization and Digital Security
In our multi-device world, seamless continuity is paramount. Chrome’s robust synchronization feature allows you to access your bookmarks, browsing history, saved passwords, and open tabs across all your devices – whether it’s your MacBook, iPhone, iPad, or an Android device. This means you can start working on one device and effortlessly pick up exactly where you left off on another, a critical feature for maintaining workflow efficiency and consistency in your digital life.
Beyond convenience, Google invests heavily in Chrome’s security features. It includes built-in phishing and malware protection, automatic updates that patch vulnerabilities, and a “Safe Browsing” feature that warns you about dangerous websites. While no browser is entirely immune, Chrome’s proactive approach to security helps protect your personal data and financial information, offering peace of mind as you navigate the complexities of the online world. This focus on digital security is a cornerstone of responsible technology use and crucial for safeguarding your personal and financial brand online.
Preparing Your MacBook for Google Chrome Installation
Installing Google Chrome on your MacBook is a straightforward process, but a few preliminary checks can ensure a smooth and hassle-free experience. These steps are designed to prevent common issues and ensure your system is ready for the new application.
Checking macOS Version and System Requirements
Google Chrome is designed to run on a wide range of macOS versions, but it’s always wise to ensure your system meets the minimum requirements. Typically, Chrome supports the latest macOS versions and several preceding ones. To check your macOS version:
- Click the Apple menu () in the top-left corner of your screen.
- Select “About This Mac.”
- The overview tab will display your macOS version (e.g., macOS Ventura, macOS Monterey, etc.).
While Chrome is generally lightweight, having sufficient RAM and processor power will contribute to a smoother experience, especially if you plan to use many tabs or extensions. Most modern MacBooks will easily exceed these requirements. Ensuring your macOS is up to date can also resolve potential compatibility issues and enhance overall system security.
Ensuring Stable Internet Connection and Disk Space
A reliable internet connection is crucial for downloading the Chrome installer package. While the file size isn’t exceptionally large (typically around 150-200 MB), a stable connection prevents corrupted downloads and ensures the process completes without interruption. If you’re using Wi-Fi, make sure you’re connected to a strong, stable network.
Furthermore, ensure you have adequate free disk space on your MacBook. Chrome itself requires a modest amount of space, but over time, cache, extensions, and downloads will consume more. A general rule of thumb is to have at least a few gigabytes of free space to allow for optimal system performance and application installations. You can check your available storage by going to “About This Mac” and then selecting the “Storage” tab. If space is tight, consider clearing old files, applications, or emptying your trash before proceeding.
Step-by-Step Guide: Installing Google Chrome on Your MacBook
With your MacBook prepped and ready, the actual installation process is quick and intuitive. Follow these steps carefully to get Chrome up and running in no time.
1. Downloading the Chrome Installer
The first step is to obtain the official Chrome installer. It’s imperative to download it from Google’s official website to ensure you get a legitimate, malware-free version.
- Open your current web browser (e.g., Safari) on your MacBook.
- Navigate to the official Google Chrome download page by typing
google.com/chromeinto the address bar and pressing Enter. - On the Chrome download page, you should see a prominent “Download Chrome” button. Click this button. The website should automatically detect that you’re on a macOS device and offer the correct version.
- A prompt will appear asking you to confirm the download. Click “Allow” or “Save File” depending on your browser’s settings. The
googlechrome.dmgfile will begin downloading to your “Downloads” folder.
2. Opening the .dmg File and Dragging to Applications

Once the download is complete, you’ll need to open the disk image file.
- Locate the downloaded
googlechrome.dmgfile in your “Downloads” folder or directly from your browser’s download manager. - Double-click the
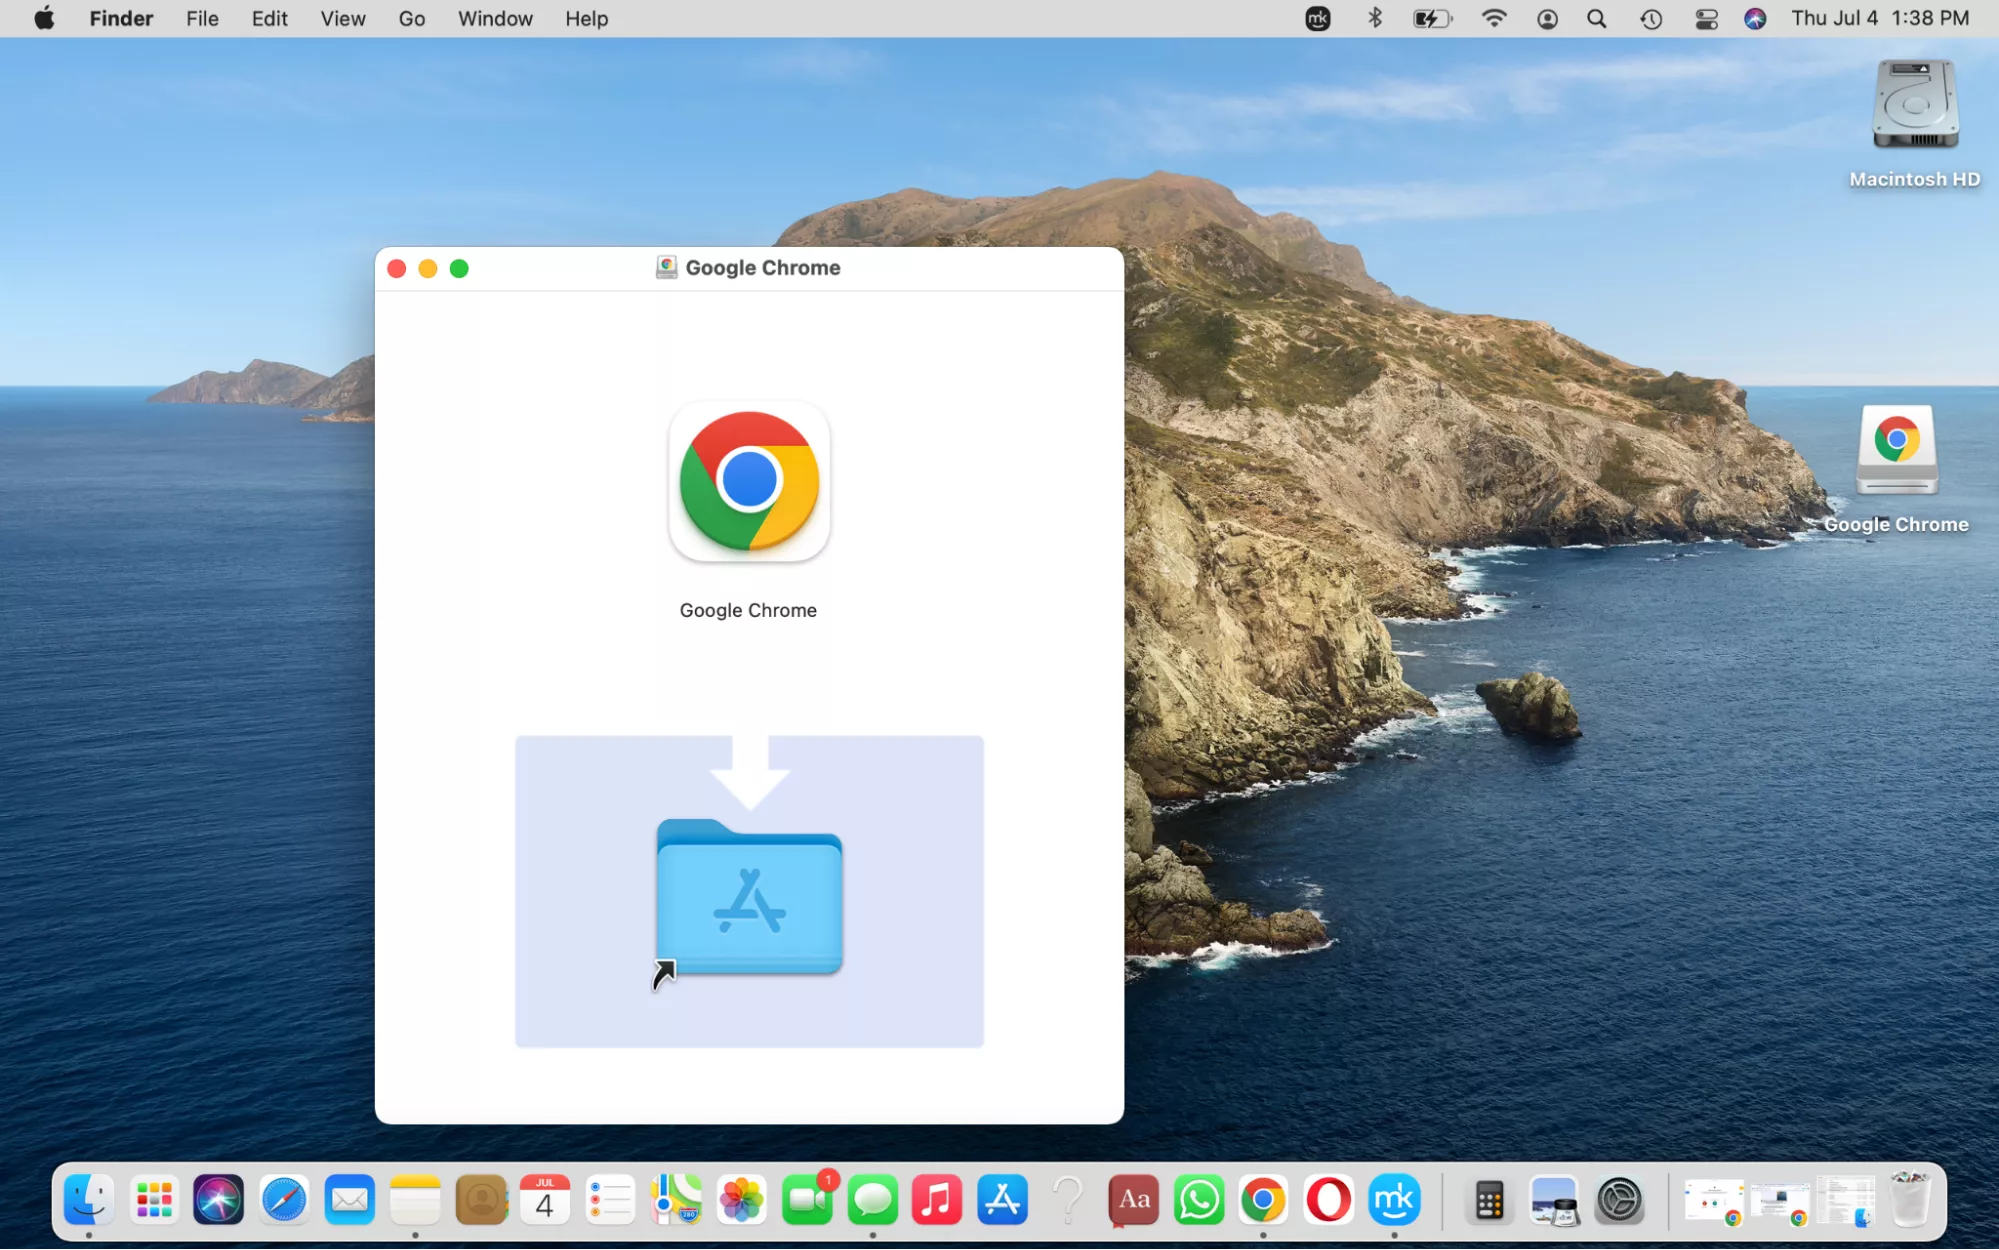
googlechrome.dmgfile. This action will mount the disk image, opening a new Finder window that typically displays the Chrome application icon and an “Applications” folder alias. - In the opened Finder window, click and drag the “Google Chrome” application icon directly into the “Applications” folder alias. This action copies the Chrome application from the disk image to your MacBook’s Applications folder, making it permanently available.
3. Launching Chrome and Initial Setup
After copying the application, you can launch Chrome for the first time.
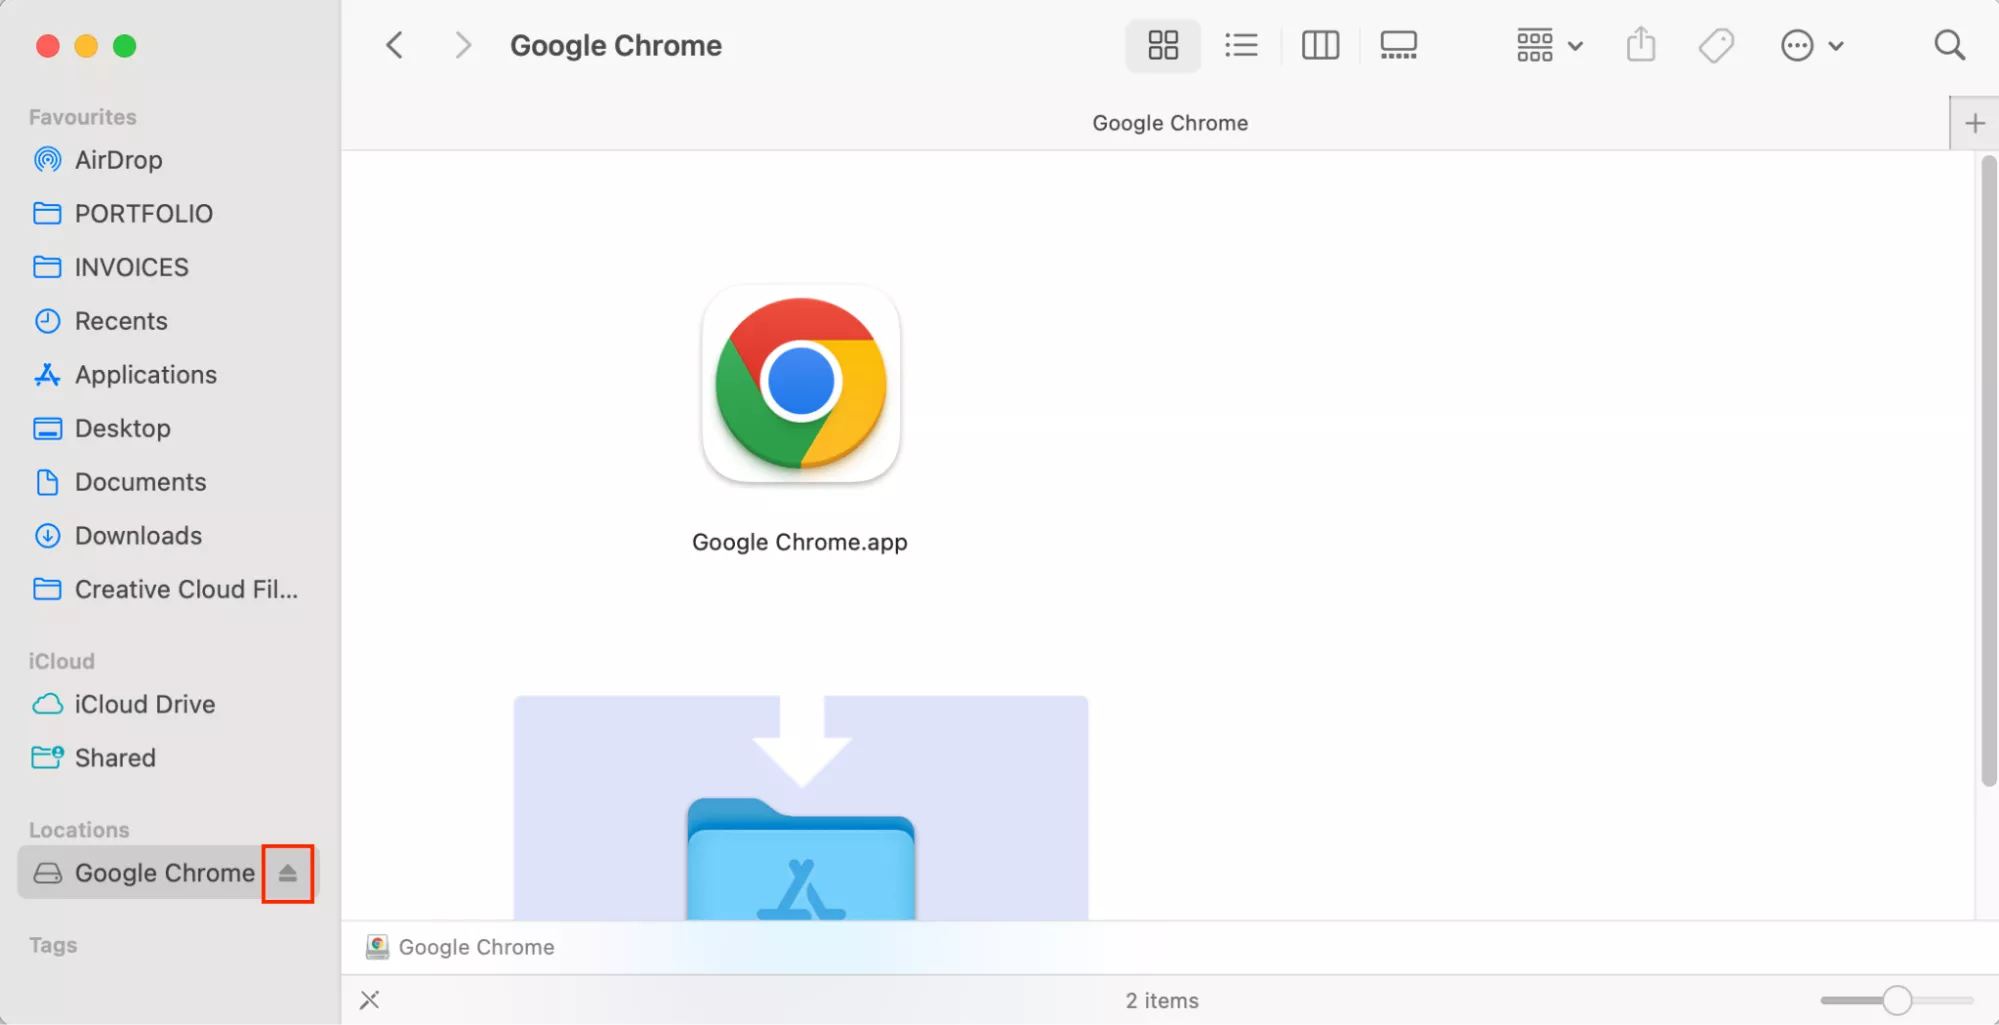
- Eject the Disk Image: Before launching, it’s good practice to eject the disk image. You can do this by dragging the “Google Chrome” disk image icon from your desktop to the Trash (the Trash icon will change to an Eject icon), or by right-clicking (or Control-clicking) the disk image icon on your desktop or in the Finder sidebar and selecting “Eject ‘Google Chrome’.”
- Open Chrome: Navigate to your “Applications” folder (you can find it in the Finder sidebar or by pressing
Shift + Command + A). - Double-click the “Google Chrome” icon.
- Security Warning: The first time you open Chrome, macOS might display a security warning stating that “Google Chrome is an application downloaded from the Internet. Are you sure you want to open it?” Click “Open” to confirm. This is a standard security measure for applications downloaded outside of the App Store.
- Initial Configuration: Chrome will then launch. You’ll likely be greeted with a welcome screen prompting you to sign in with your Google Account, set Chrome as your default browser, and import bookmarks from your existing browser. Signing in is highly recommended to enable synchronization and personalize your experience.
Post-Installation: Optimizing Your Chrome Experience
Installing Chrome is just the beginning. To truly harness its power and integrate it into your digital workflow, some post-installation steps and optimizations are highly recommended. These steps can significantly enhance your productivity, protect your privacy, and fine-tune your browsing experience to match your unique needs and brand identity.
Setting Chrome as Your Default Browser
For many users, Chrome becomes their primary browser due to its features and performance. Making it your default ensures that all web links clicked from emails, documents, or other applications automatically open in Chrome.
- When you first launch Chrome, you’ll usually see a banner at the top asking if you want to “Set Chrome as default.” Click this button.
- Alternatively, go to Chrome’s settings (click the three vertical dots in the top-right corner, then “Settings”).
- In the “Default browser” section, click “Make default.” This will open your macOS System Settings or System Preferences.
- Navigate to “Desktop & Dock” (or “General” in older macOS versions), find the “Default web browser” dropdown menu, and select “Google Chrome.”
Signing In and Enabling Synchronization
Signing in with your Google Account is one of the most beneficial steps you can take. It allows Chrome to synchronize your bookmarks, browsing history, passwords, extensions, and settings across all your devices where you’re signed into Chrome. This ensures a consistent and personalized browsing environment, whether you’re on your MacBook, smartphone, or another computer.
- Click the profile icon in the top-right corner of Chrome (it might be a silhouette or your Google profile picture).
- Click “Turn on sync…” and follow the prompts to sign in with your Google account credentials.
- You can customize what gets synced in Chrome’s settings under “You and Google” > “Sync and Google services.”
Customizing with Essential Extensions and Privacy Settings
The Chrome Web Store is your playground for personalization and productivity.
- Essential Extensions: Consider installing a reputable ad blocker (e.g., uBlock Origin), a password manager (e.g., LastPass, Bitwarden), a grammar checker (e.g., Grammarly), and any specific tools relevant to your work (e.g., SEO tools, design tools, financial trackers). Be selective, as too many extensions can impact performance. Only install extensions from trusted developers.
- Privacy Settings: Navigate to Chrome’s settings > “Privacy and security.” Here you can:
- Manage cookies and site data.
- Control “Safe Browsing” protection levels.
- Review and manage site permissions (camera, microphone, location).
- Enable “Do Not Track” requests (though websites are not obligated to honor them).
- Regularly clear your browsing data (history, cookies, cache) to maintain privacy and free up disk space.
Performance Tips and Regular Updates
To keep Chrome running smoothly and securely:
- Manage Tabs: Chrome can be resource-intensive, especially with many tabs open. Use tab groups, tab suspension extensions, or simply close unnecessary tabs.
- Update Regularly: Chrome automatically checks for and installs updates. Ensure this feature is active. Regular updates not only bring new features but also crucial security patches. You can manually check for updates by going to Chrome settings > “About Chrome.”
- Clear Cache: Periodically clear your browser cache and cookies (Settings > “Privacy and security” > “Clear browsing data”) to resolve performance issues and ensure you’re viewing the latest version of websites.
Troubleshooting Common Issues and Advanced Management
Even with a smooth installation, you might occasionally encounter issues or wish to manage Chrome more deeply. Understanding how to troubleshoot and perform advanced management tasks can save you time and frustration.
Common Installation Errors and Solutions
- “Google Chrome.dmg is damaged and can’t be opened”: This usually indicates a corrupted download. Delete the
.dmgfile and download it again from the official Google Chrome website. Ensure your internet connection is stable during the download. - “Can’t move Google Chrome to Applications because a file with that name already exists”: This means Chrome is already in your Applications folder, possibly from a previous attempt or an old installation. Go to your Applications folder, drag any existing “Google Chrome” application to the Trash, and then empty the Trash before trying to copy the new installer.
- Chrome won’t open after installation: Ensure you ejected the disk image properly. Try restarting your MacBook. If the issue persists, try reinstalling Chrome after fully deleting the existing application from your Applications folder.
Chrome Not Opening, Crashing, or Freezing
If Chrome launches but then misbehaves, these steps can help:
- Restart Chrome: Close all Chrome windows and then reopen the application.
- Restart MacBook: A full system restart can often resolve underlying software conflicts or memory issues.
- Disable Extensions: Extensions are a common source of problems. Open Chrome in Incognito Mode (which usually disables extensions by default) to see if the problem persists. If not, systematically disable your extensions one by one (go to
chrome://extensionsin your browser) to identify the culprit. - Clear Browser Data: Corrupted cache or cookies can cause issues. Clear your browsing data for “all time.”
- Reset Chrome Settings: If all else fails, you can reset Chrome to its original defaults (Settings > “Reset settings” > “Restore settings to their original defaults”). This will disable extensions, clear temporary data, and reset your homepage but keep your bookmarks, history, and saved passwords.
- Check for Malware: Malicious software can interfere with browser functionality. Run a reputable antivirus or anti-malware scan on your MacBook.
Uninstalling Google Chrome from MacBook
If you decide Chrome isn’t for you, or if you need a fresh start, uninstalling it is simple:
- Close all Chrome windows and quit the application completely (ensure it’s not running in the background via Activity Monitor or by right-clicking its icon in the Dock and selecting “Quit”).
- Open Finder.
- Navigate to your “Applications” folder.
- Drag the “Google Chrome” application icon to the Trash.
- Right-click (or Control-click) the Trash icon and select “Empty Trash” to permanently delete the application.
For a more thorough uninstallation, which removes associated application data, preferences, and cache files, you would need to manually delete specific folders located in ~/Library/Application Support/Google/Chrome/ and ~/Library/Preferences/com.google.Chrome.plist. However, for most users, simply dragging the app to the Trash is sufficient.
Conclusion
Installing Google Chrome on your MacBook is a straightforward process that opens up a world of possibilities for enhanced productivity, seamless integration with the Google ecosystem, and extensive customization. By following this comprehensive guide, you’ve not only learned the practical steps for installation but also gained insights into why Chrome is a preferred choice for many – from its speed and security features to its unparalleled array of extensions that cater to every digital need.
Whether you’re harnessing its power for professional endeavors, managing personal finances with specialized tools, or simply enjoying a faster, more personalized browsing experience, Chrome stands as a robust platform that complements the sophisticated hardware of your MacBook. Embrace the digital agility and expanded capabilities that Chrome brings, ensuring your MacBook remains a powerful hub for all your technology, branding, and financial pursuits in the ever-evolving online world.
aViewFromTheCave is a participant in the Amazon Services LLC Associates Program, an affiliate advertising program designed to provide a means for sites to earn advertising fees by advertising and linking to Amazon.com. Amazon, the Amazon logo, AmazonSupply, and the AmazonSupply logo are trademarks of Amazon.com, Inc. or its affiliates. As an Amazon Associate we earn affiliate commissions from qualifying purchases.