
In an increasingly interconnected world, the role of cameras, particularly security cameras, has evolved from a niche surveillance tool to an indispensable component of modern safety and smart home ecosystems. Whether for enhancing personal security, monitoring property, or simply keeping an eye on pets and loved ones, properly installing a camera system is crucial for its effectiveness. This comprehensive guide delves into the nuances of camera installation, focusing on practical steps, essential considerations, and best practices to ensure your system operates optimally and provides the peace of mind you seek. From understanding the diverse range of available technologies to navigating the intricacies of network configuration, we will equip you with the knowledge to undertake this project with confidence.
1. Understanding Your Camera System Needs
Before even unboxing a camera, the most critical step is to clearly define your needs and understand the landscape of available camera technologies. A well-chosen system is the foundation of effective surveillance and ease of use.
Types of Security Cameras
The market offers a diverse array of cameras, each suited for different applications and environments:
-
Wired Cameras (Analog/HD-TVI/CVI/AHD): These traditional systems often rely on coaxial cables for video transmission and separate power cables. While installation can be more labor-intensive due to extensive cabling, they are known for their reliability, minimal interference, and often lower upfront cost. They typically connect to a Digital Video Recorder (DVR) for recording.
-
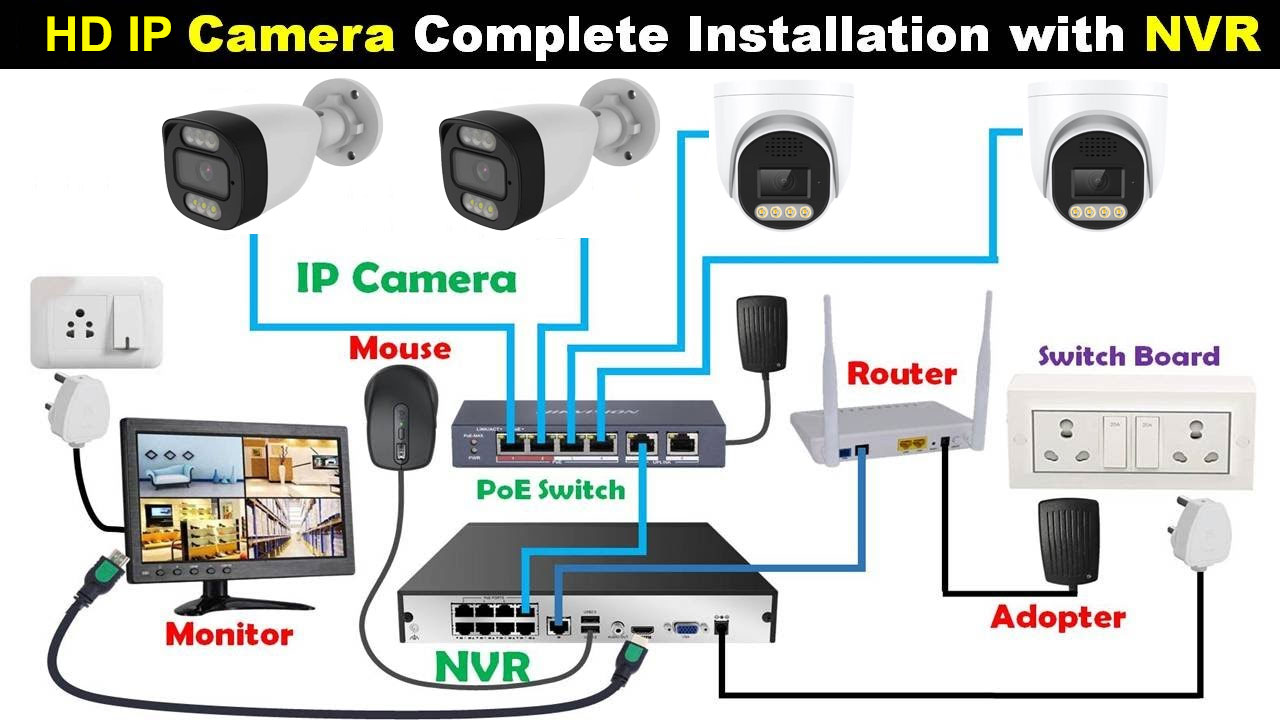
IP Cameras (Network Cameras): These modern marvels transmit video data over a network (Ethernet or Wi-Fi). They offer higher resolutions, advanced features like Power over Ethernet (PoE), and greater flexibility in placement. IP cameras connect to a Network Video Recorder (NVR) or can record directly to cloud storage or an SD card.
-
Wireless Cameras: Utilizing Wi-Fi for data transmission, these cameras offer unparalleled flexibility in placement as they eliminate the need for video cables. However, they still require a power source, either via an adapter or battery. Signal strength and network stability are critical for their performance.
-
Battery-Powered Cameras: A subset of wireless cameras, these are entirely wire-free, offering maximum placement versatility. They are ideal for temporary monitoring or locations where running power is impossible. Battery life and delayed recording (to conserve power) are key considerations.
-
PTZ (Pan-Tilt-Zoom) Cameras: These cameras offer remote control over their field of view, allowing users to pan horizontally, tilt vertically, and zoom in/out. They are excellent for covering large areas with a single camera but can be more complex to integrate.
-
Doorbell Cameras: Integrated into a doorbell unit, these provide a view of your front door, allowing two-way audio communication and motion detection, often with smart home integration.
Key Features to Consider
Beyond the basic type, several features significantly impact a camera’s suitability for your needs:
-
Resolution: Measured in megapixels (MP) or lines (e.g., 1080p, 4K), higher resolution translates to sharper images and more detail, crucial for identification.
-
Night Vision: Infrared (IR) LEDs enable cameras to “see” in low light or complete darkness. The effective range of night vision varies significantly between models.
-
Motion Detection: A standard feature, it triggers recording or sends alerts when movement is detected. Advanced systems offer customizable detection zones and AI-powered person/vehicle detection to reduce false alarms.
-
Storage Options: Cameras can store footage locally (SD card, DVR/NVR hard drive) or in the cloud. Cloud storage offers remote access and redundancy but often involves subscription fees.
-
Field of View (FoV): This refers to the angle a camera can capture. Wider FoV (lower focal length) covers more area but can distort images; narrower FoV (higher focal length) offers more detail in a smaller area.
-
Weather Resistance: For outdoor cameras, an IP rating (e.g., IP66) indicates its resistance to dust and water.
Planning Your Coverage
A well-thought-out plan minimizes blind spots and maximizes efficiency. Walk around your property, identifying:
-
Vulnerable Areas: Entrances, windows, secluded spots, garages, and backyards are common targets.
-
Optimal Mounting Locations: Consider areas that offer a clear, unobstructed view without being easily accessible to tampering. Aim for a height that captures faces clearly but is out of easy reach.
-
Power Sources: Determine how each camera will receive power. For wired cameras, this means routing cables to outlets; for PoE, ensuring your NVR or switch supports it; for battery-powered, planning for battery swaps/recharging.
-
Network Signal Strength: For wireless cameras, test Wi-Fi signal strength at proposed mounting locations. Repeaters or mesh networks might be necessary.
2. Essential Tools and Preparations
Successful installation hinges on having the right tools and completing necessary pre-installation checks. This proactive approach saves time and prevents frustration during the actual setup.
Required Equipment
Gathering your tools beforehand makes the process smoother:
-
Drill and Drill Bits: For mounting brackets and routing cables.
-
Ladder: For reaching high mounting points.
-
Screwdrivers and Wrenches: For securing mounts and adjusting camera angles.
-
Cable Ties, Clips, and Conduit: For neat and protected cable management.
-
Network Cables (Ethernet) and Connectors (if self-terminating): For IP and wired cameras.
-
Power Adapters/Extension Cords: If direct outlets aren’t available.
-
Wire Strippers and Crimping Tools: For wired systems requiring custom cable lengths.
-
Voltage Tester/Multimeter: For checking power availability.
-
Stud Finder: To locate wall studs for secure mounting.
-
Pencil/Marker and Measuring Tape: For precise placement.
-
Safety Gear: Gloves, safety glasses.
Pre-installation Testing
This step is critical to confirm camera functionality and network connectivity before permanent installation.
-
Camera Functionality: Connect each camera to power and, if applicable, your NVR/DVR or network in a temporary, easily accessible location. Verify that it powers on, streams video, and all basic features (like night vision, motion detection) are working.
-
Signal Strength (for Wireless Cameras): Test Wi-Fi signal strength at your intended mounting locations using a smartphone app or the camera’s setup utility. A weak signal will lead to dropped connections and poor performance.
-
Power Supply: Ensure the chosen power outlets are functional and provide the correct voltage/amperage for your cameras. For PoE systems, verify your switch or NVR is providing adequate power.
Understanding Local Regulations
While not strictly a “tool,” knowledge of local laws is paramount. Privacy regulations vary by region and can dictate where cameras can be pointed (e.g., avoiding neighbors’ private property), retention policies for recorded footage, and whether you need to display signage indicating surveillance. Consult local ordinances or legal advice if unsure.
3. The Installation Process: Step-by-Step
With your planning complete and tools ready, it’s time for the hands-on installation. Precision and attention to detail here ensure long-term reliability.
Mounting Cameras Securely
-
Optimal Height and Angle: Mount outdoor cameras typically 8-10 feet high to deter tampering while still capturing clear facial features. Angle them to cover the desired area without pointing into direct sunlight, which can cause glare.
-
Surface Preparation: For walls, use a stud finder to locate a stud for the most secure mounting. If mounting on drywall, use appropriate wall anchors.
-
Weatherproofing: For outdoor cameras, ensure all cable connections are sealed from moisture. Use weatherproof junction boxes or silicone sealant around cable entry points into the wall.
Wiring and Powering Your Cameras

This step varies significantly based on your camera type:
-
Wired Analog/HD Cameras: Route coaxial cables from the camera to the DVR. Ensure cables are neatly run along walls, through conduits, or inside walls/attics to protect them from damage and weather. Connect power adapters near the camera or use combined video/power cables.
-
PoE IP Cameras: Run a single Ethernet cable from each camera directly to a PoE-enabled NVR or a PoE switch. This cable carries both data and power, simplifying wiring.
-
Wireless Cameras (with power adapter): Route the power cable from the camera to the nearest electrical outlet. Use outdoor-rated extension cords and protective covers if the outlet is exposed.
-
Battery-Powered Cameras: Simply attach them to their mounts, ensuring they are charged or have fresh batteries.
Network Configuration for IP Cameras
This is where the “Tech” aspect truly shines.
-
Connecting to NVR/DVR: For most NVRs, connecting IP cameras via Ethernet allows for automatic detection (Plug-and-Play). If not, you may need to manually add cameras by their IP address.
-
Wi-Fi Setup: For wireless IP cameras, connect them to your home Wi-Fi network using the manufacturer’s app. Follow the on-screen prompts, which often involve scanning a QR code or entering network credentials.
-
App Integration: Download the camera manufacturer’s app on your smartphone or tablet. This app is crucial for live viewing, receiving alerts, configuring settings, and remote access. Ensure the app is connected to your camera system and accessible from outside your home network.
Testing and Fine-Tuning
After mounting and initial configuration:
-
Adjusting Angles: Access the live view on your monitor or app and fine-tune each camera’s angle to eliminate blind spots and optimize coverage.
-
Verifying Recordings: Trigger motion detection or manually record to confirm footage is being captured and stored correctly.
-
Motion Sensitivity: Adjust motion detection sensitivity and define detection zones to minimize false alarms from pets, trees, or passing traffic, focusing on areas of true interest.
-
Audio Check (if applicable): Test two-way audio functionality.
4. Post-Installation Best Practices and Maintenance
Installation is not a “set it and forget it” task. Ongoing practices ensure your system remains effective and secure.
Securing Your System
Security cameras, by their nature, deal with sensitive data. Protecting your system is paramount.
-
Strong Passwords: Immediately change default usernames and passwords for all cameras, NVRs/DVRs, and associated apps. Use strong, unique passwords with a mix of uppercase, lowercase, numbers, and symbols.
-
Firmware Updates: Regularly check for and install firmware updates from the manufacturer. These often include security patches and performance enhancements.
-
Network Security: Ensure your home Wi-Fi network is secured with WPA3 or WPA2 encryption. Consider isolating your camera system on a separate VLAN or guest network if your router supports it, to prevent potential compromises from affecting your main network.
-
Two-Factor Authentication (2FA): Enable 2FA for any cloud accounts or apps linked to your camera system for an extra layer of protection.
Data Storage and Management
-
Local vs. Cloud Storage: Understand the pros and cons of each. Local storage (NVR/DVR, SD card) offers privacy and no recurring fees but is vulnerable to physical theft/damage. Cloud storage offers remote access, redundancy, and off-site backup, but typically involves a subscription and relies on internet connectivity.
-
Backup Strategies: If using local storage, consider a backup strategy for critical footage. Some NVRs/DVRs allow for external hard drive backups or scheduled transfers to network-attached storage (NAS).
-
Retention Policies: Be mindful of how long you store footage. Many systems allow you to configure automatic deletion of old recordings to manage storage space and comply with privacy regulations.
Regular Maintenance
-
Cleaning Lenses: Dust, dirt, spiderwebs, and rain spots can obscure camera lenses. Regularly clean them with a soft, microfiber cloth.
-
Checking Connections: Periodically inspect all wired connections for corrosion, damage, or looseness.
-
Software Updates: Besides firmware, keep your camera apps and NVR/DVR software updated.
-
Power Supply Checks: For battery-powered cameras, monitor battery life and recharge/replace batteries as needed. For wired systems, ensure power adapters are functioning correctly.
-
Field of View Inspection: Confirm cameras haven’t been bumped out of alignment, which can create blind spots.
5. Troubleshooting Common Installation Issues
Even with careful planning, issues can arise. Knowing how to diagnose and resolve common problems is key to maintaining a reliable system.
No Power or Signal
-
Check Power: Verify that the camera is receiving power. For wired cameras, check outlets and power adapters. For PoE, ensure your NVR/switch is providing power. For battery cameras, check battery level.
-
Check Cables: Inspect all cables for damage or loose connections. Try swapping cables if you suspect a faulty one.
-
Reboot Devices: Power cycle the camera, NVR/DVR, and your network router/modem. This often resolves minor glitches.
-
Test Signal (Wireless): If a wireless camera shows no signal, move it closer to the router or consider a Wi-Fi extender.
Poor Image Quality
-
Lens Cleanliness: The most common cause; clean the camera lens thoroughly.
-
Resolution Settings: Check the camera’s resolution settings in the app or NVR interface. Ensure it’s set to the highest possible resolution.
-
Lighting Conditions: Ensure adequate lighting. For night vision, ensure the IR illuminators are not obstructed and are functioning. Avoid direct light sources shining into the lens at night, as this can cause glare.
-
Network Bandwidth: For IP cameras, insufficient network bandwidth can lead to choppy or low-quality streams. Reduce the camera’s bitrate if your network is congested.
Network Connectivity Problems
-
IP Address Conflicts: Ensure each IP camera has a unique IP address. Your router’s DHCP server usually handles this, but manual IP settings can cause conflicts.
-
Firewall Settings: Your router’s firewall might be blocking camera traffic. Check your router settings to ensure necessary ports are open or that cameras are allowed access.
-
Wi-Fi Interference: Other wireless devices or neighboring Wi-Fi networks can interfere with your camera’s signal. Change your router’s Wi-Fi channel.
-
Firmware Outdated: Outdated firmware can cause connectivity issues. Update to the latest version.

Motion Detection False Alarms
-
Sensitivity Settings: Reduce the motion detection sensitivity in the camera’s settings.
-
Detection Zones: Utilize detection zones to exclude areas with constant, irrelevant motion (e.g., busy streets, swaying trees). Focus on entrances and specific points of interest.
-
AI Analytics: If your camera supports it, enable AI-powered person/vehicle detection to filter out motion from animals, weather, or shadows.
-
Camera Placement: Avoid pointing the camera at objects that constantly move (flags, tree branches in the wind) or areas with frequent changes in light/shadow.
Installing cameras is a valuable investment in security and peace of mind. By methodically planning, using the right tools, executing the installation carefully, and committing to ongoing maintenance and security, you can establish a robust and reliable surveillance system that serves its purpose effectively for years to come. Whether you opt for a DIY approach or enlist professional help, understanding these core principles will empower you to make informed decisions and ensure your cameras are always watching over what matters most.
aViewFromTheCave is a participant in the Amazon Services LLC Associates Program, an affiliate advertising program designed to provide a means for sites to earn advertising fees by advertising and linking to Amazon.com. Amazon, the Amazon logo, AmazonSupply, and the AmazonSupply logo are trademarks of Amazon.com, Inc. or its affiliates. As an Amazon Associate we earn affiliate commissions from qualifying purchases.