
In an age where our smartphones have become extensions of ourselves – our communication hubs, entertainment centers, productivity tools, and even our digital wallets – storage capacity is paramount. Apps are growing in size, high-resolution photos and videos fill up galleries, and cached data from our daily browsing accumulates relentlessly. For many Android users, especially those with budget-friendly devices, the dreaded “Storage Full” notification is an all too familiar antagonist. This is where the humble SD card often steps in as a potential savior, offering an affordable and expandable solution to the internal storage crunch.
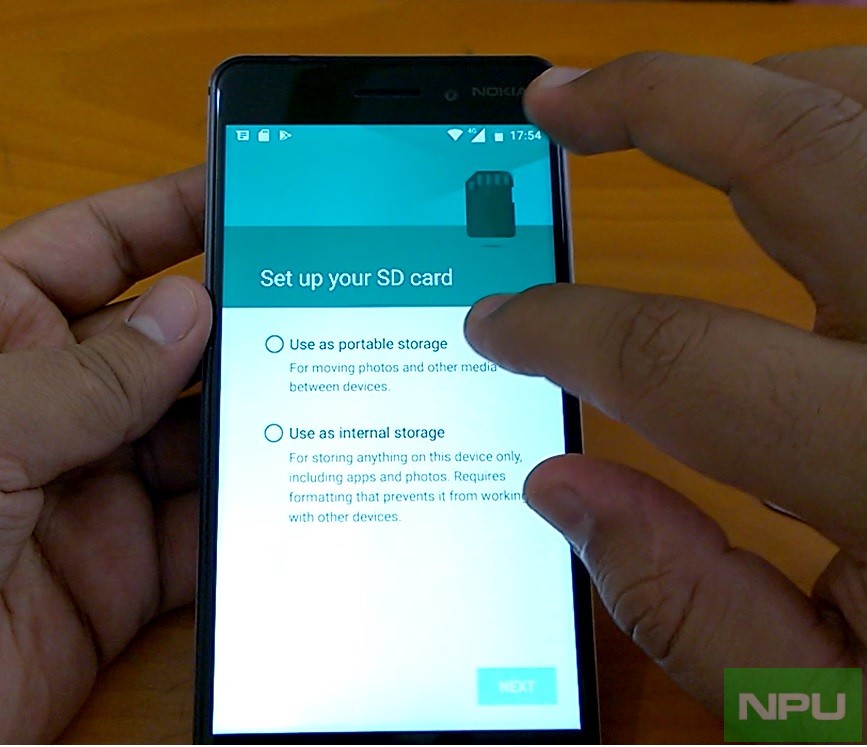
However, the process of installing apps directly onto an SD card, or migrating existing ones, is not always straightforward. It has evolved significantly with different Android versions and device manufacturers, and it comes with its own set of caveats and considerations. This guide aims to demystify the process, providing a comprehensive walkthrough for users looking to leverage their SD card to enhance their phone’s capacity and, by extension, its longevity and usability. We’ll explore the underlying reasons why you might want to consider this, the essential prerequisites, step-by-step methods, and crucial best practices to ensure a smooth and effective experience.
Understanding the Need for SD Card App Storage
The desire to install apps on an SD card stems from a fundamental conflict: the ever-increasing demands of modern mobile software against the often finite and sometimes insufficient internal storage of many smartphones. Addressing this need can significantly improve your device’s functionality and your overall digital experience.
The Ever-Growing Storage Dilemma
Modern applications are becoming increasingly sophisticated, feature-rich, and, consequently, larger in file size. From graphically intensive games to comprehensive productivity suites and social media apps that store vast amounts of data, the gigabytes add up quickly. Consider also the sheer volume of personal media – high-definition photos, 4K videos, and downloaded music or podcasts – that we accumulate daily. Budget and mid-range smartphones often come equipped with internal storage capacities of 32GB, 64GB, or 128GB. While these numbers might seem adequate on paper, a significant portion is often consumed by the operating system itself and pre-installed bloatware, leaving users with far less usable space than advertised. This scenario inevitably leads to performance degradation, hindered updates, and the frustrating necessity of constantly deleting beloved apps or cherished memories.
Benefits Beyond Just Space
While the primary driver for using an SD card for apps is undeniably to free up internal storage, there are other potential, albeit sometimes subtle, benefits. By offloading less critical applications, or parts of them, to an external card, you can ensure that your device’s faster internal storage remains dedicated to the operating system, critical system files, and high-performance applications that demand quick read/write speeds. This strategic allocation can potentially contribute to a snappier overall user experience, faster boot times, and smoother multitasking. Furthermore, for users who frequently switch devices or need to factory reset their phones, having certain app data or even entire apps stored on a removable SD card can simplify the backup and restoration process, making device transitions less cumbersome. For those keen on productivity, a well-managed storage system means less time spent wrestling with storage alerts and more time focused on tasks, enhancing the longevity of your device before an upgrade is financially necessary.
When is it Not Recommended? Navigating the Downsides
Despite the clear advantages, installing apps on an SD card is not a universal panacea and comes with its own set of potential drawbacks that users must be aware of. The most significant concern often revolves around performance. SD cards, by their very nature, are generally slower than a phone’s internal flash storage. Running apps from a slow SD card can lead to noticeable delays in app loading times, sluggish performance, and even crashes, especially for demanding applications like games or video editors.
Reliability and Durability are also factors. SD cards, particularly cheaper or unbranded ones, can be more prone to corruption or failure than internal storage. A failing SD card can result in lost app data or inaccessible applications, leading to significant frustration. Moreover, if the SD card is physically removed or becomes dislodged, apps stored on it will become unavailable.
App Compatibility is another limitation. Not all applications are designed to run from an SD card, even if the Android system allows it. Many developers hardcode their apps to expect certain internal storage paths, or they contain widgets, services, or background processes that simply do not function correctly when moved to external storage. Critical system apps, messaging apps, and apps that rely heavily on real-time data or widgets are often best left on internal storage. Understanding these limitations is crucial for making an informed decision about which apps, if any, are suitable for SD card installation.
Prerequisites and Important Considerations Before You Start
Before you embark on the journey of moving or installing apps onto an SD card, a few critical considerations and preparatory steps are essential. Ignoring these can lead to frustration, performance issues, or even data loss.
Choosing the Right SD Card: Speed, Capacity, and Reliability
The quality of your SD card is paramount when planning to store apps on it. This isn’t just about capacity; it’s about speed and reliability.
- Speed Classes: SD cards are rated with speed classes to indicate their minimum sequential write speed.
- Class 10: (C10) Minimum 10 MB/s. Good for basic photo/video, but possibly slow for apps.
- UHS Speed Class (U1, U3): U1 guarantees 10 MB/s, U3 guarantees 30 MB/s. U3 cards are significantly better for apps.
- Video Speed Class (V10, V30, V60, V90): Similar to UHS, with V30 guaranteeing 30 MB/s, ideal for video recording, also good for apps.
- Application Performance Class (A1, A2): These are specifically designed for running applications.
- A1: Guarantees a minimum random read IOPS of 1500 and random write IOPS of 500, with a sustained sequential performance of 10 MB/s. This is the minimum recommended for apps.
- A2: Guarantees significantly higher random read IOPS of 4000 and random write IOPS of 2000, with sustained sequential performance of 10 MB/s. A2 cards offer the best performance for app storage.
Investing in an A1 or, preferably, an A2-rated SD card from a reputable brand (like SanDisk, Samsung, Lexar, Kingston) is highly recommended. While they might cost a bit more, the superior performance will translate directly into a smoother app experience, reducing stuttering and load times. Using a slow card (e.g., a basic Class 4 or 6) for app storage will almost certainly lead to a frustratingly sluggish phone.
Device Compatibility and Android Versions
Not all Android devices offer the same flexibility when it comes to SD card app storage. Older or entry-level phones might have limited support, while different Android versions introduce new functionalities.
- Android Lollipop (5.0) and earlier: Generally allowed users to move some app data to SD, but not full apps.
- Android Marshmallow (6.0) and newer: Introduced “Adoptable Storage” (also known as “Flex Storage”). This revolutionary feature allows the SD card to be formatted and treated as an extension of the internal storage, meaning apps can genuinely be installed and run from it as if it were internal memory. However, not all device manufacturers enable Adoptable Storage, even on devices running Marshmallow or later. Some, like Samsung, have opted to disable it in favor of their own methods or due to concerns about performance degradation with slow cards. It’s crucial to check your specific device’s capabilities and its Android version. A quick search online for “[your phone model] SD card app install” should clarify this.
Backup Your Data (Always!)
Before undertaking any significant changes to your phone’s storage configuration, especially if you plan to format your SD card as internal storage, backing up your data is non-negotiable. The formatting process will erase all data on the SD card, and unforeseen issues during the migration or setup could potentially affect internal storage as well. Use cloud services (Google Drive, Dropbox), PC backup tools, or even another physical storage device to ensure all your photos, videos, documents, and essential app data are safe. This proactive step can save you immense grief if anything goes awry.
Methods to Install Apps on SD Card (Android)
Android offers a few distinct ways to manage apps with an SD card, depending on your device’s capabilities and your Android version. Understanding these methods is key to choosing the right approach for your needs.
Method 1: Moving Individual Apps to SD Card (Standard Feature)
This is the most common and widely supported method, available on most Android devices, even those without Adoptable Storage. However, it comes with limitations. When you “move” an app, you’re typically moving only a portion of its data (e.g., cached files, user data) to the SD card, not the entire app’s executable files. The core components usually remain on internal storage. Furthermore, not all apps can be moved; developers must enable this functionality.
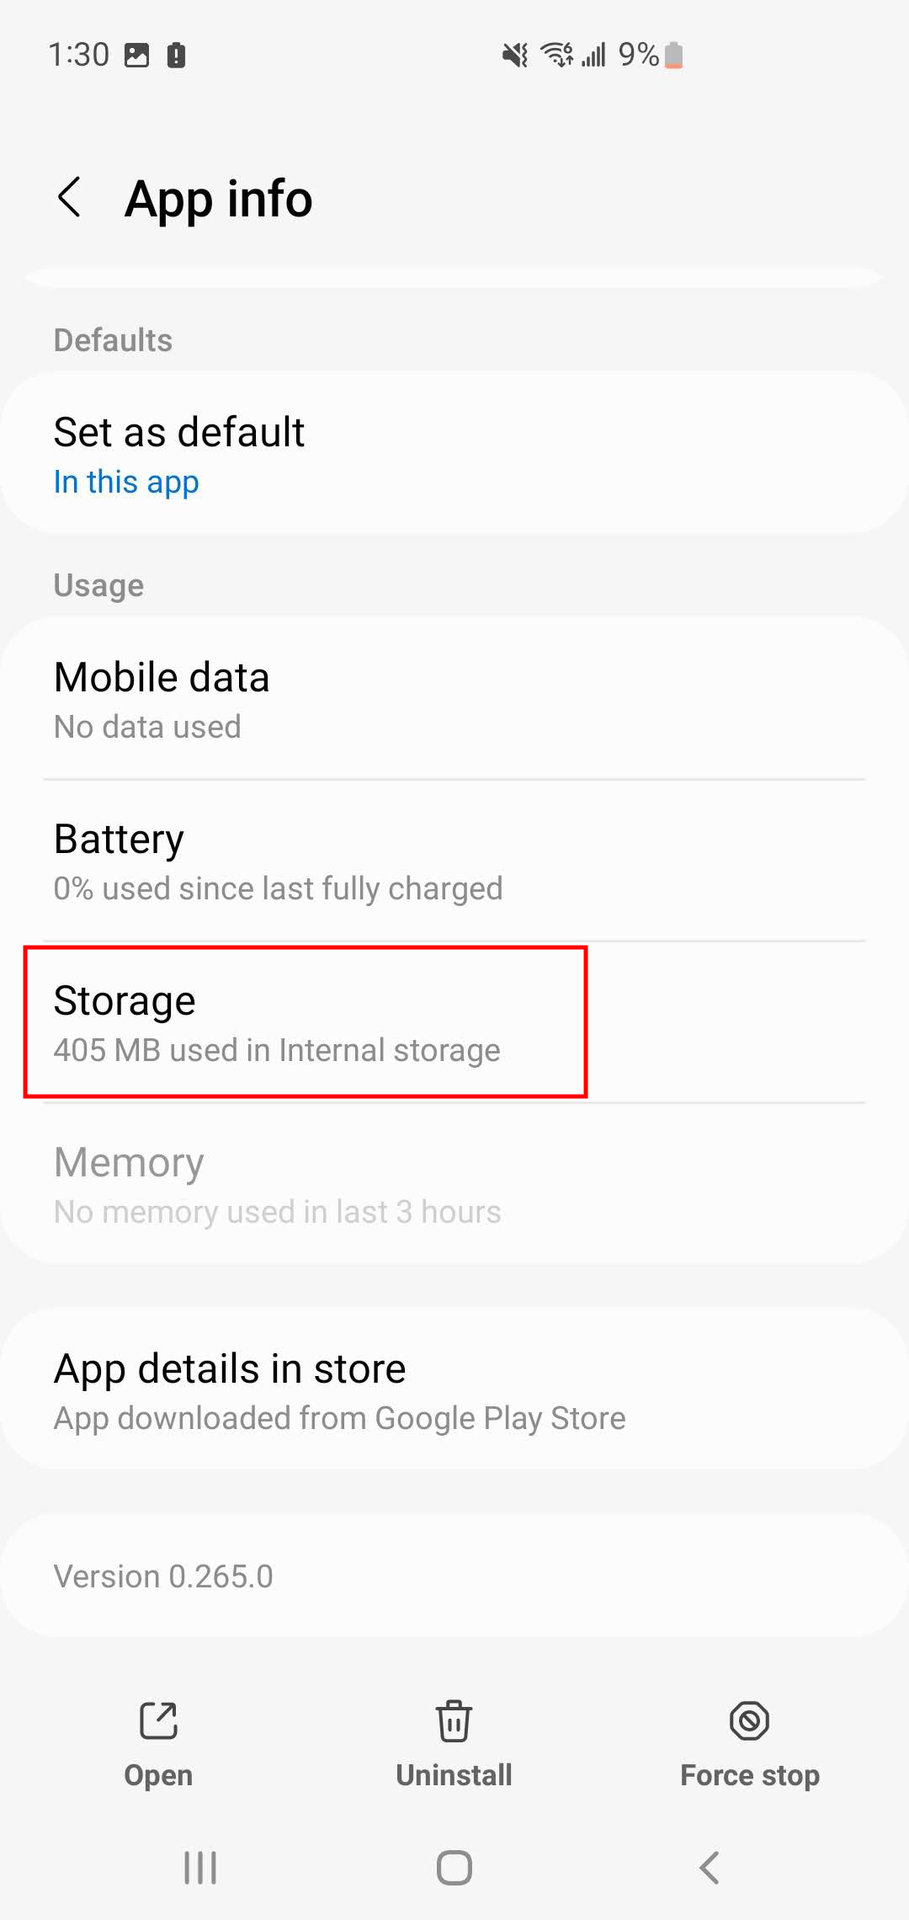
Step-by-Step Guide:
- Insert SD Card: Ensure your SD card is properly inserted and recognized by your phone.
- Navigate to Settings: Open your phone’s “Settings” app.
- Access Apps/Applications: Scroll down and tap on “Apps” or “Applications” (the exact name may vary).
- Select the App: Find and tap on the app you wish to move to the SD card.
- Go to Storage: Within the app’s info page, tap on “Storage” or “Storage & cache.”
- Change Storage Location: Look for an option like “Change” or “Move” next to “Storage used.” If this option is grayed out or not present, the app cannot be moved to the SD card.
- Select SD Card: If available, tap “Change” and then select “SD card” from the options.
- Confirm Movement: Confirm the action. The phone will then move the eligible parts of the app to the SD card. This process can take a few moments.
Limitations:
- Only a portion of the app moves; the main app file (APK) often stays on internal storage.
- Widgets associated with moved apps might stop working.
- Some apps might not function correctly or experience performance issues.
- Many pre-installed apps or critical system components cannot be moved.
Method 2: Adopting SD Card as Internal Storage (Android Marshmallow and Newer – “Adoptable Storage”)
Introduced with Android 6.0 Marshmallow, “Adoptable Storage” is a more robust solution that truly integrates the SD card into your device’s internal storage system. When an SD card is adopted, it is formatted and encrypted, becoming an extension of the internal storage. This means the Android system treats it as one logical storage pool, allowing apps to be fully installed and run from the SD card without explicit user intervention for each app.
Pros of Adoptable Storage:
- Apps can be fully installed on the SD card.
- The system manages storage seamlessly; you don’t need to manually move apps.
- Significantly increases usable storage for apps and data.
Cons of Adoptable Storage:
- Performance Dependency: If you use a slow SD card, your entire phone’s performance can be severely degraded, as the OS and apps will rely on its speed. An A1 or A2 class card is essential.
- Encryption and Device Locking: The SD card is formatted and encrypted to your specific device. If you remove it and try to use it in another device or a computer, it will be unreadable unless reformatted (losing all data).
- Data Loss Risk: If the SD card fails or is corrupted, all apps and data stored on it will be lost, and your device might become unstable.
- Not universally enabled: Many manufacturers, like Samsung, have disabled this feature in their devices due to the aforementioned performance and reliability concerns.
Step-by-Step Guide (if supported by your device):
- Insert High-Quality SD Card: Ensure you’re using a fast (A1/A2 recommended) and reliable SD card.
- Navigate to Storage Settings: Go to “Settings” > “Storage.”
- Select SD Card: Tap on your SD card listed under “Portable storage.”
- Format as Internal: Look for a menu option (often three vertical dots in the corner) and select “Storage settings” or “Format as internal/Adoptable Storage.”
- Confirm and Erase: You’ll be warned that all data on the SD card will be erased. Confirm to proceed. The card will then be formatted and encrypted.
- Migrate Data (Optional but Recommended): After formatting, the system might ask if you want to migrate existing data (apps, photos, etc.) from internal storage to the newly adopted SD card. It’s often a good idea to do this to immediately free up internal space.
- Reboot: A reboot might be required to finalize the process.
Once adopted, your phone will automatically prioritize installing new apps and storing data on the combined storage space, alleviating the “Storage Full” problem.
Method 3: Using Third-Party Tools (Rooting/Advanced Users)
For users with rooted Android devices, there are more powerful third-party tools like Link2SD or AppMgr III (formerly App 2 SD) that offer advanced control over app storage. These tools can create a second partition on the SD card (often ext2, ext3, or ext4 format), then create symbolic links between the app’s actual installation location on internal storage and this partition on the SD card. This effectively “fools” the system into thinking the app is still on internal storage while its files are actually on the SD card.
Key Features of Third-Party Tools:
- Move almost any app (even those not officially supported by Android’s built-in mover).
- Move app data, cache, and even libraries.
- Batch moving.
Risks and Considerations:
- Requires Root Access: Rooting voids your warranty, can make your device less secure, and carries the risk of bricking your phone if done incorrectly.
- Complexity: Setting up a second partition requires a good understanding of disk partitioning and file systems.
- Potential Instability: Even with these tools, some apps might still misbehave when heavily modified in their storage location.
- Data Integrity: Relying on symlinks and custom partitions adds layers of complexity that can introduce potential data corruption if not managed carefully.
Given the significant risks and technical expertise required, this method is generally not recommended for the average user. The focus of this guide remains on the more accessible and less risky built-in Android features.
Optimizing and Managing Your SD Card for Apps
Once you’ve configured your SD card for app storage, ongoing management and optimization are crucial to ensure continued performance and reliability.
Regular Maintenance and Monitoring
An SD card, especially when used as internal storage, requires regular attention:
- Check Card Health: Periodically check your SD card’s health using file managers or dedicated storage analysis apps. Look for errors or slowdowns. Some cards have a limited number of write cycles; frequent app updates and data changes can wear them out over time.
- Free Up Space: Even with an SD card, regular spring cleaning is vital. Apps still create cache files, downloads accumulate, and media files expand. Use your phone’s built-in storage analyzer (Settings > Storage) or third-party apps like Files by Google to identify and delete unnecessary files.
- Clean Cache: App caches can grow significantly. Regularly clearing app caches (Settings > Apps > [App Name] > Storage > Clear cache) can free up space and potentially improve app performance without deleting user data.
Best Practices for Performance
To get the most out of your SD card for app storage:
- Invest in Quality: As reiterated, a high-speed, reputable A1 or A2-rated SD card is non-negotiable for acceptable performance. Do not compromise on quality to save a few dollars; it will cost you in frustration. This aligns with a financial sensibility: investing wisely upfront prevents future costs (like needing to replace a failing card or suffering with a sluggish phone).
- Don’t Overload: While the SD card provides ample space, avoid filling it to its absolute maximum capacity. Keeping some free space (10-15%) can aid performance, as flash storage often performs better with room to maneuver.
- Avoid Constant Moving: If you’re using the “move individual apps” method, try to avoid constantly moving apps back and forth. Each move involves read/write operations that can contribute to wear and tear.
- Keep Critical Apps Internal: Always prioritize keeping performance-critical apps (e.g., your primary web browser, camera app, essential messaging apps, demanding games) on internal storage if possible. This ensures they run at optimal speed and reliability.
Troubleshooting Common Issues
Despite best efforts, you might encounter issues:
- Apps Disappearing/Not Launching:
- Adoptable Storage: The SD card might be corrupted, or physically dislodged. Try removing and reinserting the card. If the card is corrupted, you might need to reformat it (losing all data) or replace it.
- Moved Apps: The SD card might have been unmounted or removed. Reinsert and restart your phone. The app’s core components on internal storage might also be corrupted; try clearing cache/data or reinstalling the app.
- Slow Performance: Your SD card is likely too slow for the apps being run from it. Upgrade to an A1 or A2 class card. Alternatively, move critical apps back to internal storage.
- SD Card Not Recognized:
- Check if it’s properly seated.
- Test the card in another device to see if the card itself is faulty.
- If using Adoptable Storage, ensure it’s not simply “unmounted” from the system due to a minor glitch; a reboot often helps.
- You might need to reformat the card, which will erase all data.

Conclusion
The ability to install apps on an SD card remains a valuable feature for many Android users, particularly those grappling with limited internal storage on older or budget-conscious devices. By understanding the distinct methods – from simply moving portions of individual apps to fully adopting an SD card as internal storage – and being aware of the associated advantages and drawbacks, you can make an informed decision that best suits your needs and device capabilities.
While the “move to SD card” option offers a quick fix for some apps, it’s often more of a partial solution. Adoptable Storage, when supported and implemented with a high-quality, fast SD card, provides a more integrated and seamless expansion of your device’s capacity, genuinely allowing apps to run from external media. However, it mandates careful selection of your SD card to avoid significant performance penalties and carries a higher risk of data loss if the card fails.
As internal storage capacities continue to grow in newer smartphones, the reliance on SD cards for app storage might diminish for premium devices. Yet, for millions of users worldwide, the SD card remains a crucial tool for extending the life and usability of their Android phones. By following the guidelines in this comprehensive guide – prioritizing a fast SD card, understanding your device’s capabilities, backing up your data, and performing regular maintenance – you can effectively leverage this technology to manage your digital footprint, maintain device performance, and ensure a more productive and frustration-free smartphone experience.
aViewFromTheCave is a participant in the Amazon Services LLC Associates Program, an affiliate advertising program designed to provide a means for sites to earn advertising fees by advertising and linking to Amazon.com. Amazon, the Amazon logo, AmazonSupply, and the AmazonSupply logo are trademarks of Amazon.com, Inc. or its affiliates. As an Amazon Associate we earn affiliate commissions from qualifying purchases.