
In an era defined by technological advancement, efficiency, and smart living, Light Emitting Diodes (LEDs) have revolutionized how we illuminate our spaces. From intricate home setups to commercial lighting solutions, LEDs offer unparalleled benefits in terms of energy efficiency, longevity, and design versatility. Understanding how to properly install an LED, whether it’s a simple bulb replacement, a strip light under cabinet, or a more complex fixture, is a valuable skill that not only enhances your environment but also contributes to significant long-term savings and a more sustainable footprint. This comprehensive guide will walk you through the essential steps, considerations, and best practices for installing LEDs, ensuring a safe, efficient, and successful setup.

Why Choose LEDs? Understanding the Benefits and Types
Before diving into the mechanics of installation, it’s crucial to appreciate why LEDs have become the lighting standard. Their advantages extend far beyond mere illumination, touching upon aspects of technology, personal finance, and even brand perception for businesses.
The Allure of LED Technology: Efficiency, Longevity, and Versatility
LEDs represent a pinnacle in lighting technology. Unlike traditional incandescent bulbs that generate light by heating a filament, or fluorescent lights that rely on gas ionization, LEDs produce light through electroluminescence – a much cooler and more efficient process. This fundamental difference underpins their numerous benefits:
- Energy Efficiency: LEDs consume significantly less power than conventional lighting. A typical LED bulb uses 75-80% less energy than an incandescent bulb, translating directly into lower electricity bills. This efficiency isn’t just a “tech trend”; it’s a tangible financial advantage that savvy homeowners and businesses quickly recognize. For the “Money” aspect of our website, this is a direct correlation to personal finance and business finance savings.
- Extended Lifespan: While an incandescent bulb might last 1,000-2,000 hours, a quality LED can operate for 25,000 to 50,000 hours, or even more. This drastically reduces the frequency of replacements, saving both time and money on maintenance and new purchases. For businesses, this also reduces operational costs and enhances productivity by minimizing disruption.
- Durability: LEDs are solid-state lighting (SSL) devices, meaning they don’t have filaments or glass envelopes that can break. They are much more resistant to vibration, impact, and temperature fluctuations, making them ideal for a wide range of applications, including outdoor and industrial settings.
- Design Flexibility: LEDs are incredibly compact and can be integrated into various shapes and sizes. This allows for innovative lighting designs, from ultra-thin strip lights and flexible ropes to sophisticated fixtures and smart bulbs capable of millions of colors. This versatility plays into “Tech” (gadgets, smart home integration) and also “Brand” (design, aesthetics for corporate identity or personal spaces).
- Instant On and Full Brightness: Unlike some fluorescent lights, LEDs illuminate instantly at full brightness, with no warm-up period.
- Reduced Heat Emission: Because they are so efficient, LEDs emit very little heat in the form of infrared radiation, making them safer to touch and reducing the burden on air conditioning systems, further contributing to energy savings.
- Environmental Friendliness: LEDs contain no mercury or other hazardous substances, making them a more environmentally sound choice for disposal. Their long lifespan also means less waste in landfills, aligning with sustainable practices often championed by modern “Brand” strategies and “Tech” innovations.
Decoding LED Types: From Strip Lights to Smart Fixtures
The term “LED” encompasses a vast array of products, each designed for specific applications. Understanding the different types will help you choose the right product for your installation project.
- LED Bulbs (Retrofit Bulbs): These are designed to directly replace traditional incandescent or CFL bulbs in existing sockets (e.g., E27, E26, GU10, MR16). They come in various wattages, color temperatures (warm white to cool daylight), and beam angles.
- LED Strip Lights (Tape Lights): Flexible circuits with individual LEDs mounted at regular intervals, often backed with adhesive. They are popular for accent lighting, under-cabinet lighting, cove lighting, and backlighting, providing a continuous line of light. They typically operate on low voltage (12V or 24V DC) and require a power supply (driver).
- LED Panel Lights: Flat, often square or rectangular fixtures designed for ambient lighting in offices, schools, and commercial spaces. They offer uniform illumination and are usually recessed into grid ceilings.
- LED Downlights and Pot Lights: Integrated LED fixtures designed to be recessed into ceilings, offering focused or general illumination.
- Integrated LED Fixtures: Lighting fixtures where the LEDs are permanently built into the design, rather than being replaceable bulbs. These often offer unique aesthetics and optimized performance.
- Smart LEDs: A subset of LED bulbs and fixtures that can connect to Wi-Fi or Bluetooth, allowing control via smartphone apps, voice assistants (like Alexa or Google Assistant), and home automation systems. They often feature tunable white light and full-color spectrum capabilities. These are prime examples of “Tech” in action, offering advanced functionality and integration with other “AI Tools” and “Gadgets.”
- Outdoor and Specialty LEDs: Designed for specific outdoor conditions (weatherproof) or unique applications (e.g., grow lights, automotive LEDs).
For most DIY home installations, you’ll likely be dealing with retrofit bulbs, strip lights, or integrated fixtures. This guide will primarily focus on the more common and slightly more involved installation of LED strip lights and basic fixtures, as bulb replacement is typically self-explanatory.
Essential Preparation: Tools, Materials, and Safety First
A successful LED installation hinges on thorough preparation. This includes gathering the right tools and materials and, most importantly, adhering to strict safety protocols. Ignoring safety can lead to electrical hazards, injury, or damage to your property.
Gathering Your Arsenal: A Toolkit for LED Installation
Depending on the complexity of your project, your toolkit may vary, but these are the common items you’ll likely need:
- Measuring Tape: For accurately determining lengths of LED strips or placement of fixtures.
- Pencil/Marker: For marking installation points.
- Wire Strippers: Essential for preparing wires for connection.
- Screwdrivers (Phillips and Flathead): For mounting fixtures or accessing wiring terminals.
- Drill with Assorted Bits: For creating pilot holes or mounting hardware.
- Utility Knife or Scissors: For cutting LED strips (only at designated cut marks!) and opening packaging.
- Multimeter (Optional but Recommended): For testing voltage and continuity, invaluable for troubleshooting.
- Soldering Iron and Solder (for advanced users): If you need to make custom connections for LED strips or repair wires.
- Heat Shrink Tubing or Electrical Tape: For insulating connections.
- Wire Connectors (e.g., Wago, lever nuts, wire nuts): For securely joining wires.
- LED Power Supply/Driver (Transformer): Converts AC household voltage to the low voltage DC required by most LED strips and many fixtures. Ensure it matches the voltage (e.g., 12V, 24V) and total wattage requirements of your LEDs.
- LED Strips/Fixtures: The star of your installation!
- Mounting Hardware: Clips, screws, adhesive backing (often included with LED strips), or mounting channels/profiles.
- Extension Cords/Power Strips (for testing): For temporary power connections.
- Cable Ties or Clips: For neatly managing wires.
Prioritizing Safety: Electrical Precautions You Must Take
Working with electricity always carries risks. Emphasizing safety is not just good practice; it’s non-negotiable.
- Turn Off Power at the Breaker: This is the most critical step. Before touching any wires or electrical components, locate the circuit breaker that controls the power to the area you’ll be working in and switch it OFF. If unsure, turn off the main breaker to your entire home. Use a non-contact voltage tester to confirm that the power is indeed off at the light switch and at the fixture wires.
- Isolate the Circuit: Ensure no one can accidentally turn the power back on while you are working. Consider placing a “DO NOT OPERATE” tag on the breaker switch.
- Wear Protective Gear: Safety glasses can protect your eyes from debris, and electrical gloves (if appropriate for the task) can add an extra layer of protection.
- Read Instructions Carefully: Always consult the manufacturer’s installation manual for your specific LED product. It contains crucial details regarding voltage, wiring diagrams, and specific safety warnings.
- Work with Dry Hands and Tools: Never handle electrical components with wet hands or while standing in water. Ensure your tools are insulated and in good condition.
- Understand Polarity: LEDs are diodes, meaning current flows in one direction. Most DC LED strips and fixtures have positive (+) and negative (-) terminals. Connecting them incorrectly won’t usually damage them but they simply won’t light up. Double-check your connections.
- Match Voltage and Wattage: Ensure your LED power supply (driver) matches the voltage requirements of your LEDs (e.g., 12V LEDs require a 12V power supply). Also, ensure the power supply’s total wattage capacity exceeds the total wattage draw of your connected LEDs. Overloading a power supply can lead to overheating and fire hazards.
- Consult a Professional: If you’re uncomfortable with electrical work, dealing with high voltage, or modifying existing house wiring, always consult a licensed electrician. This falls under the “Digital Security” and “Productivity” umbrella of preventing issues and ensuring correct, compliant installation.
A Step-by-Step Guide to LED Installation
With safety measures in place and your tools ready, you can now proceed with the actual installation. This section outlines a general procedure, focusing on common LED strip light and basic fixture installations.
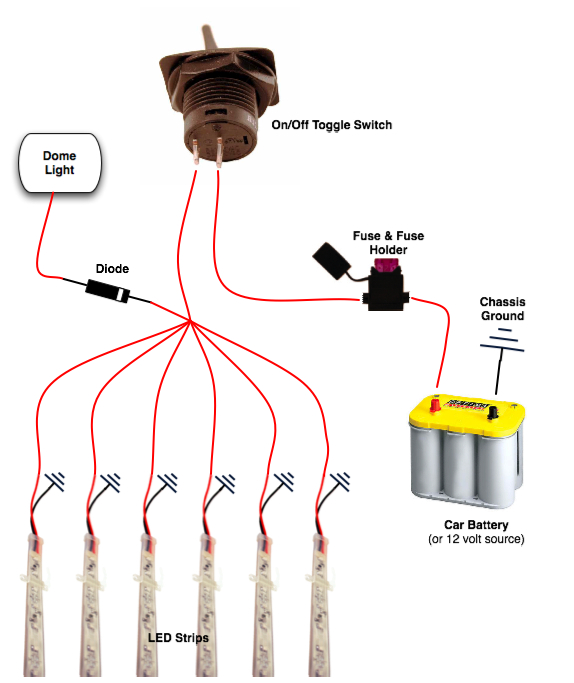
Planning Your Setup: Location, Power, and Wiring Diagram
Careful planning eliminates most potential headaches during installation.
- Determine Placement and Length:
- LED Strips: Measure the surface where you intend to install the strips (e.g., under cabinets, behind a TV, along coves). Remember that LED strips have designated cut points, typically every 1 to 4 inches. Plan your lengths to end at these cut points to ensure functionality.
- Fixtures: Mark the exact spot where the fixture will be mounted, considering aesthetics, light spread, and accessibility for wiring.
- Identify Power Source:
- Low Voltage LEDs (e.g., most strips): You’ll need an AC-to-DC power supply (driver) to convert your household 120V/240V AC to the required low voltage DC (e.g., 12V or 24V). Plan where this power supply will be located – it needs to be accessible but often hidden (e.g., inside a cabinet, behind a wall plate).
- High Voltage LEDs (e.g., many integrated fixtures, retrofit bulbs): These connect directly to your household AC wiring. Ensure the existing wiring can handle the load, though LEDs typically draw very little power.
- Sketch a Wiring Diagram:
- For anything more complex than a single strip, a simple diagram can prevent errors.
- For LED Strips: Show the power source (outlet or junction box) -> LED driver -> LED strip(s). If using multiple strips from one driver, consider parallel connections (all positives together, all negatives together) to ensure even brightness across all strips. If using connectors or solder, indicate those points.
- For Fixtures: Show the power source -> switch -> fixture. Note color codes for wires (typically black/brown for live, white/blue for neutral, green/yellow-green for ground).
The Installation Process: Connecting and Mounting Your LEDs
This is where your planning comes to fruition. Remember to double-check that the power is OFF before starting any wiring.
- Prepare the Surface:
- For Adhesive LED Strips: Clean the surface thoroughly with isopropyl alcohol to remove dust, grease, and grime. A clean, dry surface is crucial for the adhesive to stick properly.
- For Fixtures: If mounting to drywall or plaster, ensure you’re drilling into studs or using appropriate drywall anchors.
- Cut and Connect LED Strips (if applicable):
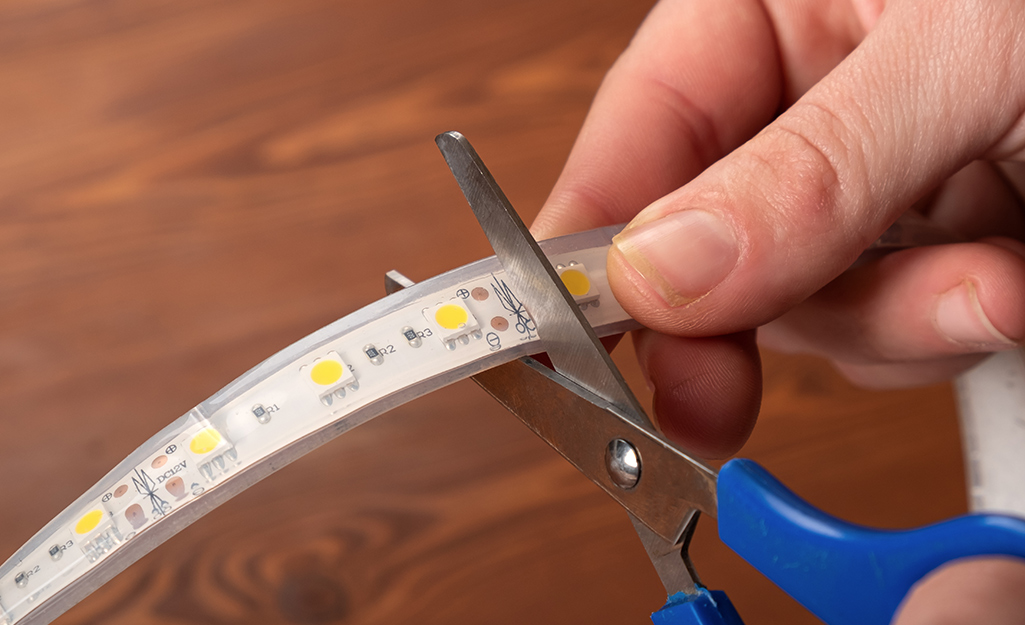
- Cutting: Use sharp scissors or a utility knife to cut LED strips ONLY at the marked cut points (usually indicated by a copper pad or scissor icon). Cutting elsewhere will break the circuit and render a section of the strip useless.
- Connecting:
- Solderless Connectors: For simple, tool-free connections, use clip-on connectors. Ensure the strip’s copper pads align perfectly with the connector’s pins, and snap the clip shut securely. These are great for connecting strip to strip, strip to wire, or creating corners.
- Soldering (Advanced): For more robust and reliable connections, especially in permanent or high-vibration applications, solder wires directly to the copper pads. Pay close attention to positive and negative polarity. Insulate soldered joints with heat shrink tubing or electrical tape.
- Wire the LED Power Supply/Driver (for low voltage LEDs):
- Most LED drivers have two sides: an AC input (high voltage) and a DC output (low voltage).
- AC Input: Connect the live (black/brown), neutral (white/blue), and ground (green/yellow-green) wires from your household power source to the corresponding terminals on the driver. Always consult the driver’s wiring diagram.
- DC Output: Connect the positive (+) and negative (-) wires from the driver’s low-voltage output to the positive (+) and negative (-) inputs of your LED strip or fixture.
- Enclose Connections: Ensure all AC wiring connections are safely enclosed within a junction box or the driver’s housing, complying with local electrical codes.
- Wire Integrated LED Fixtures:
- If installing an integrated LED fixture that connects directly to household wiring, follow standard fixture installation procedures.
- Connect the fixture’s live wire to the circuit’s live wire, neutral to neutral, and ground to ground. Use appropriate wire connectors.
- Ensure all connections are secure and tucked neatly into the electrical box before mounting the fixture.
- Mount the LEDs:
- LED Strips: Peel off the adhesive backing and carefully press the strip onto the clean, prepared surface. For longer runs or irregular surfaces, or if the adhesive isn’t strong enough, use mounting clips (screwed in) for added security. Consider using aluminum channels for a more professional finish, better heat dissipation, and diffusion of individual LED dots.
- Fixtures: Secure the fixture to the mounting bracket, which is typically attached to the electrical box. Ensure it’s flush and stable.
- Manage Cables: Neatly route and secure all visible cables using cable ties, clips, or cable management channels. This improves aesthetics and prevents tripping hazards or damage.
Testing and Troubleshooting: Ensuring a Flawless Glow
Once everything is connected and mounted, it’s time for the moment of truth.
- Initial Test:
- Carefully turn the power back on at the circuit breaker.
- Activate the switch or power source for your newly installed LEDs.
- Do they light up? Is the brightness consistent?
- Troubleshooting Common Issues:
- No Light:
- Is the power on at the breaker and switch?
- Are all connections secure? (Especially power supply to strip, and AC input to power supply).
- Is polarity correct (+ to +, – to -) for low-voltage LEDs?
- Is the power supply working (check indicator light if present)? Use a multimeter to test voltage output from the driver.
- Is the LED strip cut correctly at the designated points? A faulty cut can kill a section.
- Is the wattage of the LEDs within the capacity of the power supply?
- Flickering or Dimming:
- Is the power supply overloaded (too many LEDs for its wattage)?
- Are connections loose?
- Is there a faulty LED segment or strip?
- Is there voltage drop over long runs of LED strips (especially 12V)? You might need to power longer runs from both ends or use a higher gauge wire.
- Only Parts of the Strip Light Up:
- This usually indicates a broken circuit in the unlit section. Check for bad solder joints, faulty connectors, or an incorrect cut.
- LEDs are not responding to controls (for smart LEDs):
- Ensure the smart LED is within range of your Wi-Fi router or Bluetooth hub.
- Check your smartphone app settings and ensure the device is paired correctly.
- Perform a hard reset on the smart LED (often by cycling power a certain number of times).
- No Light:
Advanced Considerations and Maximizing Your LED Investment
Beyond basic installation, leveraging the full potential of LED technology involves considering smart integration, understanding the financial impact, and ensuring proper maintenance.
Integrating Smart Features and Dimming Capabilities
The “Tech” aspect of LEDs truly shines with smart integration.
- Smart Home Integration: If you’ve opted for smart LED bulbs or controllers, connect them to your home’s Wi-Fi network using the manufacturer’s app. This allows for remote control, scheduling, scene creation (e.g., “movie night” scene), and integration with voice assistants like Amazon Alexa, Google Assistant, or Apple HomeKit. This elevates your lighting from a mere utility to an interactive and personalized experience, boosting “Productivity” through automation and enhancing your living “Brand” (personal branding through a modern, efficient home).
- Dimming: Not all LEDs are dimmable, and not all dimmers work with LEDs.
- Dedicated Dimmable LEDs: Look for LEDs explicitly labeled “dimmable.”
- Compatible Dimmers: Use dimmers designed for LED loads (often labeled “LED compatible” or “low voltage electronic dimmers”). Traditional incandescent dimmers (leading edge/MLV) can cause flickering or damage to LEDs.
- Smart Dimmers: Integrate smart dimmers or smart LED controllers (for strip lights) into your home automation system for seamless control via app or voice.
Energy Savings and Long-Term Financial Impact
The decision to install LEDs is a sound financial one, aligning perfectly with the “Money” topics of personal finance and investing.
- Reduced Electricity Bills: As mentioned, the primary financial benefit is the dramatic reduction in energy consumption. Over time, these savings accumulate significantly. For businesses, this translates to lower operating costs and a healthier bottom line.
- Lower Maintenance Costs: The extended lifespan of LEDs means fewer bulb replacements, reducing material costs and labor time, especially important for large installations or hard-to-reach fixtures.
- Payback Period: While the initial cost of quality LEDs or integrated fixtures might be higher than traditional alternatives, the energy and maintenance savings often lead to a relatively short payback period, after which you’re enjoying pure savings. This is a solid “investment” in your home or business infrastructure.
- Increased Property Value: Modern, efficient LED lighting can be an attractive feature for potential buyers or tenants, subtly increasing property value or appeal.
Maintenance and Extending the Life of Your LEDs
While LEDs are known for their longevity, proper care can further extend their life and ensure consistent performance.
- Keep Them Clean: Dust and dirt can accumulate on LED surfaces, reducing light output and potentially trapping heat. Gently wipe LED bulbs and fixtures with a dry, soft cloth periodically.
- Ensure Proper Ventilation: Although LEDs produce less heat than incandescents, they still generate some. Ensuring adequate airflow around fixtures prevents heat buildup, which can degrade LED components over time. Avoid enclosing non-enclosed rated LEDs in sealed fixtures.
- Avoid Overloading Drivers: Always ensure your LED driver’s wattage capacity exceeds the total wattage draw of the connected LEDs. An overloaded driver will overheat and fail prematurely.
- Check Connections Periodically: Loose connections can cause flickering or intermittent operation. Occasionally inspect connections, especially in high-vibration areas.
- Use Surge Protectors: For expensive or critical LED installations, especially those connected to smart home systems, using a surge protector can guard against power spikes that could damage the electronics.
Installing an LED system is a rewarding project that combines practical skills with a foray into modern technology. By carefully planning, adhering to safety protocols, and understanding the nuances of LED types and their integration, you can create a vibrant, efficient, and smart lighting environment. The investment in time and resources will pay dividends in energy savings, reduced maintenance, and an enhanced aesthetic, solidifying your space in the forefront of technological convenience and sustainable living.
aViewFromTheCave is a participant in the Amazon Services LLC Associates Program, an affiliate advertising program designed to provide a means for sites to earn advertising fees by advertising and linking to Amazon.com. Amazon, the Amazon logo, AmazonSupply, and the AmazonSupply logo are trademarks of Amazon.com, Inc. or its affiliates. As an Amazon Associate we earn affiliate commissions from qualifying purchases.