In today’s interconnected digital landscape, a reliable printer remains an indispensable tool for homes and businesses alike. From printing essential documents and creative projects to capturing cherished memories in physical form, the ability to produce high-quality prints is paramount. Among the leading brands, HP has consistently stood out for its innovative technology, diverse product range, and commitment to user-friendly design. Installing a new HP printer might seem like a daunting task, especially if you’re not particularly tech-savvy. However, with the right guidance, the process is straightforward and can be completed efficiently.

This comprehensive guide aims to demystify the HP printer installation process, empowering you to set up your device quickly and begin printing without a hitch. We’ll cover everything from the initial unboxing to connecting your printer, installing the necessary software, and even basic troubleshooting. By mastering these steps, you’ll not only save time and potential service costs but also gain confidence in managing your digital peripherals, a valuable skill in an increasingly tech-driven world. For those keen on productivity and smart tech integration, understanding your devices is the first step towards a more streamlined digital life.
The Essential First Steps: Preparation and Unboxing
Before you even think about connecting wires or installing software, a methodical approach to preparation can save you a lot of time and frustration. Unboxing your new HP printer correctly and ensuring you have all the necessary components and information at hand forms the bedrock of a smooth installation experience. This initial phase is crucial, akin to laying a strong foundation for any important project, whether it’s building a brand identity or managing your personal finances – preparation is key.
Unpacking Your New HP Printer
Your excitement to get started might tempt you to rip open the box, but a careful unboxing process is vital to prevent damage and ensure you don’t miss any critical components.
- Choose a Suitable Location: Select a sturdy, level surface near a power outlet where your printer will reside permanently. Consider proximity to your computer or Wi-Fi router, depending on your preferred connection method. Ensure there’s enough space for the printer itself, as well as for opening trays, accessing cartridges, and allowing proper ventilation. This forethought can prevent future issues, much like strategic financial planning helps avoid monetary woes.
- Remove from Packaging: Carefully lift the printer out of its box. Most HP printers are well-protected with foam inserts and plastic wrapping. Gently remove all external packaging materials. Keep the packaging materials for a short period, especially if you anticipate needing to return the printer.
- Remove Internal Packing Materials: This is a crucial step often overlooked. HP printers typically come with various pieces of tape, cardboard, and plastic inserts designed to secure moving parts during transit. These are usually brightly colored (e.g., blue or orange) and are often indicated by arrows or labels. Check all compartments: the main paper tray, the output tray, the cartridge access area, and any scanner lids. Failing to remove all these materials can cause paper jams, printing errors, or even damage the printer when you first turn it on.
- Locate All Components: Within the box, you should find:
- The HP Printer itself.
- Power cord.
- Ink cartridges (often sealed in individual bags).
- Setup guide or quick start poster.
- Installation CD (less common now, as software is often downloaded).
- USB cable (sometimes included, but often sold separately, especially for wireless models).
- Any additional accessories (e.g., photo tray, specific cables for certain models).
Ensure everything is present according to the packing list, which is usually found in the setup guide.
Gathering Your Tools and Drivers
With the printer physically ready, the next step involves preparing the digital side of the equation. This includes identifying the right drivers and ensuring your system is primed for the installation.
- Install Ink Cartridges: Following the instructions in your printer’s setup guide, carefully unseal and install the ink cartridges. Each cartridge slot is typically color-coded or labeled. Ensure they click securely into place. Many HP printers will perform an initial alignment and calibration process after ink installation.
- Connect to Power: Plug the power cord into the printer and then into a wall outlet. Avoid using power strips or surge protectors during the initial setup, as they can sometimes interfere with the printer’s power-on sequence. Turn on the printer using the power button.
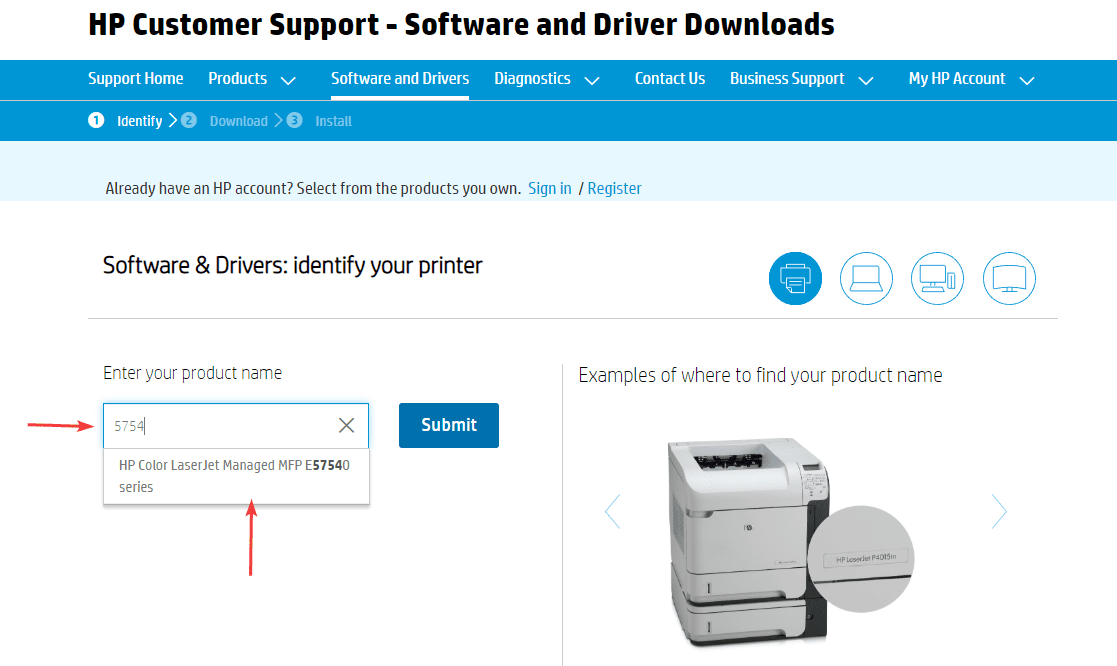
- Identify Your Printer Model: This is critical for finding the correct drivers and software. The model number is usually printed on a label on the back or bottom of the printer, or on the front panel display. For example, “HP OfficeJet Pro 9015” or “HP DeskJet 2700 Series.”
- Obtain Necessary Software and Drivers:
- HP Smart App (Recommended): For most modern HP printers, the HP Smart app is the easiest and most recommended way to install and manage your printer. You can download it for free from your device’s app store (Windows Store, macOS App Store, Google Play Store, Apple App Store) or directly from
123.hp.com. This app not only guides you through installation but also provides ongoing management, troubleshooting, and even ink ordering, streamlining your digital workflow. - HP Support Website: If you prefer a more traditional approach or have an older model, visit
support.hp.com. Enter your printer model number, and you’ll find a dedicated support page with the latest drivers, software, and firmware updates. Always download drivers directly from the manufacturer’s website to ensure compatibility and security. - Installation CD: If your printer came with a CD, and your computer has an optical drive, you can use it. However, the software on the CD may be outdated, so it’s generally better to download the latest versions online.
- HP Smart App (Recommended): For most modern HP printers, the HP Smart app is the easiest and most recommended way to install and manage your printer. You can download it for free from your device’s app store (Windows Store, macOS App Store, Google Play Store, Apple App Store) or directly from
- Check Your Computer’s Operating System (OS): Knowing whether you’re running Windows (e.g., Windows 10, Windows 11) or macOS (e.g., Ventura, Sonoma) and its specific version is essential for downloading the correct drivers.
- Temporarily Disable Antivirus/Firewall (Optional but Recommended for Initial Setup): Sometimes, security software can interfere with the installation process. Temporarily disabling them during the driver installation (and re-enabling immediately afterward) can prevent conflicts. Exercise caution and only do this if you are downloading from trusted sources like
123.hp.comorsupport.hp.com.
Connecting Your HP Printer: Wired vs. Wireless Setup
With your HP printer unboxed, inked, and powered on, the next critical step is establishing a connection between your computer and the printer. HP offers flexibility in how you connect your devices, primarily through wired (USB) or wireless (Wi-Fi) methods. Each has its advantages, and understanding them will help you choose the best option for your setup, much like selecting the right AI tool for a specific task.
Wired Connection: USB Setup
A USB connection is the most straightforward and often the most reliable method, especially for initial setup or in environments where wireless connectivity is unstable.
- Connect the USB Cable: With both your printer and computer powered on, connect one end of the USB cable (Type-B square end) to the appropriate port on the back of your HP printer. Then, connect the other end (Type-A rectangular end) to an available USB port on your computer.
- Automatic Detection (Plug and Play): In many cases, especially with modern operating systems like Windows 10/11 or recent macOS versions, your computer will automatically detect the new hardware. It might try to install generic drivers or prompt you to install specific HP drivers.
- Run HP Smart App or Downloaded Installer: If you’ve downloaded the HP Smart app or a full feature driver package from HP’s website, launch it. The software will guide you through the remaining steps, including confirming the connection, installing full drivers, and setting up features like scanning or faxing.
- Follow On-Screen Prompts: The installer will typically ask you to confirm your printer model, accept terms and conditions, and select desired installation options (e.g., recommended setup vs. custom setup). Follow these prompts carefully.
Advantages of USB:
- Simplicity: Direct connection, often plug-and-play.
- Reliability: Less prone to network interference or signal drops.
- Security: Data travels directly between devices, reducing network vulnerability.
Disadvantages of USB:
- Proximity Required: The printer must be physically close to the computer.
- Single-Device Use: Primarily designed for one computer at a time, though some networks can share a USB printer.
Wireless Connection: Network Integration
Wireless connectivity offers unparalleled flexibility, allowing you to place your printer almost anywhere within your Wi-Fi network’s range and print from multiple devices (computers, smartphones, tablets) without physical cables. This is especially useful in modern, dynamic workspaces where mobility is key.
HP printers generally offer a few methods for wireless setup:
-
HP Smart App Setup (Recommended for most users):
- Ensure your printer is powered on and in a ready state.
- Download and open the HP Smart app on your computer or mobile device.
- The app will usually detect nearby printers. If not, click “Add Printer” or a similar option.
- Follow the on-screen instructions. The app will guide you through connecting your printer to your Wi-Fi network. This often involves selecting your network name (SSID) and entering your Wi-Fi password.
- Once the printer is connected to the network, the app will install the necessary drivers and software on your device.
-
Wi-Fi Protected Setup (WPS) Push Button (If your router supports it):
- Ensure your printer is on and in a ready state.
- Locate the WPS button on your Wi-Fi router.
- On your HP printer’s control panel, navigate to the Wireless Setup menu or press the Wireless button until you see a prompt for WPS. Select “Push Button” method.
- Within two minutes, press the WPS button on your router.
- The printer and router will communicate and establish a connection. A light on the printer will usually indicate a successful connection (e.g., solid blue Wi-Fi light).
- Wireless Setup Wizard (Via Printer Control Panel):
- On your printer’s control panel, navigate to the “Wireless” or “Network” settings.
- Select “Wireless Setup Wizard.”
- The printer will scan for available Wi-Fi networks. Select your network name (SSID) from the list.
- Enter your Wi-Fi password (network key or security passphrase) using the printer’s keypad or touchscreen. Be careful to enter it correctly, minding case sensitivity.
- Once successfully connected, the printer will display a confirmation message and/or illuminate a solid blue Wi-Fi light.
After establishing the wireless connection:
- Return to your computer or mobile device.
- Launch the HP Smart app, or go to your system’s “Add a Printer” function. Your wirelessly connected HP printer should now be discoverable on the network.
- Select your printer and complete the driver installation.
Advantages of Wireless:
- Flexibility: Place the printer anywhere within Wi-Fi range.
- Multi-Device Access: Print from any computer, smartphone, or tablet on the same network.
- Clutter-Free: No need for extra cables running to your computer.
Disadvantages of Wireless:
- Network Dependency: Requires a stable Wi-Fi network; performance can be affected by signal strength.
- Initial Setup Complexity: Can be slightly more involved than a simple USB connection.
- Potential Security Concerns: Requires a secure Wi-Fi network to prevent unauthorized access.
Software Installation and Driver Configuration
While physical connection is foundational, the printer won’t function optimally without the correct software and drivers. This digital handshake between your computer and the printer is where the magic happens, enabling seamless communication and unlocking all of your HP printer’s features. This step is where technology trends truly meet user productivity, providing the digital tools for efficient operation.
Automatic Driver Installation via HP Smart App
For most users and modern HP printers, the HP Smart app is the most streamlined and user-friendly way to handle software installation. It’s designed to be an all-in-one hub for your printer.
- Download and Launch HP Smart: If you haven’t already, download the HP Smart app from your device’s app store (Windows Store, Apple App Store, Google Play Store) or from
123.hp.com. Launch the application. - Add Your Printer: The app will likely automatically detect your new HP printer if it’s connected via USB or wirelessly on the same network. If not, click “Add Printer” (often represented by a plus sign “+”) and follow the prompts to find and select your printer from the list of discovered devices.
- Guided Setup: HP Smart provides a step-by-step wizard. It will:
- Verify the connection.
- Download and install the latest printer drivers specific to your operating system.
- Configure essential settings.
- Offer to set up advanced features like mobile printing, scanning to cloud services, and HP Instant Ink (HP’s subscription service for ink delivery, which can be a money-saving option for frequent printers).
- Register your printer for warranty purposes.
- Complete the Installation: Follow all on-screen instructions until the installation is complete. The app will confirm when your printer is ready to use.
The HP Smart app offers more than just drivers; it’s a comprehensive dashboard. You can check ink levels, order supplies, troubleshoot issues, print from your phone, and manage scan functions – truly integrating your printer into your digital ecosystem.
Manual Driver Installation and Troubleshooting
While the HP Smart app is highly recommended, there might be scenarios where a manual approach is necessary. This could be due to an older printer model, specific network configurations, or simply personal preference.
- Download Full Feature Driver: Go to
support.hp.com. Enter your printer’s model number into the search bar. On your printer’s support page, locate the “Software and Driver Downloads” section. Download the “Full Feature Software and Driver” package, which usually includes all necessary drivers, utilities, and optional software. Choose the correct operating system and version for your computer. - Run the Installer: Once downloaded, locate the executable file (usually ending in
.exefor Windows or.dmgfor macOS) and run it. - Follow On-Screen Prompts: The installer will guide you through the process:
- Accept License Agreement: Read and accept the terms.
- Connection Type: Select your connection type (USB or wireless). If wireless, the installer might guide you through connecting to your network, similar to the HP Smart app.
- Custom vs. Recommended Installation: Choose “Recommended” or “Typical” for most users, which installs all essential components. “Custom” allows you to select specific software components if you have advanced needs.
- Printer Detection: The installer will search for your printer. Ensure your printer is on and connected (via USB or network).
- Complete Installation: Let the installer finish copying files and configuring your system. A restart of your computer might be required.
Common Installation Troubleshooting Tips:
- “Printer Not Found” Error:
- Check Physical Connections: Ensure USB cables are securely plugged in, or the printer is correctly connected to your Wi-Fi network (check the Wi-Fi light on the printer).
- Restart Everything: Turn off the printer, computer, and router. Wait a minute, then turn them back on in this order: router, printer, computer.
- Firewall/Antivirus: Temporarily disable your computer’s firewall or antivirus software during installation, then re-enable it immediately after.
- Correct Network: Ensure your computer and printer are connected to the same Wi-Fi network (e.g., both on your home network, not one on a guest network).
- Driver Installation Failure:
- Download Latest Drivers: Always use drivers directly from
support.hp.comor through the HP Smart app. - Run as Administrator: Right-click the installer file and select “Run as administrator” (Windows) to ensure it has necessary permissions.
- Check OS Compatibility: Ensure the drivers you downloaded are for your specific operating system version.
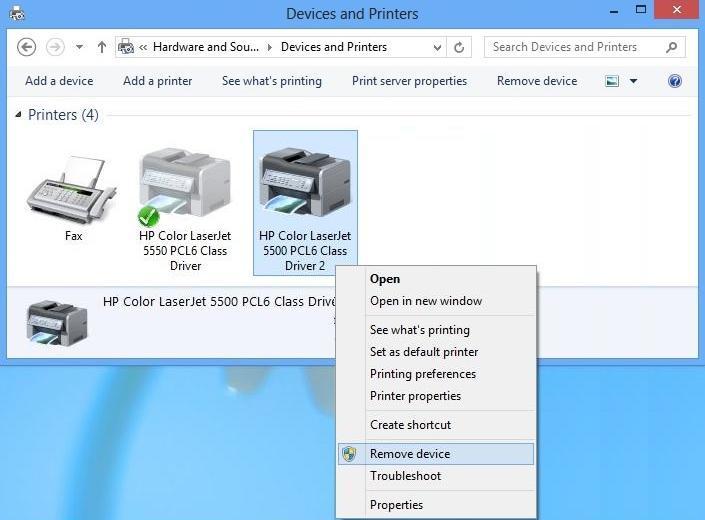
- Clear Previous Installations: If you had issues with a previous installation attempt, you might need to uninstall any partial drivers from “Printers & Scanners” (Windows) or “Printers & Scanners” (macOS System Settings) before trying again.
- Download Latest Drivers: Always use drivers directly from
- Printing Issues After Installation:
- Set as Default Printer: Ensure your new HP printer is set as the default printer in your operating system’s settings.
- Print Spooler Service: On Windows, sometimes the print spooler service can get stuck. Search for “Services” in the Start menu, find “Print Spooler,” right-click, and select “Restart.”
- Run HP Print and Scan Doctor: This free utility from HP (
support.hp.com/us-en/help/print-scan-doctor) can diagnose and fix many common printing and scanning problems. It’s an invaluable tool for troubleshooting.
Post-Installation: Testing, Maintenance, and Advanced Tips
Congratulations! Your HP printer is now installed. However, the process doesn’t end there. To ensure everything is working correctly, maintain peak performance, and get the most out of your investment, a few final steps and ongoing practices are recommended. This ensures your tech investment provides continuous value, similar to how careful financial management ensures long-term wealth.
Running a Test Print and Basic Troubleshooting
The first print after installation is a moment of truth. A successful test print confirms that your printer and computer are communicating effectively.
- Print a Test Page:
- From HP Smart App: Look for an option like “Print Test Page” or access a document within the app to print.
- From Windows: Go to “Settings” > “Bluetooth & devices” > “Printers & scanners.” Click on your HP printer, then select “Printer properties” or “Printing preferences.” Look for a “Print Test Page” button.
- From macOS: Go to “System Settings” > “Printers & Scanners.” Select your HP printer, then click “Open Print Queue” or “Options & Supplies.” There might be a “Print Test Page” or similar option.
- Alternatively, simply open any document (e.g., a Word document, PDF) and try to print it.
- Verify Quality: Examine the test page. Is the text crisp? Are images reproduced accurately? Are colors vibrant and free of streaks or faded areas?
- Basic Print Quality Troubleshooting:
- Streaks or Faded Prints: This often indicates low ink levels or clogged printheads. Use the HP Smart app or your printer’s control panel to check ink levels. Run the “Clean Printhead” utility from the printer’s maintenance menu or through the HP Smart app.
- Paper Jams: Ensure you are using the correct paper type and that it is loaded properly in the tray. Fan the paper before loading to separate sheets. Remove any jammed paper carefully, following your printer’s instructions.
- Connectivity Issues (Suddenly Offline): If your printer was working and now isn’t, restart your printer, router, and computer. For wireless connections, ensure your Wi-Fi network is stable. Re-run the HP Print and Scan Doctor tool if you’re on Windows.
Maximizing Your HP Printer’s Performance and Longevity
Beyond basic functionality, a few practices can significantly enhance your printer’s lifespan and efficiency, providing better returns on your tech investment.
- Keep Drivers and Firmware Updated: Just like any software, printer drivers and firmware receive updates that improve performance, add features, and fix bugs. Regularly check for updates through the HP Smart app or by visiting
support.hp.comfor your specific model. - Use Genuine HP Ink Cartridges: While third-party cartridges might seem cheaper initially, they can lead to print quality issues, inconsistent performance, and potential damage to your printer’s printheads. HP designs its printers and ink to work together for optimal results. Using genuine HP ink also often maintains your printer’s warranty. This is a common “Brand” consideration, where sticking to the original manufacturer’s supplies ensures the intended quality and reliability.
- Enroll in HP Instant Ink (Optional): If you print frequently, HP Instant Ink is a subscription service that delivers ink to your door before you run out. It can offer significant cost savings compared to buying cartridges individually, optimizing your “Money” spent on supplies. The printer automatically orders new cartridges when your ink levels are low, based on your chosen print plan.
- Regular Cleaning: Over time, dust and debris can accumulate inside the printer, especially around the paper path. Periodically clean the exterior with a soft, lint-free cloth. Refer to your printer’s manual for instructions on cleaning internal components like scanner glass or roller paths.
- Proper Shutdown: When not in use for extended periods, it’s best to turn off your printer using its power button. This helps conserve energy and prevents unnecessary wear and tear. However, for most home users, leaving it on is fine, as modern printers enter low-power modes.
- Environment Matters: Place your printer in a cool, dry place away from direct sunlight, excessive dust, or extreme temperatures. These environmental factors can affect printer performance and longevity.
By diligently following these installation steps and maintenance tips, you’ll ensure that your HP printer serves you reliably for years to come. Installing an HP printer is more than just connecting a device; it’s about integrating a powerful tool into your personal or professional workflow, enabling productivity and creative expression with minimal fuss. Embrace the capabilities of your new HP printer, and enjoy a seamless printing experience, knowing you’ve mastered its setup from start to finish.
aViewFromTheCave is a participant in the Amazon Services LLC Associates Program, an affiliate advertising program designed to provide a means for sites to earn advertising fees by advertising and linking to Amazon.com. Amazon, the Amazon logo, AmazonSupply, and the AmazonSupply logo are trademarks of Amazon.com, Inc. or its affiliates. As an Amazon Associate we earn affiliate commissions from qualifying purchases.