In an era defined by smart technology and a growing consciousness for energy efficiency, the smart thermostat has emerged as a cornerstone of the modern connected home. Among the leading innovators in this space, Ecobee stands out, offering a suite of devices that seamlessly blend sophisticated technology with user-friendly design. Moving beyond mere temperature control, Ecobee thermostats leverage advanced algorithms, robust sensors, and intuitive app-based management to optimize indoor climate, reduce energy consumption, and integrate effortlessly into your broader smart home ecosystem.
For many homeowners, the idea of replacing a traditional thermostat with a cutting-edge smart device might seem daunting. Visions of complex wiring diagrams and hours spent troubleshooting can deter even the most enthusiastic tech adopter. However, the reality of installing an Ecobee thermostat is surprisingly straightforward, designed with the DIY enthusiast in mind. This comprehensive guide will walk you through every step of the process, from initial preparation to full configuration, ensuring a smooth transition to a smarter, more efficient home. We’ll delve into the practicalities of installation, highlight the innovative tech features that set Ecobee apart, and explore the tangible financial benefits this upgrade can bring, all while ensuring your digital security and peace of mind.
Preparing for Your Smart Home Upgrade
Embarking on any home improvement project, especially one involving your home’s critical HVAC system, requires careful preparation. Before you even touch a screwdriver, understanding your system’s compatibility and gathering the right tools are crucial steps that will pave the way for a successful and stress-free Ecobee installation. This foundational phase is where we ensure the “Tech” aspect aligns perfectly with your home’s existing infrastructure, setting the stage for smart energy management and comfort.
Compatibility Check: Is Ecobee Right for Your System?
One of the most common questions before purchasing a smart thermostat revolves around compatibility. Ecobee thermostats are designed to work with a wide range of heating and cooling systems, but a quick check can save you time and potential frustration.
Firstly, identify your HVAC system type. Ecobee devices typically support:
- Conventional systems: Single-stage, multi-stage, gas, oil, electric, and hydronic (hot water) systems.
- Heat pumps: With or without auxiliary/emergency heat.
- Boilers and furnaces.
The most critical factor, however, is the presence of a Common Wire (C-wire). Smart thermostats, with their backlit screens, Wi-Fi connectivity, and advanced processing, require a consistent 24VAC power supply, which the C-wire provides. Without it, the thermostat attempts to “power steal” from other wires, which can lead to intermittent operation, battery drainage, or even damage to your HVAC system.
How to check for a C-wire:
- Turn off power to your HVAC system at the breaker box (this is paramount for safety).
- Carefully remove the faceplate of your existing thermostat.
- Look at the terminal block. If you see a wire connected to a terminal labeled “C,” you have a C-wire.
- If you don’t see a “C” terminal or a wire connected to it, don’t despair! Ecobee provides a Power Extender Kit (PEK) with most of its models. The PEK is a clever solution that allows you to install the Ecobee thermostat even if you only have four wires running to your thermostat. It essentially reconfigures your existing wiring at the furnace or air handler to create a C-wire connection. We’ll detail its installation later if needed.
Finally, ensure your system operates on standard 24VAC. While most residential systems do, it’s always good practice to confirm, especially if you have an older or non-standard setup. If in doubt, consult your HVAC manual or a professional.
Gathering Your Tools and Getting Ready
Once you’ve confirmed compatibility, it’s time to gather your arsenal of tools. Thankfully, you won’t need anything exotic; most items are standard household tools. Having everything ready before you start will ensure a smooth, uninterrupted installation process.
Essential Tools:
- Phillips and Flathead Screwdrivers: For removing the old thermostat and mounting the new one.
- Wire Strippers (optional): Only if you need to strip wires, which is rare for a direct replacement.
- Drill (optional): If you need to drill new mounting holes or install wall anchors, especially if your old thermostat’s holes don’t align with the Ecobee backplate.
- Level: To ensure your Ecobee thermostat is perfectly straight on the wall, contributing to a clean aesthetic.
- Pen or Pencil: For marking drill holes.
- Small Flashlight or Headlamp: To illuminate dimly lit wiring behind the wall.
- Smartphone or Digital Camera: CRUCIAL for taking photos of your existing wiring. This cannot be stressed enough – these photos are your lifeline if you forget which wire goes where.
- Your Ecobee Thermostat Kit: Unpack it and familiarize yourself with the components (thermostat, backplate, trim plate, wall anchors, screws, labels, Power Extender Kit if applicable).
- Your Smart Device (phone/tablet): You’ll need this later for the Ecobee app setup.
Safety First:
Before doing anything else, ALWAYS turn off the power to your heating and cooling system at the circuit breaker box. This is a non-negotiable safety step. Working with electrical wires while the power is on can lead to serious injury or damage to your system. Double-check that the system is off by trying to adjust your old thermostat and confirming it doesn’t respond. With your tools ready and safety secured, you’re now poised to begin the physical installation.
The Step-by-Step Installation Process
With your preparations complete, it’s time for the hands-on part of the installation. This section will guide you through removing your old thermostat, connecting the new Ecobee, and mounting it securely to your wall. We’ll provide detailed instructions for standard wiring and for scenarios requiring the Power Extender Kit (PEK), ensuring that the “Tech” of your new device integrates flawlessly with your home’s infrastructure.
Disconnecting Your Old Thermostat
This is where the transformation begins. Taking your time and being methodical here will prevent headaches later on.
- Take Pictures – Lots of Them!
- Before touching any wires, take multiple clear, well-lit photos of your existing thermostat’s wiring. Capture the terminals and the wires connected to them from various angles. This visual record is invaluable for reference.
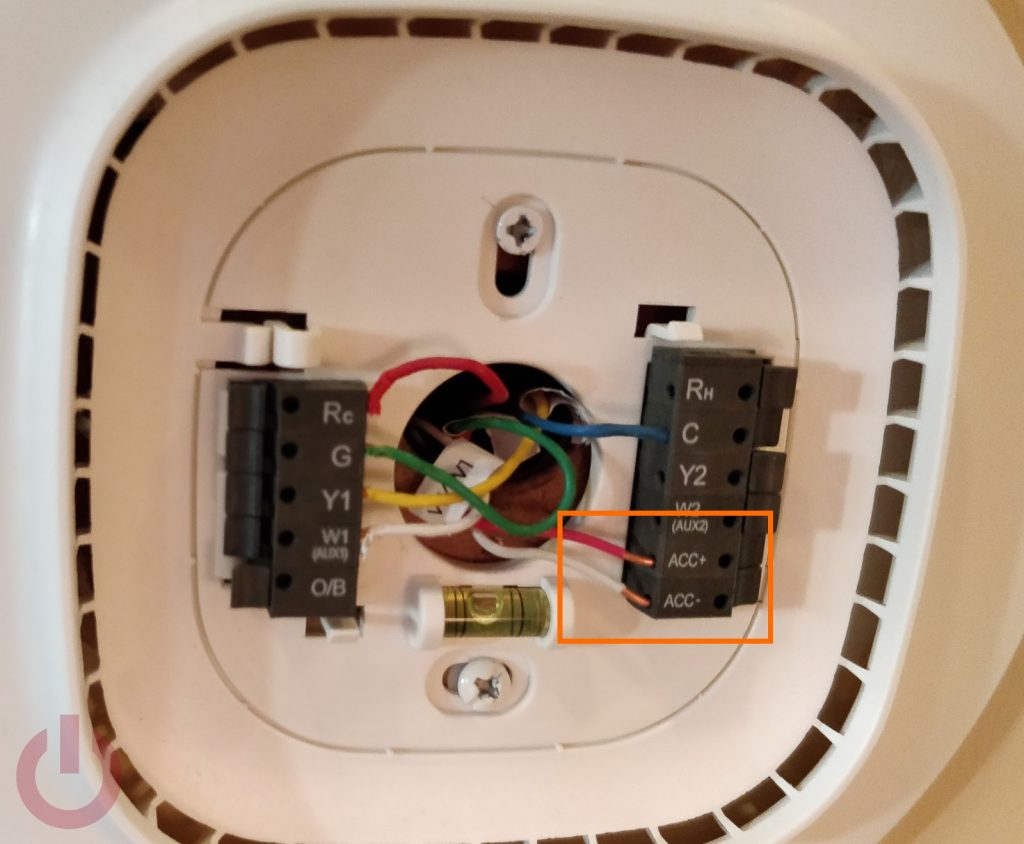
- Label Your Wires:
- Ecobee provides small adhesive labels with letters corresponding to standard thermostat terminals (R, G, Y, W, C, etc.). Carefully disconnect each wire from its terminal on your old thermostat, and immediately attach the corresponding label to the wire. If your old thermostat has a “RH” and “RC” terminal, and you only have one “R” wire, it’s common to jump these two terminals. Note this, but you’ll likely connect the single “R” wire to the “Rc” terminal on the Ecobee.
- If you encounter a wire that isn’t labeled (e.g., a spare wire tucked away), it’s still a good idea to label it “spare” or simply note its color.
- Gently push the labeled wires back into the wall opening to prevent them from falling back into the wall cavity.
- Remove the Old Baseplate:
- Once all wires are disconnected and labeled, unscrew the old thermostat’s backplate from the wall. You might find a large, rectangular hole in the wall, or just a small one where the wires emerge. Don’t worry about aesthetics yet; the Ecobee trim plate will cover any marks or unsightly holes.
Wiring Your Ecobee Thermostat
Now for the heart of the installation – connecting your Ecobee. The process differs slightly depending on whether you have a C-wire or need to use the Power Extender Kit (PEK).
Scenario 1: You Have a C-Wire
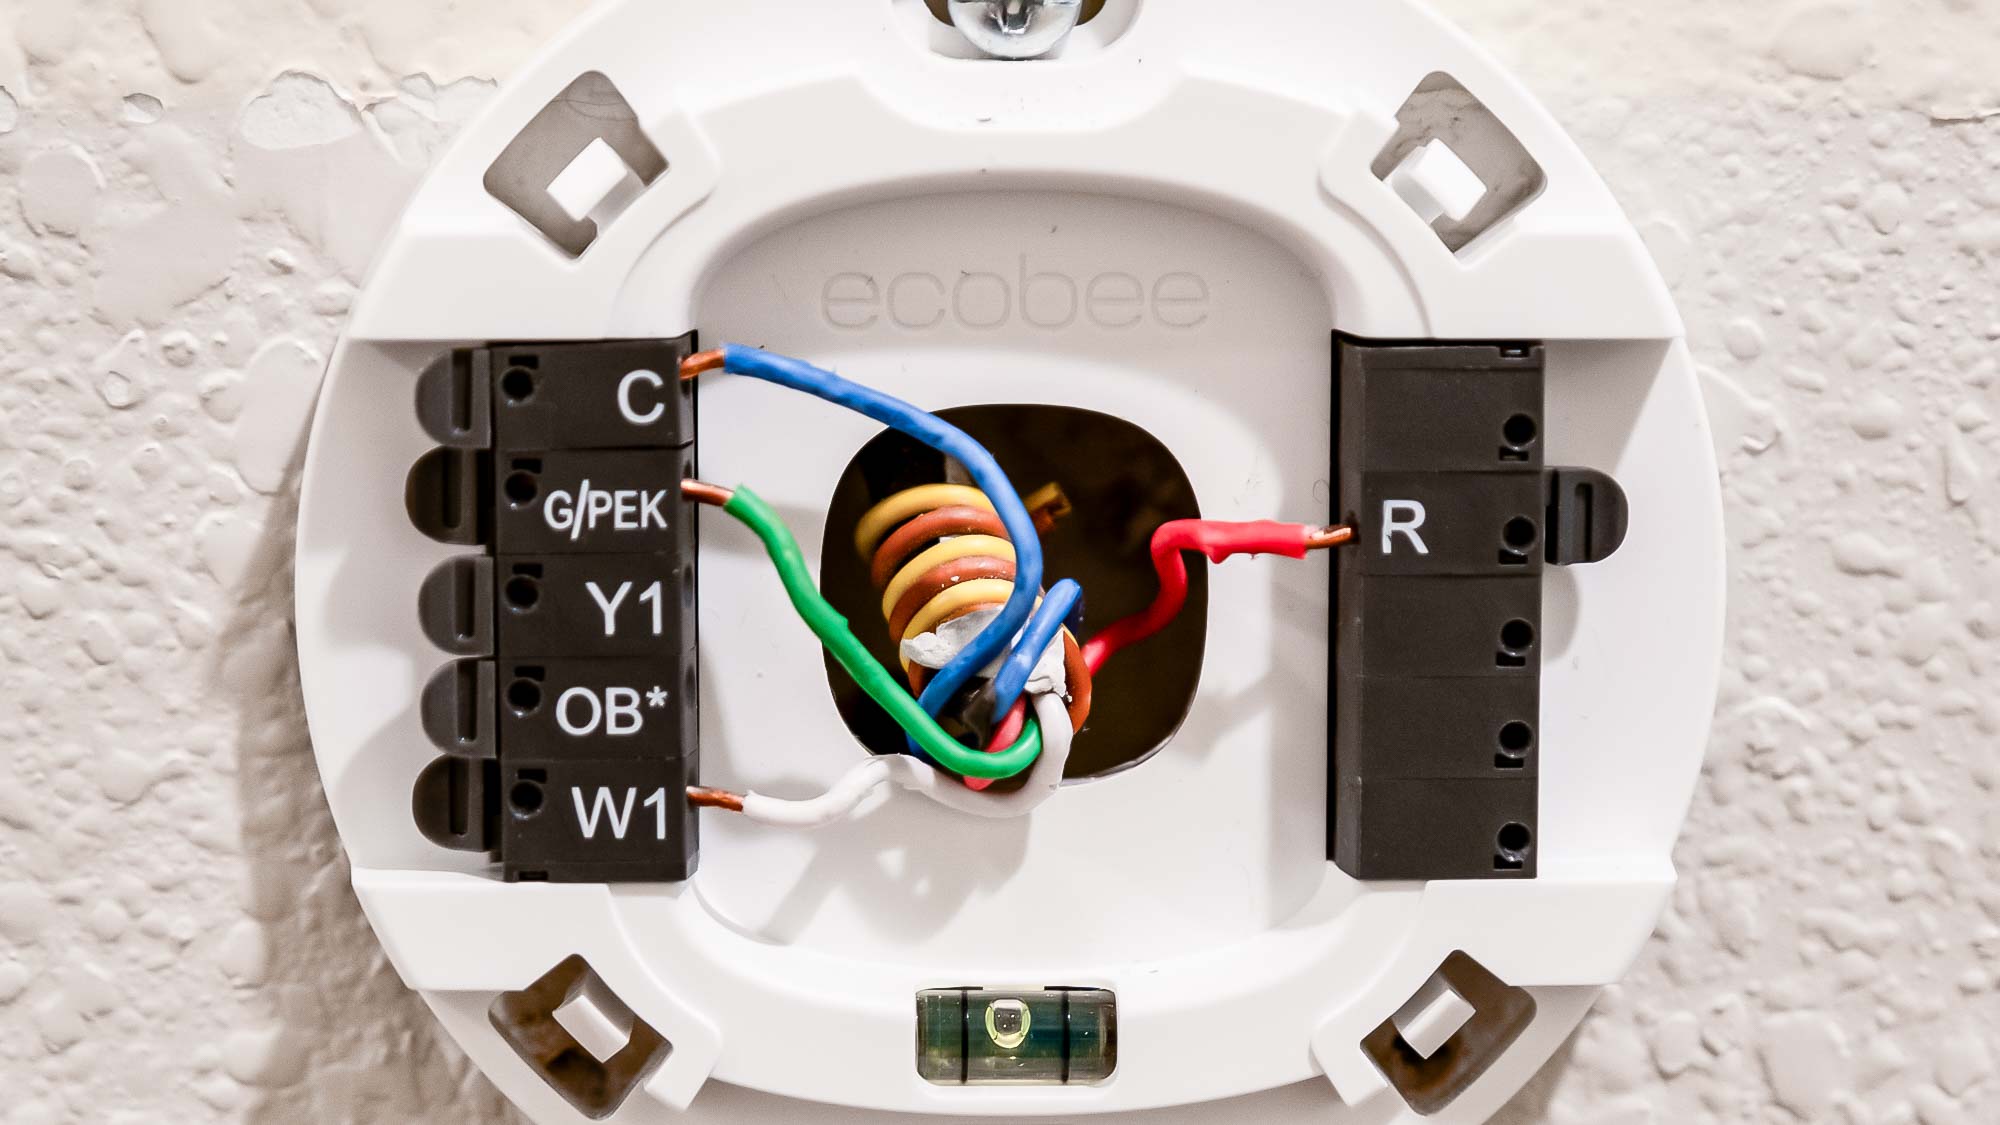
- Mount the Ecobee Backplate:
- Thread your labeled wires through the center opening of the Ecobee backplate.
- Hold the backplate against the wall, using the included screws to secure it. If the old screw holes don’t align, use a level to ensure the backplate is straight, mark new drill holes, and use the included wall anchors if drilling into drywall.
- Connect the Wires:
- Match the labels on your wires to the corresponding terminals on the Ecobee backplate. For instance, the wire labeled “G” goes into the “G” terminal, “Y” into “Y,” “W” into “W,” “C” into “C,” and your “R” wire (from your old “RH” or “RC”) goes into “Rc.” If you have separate “RH” and “RC” wires, connect “RH” to “Rh” and “RC” to “Rc” and remove the jumper between them if your Ecobee comes with one (most new models don’t have an internal jumper, it’s auto-detected).
- Push down the terminal lever, insert the bare wire end, and release the lever to secure it. Give each wire a gentle tug to ensure it’s firmly seated.
- Make sure no bare wire is exposed beyond the terminal, as this can cause shorts.

Scenario 2: You Need to Install the Power Extender Kit (PEK)
If you don’t have a C-wire and are using the PEK, the process involves an extra step at your furnace or air handler.
- Install the Ecobee Backplate: As described in Step 1 above.
- Connect Wires to Ecobee Backplate (Temporary):
- Connect your existing wires (R, G, Y, W) to the corresponding terminals on the Ecobee backplate. For the C-wire terminal, you will connect a wire from the PEK later.
- Install the PEK at Your HVAC Control Board:
- Go to your furnace or air handler. Ensure the power is still off!
- Locate the control board where your thermostat wires connect. Take pictures of this wiring setup as well.
- Disconnect the R, G, Y, and W wires from the control board.
- Connect these four wires directly into the PEK terminals labeled R, G, Y, W.
- Now, connect the five wires coming out of the PEK to your HVAC control board:
- R from PEK to R on control board.
- C from PEK to C on control board.
- G from PEK to G on control board.
- Y from PEK to Y on control board.
- W from PEK to W on control board.
- Essentially, the PEK takes your 4 existing wires, consolidates them, and outputs 5 wires that match the expected connections on your HVAC board and provides a virtual C-wire at your thermostat.
- Complete Ecobee Wiring:
- Back at your thermostat, connect the wire that was originally “G” (now acting as the C-wire through the PEK) to the “C” terminal on the Ecobee backplate.
- Connect your “R” wire to “Rc,” “Y” to “Y,” and “W” to “W.” The “G” terminal on the Ecobee backplate will remain empty, as the PEK repurposes this wire.
Mounting the Ecobee and Powering Up
Once the wiring is correctly in place, the finish line is in sight.
- Attach the Display:
- Align the Ecobee display module with the backplate. It should snap firmly into place.
- Restore Power:
- Go back to your circuit breaker box and flip the switch to restore power to your HVAC system.
- The Ecobee screen should light up, indicating it’s receiving power. If it doesn’t, immediately check your wiring connections and ensure the power is truly on.
Congratulations! The physical installation is complete. Now it’s time to bring your Ecobee to life with its intelligent features.
Initial Setup and Smart Features Configuration
With your Ecobee physically installed and powered up, the next phase involves configuring its settings and unlocking its full potential. This is where the true “Tech” capabilities shine, transforming a simple thermostat into an intelligent climate control hub, capable of learning, adapting, and integrating with your broader digital lifestyle. The app-based setup also offers a seamless “Brand” experience, guiding you through a user-friendly interface.
On-Device and App-Based Setup
Upon powering on for the first time, your Ecobee will walk you through an initial setup wizard on its screen. This process is intuitive, but having your smartphone ready will significantly enhance the experience.
- Initial On-Device Prompts:
- Language Selection: Choose your preferred language.
- Network Connection (Wi-Fi): This is critical for all smart features. The Ecobee will scan for available Wi-Fi networks. Select yours and enter your password. A strong, stable Wi-Fi connection is paramount for optimal performance, ensuring your Ecobee can communicate with the cloud, receive updates, and respond to app commands.
- HVAC System Configuration: The Ecobee will attempt to detect your system type based on the wires connected. Confirm this information (e.g., conventional, heat pump, number of stages for heating/cooling). It will ask about your fuel source (gas, electric, oil) and if you have accessories like humidifiers or dehumidifiers. Be accurate here, as incorrect settings can lead to inefficient operation.
- Location and Time Zone: Set your geographical location to enable features like local weather integration and optimized scheduling.
- Registering the Device with the Ecobee App:
- Download the Ecobee app on your smartphone or tablet from your device’s app store.
- Create an Ecobee account or log in if you already have one.
- The Ecobee screen will display a 4-digit registration code. In the app, select “Add a new thermostat” and enter this code.
- Follow the remaining prompts in the app to name your thermostat (e.g., “Living Room Thermostat”), set up your home, and invite other family members to control the device. The app provides a richer interface for fine-tuning settings and accessing advanced features.
Unleashing Ecobee’s Intelligent Capabilities
Once registered, your Ecobee is ready to impress with its suite of smart features, designed to enhance comfort, save energy, and integrate with your smart home ecosystem. This is where the investment truly starts to pay off, both in comfort and on the “Money” front through energy savings.
- Room Sensors: The Heart of True Home Comfort:
- Most Ecobee models come with at least one remote room sensor. These small, unobtrusive devices detect both temperature and occupancy.
- Placement: Strategically place sensors in rooms you use most often, or in areas where temperature fluctuates significantly (e.g., a sunny room, a cold basement). Avoid placing them near heat sources (lamps, electronics) or direct sunlight.
- Benefits:
- Follow Me: When enabled, the Ecobee averages the temperature readings from occupied sensors, ensuring comfort where you are, not just where the thermostat is located.
- Smart Home/Away: Sensors detect when people are home or away, automatically adjusting the temperature to save energy when no one is around and returning to comfort settings upon your return.
- Smart Home Integrations: Seamless Connectivity:
- Ecobee is a true team player in the smart home arena. Integrate it with popular platforms for voice control and automation:
- Amazon Alexa: Many Ecobee models have built-in Alexa, allowing you to use voice commands directly from the thermostat. You can also link it to existing Alexa devices.
- Google Assistant: Control your Ecobee with “Hey Google” commands from any Google Assistant-enabled device.
- Apple HomeKit: For Apple users, Ecobee seamlessly integrates into the Home app, allowing control via Siri or automated scenes.
- IFTTT (If This Then That): Create powerful custom automations (e.g., “If outside temperature drops below 40°F, turn on auxiliary heat”).
- These integrations elevate your “Tech” experience, making your home truly responsive to your lifestyle.
- Ecobee is a true team player in the smart home arena. Integrate it with popular platforms for voice control and automation:
- Energy Saving Features: Smart Savings on Your Bill:
- Eco+ Settings: This suite of features automatically optimizes your schedule for energy savings. It includes things like “Feels Like” (adjusting based on humidity), “Community Energy Savings” (slight adjustments during peak demand), and “Time of Use” (optimizing for cheaper energy rates).
- Smart Schedules: Beyond basic scheduling, Ecobee learns your preferences and optimizes start times to reach your desired temperature efficiently.
- Home/Away Assist: Utilizes sensors to detect occupancy, preventing heating or cooling an empty house.
- Detailed Energy Reports: Access comprehensive monthly reports in the Ecobee app, detailing your energy consumption, identifying savings opportunities, and providing actionable insights – a direct benefit to your “Money” management.
Post-Installation Tips, Troubleshooting, and Maximizing Your Investment
Having successfully installed and configured your Ecobee, you’re now on the path to a smarter, more efficient home. However, like any advanced “Tech” gadget, occasional minor issues might arise, and understanding how to troubleshoot them, along with knowing how to leverage your device for long-term “Money” savings, will ensure you maximize your investment.
Common Installation Hurdles and Solutions
Even with careful planning, sometimes things don’t go exactly as expected. Here are some common issues and their fixes:
- Ecobee Has No Power (Screen is Blank):
- Check Breaker: Ensure the power to your HVAC system is turned back on at the circuit breaker.
- Wiring Check: Verify all wires are securely seated in their terminals on the Ecobee backplate. A loose connection, especially for the R or C wire, is a common culprit.
- PEK Installation (if applicable): If you used the PEK, re-check all connections at both the thermostat and the HVAC control board. A single misplaced wire on the PEK is the most frequent cause of power issues in these setups.
- HVAC Fuse: Some HVAC systems have a low-voltage fuse on the control board. If the Ecobee installation caused a short, this fuse might have blown. Consult your HVAC manual or a professional if you suspect this.
- HVAC System Not Responding (No Heat/Cool):
- Wiring Mismatch: Double-check that the wires connected to the Ecobee terminals match your previous setup and the Ecobee’s instructions (refer back to your photos!). A common error is connecting Y to W or vice versa.
- System Configuration: In the Ecobee’s settings (on the device or in the app), ensure the HVAC system type (conventional, heat pump, etc.), number of stages, and fuel type are correctly configured.
- Safety Cut-off: Many HVAC systems have a built-in delay (often 5-10 minutes) after power restoration or a major change before they respond to commands. Be patient.
- Wi-Fi Connectivity Issues:
- Router Distance: Ensure your Ecobee is within range of your Wi-Fi router.
- Password: Double-check your Wi-Fi password for typos.
- 2.4GHz Network: Ecobee thermostats generally connect to 2.4GHz Wi-Fi networks. If you have a dual-band router, ensure this band is enabled and your phone is connected to it during setup.
- Router Reboot: Sometimes a simple reboot of your Wi-Fi router can resolve connectivity problems.
- Inaccurate Temperature Readings:
- Sensor Placement: Ensure the Ecobee thermostat itself and any remote sensors are not near heat sources (lamps, direct sunlight, vents, electronics) or drafts.
- Calibration: If you suspect a consistent offset, you can sometimes calibrate the temperature reading in the Ecobee’s advanced settings (though this is rarely needed for new units).
Advanced Usage and Long-Term Value
Installing an Ecobee is just the beginning. To truly maximize your “Money” savings and enjoy the full “Tech” experience, consider these advanced usage tips:
- Monitor Energy Usage and Reports: Regularly review the detailed energy reports provided by Ecobee. These reports break down your heating and cooling runtime, showing you when and where you’re consuming the most energy. This data is invaluable for identifying patterns, making informed adjustments to your schedule, and tracking your savings over time. It’s a key feature that transforms your Ecobee from a controller into an insightful energy management tool.
- Leverage Utility Rebates and Incentives: Many energy providers offer rebates or incentives for installing smart thermostats like Ecobee. Check your local utility company’s website or Ecobee’s own rebate finder tool to see if you qualify. These programs can significantly offset the upfront cost of your thermostat, boosting your return on investment. This directly contributes to the “Money” aspect of your smart home upgrade.
- Explore Advanced Settings and Integrations:
- HVAC Overcool Max (for AC): Allows the system to slightly overcool to remove more humidity, which can make a higher temperature feel more comfortable.
- Ventilation Control: If your system supports it, Ecobee can manage fresh air intake.
- IFTTT Applets: Dive deeper into IFTTT to create custom automations that respond to external factors like weather forecasts, sunrise/sunset, or even your phone’s location.
- Smart Home Ecosystem Expansion: Consider how your Ecobee can interact with other smart devices. For example, linking it to smart blinds that close automatically on hot days, or integrating with smart lighting that adjusts based on occupancy.
- Stay Updated with Firmware: Ecobee regularly releases firmware updates that introduce new features, improve performance, and enhance security. Your thermostat will typically update automatically when connected to Wi-Fi, but you can check for updates in the app. Regular updates ensure your device remains cutting-edge and secure.
- Maintain Your Sensors: Periodically dust your Ecobee thermostat and remote sensors to ensure accurate readings. While low maintenance, keeping them clean ensures optimal performance.
By taking advantage of these tips, you’re not just installing a thermostat; you’re implementing a sophisticated energy management system that actively works to reduce your utility bills, enhance your comfort, and elevate your home into a truly smart environment. The initial DIY installation is a testament to the accessible nature of modern “Tech,” empowering you to take control of your home’s climate and financial future.
Embracing an Ecobee thermostat is more than just an upgrade; it’s an investment in a smarter, more sustainable, and ultimately more comfortable home. By following this guide, you’ve not only mastered the “how-to” of installation but also unlocked the potential for significant energy savings and seamless integration into the growing ecosystem of smart home technology. From the initial wiring to the nuanced configuration of sensors and smart schedules, each step contributes to a home environment that is precisely tuned to your lifestyle, delivering comfort when you need it and conserving energy when you don’t. The fusion of intuitive design with powerful “Tech” capabilities, coupled with the tangible “Money” savings through optimized energy consumption, makes the Ecobee a standout choice for the modern homeowner. Embrace the intelligence, enjoy the savings, and revel in the comfort of your newly smart home.
aViewFromTheCave is a participant in the Amazon Services LLC Associates Program, an affiliate advertising program designed to provide a means for sites to earn advertising fees by advertising and linking to Amazon.com. Amazon, the Amazon logo, AmazonSupply, and the AmazonSupply logo are trademarks of Amazon.com, Inc. or its affiliates. As an Amazon Associate we earn affiliate commissions from qualifying purchases.