In the dynamic landscape of Linux software distribution, traditional package managers like apt, yum, and pacman have long been the bedrock, providing robust and secure ways to install applications. However, as the demand for cross-distribution compatibility, easier updates, and user-level installations grows, innovative solutions are emerging. Among these, AppImage stands out as a powerful and increasingly popular format, revolutionizing how Linux users access and manage their software.
This comprehensive guide will delve into the world of AppImages, explaining what they are, why they offer significant advantages, and providing a step-by-step tutorial on how to install and effectively manage them on your Linux system. Whether you’re a seasoned Linux user seeking more flexibility or a newcomer looking for a simpler way to run cutting-edge software, understanding AppImages is a valuable skill that enhances your digital productivity and experience.

Understanding AppImages: A Leap in Linux Software Distribution
The traditional method of installing software on Linux often involves dealing with dependencies, repository management, and potential conflicts between different software versions. AppImages offer an elegant solution to many of these challenges, providing a self-contained, portable, and user-friendly way to distribute and run applications.
What Exactly is an AppImage?
At its core, an AppImage is a single file that contains an application and all the libraries and dependencies it needs to run. This “one app = one file” philosophy means that you don’t “install” an AppImage in the conventional sense of adding it to your system’s package database. Instead, you simply download the file, make it executable, and run it.
Think of an AppImage as a portable application that carries everything it needs within itself, much like a .exe file on Windows or a .dmg package on macOS. This self-contained nature ensures that the application runs consistently across different Linux distributions, regardless of their specific package versions or system configurations. This concept is particularly appealing for developers who want to distribute their software widely without compiling for countless distributions, and for users who want to access the latest versions of applications without waiting for repository updates.
Why Choose AppImages? The Advantages for Linux Users
The rise of AppImages isn’t just a fleeting trend; it addresses genuine pain points in the Linux ecosystem, offering a suite of benefits that enhance flexibility, security, and productivity.
-
Portability and Zero Installation: This is perhaps the most significant advantage. AppImages require no formal installation. You can store them on a USB drive, a network share, or cloud storage, and run them directly from anywhere. This makes them ideal for temporary use, demonstrating software on different machines, or maintaining a personal toolkit of applications without cluttering your system. Just download, make executable, and run – it’s that simple.
-
Distribution Agnostic: A common headache for Linux users and developers is the fragmentation of distributions, each with its own package manager and library versions. AppImages overcome the dreaded “dependency hell” by bundling all necessary components. An AppImage built on Ubuntu will typically run flawlessly on Fedora, Arch, Debian, openSUSE, and virtually any other modern Linux distribution. This universality is a game-changer for software accessibility.
-
No Root Privileges Required: Installing software often demands root access, which can be a security concern or simply an inconvenience for users in restricted environments. AppImages can be run entirely from your user directory, without requiring
sudoor any administrative privileges. This enhances security by limiting the potential impact of a compromised application and empowers users with greater control over their software. -
Always Access to the Latest Software: Official distribution repositories, while stable and secure, can sometimes lag behind in offering the absolute latest versions of applications. Developers often release cutting-edge features and bug fixes first as AppImages. This allows users to access the newest functionalities as soon as they are available, ensuring they are always at the forefront of software innovation.
-
Clean Uninstallation: Since AppImages don’t integrate deeply into your system like traditional packages, removing them is as simple as deleting the AppImage file itself. No leftover configuration files, no orphaned dependencies, no complex uninstallation commands. This tidiness contributes to a cleaner and more efficient system over time.
-
Sandbox-like Behavior: While not a true sandbox like Flatpak or Snap, AppImages are largely self-contained and have minimal impact on your system’s core libraries. This reduces the risk of conflicts with other installed software and helps maintain system stability, aligning with best practices for digital security.
In essence, AppImages provide a pragmatic solution for modern software distribution, offering unparalleled flexibility and ease of use, which directly contributes to enhanced productivity for Linux users across the board.
Preparing Your Linux System for AppImages
Before you dive into downloading and running AppImages, a minimal amount of preparation ensures a smooth experience. Most modern Linux distributions are already well-equipped, but a quick check can prevent common hiccups.
Checking Prerequisites and Best Practices
The primary requirement for running an AppImage is that the file itself must be marked as executable. Without this permission, your system won’t know that it’s supposed to run the file as a program. Additionally, while not strictly a prerequisite for all AppImages, the FUSE (Filesystem in Userspace) library is often recommended or required for optimal performance and integration, especially for larger or more complex applications. FUSE allows unprivileged users to mount filesystems, which AppImages use internally to present their bundled contents.
Here’s a quick checklist:
-
Ensure FUSE is Installed (and if not, install it):
- Many modern Linux distributions come with FUSE pre-installed. You can check if it’s installed by trying to run an AppImage; if you encounter an error related to FUSE, you’ll need to install it.
- For Debian/Ubuntu-based systems:
bash

sudo apt update

sudo apt install libfuse2
- For Fedora/CentOS-based systems:
bash

sudo dnf install fuse-libs
- For Arch Linux-based systems:
bash

sudo pacman -S fuse2
- This step ensures that the AppImage can properly “mount” its internal filesystem to access its components.
-
Download from Trusted Sources: Always download AppImages from the official website of the software developer or a reputable open-source repository. Like any executable file, AppImages from unknown sources could pose a security risk. Prioritizing secure downloads is a key aspect of digital security in the Linux environment.
-
Sufficient Disk Space: While AppImages are single files, they can range in size from a few megabytes to several gigabytes. Ensure you have enough disk space in the directory where you plan to store them.
With these simple checks, your system will be ready to embrace the convenience of AppImages.
Step-by-Step Guide: Installing and Running an AppImage
The process of “installing” and running an AppImage is remarkably straightforward. We’ll cover the basic command-line approach and then explore a more integrated method for a seamless desktop experience.
Method 1: The Basic Command-Line Approach
This method is universal, works on any Linux distribution, and is perfect for quick access or for users who prefer the terminal.
Step 1: Download the AppImage
Navigate to the official website of the application you wish to use and locate the download link for its AppImage version. For instance, if you’re looking for Balena Etcher, you’d go to their official download page.
Once downloaded, the AppImage file will typically have a .AppImage extension (e.g., Etcher-1.5.116-x64.AppImage) and will likely be in your Downloads directory.
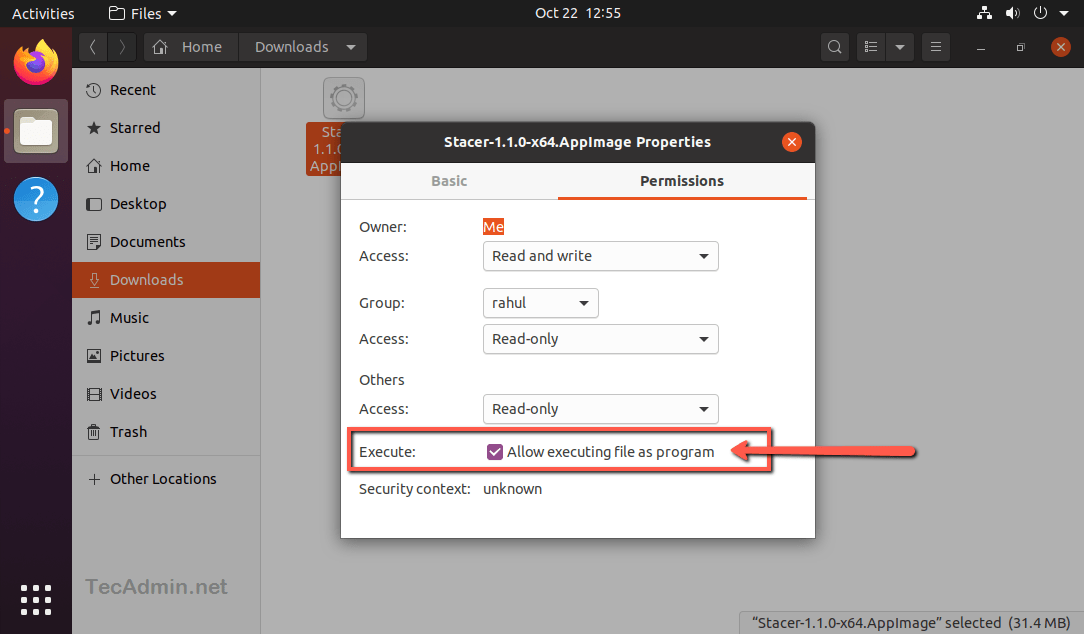
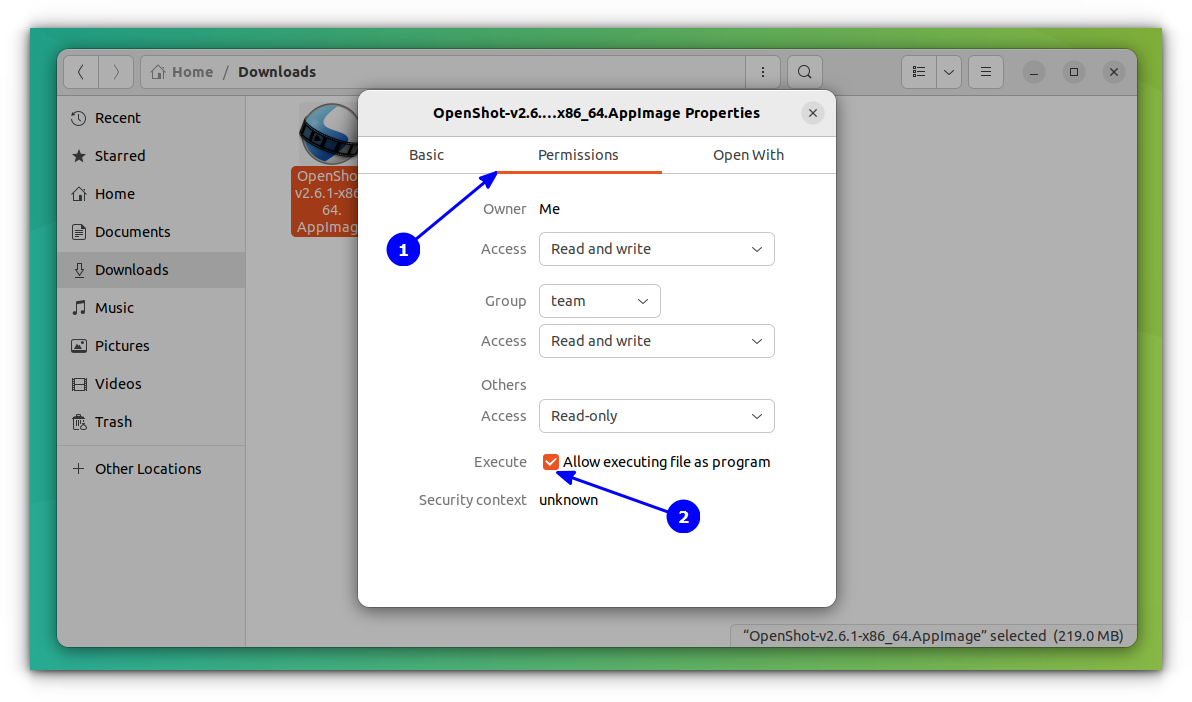
Step 2: Make it Executable
This is the most crucial step. By default, files downloaded from the internet do not have executable permissions for security reasons. You need to explicitly grant this permission.
- Open your terminal.
- Navigate to the directory where you downloaded the AppImage. If it’s in
Downloads, you’d type:
bash

cd ~/Downloads
- Grant executable permissions using the
chmodcommand. Replaceyour-app.AppImagewith the actual name of your downloaded file:
bash

chmod +x your-app.AppImage
chmod: Change mode (permissions)+x: Add executable permissionyour-app.AppImage: The target file
Step 3: Run the AppImage
Once the file is executable, you can run it directly from the terminal.
Still in the same directory, execute the file by prefixing it with ./:
./your-app.AppImage
The application should now launch! You can also double-click the file in your file manager, and it should open directly, assuming your file manager is configured to run executable files.
Method 2: Integrating AppImages for a Desktop Experience
While the command-line method is effective, you might want your AppImages to behave more like traditionally installed applications – appearing in your application menu, having proper icons, and launching with a simple click. There are two main ways to achieve this: manually creating a .desktop file or using a dedicated tool like AppImageLauncher.
Option A: Manual Integration (Creating a .desktop File)
For a single AppImage or if you prefer a hands-on approach, creating a .desktop file provides good integration. These files are standard Freedesktop.org entries for applications.
-
Move the AppImage to a sensible location: It’s good practice to move your AppImages out of
Downloadsto a dedicated directory, such as~/Applicationsor~/.local/bin, to keep them organized.mkdir -p ~/Applications mv ~/Downloads/your-app.AppImage ~/Applications/ cd ~/Applications -
Create a
.desktopfile: Open a text editor and create a new file namedyour-app.desktop(replaceyour-appwith your application’s name) in~/.local/share/applications/.nano ~/.local/share/applications/your-app.desktopPaste the following content, adjusting
Name,Exec, andIconaccordingly:[Desktop Entry] Name=Your App Name Comment=A brief description of your app Exec=/home/your_username/Applications/your-app.AppImage # Adjust path and filename Icon=/home/your_username/Applications/your-app.png # Optional: path to an icon file, or a standard icon name Terminal=false Type=Application Categories=Utility; # Or other relevant categories like Graphics;Development;- Name: The name that appears in your application menu.
- Comment: A tooltip description.
- Exec: The full path to your executable AppImage. Crucially, ensure this path is correct.
- Icon: You can provide the full path to an icon file (e.g., a
.pngor.svg) or use a standard icon name recognized by your desktop environment (e.g.,firefox). If you have an icon for your app, place it alongside the AppImage or in a well-known icon directory. - Terminal=false: Ensures the app runs without an extra terminal window popping up.
- Type=Application: Specifies it’s an application entry.
- Categories: Helps the application appear in the correct sections of your menu.
-
Save the file and make it executable (optional but recommended for some desktop environments):
bash

chmod +x ~/.local/share/applications/your-app.desktop
Your application should now appear in your desktop environment’s application launcher or menu.
Option B: Using AppImageLauncher (Recommended for Seamless Integration)
For managing multiple AppImages and achieving the best desktop integration, AppImageLauncher is highly recommended. It’s an open-source tool designed specifically to integrate AppImages into your system, creating desktop entries, handling MIME types, and providing update capabilities.
-
Install AppImageLauncher:
- For Debian/Ubuntu-based systems: AppImageLauncher provides a PPA (Personal Package Archive).
bash

sudo add-apt-repository ppa:appimagelauncher-team/stable

sudo apt update

sudo apt install appimagelauncher
- For Arch Linux/Manjaro: It’s available in the AUR (Arch User Repository). You can install it using an AUR helper like
yayorpamac.
bash

yay -S appimagelauncher

# or

pamac install appimagelauncher
- For other distributions: You might need to download the
.debor.rpmpackage directly from the AppImageLauncher GitHub releases page and install it using your system’s package manager, or even compile it from source.
- For Debian/Ubuntu-based systems: AppImageLauncher provides a PPA (Personal Package Archive).
-
How AppImageLauncher Works:
Once installed, AppImageLauncher automatically intercepts any AppImage you double-click. It will prompt you with an option to “Integrate and run” or “Run once.”- Integrate and run: This is the recommended option. AppImageLauncher will move the AppImage to a designated directory (usually
~/Applicationsor~/bin), create a.desktopfile for it, and add it to your application menu. It also handles icon extraction and other integration details. - Run once: This just executes the AppImage without any integration, similar to the basic command-line approach.
From then on, your integrated AppImages will behave like any other installed application, complete with icons and menu entries, significantly boosting your daily productivity. AppImageLauncher also helps manage updates by offering to replace older versions with newer ones while preserving your settings.
- Integrate and run: This is the recommended option. AppImageLauncher will move the AppImage to a designated directory (usually
Launching Your AppImage
Once you’ve followed one of the “installation” methods, launching your AppImage is straightforward:
- From the terminal:
cd /path/to/your/AppImage && ./your-app.AppImage(always works). - From your desktop environment’s application menu/launcher: If you integrated it manually or with AppImageLauncher, simply search for its name and click to launch.
- By double-clicking: In your file manager, double-click the AppImage file (after making it executable and optionally with AppImageLauncher).
Common Issues and Troubleshooting
While AppImages are designed for simplicity, you might encounter a few common issues. Here’s how to troubleshoot them effectively, keeping digital security and system stability in mind.
“Permission Denied” Error
- Cause: The most frequent issue. The AppImage file does not have executable permissions.
- Solution: Open your terminal, navigate to the directory where the AppImage is located, and run
chmod +x your-app.AppImage. Remember to replaceyour-app.AppImagewith the correct filename.
“Cannot Execute Binary File” or Missing FUSE
- Cause: Your system might be missing the FUSE library, or it’s not correctly set up. Some older or minimalist distributions might not include it by default.
- Solution: Install FUSE if you haven’t already. Refer to the “Preparing Your Linux System for AppImages” section for installation commands specific to your distribution (e.g.,
sudo apt install libfuse2on Ubuntu). Rebooting might be necessary after installation for the changes to take effect.
No Desktop Integration (No Icon, Not in Menu)
- Cause: The
.desktopfile is missing, incorrectly configured, or your desktop environment hasn’t re-scanned for new applications yet. - Solution:
- Check the
.desktopfile: Ensure it exists in~/.local/share/applications/, has the correctExecpath pointing to your AppImage, and theNameandTypefields are set. Double-check for typos. - Restart your desktop environment: Sometimes simply logging out and back in can refresh the application menu.
- Use AppImageLauncher: If manual integration feels cumbersome, installing AppImageLauncher will automate this process for future AppImages.
- Check the
Application Fails to Launch or Crashes Unexpectedly
- Cause: This could be due to a corrupted download, a bug in the AppImage itself, or missing system libraries that the AppImage might still implicitly rely on (though rare).
- Solution:
- Re-download the AppImage: The file might have been corrupted during download.
- Check the developer’s website/issue tracker: There might be known issues with that specific version or advice for running it on certain systems.
- Run from terminal for error messages: Sometimes running
./your-app.AppImagein the terminal will output helpful error messages that can point you towards the problem. - Ensure
libfuse2(or equivalent) is installed.
Updates for AppImages
- Cause: AppImages don’t automatically update like packages from a system repository.
- Solution:
- Manual update: Download the new version of the AppImage from the official source, make it executable, and replace the old file. If you integrated it manually, the
.desktopfile will automatically point to the new version if you keep the same filename and location. - AppImageLauncher update: AppImageLauncher often provides an update mechanism, making it easier to manage and update your AppImages through its interface. This is a significant productivity booster for users with many AppImages.
- Manual update: Download the new version of the AppImage from the official source, make it executable, and replace the old file. If you integrated it manually, the
Security Concerns with AppImages
- Concern: Since AppImages bundle everything, it’s harder to inspect individual components, and they are not typically signed by distribution maintainers.
- Solution: Always download AppImages from the official and trusted sources of the software developers. Verify checksums (MD5, SHA256) if provided by the developer to ensure the file hasn’t been tampered with. Treat AppImages downloaded from unknown sources with the same caution as any unknown executable, reinforcing good digital security practices.
Conclusion
AppImages represent a significant step forward in Linux software distribution, offering unparalleled flexibility, portability, and ease of use. By providing self-contained applications that run across virtually all Linux distributions without complex installations or root privileges, they empower users with greater control over their software environment and simplify the process of accessing the latest tools.
Whether you opt for the straightforward command-line execution or leverage the power of AppImageLauncher for seamless desktop integration, understanding how to effectively manage AppImages is a valuable skill for any Linux user. This modern approach to software delivery not only enhances productivity by making software more accessible but also aligns with contemporary needs for clean system management and the ability to access cutting-edge applications without compromise. Embrace the future of Linux software – give AppImages a try today and experience a new level of freedom and convenience.
aViewFromTheCave is a participant in the Amazon Services LLC Associates Program, an affiliate advertising program designed to provide a means for sites to earn advertising fees by advertising and linking to Amazon.com. Amazon, the Amazon logo, AmazonSupply, and the AmazonSupply logo are trademarks of Amazon.com, Inc. or its affiliates. As an Amazon Associate we earn affiliate commissions from qualifying purchases.