For automotive enthusiasts and daily drivers alike, the quest for the ultimate ride experience often leads to exploring advanced suspension systems. Among these, air suspension stands out as a pinnacle of customizable comfort, performance, and aesthetic appeal. Transforming your vehicle’s stance and ride dynamics from static springs to dynamic air bladders is a significant upgrade, offering unparalleled adjustability for varying road conditions, load capacities, and personal preferences. While professional installation is always an option, many mechanically inclined individuals are eager to take on the challenge themselves. This comprehensive guide will walk you through the intricate process of installing air suspension, empowering you with the knowledge and confidence to elevate your vehicle’s capabilities.
The Allure of Air Suspension: Why Make the Switch?
Before diving into the nuts and bolts of installation, it’s crucial to understand what air suspension entails and why it has become such a sought-after modification. It’s more than just a mod; it’s a fundamental change in how your vehicle interacts with the road, offering a blend of luxury, utility, and cutting-edge technology.
Understanding Air Suspension Technology
At its core, an air suspension system replaces traditional coil springs or leaf springs with inflatable air springs, often referred to as air bags or air bellows. These air springs are connected to an onboard air compressor, an air tank, and a series of valves and air lines. An electronic control unit (ECU) typically manages the system, allowing the driver to adjust the air pressure within each spring, thereby controlling the vehicle’s ride height and stiffness. This dynamic adjustability is what truly differentiates air suspension from conventional setups. Modern systems can be incredibly sophisticated, incorporating accelerometers and pressure sensors to automatically adapt to road conditions and driving styles, providing a smoother, more controlled ride.
Key Benefits: Performance, Aesthetics, and Practicality
The advantages of air suspension are multifaceted, appealing to a broad spectrum of vehicle owners:
- Unrivalled Ride Comfort: By absorbing road imperfections more effectively than coil springs, air suspension delivers a significantly smoother and more comfortable ride. The ability to fine-tune air pressure allows for a plush, cloud-like experience on highways or a firmer, sportier feel for spirited driving. This adaptability is particularly beneficial for long journeys or for those living in areas with varying road quality.
- Dynamic Ride Height Adjustability: This is perhaps the most celebrated feature. Drivers can raise their vehicle to clear obstacles like speed bumps, steep driveways, or rough terrain, protecting undercarriage components. Conversely, they can lower it for improved aerodynamics at highway speeds, enhanced aesthetics (achieving that coveted “slammed” look), or easier entry and exit. This versatility makes it ideal for show cars, performance vehicles, and even practical daily drivers.
- Superior Load Leveling: For vehicles that frequently carry heavy loads or tow trailers, air suspension automatically levels the vehicle, preventing sag and maintaining optimal steering geometry, braking performance, and headlight aim. This is a significant safety and performance advantage over traditional springs, which can become overstressed and compromise handling under heavy loads.
- Enhanced Handling and Stability: While often associated with comfort, modern air suspension systems, especially those with advanced dampening, can significantly improve handling. By reducing body roll and maintaining a consistent contact patch between tires and the road, they offer better grip and a more confident driving experience, particularly in corners or during evasive maneuvers.
- Customizable Aesthetics (Stance): For many, the ability to control their vehicle’s “stance” is a primary motivator. Air suspension allows for dramatic drops, tucking wheels into fenders for a show-stopping look when parked, and then lifting the vehicle to a practical driving height when on the move. This blend of form and function is highly appealing to the custom car community.
Essential Preparations: Setting the Stage for Success
Installing air suspension is a demanding project that requires meticulous planning and preparation. Rushing through this stage can lead to frustration, errors, and potentially dangerous outcomes. A well-prepared workspace and a thorough understanding of your kit are paramount.
Gathering Your Arsenal: Tools and Equipment Checklist
Before you unbox your new air suspension kit, ensure you have all the necessary tools at hand. This will save you countless trips to the hardware store and keep your workflow smooth.
- Safety Gear: Safety glasses, gloves, steel-toed boots are non-negotiable.
- Lifting Equipment: A sturdy hydraulic floor jack and at least four robust jack stands are essential. Never work under a vehicle supported only by a jack.
- Wrenches and Sockets: A comprehensive set (metric and/or SAE, depending on your vehicle and kit) including ratchets, extensions, and universal joints. Impact wrenches (air or electric) can significantly speed up the removal of stubborn bolts.
- Torque Wrench: Crucial for tightening suspension components to manufacturer specifications, preventing loose parts or over-tightening damage.
- Cutting Tools: A hacksaw or angle grinder for cutting old bolts if necessary. Tubing cutter for air lines.
- Air Line Tools: Deburring tool for air lines, possibly a line crimper if your kit uses specific fittings.
- Electrical Tools: Wire strippers, crimpers, multimeter (for testing continuity and voltage), soldering iron (optional, but recommended for durable electrical connections), heat shrink tubing.
- Marking Tools: Chalk, paint pen, or scribe for marking alignment points.
- Drill and Drill Bits: For mounting the compressor, tank, and manifold.
- Consumables: Zip ties, loom tubing, thread locker (blue Loctite), anti-seize compound, soap and water mixture (for leak detection).
- Measuring Tape: For accurately setting ride heights and component placement.
Choosing the Right Air Suspension Kit
The market offers a wide array of air suspension kits, ranging from basic manual systems to advanced digital setups. Your choice should align with your vehicle, budget, and desired functionality.
- Vehicle-Specific Kits: Always opt for a kit designed specifically for your make and model. This ensures proper fitment, compatibility with OEM mounting points, and optimal performance characteristics. Universal kits often require extensive fabrication.
- Types of Systems:
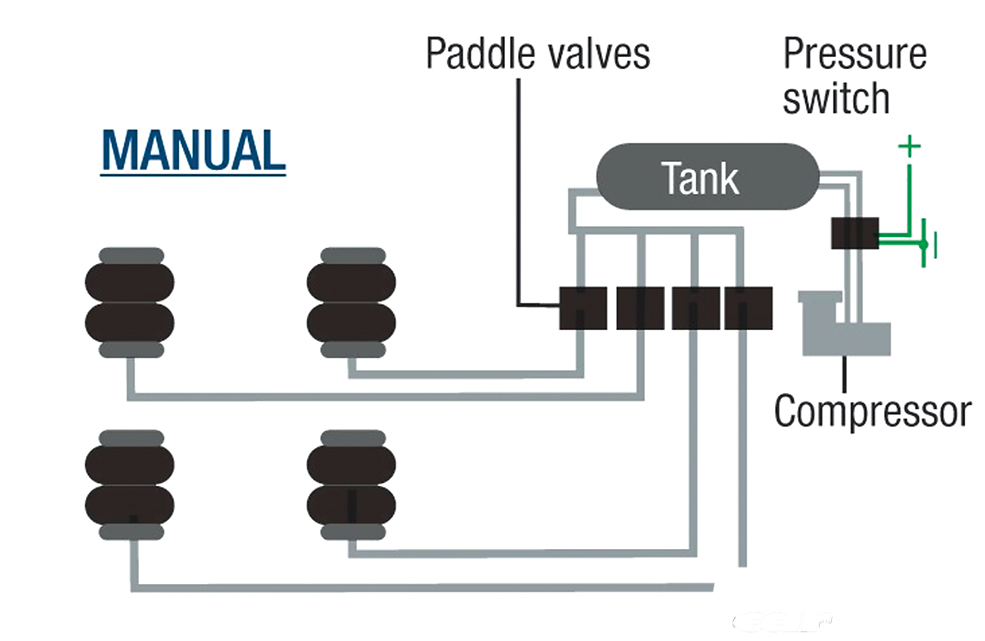
- Manual Systems: Use toggle switches and gauges to inflate/deflate air springs individually or in pairs. More budget-friendly, but less precise.
- Analog Electronic Systems: Utilize electric switches and pressure sensors for more convenient control, often with a digital display.
- Digital Electronic Systems (ECU-based): Offer the most advanced control, often with preset ride heights, automatic leveling, remote control via apps, and sophisticated self-diagnostics. These are typically more expensive but provide superior user experience and precision.
- Component Quality: Invest in a kit with high-quality components – durable air springs, reliable compressors (e.g., Viair), robust air tanks, and leak-free fittings. Skimping on quality here can lead to frequent maintenance and system failures.
- Reputable Brands: Research and choose kits from well-known and respected manufacturers with good customer support and a track record of reliability.
Prioritizing Safety: A Non-Negotiable Step
Working under a vehicle can be incredibly dangerous. Adhere to these safety guidelines without exception:
- Level Ground: Always work on a flat, stable, level surface.
- Chock Wheels: Chock the wheels that are not being lifted to prevent any accidental rolling.
- Disconnect Battery: Disconnect the negative terminal of your vehicle’s battery to prevent electrical shorts or accidental airbag deployment if your car has them.
- Jack Stands Only: Once the vehicle is lifted, always support it securely with jack stands on designated frame points. Never rely solely on a hydraulic jack. Give the vehicle a gentle shake to ensure stability before getting underneath.
- Eye Protection: Flying debris, rust, and fluids can cause serious eye injuries.
- Gloves: Protect your hands from grime, sharp edges, and chemicals.
- Ventilation: If using an angle grinder or performing any tasks that generate fumes, ensure adequate ventilation.
Understanding Your System’s Components
Familiarize yourself with every component in your air suspension kit. Knowing what each part does and where it goes will make the installation process much smoother.
- Air Springs/Bags: Replace your traditional springs, providing adjustable lift/drop.
- Struts/Shocks: Often integrated with the air springs (air struts) or separate.
- Compressor: Pumps air into the system. Often rated by CFM (Cubic Feet per Minute) and duty cycle.
- Air Tank: Stores compressed air, allowing for quicker adjustments without constantly running the compressor.
- Air Lines: Hoses that transport compressed air between components (compressor, tank, manifold, air springs). Typically made of high-pressure nylon or DOT-approved lines.
- Fittings: Connectors for air lines, crucial for leak-free operation. Often push-to-connect or threaded.
- Manifold/Valve Block: Directs air to individual air springs, controlling inflation and deflation.
- ECU (Electronic Control Unit): The “brain” of digital systems, processing sensor data and controlling valves.
- Pressure Sensors: Monitor air pressure in the tank and individual air springs.
- Control Panel/Remote/App: User interface for adjusting ride height.
Deconstructing the Installation Process: A Step-by-Step Guide
This section outlines the general steps involved in installing air suspension. While specific procedures may vary slightly depending on your vehicle and kit, the fundamental principles remain consistent. Always refer to your kit’s instructions and your vehicle’s service manual for precise torque specifications and procedures.
Phase 1: Removing the OEM Suspension
This is often the most labor-intensive part, especially on older or rust-prone vehicles.
- Lift and Secure the Vehicle: Jack up the vehicle and place it securely on jack stands, ensuring all four wheels are off the ground if you’re doing a full front and rear installation. Remove the wheels.
- Disconnect Components: Carefully disconnect any components attached to the original suspension that might impede removal, such as brake lines, ABS sensor wires, sway bar end links, and tie rod ends (if replacing complete struts). Be gentle with these, as damage can lead to costly repairs.
- Unbolt Old Suspension:
- Front: Support the lower control arm with a jack, then unbolt the lower mounting points of the strut/shock assembly. Access the upper strut mounts (usually in the engine bay) and unbolt them. Carefully lower and remove the entire strut assembly.
- Rear (Coil-Over Shock): Similar to the front, support the axle/lower control arm, unbolt the lower shock mount, then the upper shock mount. Remove the shock. If separate, the coil spring may be under compression; use a spring compressor if necessary, or carefully lower the control arm to release tension (refer to your vehicle’s manual for safe spring removal).
- Rear (Leaf Spring/Beam Axle): This might involve different procedures, but the principle is to remove the components being replaced.
- Inspect and Clean: Take this opportunity to inspect surrounding components like bushings, ball joints, and tie rod ends for wear. Clean the mounting areas of any dirt or rust to ensure a flush fit for the new components.
Phase 2: Installing the Air Springs and Struts
This is where your vehicle starts to take on its new identity.
- Assemble Air Struts (if separate): If your kit provides separate air bags and struts, assemble them according to the manufacturer’s instructions, ensuring all seals and mounting hardware are correctly installed.
- Install New Air Struts/Bags:
- Front: Carefully insert the new air strut assembly into the wheel well. Align the upper mounting studs with the holes in the chassis and loosely attach the nuts. Align the lower strut mounting points with the control arm or knuckle and insert the bolts.
- Rear: Install the rear air springs (either integrated into a strut or as a separate bag that sits in place of the coil spring). Ensure they are properly seated in their upper and lower perches. If it’s an air shock, install it similar to the front strut.
- Tighten Mounting Hardware: Once all components are in place, reattach any disconnected brake lines, ABS wires, and sway bar links. Refer to your vehicle’s service manual and the air suspension kit’s instructions for the correct torque specifications for all bolts. This step is critical for safety and system integrity. Use thread locker on critical fasteners as recommended.
- Install Air Fittings: Thread the provided air fittings into the top of each air spring. Ensure they are tightened securely but do not overtighten, as this can strip threads or damage the fitting. Use a small amount of thread sealant (Teflon tape or liquid sealant) if specified by the kit.
Phase 3: Setting Up the Air Management System
This phase involves creating the “heart” and “lungs” of your air suspension system. Proper placement and secure mounting are essential.
- Mount Compressor and Air Tank:
- Location: Choose a location that is dry, protected from road debris, and has good ventilation. Popular spots include the trunk, under the rear seat, or in the spare tire well. For trucks, under the bed or in a custom box are common.
- Security: Mount the compressor and tank securely to a solid surface using appropriate hardware. Vibration isolators are often supplied with the compressor; use them to reduce noise and extend compressor life.
- Noise and Heat: Be mindful of compressor noise and heat generation. Ensure adequate clearance for airflow.
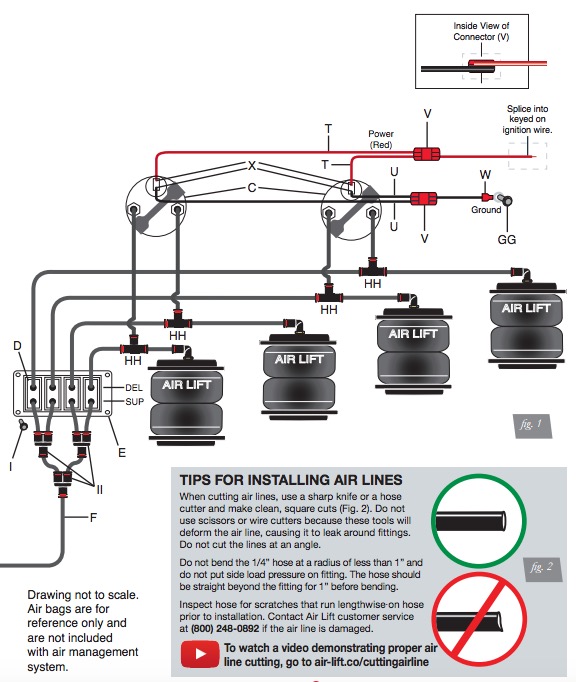
- Route Air Lines:
- Planning: Plan your air line routing carefully. Avoid sharp bends, kinks, or areas where lines could be pinched, abraded by moving parts, or exposed to excessive heat (e.g., exhaust).
- Protection: Use loom tubing or zip ties to secure lines along frame rails or existing wiring harnesses. Leave a small amount of slack to account for suspension travel.
- Cutting: Use a specialized air line cutter to ensure clean, perpendicular cuts. Burrs or uneven cuts can cause leaks.
- Install Manifold/Valve Block: Mount the manifold in a protected, easily accessible location, often near the tank and compressor. Connect the main air line from the tank to the manifold’s inlet, and then route individual air lines from the manifold’s outlets to each air spring. Label lines if necessary for easier troubleshooting.
Phase 4: The Electrical Backbone
The electrical system powers your air suspension and allows you to control it. Clean, secure wiring is crucial for reliable operation.
- Compressor Wiring:
- Power: Connect the main power wire from the compressor (often a heavy gauge wire) directly to the vehicle’s battery positive terminal, always through an inline fuse (as specified by the kit manufacturer).
- Ground: Connect the compressor’s ground wire to a clean, unpainted chassis ground point.
- Relay: Most compressors require a relay to handle the high current draw, triggered by a smaller gauge wire from your control system.
- Manifold/ECU Wiring: Connect the power and ground wires for the manifold and ECU as per the kit’s instructions. These typically draw less current than the compressor and can often be connected to a switched ignition power source (so the system only operates when the car is on) via a fuse in the vehicle’s fuse box.
- Control Panel/Remote Wiring: Route the necessary wires from the ECU to your chosen control panel or connect the remote receiver.
- Professional Connections: Use crimp connectors with heat shrink, or preferably solder and heat shrink all electrical connections, to ensure durability and prevent corrosion. Neatly loom and secure all wiring to prevent chafing or interference.
Phase 5: Leak Detection and System Testing
This is arguably the most critical step to ensure a reliable and trouble-free system. Do not skip or rush this phase.
- Initial Power-Up: Reconnect the vehicle’s battery. Turn the ignition to the “on” position (engine off).
- Inflate System: Power up your air suspension system. The compressor should start running to fill the air tank and then the air springs. Monitor the pressure gauges.
- Cycle System: Once the system is fully pressurized, cycle the suspension through its full range of motion (raise and lower) several times to seat all components and check for any mechanical binding or obstructions.
- Leak Detection (The Soap Test):
- Mix a solution of dish soap and water in a spray bottle.
- Spray generously on all air fittings, connections, and around the air springs themselves.
- Look closely for bubbles. Any bubbling indicates an air leak. Tighten the fitting or re-cut and re-seat the air line if a leak is found. This process can be tedious but is absolutely necessary.
- Repeat the soap test on all connections until no leaks are detected.
- Overnight Test: Once you believe all leaks are sealed, fully inflate the system and leave the vehicle overnight. Check the pressure gauges in the morning. A significant drop in pressure indicates a slow leak that needs to be found and rectified.
Post-Installation: Fine-Tuning and Long-Term Care
Congratulations, your air suspension is installed! However, the journey isn’t quite over. Fine-tuning and regular maintenance are key to enjoying your new setup for years to come.
Calibration and Ride Height Adjustment
- Initial Calibration: If your kit has a digital management system, follow its instructions for initial calibration. This often involves teaching the system the “zero pressure” point and various ride height presets.
- Setting Ride Heights: With the vehicle on level ground, inflate the system to your desired driving height. Use a tape measure to ensure the vehicle is level front-to-back and side-to-side. Adjust individual air spring pressures as needed. Consider your primary driving height and also a “slammed” height for parking and a “maximum lift” height for clearance.
- Alignment: After any significant change to a vehicle’s suspension, a professional wheel alignment is absolutely mandatory. Air suspension significantly alters geometry, and proper alignment is crucial for tire wear, steering feel, and overall safety. Get an alignment done at your primary driving height.
Ongoing Maintenance and Troubleshooting
Air suspension systems, while robust, benefit from regular checks.
- Routine Inspections: Periodically inspect all air lines for chafing or damage. Check electrical connections for corrosion. Inspect air springs for any signs of wear or cracking.
- Drain Air Tank: Depending on your climate and humidity levels, moisture can accumulate in the air tank. Most tanks have a drain valve at the bottom. Periodically drain any accumulated moisture to prevent rust inside the tank and protect your compressor and valves.
- Compressor Filter: Many compressors have an air filter. Check and clean or replace it according to the manufacturer’s recommendations.
- Listen for Leaks: Over time, fittings can loosen or lines can develop small leaks. Listen for hissing sounds, especially when the vehicle has been parked. Re-perform a soap test if you suspect a leak.
- Common Issues:
- Compressor not running: Check fuses, relays, and power connections.
- System losing pressure: Most likely a leak in an air line or fitting.
- Uneven ride height: Could be an individual air spring leak, a faulty height sensor (on digital systems), or an issue with a manifold valve.
- System constantly airing up: Often indicates a persistent small leak somewhere.

Conclusion: Elevating Your Ride, Enhancing Your Experience
Installing air suspension is an undertaking that demands patience, precision, and a commitment to safety. However, the rewards are immense: a vehicle that offers unparalleled ride comfort, dynamic adjustability, and a captivating aesthetic presence. By carefully following the steps outlined in this guide – from meticulous preparation and systematic installation to rigorous leak testing and diligent maintenance – you can confidently transform your vehicle. Embrace the technology, enjoy the journey, and experience the elevated driving experience that only a well-installed air suspension system can provide. Your vehicle will thank you, and every drive will become an opportunity to showcase its newfound versatility and style.
aViewFromTheCave is a participant in the Amazon Services LLC Associates Program, an affiliate advertising program designed to provide a means for sites to earn advertising fees by advertising and linking to Amazon.com. Amazon, the Amazon logo, AmazonSupply, and the AmazonSupply logo are trademarks of Amazon.com, Inc. or its affiliates. As an Amazon Associate we earn affiliate commissions from qualifying purchases.