
In today’s interconnected digital landscape, the efficient management of network resources, user accounts, and security policies is paramount for any organization. At the heart of this management for many businesses lies Microsoft’s Active Directory, a powerful directory service that organizes network components. For IT professionals, system administrators, and even advanced users, the ability to interact with and manage Active Directory from a client machine is not just a convenience, but a necessity. This is where Active Directory Users and Computers (ADUC) comes into play.
ADUC is a Microsoft Management Console (MMC) snap-in that serves as the primary tool for administering users, groups, computers, and organizational units (OUs) within an Active Directory domain. While it’s standard practice for domain controllers to host this tool, managing a large or distributed network often requires administrators to perform tasks from their everyday workstations. For those running Windows 11, the process of installing ADUC might seem a little different than on older operating systems, but it’s straightforward once you understand the necessary steps.
This comprehensive guide will walk you through everything you need to know about getting ADUC up and running on your Windows 11 machine. We’ll delve into what ADUC is, why it’s so important, how to prepare your system, and provide a detailed, step-by-step installation process. By the end of this article, you’ll be equipped to leverage the full power of ADUC directly from your Windows 11 desktop, streamlining your administrative tasks and enhancing your productivity. Whether you’re a seasoned IT professional or just getting started with network administration, mastering ADUC on Windows 11 is a valuable skill in the modern tech ecosystem.
Understanding Active Directory and ADUC’s Indispensable Role
Before diving into the “how-to,” it’s crucial to grasp the foundational concepts of Active Directory and understand why ADUC is such a cornerstone tool for IT administration. This understanding will not only clarify its importance but also highlight the value it brings to your daily tasks, reinforcing why its installation on your Windows 11 machine is a strategic move for enhanced digital security and productivity.
What is Active Directory? A Foundation of Network Management
Active Directory (AD) is a directory service developed by Microsoft for Windows domain networks. It’s essentially a database that stores information about network objects – like users, computers, groups, printers, and shared folders – and provides a centralized, standardized way to manage them. Think of it as a phone book and security guard for your entire network.
Key functions of Active Directory include:
- Centralized Authentication: When a user logs into a computer on a domain, Active Directory verifies their credentials.
- Authorization: It determines what resources a user or computer is allowed to access.
- Information Storage: It stores detailed information about every object in the network.
- Network Resource Management: It allows administrators to organize, manage, and control access to resources across the network.
- Policy Enforcement: Group Policy, a feature of Active Directory, allows administrators to define security settings, software installation policies, and other configurations across a large number of users and computers.
In essence, Active Directory brings order and control to complex network environments, making it easier for organizations to manage their IT infrastructure, maintain security, and ensure compliance. Without it, managing a network with more than a handful of users and devices would quickly become unwieldy and insecure.
Why is ADUC Essential for IT Professionals?
Active Directory Users and Computers (ADUC) is the primary graphical user interface (GUI) tool that administrators use to manage the objects stored within Active Directory. While other tools exist (like PowerShell for scripting or Active Directory Administrative Center for more advanced tasks), ADUC remains the most frequently used and intuitive tool for many day-to-day operations.
Here’s why ADUC is indispensable:
- User Account Management: Create, modify, delete, enable, disable user accounts. Reset passwords, manage user properties (department, title, contact info), and configure logon hours or workstation restrictions. This is perhaps its most common use, ensuring proper digital security by controlling who has access to what.
- Group Management: Create security and distribution groups, add or remove members, and configure group scope. Groups are crucial for assigning permissions efficiently across multiple users.
- Computer Account Management: Manage computer objects, move them between OUs, and reset their accounts.
- Organizational Unit (OU) Management: Create, delete, and move OUs to structure your Active Directory logically, which is vital for applying Group Policies effectively and delegating administrative control.
- Basic Domain Management: View domain controllers, manage built-in containers, and delegate control over specific OUs or tasks to other administrators or help desk staff.
- Troubleshooting: Quickly identify user lockout status, check group memberships, or verify computer account status.
For IT professionals, ADUC streamlines administrative workflows, reduces the complexity of managing a large user base, and ensures that security policies are consistently applied. Installing it on your Windows 11 workstation means you don’t have to remote into a domain controller every time you need to perform a simple task, significantly boosting your productivity and responsiveness.
Preparing Your Windows 11 Machine for ADUC Installation
Installing ADUC on Windows 11 isn’t as simple as downloading a standalone application. It’s part of a larger suite of tools, and certain prerequisites must be met to ensure a smooth installation process. This section will guide you through preparing your system, emphasizing the importance of administrative privileges, a stable internet connection, and understanding the role of Remote Server Administration Tools (RSAT). Proper preparation is key to avoiding common pitfalls and ensuring a successful setup, ultimately contributing to your overall digital security and efficient system management.
System Requirements and Essential Prerequisites
Before you begin the installation of ADUC, it’s vital to ensure your Windows 11 machine meets the necessary criteria. While Windows 11 is generally capable, specific configurations are often required for seamless integration with Active Directory environments.
- Operating System Edition: While Windows 11 Home edition users might struggle with some advanced domain functionalities, Windows 11 Pro, Enterprise, or Education editions are strongly recommended, as they offer full domain join capabilities and robust support for tools like ADUC. Most IT professionals will already be on these editions.
- Administrative Privileges: You must be logged in with an account that has local administrator rights on your Windows 11 machine. Without these privileges, you won’t be able to install optional features or make system-level changes. This is a fundamental security measure in Windows.
- Internet Connectivity: The ADUC tool, as part of RSAT, is often downloaded from Microsoft’s servers as an “Optional Feature.” A stable and active internet connection is essential for this download process.
- Sufficient Disk Space: While RSAT tools aren’t excessively large, ensure you have a few hundred megabytes of free disk space to accommodate the installation files and the tools themselves.
- Up-to-date Windows: It’s always a good practice to ensure your Windows 11 operating system is fully updated. Go to
Settings > Windows Updateand install any pending updates. This helps prevent compatibility issues and ensures you have the latest security patches.
Meeting these basic requirements lays the groundwork for a trouble-free installation and helps maintain the overall health and security of your workstation.
The Indispensable Role of Remote Server Administration Tools (RSAT)
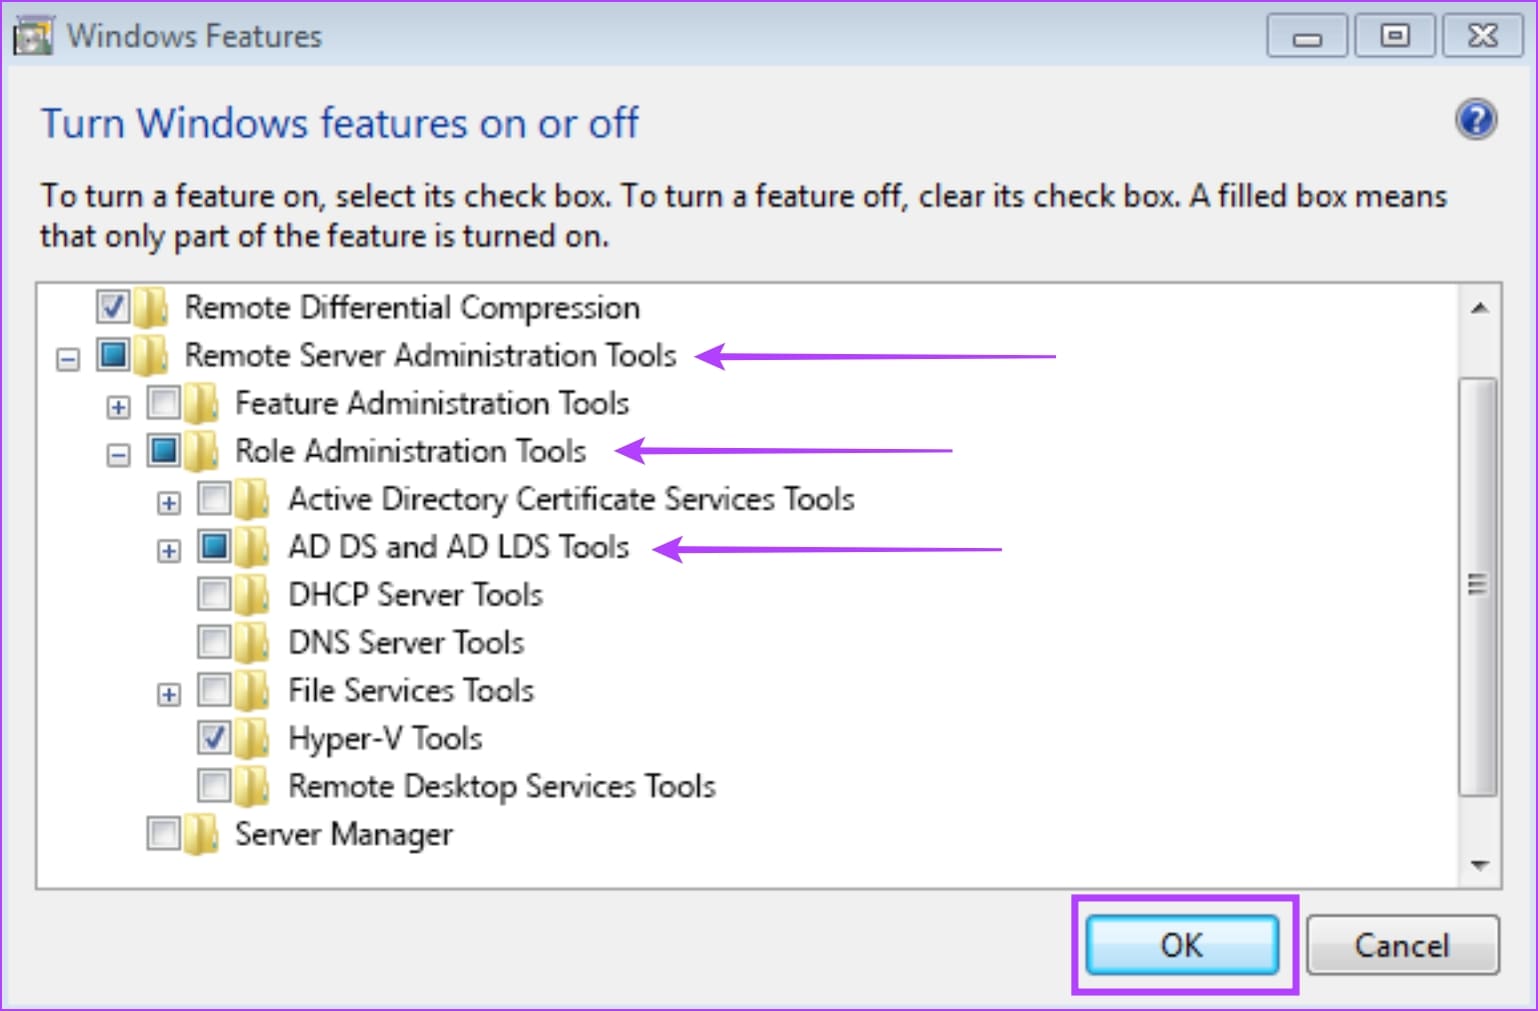
One of the most common misconceptions about ADUC is that it’s a standalone application you can just download and install. In reality, Active Directory Users and Computers is a component of a larger suite of utilities known as Remote Server Administration Tools (RSAT).
What is RSAT?
RSAT is a collection of tools that allows IT administrators to remotely manage server roles and features from a client operating system (like Windows 11). Instead of having to log directly onto a server (e.g., a domain controller) to perform administrative tasks, RSAT provides the necessary consoles and command-line tools on your local machine, significantly enhancing administrative flexibility and efficiency.
The RSAT suite includes tools for managing various server roles, such as:
- Active Directory Domain Services (AD DS): This includes ADUC, Active Directory Sites and Services, Active Directory Domains and Trusts, and ADSI Edit. These are the tools relevant for ADUC installation.
- DHCP Server Tools: For managing Dynamic Host Configuration Protocol services.
- DNS Server Tools: For managing Domain Name System services.
- Group Policy Management: For configuring and enforcing Group Policies.
- Server Manager: A console for managing multiple servers.
- …and many more.
For Windows 11, Microsoft has made RSAT tools available as “Optional Features” directly within the operating system. This is a significant improvement over older Windows versions where you had to download and install a separate RSAT package. By integrating it as an optional feature, installation and management become much simpler and more tightly integrated with the OS. When you install ADUC, you are essentially enabling the specific Active Directory Domain Services tools within the RSAT package. Understanding this relationship is crucial for navigating the installation process correctly and efficiently.
Step-by-Step Guide to Installing ADUC on Windows 11
With your Windows 11 system properly prepared, you’re ready to proceed with the installation of Active Directory Users and Computers. As mentioned, ADUC is part of the Remote Server Administration Tools (RSAT) suite, which is available as an “Optional Feature” in Windows 11. There are primarily two methods to install it: via the graphical Settings interface (recommended for most users) or through PowerShell for those who prefer command-line efficiency.
Method 1: Installing RSAT via Optional Features (Recommended)
This is the most straightforward and user-friendly method for installing ADUC on Windows 11. It leverages the built-in “Optional features” section within the Windows Settings app.
-
Open Windows Settings:
- Click on the Start button (Windows icon) in the taskbar.
- Click on the Gear icon to open Settings, or type “Settings” in the search bar and select it.
-
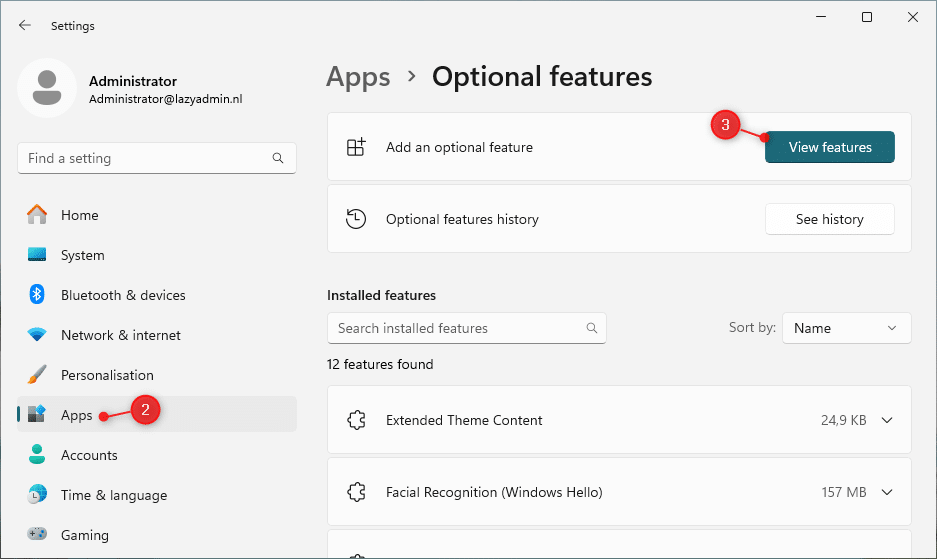
Navigate to Optional Features:
- In the Settings window, click on Apps in the left-hand navigation pane.
- Then, click on Optional features on the right-hand side.
-
Add an Optional Feature:
- Under “Optional features,” you’ll see a section titled “Add an optional feature.” Click the “View features” button.
-
Search and Select AD DS Tools:
- A new window will open listing available optional features. In the search bar at the top, type “RSAT.”
- From the filtered results, look for and select “RSAT: Active Directory Domain Services and Lightweight Directory Services Tools.” This is the specific package that contains ADUC.
- You might also see other RSAT components. If you only need ADUC, just select this one. If you anticipate needing other tools like DNS or DHCP management, you can select those as well.
- Click “Next.”
-
Confirm and Install:
- Review the selected feature(s) on the next screen.
- Click the “Install” button.
-
Wait for Installation to Complete:
- Windows will now download and install the selected RSAT components. This process may take a few minutes, depending on your internet speed and system performance. You can monitor the progress on the “Optional features” page.
-
Verify Installation:
- Once the installation is complete, close the Settings window.
- Click the Start button again.
- Type “Active Directory Users and Computers” in the search bar.
- You should see the “Active Directory Users and Computers” application listed. Click on it to launch.
Method 2: Installing RSAT via PowerShell (Advanced)
For IT professionals who prefer command-line interfaces or need to automate installations, PowerShell offers a quick and efficient way to install the RSAT tools. This method assumes you have basic familiarity with PowerShell commands.
-
Open PowerShell as Administrator:
- Click the Start button.
- Type “PowerShell” in the search bar.
- Right-click on “Windows PowerShell” or “Terminal (Windows PowerShell)” in the search results.
- Select “Run as administrator.” Confirm the UAC prompt if it appears.
-
Identify the RSAT AD DS Capability Name:
- First, it’s good practice to list available RSAT capabilities to ensure you have the correct name. Type the following command and press Enter:
powershell

Get-WindowsCapability -Name 'RSAT.ActiveDirectory.DS-LDS.Tools*' -Online
- Look for the
Namefield in the output. It should typically beRsat.ActiveDirectory.DS-LDS.Tools~~~~0.0.1.0. Make a note of this exact string.
- First, it’s good practice to list available RSAT capabilities to ensure you have the correct name. Type the following command and press Enter:
-
Install the AD DS Tools:
- Now, use the
Add-WindowsCapabilitycmdlet to install the feature. Replace the name with the exact capability name you noted (if it differs).
powershell

Add-WindowsCapability -Online -Name 'Rsat.ActiveDirectory.DS-LDS.Tools~~~~0.0.1.0'
- Press Enter. PowerShell will download and install the feature. This may take some time, and you’ll see a progress indicator.
- Now, use the
-
Verify Installation:
- Once the command completes, you should receive a
State : Installedmessage. - Close PowerShell.
- Search for “Active Directory Users and Computers” in the Start Menu to confirm it’s available.
- Once the command completes, you should receive a
Troubleshooting Common Installation Issues
While the installation process is generally smooth, you might encounter some hiccups. Here are common issues and their solutions:
- “Optional features” list is empty or doesn’t load:
- Solution: Check your internet connection. Ensure Windows Update services are running correctly. Sometimes a system restart can resolve temporary glitches.
- Installation fails or gets stuck:
- Solution:
- Check internet connection: A stable connection is crucial.
- Restart: A simple reboot can often resolve installation hangs.
- Run Windows Update: Ensure your OS is fully updated.
- Check disk space: Make sure you have enough free space.
- Run System File Checker (SFC): Open PowerShell/CMD as administrator and type
sfc /scannow. This checks for corrupted system files. - Use DISM tool: If SFC doesn’t help, try
DISM /Online /Cleanup-Image /RestoreHealthin an elevated PowerShell/CMD prompt to repair the Windows image.
- Solution:
- ADUC not found after installation:
- Solution:
- Restart your computer: Sometimes a full reboot is required for the changes to take effect and for the Start Menu to refresh.
- Double-check installation: Go back to
Settings > Apps > Optional features > Installed featuresand ensure “RSAT: Active Directory Domain Services and Lightweight Directory Services Tools” is listed as installed. If not, try the installation again. - Verify the exact capability name (for PowerShell method): Ensure you used the precise name from
Get-WindowsCapability.
- Solution:
- Permissions issues:
- Solution: Always ensure you are running PowerShell as administrator or that your user account has local administrative privileges for GUI installation.
By following these steps and troubleshooting tips, you should be able to successfully install Active Directory Users and Computers on your Windows 11 machine.
Post-Installation and First Use of ADUC
Congratulations! You’ve successfully installed Active Directory Users and Computers (ADUC) on your Windows 11 machine. The installation is just the first step; now it’s time to put this powerful tool to use. Understanding how to locate, launch, and perform basic operations with ADUC is crucial for maximizing your efficiency and leveraging its capabilities for effective domain management. This section will guide you through the initial steps of using ADUC, ensuring you can quickly get started with managing your Active Directory environment securely and productively.
Locating and Launching ADUC
After installation, ADUC doesn’t automatically create a desktop shortcut, but it’s easily accessible through the Windows Start Menu.
-
Accessing through the Start Menu Search:
- The quickest way is to click the Start button (Windows icon) or press the
Windowskey. - Start typing “Active Directory Users and Computers” into the search bar.
- The application should appear at the top of the search results. Click on it to launch.
- The quickest way is to click the Start button (Windows icon) or press the
-
Accessing through Windows Tools/Administrative Tools:
- Alternatively, you can find it within the “Windows Tools” folder (formerly “Administrative Tools”).
- Click the Start button.
- Scroll down the app list to the “Windows Tools” folder and expand it.
- Inside, you’ll find “Active Directory Users and Computers.”
Once launched, the ADUC console will open, presenting you with a familiar interface if you’ve used it on previous Windows versions or server operating systems.
Connecting to Your Domain
Upon launching ADUC for the first time, or if you’re connected to a network with multiple domains, the console will attempt to connect to the nearest or most accessible domain controller within your current domain.
- Automatic Connection: In most cases, if your Windows 11 machine is joined to an Active Directory domain, ADUC will automatically connect to that domain and display its structure in the left-hand pane.
- Connecting to a Specific Domain or Domain Controller:
- If you need to connect to a different domain or a specific domain controller, right-click on “Active Directory Users and Computers” at the very top of the console tree (in the left pane).
- Select “Change Domain…” or “Change Domain Controller…”.
- In the dialog box that appears, you can type the name of the desired domain or select a specific domain controller. This is particularly useful in multi-domain environments or when troubleshooting replication issues.
Important Note on Permissions: To perform any management tasks within ADUC, your user account must have the necessary permissions within the Active Directory domain. Typically, this means being a member of “Domain Admins,” “Enterprise Admins,” or having delegated administrative rights over specific Organizational Units (OUs) or objects. Without appropriate permissions, you’ll be able to view objects but won’t be able to make any changes.
Basic Operations with ADUC
With ADUC open and connected to your domain, you can now start performing essential administrative tasks. The interface is intuitive, with a tree structure on the left (showing your domain and its OUs) and details about the selected object on the right.
Here are some common operations you can perform:
- Creating a New User Account:
- Navigate to the OU where you want to create the user (e.g.,
Domain.com > Users > Sales). - Right-click in the right-hand pane (or right-click the OU in the left pane).
- Select
New > User. - Fill in the required details (First name, Last name, User logon name) and follow the prompts to set the initial password and account options.
- Navigate to the OU where you want to create the user (e.g.,
- Resetting a User’s Password:
- Locate the user account in the appropriate OU.
- Right-click on the user account.
- Select
Reset Password.... - Enter and confirm the new password, and choose whether the user must change the password at next logon.
- Managing Group Memberships:
- Locate a user account or a group.
- Right-click and select
Properties. - For a user, go to the
Member Oftab to add or remove groups. - For a group, go to the
Memberstab to add or remove users/computers from that group.
- Disabling/Enabling User Accounts:
- Locate the user account.
- Right-click on the user account.
- Select
Disable AccountorEnable Accountas needed.
- Moving Objects:
- Select the user, computer, or group you wish to move.
- Right-click and select
Move.... - Browse and select the target OU. This is crucial for applying appropriate Group Policies.
Always exercise caution when performing administrative tasks in ADUC, as changes can have wide-reaching impacts across your network. It’s always a good practice to double-check your selections and understand the implications of your actions.
Conclusion
Installing Active Directory Users and Computers (ADUC) on your Windows 11 machine is a strategic move for any IT professional or system administrator looking to enhance their productivity and streamline network management tasks. As we’ve explored, ADUC provides an intuitive and powerful interface for managing the core components of your Active Directory environment, from user accounts and groups to computers and organizational units. Its integration into the Remote Server Administration Tools (RSAT) as an “Optional Feature” in Windows 11 makes the installation process remarkably straightforward, whether you prefer the graphical user interface or the command-line efficiency of PowerShell.
By having ADUC readily available on your workstation, you gain the flexibility to perform critical administrative duties without the need to constantly connect directly to a domain controller. This not only saves valuable time but also reduces the attack surface by minimizing direct server logins, thereby contributing to a more robust digital security posture. From creating new user accounts and resetting passwords to managing group memberships and enforcing policies, ADUC empowers you to maintain control over your network’s resources and users effectively.
Remember to always operate with the necessary administrative privileges and to understand the impact of your actions within Active Directory. Continuous learning and adherence to best practices in IT administration are key to harnessing the full potential of tools like ADUC. In an era where technological trends are constantly evolving and digital security threats are ever-present, mastering the tools that manage your network’s foundation is more important than ever. With ADUC successfully installed on your Windows 11 system, you are well-equipped to face the challenges of modern network administration, ensuring your organization’s IT infrastructure remains secure, efficient, and well-managed.
aViewFromTheCave is a participant in the Amazon Services LLC Associates Program, an affiliate advertising program designed to provide a means for sites to earn advertising fees by advertising and linking to Amazon.com. Amazon, the Amazon logo, AmazonSupply, and the AmazonSupply logo are trademarks of Amazon.com, Inc. or its affiliates. As an Amazon Associate we earn affiliate commissions from qualifying purchases.