
In an increasingly digital world, where every interaction, document, and brand message is shaped by visual elements, the humble font plays a surprisingly pivotal role. Far from being mere stylistic choices, fonts dictate readability, convey brand personality, and subtly influence user experience. For creators, designers, marketers, and even everyday users seeking to personalize their digital environment, the ability to install and manage additional fonts is a fundamental skill that unlocks a world of creative possibilities and enhanced productivity.
Whether you’re striving for a distinct corporate identity, crafting a compelling presentation, or simply aiming to make your personal documents more visually appealing, the default font libraries provided by operating systems often fall short. This guide will walk you through the essential steps to expand your typographic arsenal, covering everything from understanding font types and sourcing new designs to hands-on installation across major operating systems and best practices for managing your ever-growing collection. Embrace the power of typography and transform your digital landscape, one typeface at a time.

The Foundation: Understanding Font Types and Sources
Before diving into the mechanics of installation, it’s crucial to understand the different types of font files you might encounter and, perhaps more importantly, where to find reliable and legally permissible font resources. This foundational knowledge will ensure a smooth installation process and prevent common pitfalls related to compatibility and licensing.
Decoding Font File Formats: TTF, OTF, WOFF, SVG
The world of digital typography is characterized by several key file formats, each with its own history, strengths, and primary use cases. Familiarizing yourself with these will demystify the files you download and help you choose the right font for the right purpose.
-
TrueType Font (TTF): Developed by Apple in the late 1980s as a competitor to Adobe’s Type 1 fonts, TTF quickly became a widely adopted standard. It encapsulates both the screen and printer font data in a single file, making it incredibly versatile and easy to use across different operating systems, particularly Windows and macOS. TTF fonts are vector-based, meaning they can be scaled to any size without losing quality, making them a staple for desktop publishing and general digital use. Most of the fonts you’ll download for desktop installation will likely be in TTF format.
-
OpenType Font (OTF): A collaborative effort between Adobe and Microsoft, OpenType is a more advanced and robust format that emerged in the mid-1990s. Building upon the strengths of TrueType, OTF fonts can include a vast array of sophisticated typographic features, such as ligatures, alternate characters, small caps, old-style figures, and contextual substitutions. These features provide designers with unparalleled control over their typography, elevating the aesthetic and functional quality of text. While visually similar to TTF, OTF offers greater potential for rich typographic expression, often preferred by professional designers for its expanded character sets and advanced layout capabilities. OTF fonts are also cross-platform compatible.
-
Web Open Font Format (WOFF/WOFF2): As the internet evolved, the need for custom fonts on websites became paramount. However, traditional desktop font formats weren’t optimized for web delivery due to file size and licensing complexities. WOFF was developed as a compressed, web-specific format that includes metadata and license information, making it efficient for web browsers to download and render. WOFF2 is an even more efficient iteration, offering better compression and faster load times. While you typically won’t install WOFF fonts on your desktop for local applications, understanding their existence is important for anyone involved in web design or development.
-
Scalable Vector Graphics (SVG) Fonts: SVG fonts represent characters as vector paths, similar to how other SVG graphics are created. While once considered a viable option for web fonts, their complexity and larger file sizes compared to WOFF/WOFF2 have led to a decline in their use for this purpose. They are still relevant for specific niche applications, especially where integration with SVG graphics is essential, but you are unlikely to encounter them for standard desktop font installation.
Navigating the Font Ecosystem: Where to Find Your Next Typographic Gem
The quest for the perfect font can lead you down many digital avenues. The key is to understand the different types of sources available, their associated costs, and crucially, their licensing agreements, which are vital for both personal branding and corporate identity.
-
Free Resources: Democratizing Design
- Google Fonts: A powerhouse of free, open-source fonts, Google Fonts offers a vast library of high-quality typefaces that are explicitly designed for both web and desktop use. Their generous licensing (SIL Open Font License or Apache License) allows for personal and commercial use without restriction, making them an ideal starting point for almost any project. Integration with Google’s services and the ease of downloading entire font families make it a go-to for many.
- DaFont: One of the oldest and most popular repositories for free fonts, DaFont boasts an enormous collection submitted by designers worldwide. While a fantastic resource for unique and experimental typefaces, it’s imperative to pay close attention to the individual font licenses. Many fonts are “100% Free,” but a significant portion is “Free for personal use” only, requiring a license purchase for commercial projects. This distinction is crucial for brand consistency and avoiding legal issues.
- Font Squirrel: Known for its carefully curated collection of high-quality, explicitly free-for-commercial-use fonts. Font Squirrel is an excellent resource if you need to ensure your chosen typeface can be used for any project without licensing worries. They also offer a handy “Webfont Generator” for converting desktop fonts to web-ready formats.
- 1001 Free Fonts: Similar to DaFont, this site offers a large array of free fonts. Again, diligence in checking licenses for personal versus commercial use is paramount. Many fonts are “demo” versions or require attribution.
-
Premium Options: Investing in Professionalism and Uniqueness
- Adobe Fonts (Creative Cloud Subscription): For professionals subscribed to Adobe Creative Cloud, Adobe Fonts (formerly Typekit) is an invaluable asset. It offers access to thousands of high-quality fonts from renowned foundries, seamlessly integrated within Adobe applications. These fonts can be “activated” and used on your desktop and often include web font versions. This subscription model provides peace of mind regarding licensing for commercial projects and ensures a consistent design ecosystem.
- MyFonts & Fontspring: These are leading online marketplaces where you can purchase individual font licenses from a vast array of independent designers and commercial foundries. They offer a staggering selection of professional typefaces, often with extensive character sets and advanced OpenType features. While an investment, buying commercial licenses ensures full legal compliance for any project, from small personal brands to large corporate identities.
- Commercial Foundries: Many prestigious type foundries (e.g., Hoefler&Co., Commercial Type, Klim Type Foundry) sell their unique and expertly crafted fonts directly. These often represent the pinnacle of typographic design, offering exclusivity and exceptional quality for high-profile branding and design projects. Investing in custom or exclusive typefaces from a reputable foundry is a significant step for companies prioritizing a distinct visual identity.
Understanding font licensing is not just a legal formality; it’s a matter of ethics and respect for designers’ work. Always review the license accompanying a font before using it for commercial purposes, website embedding, or any project that goes beyond personal, non-profit use. This due diligence protects your brand and ensures fair compensation for creators.
A Step-by-Step Guide to Font Installation Across Major Operating Systems
Once you’ve found your desired fonts and understood their licensing, the next step is to install them on your system. While the core principle remains the same – getting the font file into a system-recognized location – the exact steps vary slightly across different operating systems.
Seamless Integration: Installing Fonts on Windows
Windows, being one of the most widely used operating systems, offers a straightforward process for installing new fonts.
- Download and Unzip: Your chosen font will typically come as a
.zipfile. Download this file to a convenient location (e.g., your “Downloads” folder). Right-click the.zipfile and select “Extract All” to unpack its contents into a new folder. Inside, you’ll find the actual font files, usually in.ttfor.otfformat. - The Quick Install Method:
- Navigate to the folder containing your unzipped font files.
- Single Font: Right-click on the
.ttfor.otffile you wish to install. From the context menu, select “Install.” Windows will quickly process the font, and it will be available across most applications. - Multiple Fonts: If you want to install several fonts from the same folder, select all the desired font files (hold
Ctrland click each, or drag a selection box). Right-click on any of the selected files and choose “Install.”
- Using Windows Settings (Windows 10/11):
- Go to Start Menu > Settings > Personalization > Fonts.
- You’ll see a section titled “Drag and drop to install.” Simply drag your
.ttfor.otffont files (or the entire folder containing them) from File Explorer directly into this area. Windows will automatically install them. This method is particularly convenient for batch installations. - Alternatively, you can click “Add fonts” and browse to the location of your font files.
- Using the Control Panel (All Windows Versions):
- Type “Control Panel” into the Windows search bar and open it.
- Change “View by” to “Large icons” or “Small icons” if necessary, then click on “Fonts.”
- In the Fonts window, you can either:
- Drag and drop your font files directly into this window from File Explorer.
- Go to File > Install New Font… (if available in older versions) or simply copy and paste the font files into this folder.
- This method is robust and has been consistent across many Windows iterations.
- Verification: After installation, open an application like Microsoft Word, PowerPoint, or any design software. Look for your newly installed font in the font selection dropdown menu. If it appears, you’re ready to use it. You may need to restart the application or, in rare cases, your computer for the font to become fully recognized.
Elegance and Efficiency: Adding Fonts to macOS
Apple’s macOS offers an equally user-friendly approach to font installation, centered around its powerful Font Book application.

- Download and Unzip: Similar to Windows, download the font package, and if it’s a
.zipfile, double-click it to extract the font files (.ttf,.otf, or.ttcfor TrueType Collection). - The Double-Click Method:
- Locate the unzipped font file in Finder.
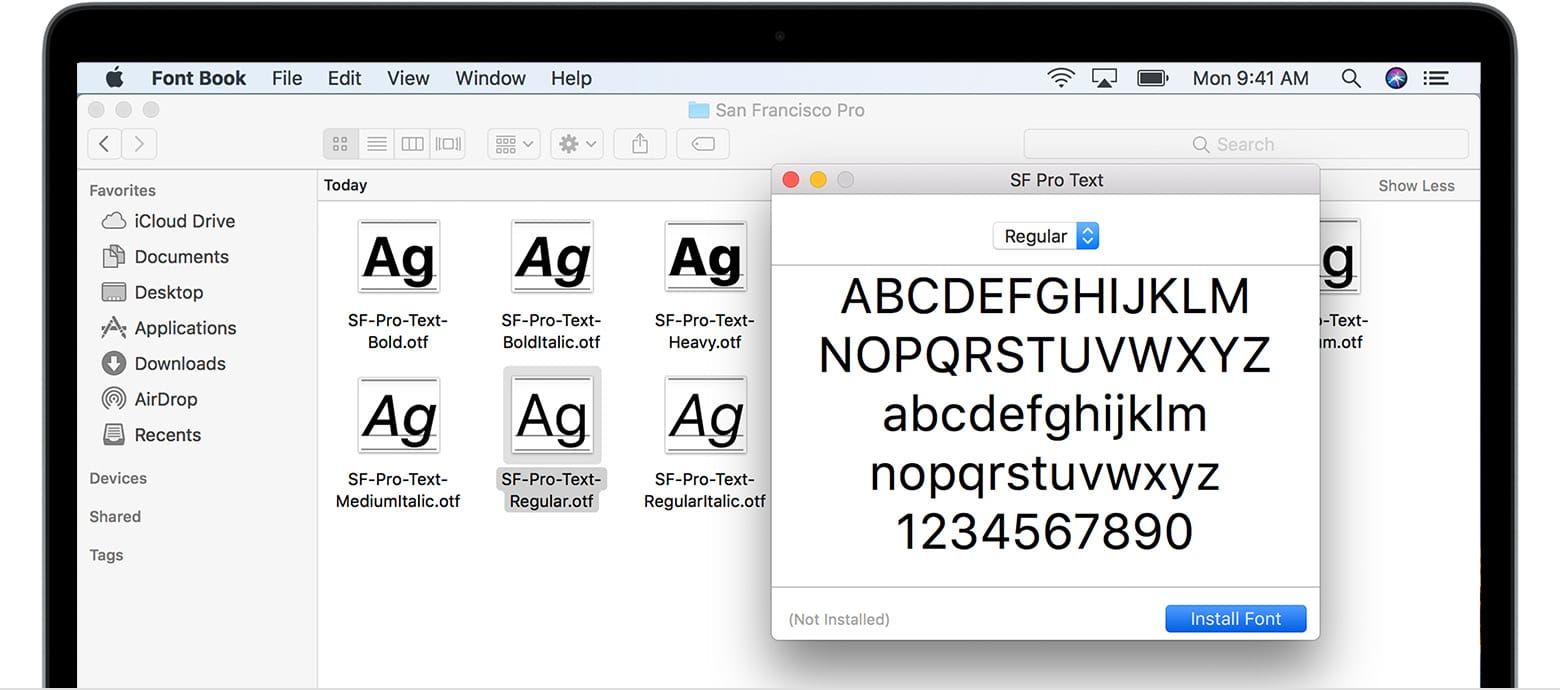
- Double-click on the
.ttfor.otffile. This action will automatically open the Font Book application, displaying a preview of the font. - In the preview window, click the “Install Font” button.
- Font Book will perform a quick validation check to ensure the font isn’t corrupted or duplicated. If the validation passes, the font will be added to your system and become available in all applications.
- Using Font Book Directly:
- Open Font Book (find it in your Applications folder or use Spotlight search).
- Go to File > Add Fonts… or click the “+” button in the Font Book toolbar.
- Navigate to the location of your font files, select them, and click “Open.”
- Font Book will then install them.
- Drag and Drop into Font Book: You can also drag one or multiple font files directly from Finder into the Font Book window, specifically into the “All Fonts” or a specific collection within the “User” section.
- User vs. Computer Fonts: When installing, Font Book usually adds fonts to your “User” collection, meaning they are available only to your user account. If you want a font to be available to all users on the Mac, you might need to move it to the “Computer” section within Font Book or ensure it’s installed as a system font. However, for most personal and professional use, user-level installation is sufficient.
- Verification: Launch a word processor or design application (e.g., Pages, Keynote, Photoshop). Check the font menu; your new font should be listed and ready for use. A restart of the application may be necessary.
Command Line and Beyond: Installing Fonts on Linux
Linux distributions offer flexibility in font installation, ranging from simple graphical tools to the more powerful command line, catering to both new users and seasoned administrators.
- Download and Unzip: Download the font archive and extract it. You’ll typically find
.ttfor.otffiles. - User-Specific Installation (Recommended for most users):
- This method makes fonts available only to your user account.
- Open your file manager (e.g., Nautilus for GNOME, Dolphin for KDE).
- Navigate to your home directory (
~). - Enable “Show Hidden Files” (usually
Ctrl+Hor a menu option). - Look for a folder named
.fonts. If it doesn’t exist, create it:.local/share/fonts. - Copy your unzipped
.ttfor.otffont files into this.local/share/fontsdirectory. You can organize them into subfolders (e.g.,~/.local/share/fonts/MyCustomFonts) for better management.
- System-Wide Installation (For all users on the system):
- This method requires root/sudo privileges. Only use this if you want everyone on the machine to have access to the font.
- The common directory for system-wide fonts is
/usr/local/share/fonts/. - Open a terminal (
Ctrl+Alt+T). - Create a directory for your fonts (e.g.,
sudo mkdir -p /usr/local/share/fonts/MyCustomFonts). - Copy your font files into this directory:
sudo cp /path/to/your/fontfile.ttf /usr/local/share/fonts/MyCustomFonts/.
- Update Font Cache (Crucial Step): After copying the fonts, Linux systems need to update their font cache for the new fonts to be recognized.
- Open a terminal.
- Run the command:
fc-cache -fv - This command forces a refresh of the font cache, making your newly installed fonts available to applications.
- Graphical Tools: Some Linux distributions or desktop environments (like GNOME or KDE) offer graphical font viewers or installers. You might be able to double-click a
.ttfor.otffile, and a font previewer will open with an “Install” button. This often handles the background steps (copying and updating cache) automatically. - Verification: Restart any open applications (or even log out and back in) and check their font selection menus. Your new fonts should now be listed.
On the Go: Font Installation on Mobile Devices (Brief Mention)
While the focus has been on desktop operating systems, the role of fonts on mobile devices is also growing. However, installing system-wide custom fonts on iOS and Android is generally more restricted due to security considerations and Apple/Google’s control over the user experience.
- iOS: Directly installing system-wide fonts without jailbreaking is typically not possible. However, specific apps (especially design apps like Adobe Illustrator Draw or Procreate) can often come with their own bundled fonts or allow you to import fonts for use within that specific app. More recently, iOS allows the installation of configuration profiles that can add fonts system-wide, but this is usually reserved for enterprise environments or specific third-party font apps that leverage this feature.
- Android: Android offers slightly more flexibility. Some custom launchers or rooted devices allow for system-wide font changes. For unrooted devices, many apps (like certain word processors or design tools) allow you to import and use fonts within their own sandboxed environment. The Google Play Store also hosts apps dedicated to font management, though their capabilities can vary and might not always offer truly system-wide changes.
For the most part, mobile font customization for general users remains limited compared to desktop environments, pushing the “Brand” aspect of fonts to be more controlled by app developers than individual users.
Beyond Installation: Managing Your Typeface Collection and Optimizing Usage
Installing fonts is just the beginning. As your collection grows, effective management becomes essential to maintain system performance, ensure design consistency, and troubleshoot potential issues. Strategic font choices also have a direct impact on your brand’s perception and overall productivity.
Best Practices for Font Management and Organization
A sprawling, unorganized font library can lead to system slowdowns and application crashes. A thoughtful approach to management is key.
- Avoid Font Overload: While tempting to install every beautiful font you find, an excessive number of active fonts can consume system resources, slow down applications, and even cause stability issues. Only install fonts you actively use for current projects. You can always disable or uninstall fonts you don’t need temporarily.
- Categorize and Tag Fonts: Organize your fonts into logical categories (e.g., “Serif,” “Sans-serif,” “Display,” “Handwritten,” “Client X Project,” “Personal Branding”). This makes it easier to find the right font for a specific purpose. If your operating system’s font manager or a third-party tool supports tagging, utilize it extensively.
- Utilize Font Management Software: For designers, marketers, and heavy font users, a dedicated font management application is an invaluable investment. Tools like FontBase (free with paid features), Suitcase Fusion, Connect Fonts, or Typeface for Mac offer advanced capabilities:
- Activation/Deactivation: Easily turn fonts on or off without uninstalling them, reducing system load.
- Previewing: Better visual previews and comparisons of fonts.
- Tagging and Organization: Robust tools for categorizing and searching.
- Conflict Resolution: Identifying and resolving issues with duplicate or corrupted fonts.
- Cloud Sync: Syncing your font library across multiple devices.
- These tools streamline workflow, save time, and ensure you’re always using the correct fonts for your projects, which is critical for maintaining brand consistency.
Troubleshooting Common Font Issues
Even with careful installation, you might encounter issues. Here are some common problems and their solutions:
- Font Not Appearing in Applications:
- Restart the Application: Most applications load their font lists when they start. If you installed a font while an app was open, close and reopen it.
- Restart Your Computer: In some cases, especially after system-wide installations or if issues persist, a full system restart might be necessary to refresh the font cache.
- Check Installation Path: Double-check that the font was installed in the correct system-recognized folder (e.g.,
~/.local/share/fontson Linux, Font Book on macOS, Settings/Control Panel on Windows).
- Corrupted Font Files: If a font causes an application to crash or renders incorrectly, it might be corrupted.
- Re-download: Delete the problematic font and download it again from the source.
- Validate (macOS): Font Book on macOS has a “Validate Fonts” feature (File > Validate Fonts) that can identify corrupted files.
- Check for Duplicates: Sometimes duplicate installations of the same font can cause conflicts. Your font manager or OS font utility can help identify and resolve these.
- Performance Issues: If your system feels sluggish after installing many fonts.
- Deactivate Unused Fonts: Use your OS’s font utility or a dedicated font manager to deactivate fonts you’re not currently using.
- Consider a Font Manager: These tools are designed to handle large libraries efficiently, only activating fonts as needed.
- Licensing Errors: If you’re using a font commercially and encounter legal issues, it’s a reminder of the importance of checking licenses.
- Always keep a record of your font licenses, especially for paid fonts.
- If in doubt, contact the font designer or foundry directly for clarification.
The Strategic Impact: Fonts in Branding and Productivity
Beyond the technicalities of installation, the choice and management of fonts carry significant strategic weight, directly impacting your brand and personal productivity. This connects deeply with the “Brand” and “Tech” pillars of our website.
-
Branding: The Silent Voice of Your Identity:
- Consistency is Key: A cohesive font strategy across all touchpoints – website, marketing materials, documents, social media – reinforces brand identity and recognition. Inconsistent typography can dilute your brand message.
- Conveying Personality: Fonts have personalities. A bold, sans-serif font might project modernity and strength, while an elegant serif font suggests tradition and sophistication. Choosing fonts that align with your brand’s values and desired perception is crucial for effective marketing and corporate identity. Think about how Google’s Product Sans or Coca-Cola’s Spencerian script instantly evoke their brands.
- Memorability: Unique and well-chosen typography can make a brand more memorable. It’s an integral part of visual communication that influences how your audience perceives your message.
-
Productivity: Enhancing Readability and Focus:
- Readability: For extended reading, document creation, or user interfaces, readability is paramount. Highly legible fonts reduce eye strain and improve comprehension, contributing to higher productivity. Fonts optimized for screen reading (like many sans-serifs) are vital for digital products and online content.
- Professionalism: Using appropriate and well-maintained fonts elevates the perceived professionalism of your documents, presentations, and digital content. It reflects attention to detail and respect for your audience.
- UI/UX Design: For those in tech, font choice is a fundamental aspect of User Interface (UI) and User Experience (UX) design. The right font hierarchy, weight, and size can guide the user’s eye, improve navigation, and create an intuitive, pleasant interaction with software and apps.
- Digital Security (Subtle Link): While not directly about fonts, the process of downloading fonts touches on digital security. Always download fonts from reputable sources to avoid malware or corrupted files, protecting your system and data.
Conclusion
The ability to install additional fonts is more than just a technical trick; it’s a gateway to unlocking creative expression, enhancing professional communications, and solidifying brand identity in the digital realm. From understanding the nuanced differences between TTF and OTF to navigating the vast landscape of free and premium font sources, each step empowers you to take greater control over your visual messages.
Whether you’re a designer meticulously crafting a corporate logo, a marketer developing compelling ad campaigns, or simply a user seeking to personalize your digital experience, a well-curated and effectively managed font library is an indispensable asset. By following the installation guides for Windows, macOS, and Linux, and adopting best practices for organization and troubleshooting, you can ensure your typographic journey is smooth and productive. Embrace the silent power of fonts, and let them speak volumes for your projects, your brand, and your unique digital voice.
aViewFromTheCave is a participant in the Amazon Services LLC Associates Program, an affiliate advertising program designed to provide a means for sites to earn advertising fees by advertising and linking to Amazon.com. Amazon, the Amazon logo, AmazonSupply, and the AmazonSupply logo are trademarks of Amazon.com, Inc. or its affiliates. As an Amazon Associate we earn affiliate commissions from qualifying purchases.