The allure of electric vehicles (EVs) is undeniable. With their reduced environmental impact, lower running costs, and cutting-edge technology, EVs are rapidly becoming the future of personal transportation. At the forefront of this revolution is Tesla, a brand synonymous with innovation and performance. For Tesla owners, having a reliable and convenient charging solution at home is not just a luxury, but a necessity. This guide will walk you through the process of installing a Tesla charger, empowering you with the knowledge to make informed decisions, understand the technicalities, and ultimately, enjoy seamless charging for your electric chariot.
Understanding Your Tesla Charging Options
Before diving into the installation process, it’s crucial to understand the different types of Tesla chargers and the implications for your home. Tesla offers a range of charging solutions, each with varying speeds and capabilities.
Level 1 Charging: The Basic Solution
The most accessible charging method is Level 1 charging, which utilizes a standard 120-volt household outlet. Your Tesla typically comes with a Mobile Connector that plugs into this outlet and then connects to your car.
-
Pros:
- Simplicity: No special installation is required. You can plug in your Tesla anywhere there’s a standard wall socket.
- Portability: The Mobile Connector is designed for on-the-go charging, making it a convenient backup.
- Cost-Effective: No upfront installation costs beyond the initial purchase of the car and its accessories.
-
Cons:
- Slow Charging Speed: Level 1 charging is significantly slower than other options. It can take anywhere from 20 to 50 hours to fully charge a Tesla from empty, depending on the battery size and the specific model. This makes it impractical for daily charging needs, especially for drivers who cover significant distances.
- Limited Practicality: For daily commutes, relying solely on Level 1 charging would mean constantly monitoring your battery level and planning charging sessions meticulously. It’s best suited for topping up overnight or for situations where you have extended periods to charge, such as at a vacation home or a relative’s house.
Level 2 Charging: The Home Charging Standard
For most Tesla owners, Level 2 charging is the sweet spot, offering a substantial improvement in charging speed and convenience. This type of charging uses a dedicated 240-volt circuit, similar to what powers large appliances like electric dryers or ovens. Tesla’s Wall Connector is the brand’s flagship Level 2 charger, though other compatible chargers are also available.
-
Pros:
- Significantly Faster Charging: Level 2 chargers can add a considerable amount of range in a matter of hours, typically providing 25-40 miles of range per hour of charging. This means you can fully charge your Tesla overnight, ensuring you start each day with a full battery.
- Convenience: The “set it and forget it” nature of Level 2 charging allows you to simply plug in your car when you arrive home and wake up to a fully charged vehicle.
- Increased Property Value: Installing a dedicated EV charger can be an attractive feature for potential homebuyers, potentially increasing your property’s resale value.
- Smart Features (Tesla Wall Connector): The Tesla Wall Connector offers advanced features like Wi-Fi connectivity for over-the-air updates, remote monitoring, and integration with the Tesla app.
-
Cons:
- Installation Costs: Level 2 chargers require a dedicated 240-volt circuit, which necessitates professional installation by a qualified electrician. This involves running new wiring, potentially upgrading your electrical panel, and ensuring compliance with local building codes.
- Higher Initial Investment: The cost of the charger itself, coupled with the installation fees, represents a more significant upfront investment compared to Level 1 charging.
Tesla Superchargers: For Fast, On-the-Go Charging
While not a home installation option, it’s worth mentioning Tesla Superchargers as they are a vital part of the Tesla ecosystem. These are DC fast chargers designed for rapid charging during road trips.
- Supercharger Network: Tesla has an extensive and well-maintained Supercharger network across many regions, allowing for quick top-ups of your battery while traveling long distances.
- Charging Speed: Superchargers can add hundreds of miles of range in as little as 15-30 minutes, making long-distance travel feasible and convenient.
- App Integration: You can easily locate Superchargers and monitor charging progress through the Tesla mobile app.
Planning Your Tesla Charger Installation
A successful installation begins with meticulous planning. This phase ensures that the chosen location, the charger itself, and the electrical infrastructure are all optimized for your needs and safety.
Assessing Your Charging Needs and Habits
The first step in planning is to understand your daily driving habits.
- Daily Mileage: How many miles do you typically drive per day? This will help determine how much charge you need to replenish overnight.
- Parking Location: Where do you primarily park your Tesla at home? Is it in a garage, a driveway, or on the street? This will dictate the optimal placement of the charger.
- Future Proofing: Consider your future needs. Are you planning to purchase another EV, or do you anticipate your driving habits changing? Investing in a slightly more powerful charger now could save you from an upgrade later.
Choosing the Right Tesla Charger
Tesla offers its own branded charging solutions, but there are also third-party options.
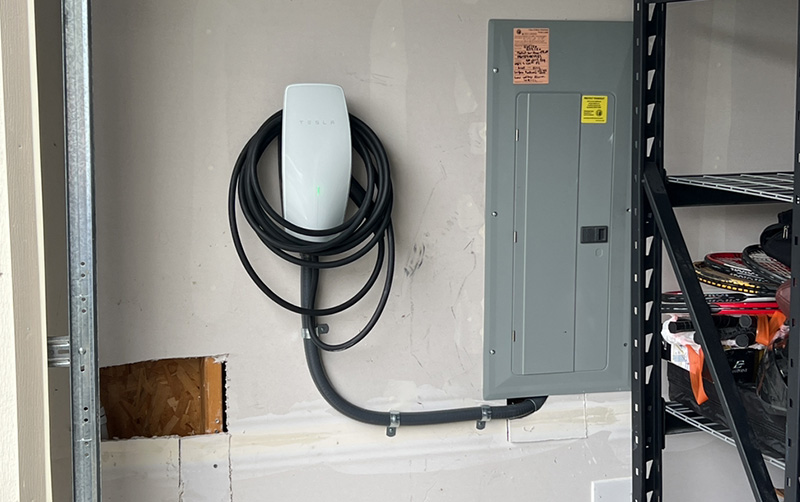
- Tesla Wall Connector: This is Tesla’s premium Level 2 charger. It’s sleek, efficient, and integrates seamlessly with Tesla vehicles. It’s designed for a permanent installation, typically mounted on a wall in your garage or on an exterior wall. The Wall Connector offers adjustable charging speeds and smart features like Wi-Fi connectivity for firmware updates and remote monitoring.
- Third-Party EVSEs (Electric Vehicle Supply Equipment): Many reputable manufacturers offer Level 2 chargers that are compatible with Tesla vehicles (often requiring an adapter). These can sometimes be more budget-friendly or offer specific features you might prefer. When choosing a third-party charger, ensure it meets the necessary safety certifications and is compatible with your Tesla model.
Selecting the Ideal Installation Location
The physical placement of your charger is critical for both convenience and functionality.
- Proximity to Parking Spot: The charger should be within easy reach of your car’s charging port. Avoid excessive cable length, which can be cumbersome.
- Protection from the Elements: If installing outdoors, consider a location that offers some protection from direct sunlight, rain, and snow. While most chargers are weather-resistant, prolonged exposure can shorten their lifespan.
- Accessibility for Installation: The chosen location should allow easy access for the electrician to run wiring from your electrical panel.
- Aesthetics: If the charger will be visible from your living space, consider its aesthetic impact.
Understanding Electrical Requirements and Permits
This is where professional expertise becomes indispensable.
- Amperage: Level 2 chargers require a dedicated 240-volt circuit. The amperage of this circuit will determine the charging speed. Common amperages for home installations are 40 amps or 48 amps, which provide the fastest charging speeds for most residential settings.
- Electrical Panel Capacity: Your existing electrical panel needs to have sufficient capacity to handle the additional load of the charger. An electrician will assess this and may recommend an electrical panel upgrade if necessary.
- Dedicated Circuit: The charger must be installed on its own dedicated circuit breaker in your electrical panel. This is a critical safety measure.
- Permits and Inspections: In most jurisdictions, installing a 240-volt circuit for an EV charger requires obtaining electrical permits and undergoing inspections by the local building department. This ensures the installation is safe and compliant with all building codes. Your electrician will handle the permit application process.
The Installation Process: A Step-by-Step Overview
While we strongly recommend hiring a qualified electrician, understanding the general steps involved can demystify the process and help you communicate effectively with your chosen professional.
Step 1: Site Assessment and Consultation with an Electrician
This is the crucial first step. Contact a licensed and experienced electrician. They will:
- Visit your home: To assess your electrical panel, identify the best location for the charger, and determine the most efficient wiring route.
- Discuss your needs: Understand your charging habits and recommend the appropriate charger and circuit amperage.
- Provide a quote: Detail the cost of the charger (if purchased through them), materials, labor, and any necessary permits.
- Explain the process: Walk you through the timeline and any potential complexities.

Step 2: Electrical Panel Assessment and Potential Upgrades
Your electrician will examine your main electrical panel to determine its capacity.
- Load Calculation: They will perform a load calculation to see if your current panel can safely accommodate the additional amperage required for the EV charger.
- Panel Upgrade: If the panel’s capacity is insufficient, an upgrade to a higher-amperage panel or the addition of a subpanel may be necessary. This is a significant undertaking and will be reflected in the overall cost.
- Breaker Installation: A new, dedicated 240-volt double-pole circuit breaker will be installed for the charger.
Step 3: Running the Electrical Wiring
This involves the physical installation of the power supply to the charger’s location.
- Wire Gauge: The electrician will use the correct gauge of wire to safely handle the amperage of the circuit over the distance from the panel to the charger.
- Conduit: In many cases, the wiring will be run through conduit (a protective pipe) to safeguard it from damage and comply with building codes. This can be done through walls, attics, crawl spaces, or externally.
- Junction Boxes: Where necessary, junction boxes will be installed to connect different sections of wiring.
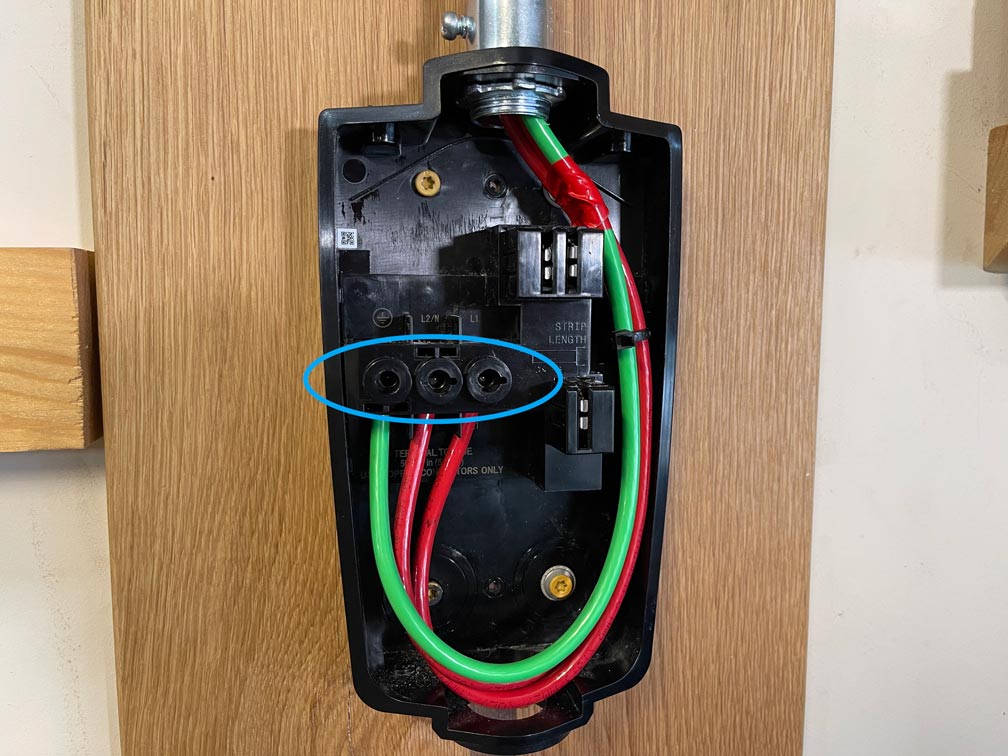
Step 4: Mounting and Connecting the Charger
Once the wiring is in place, the charger itself is installed.
- Mounting: The Tesla Wall Connector or the chosen third-party charger will be securely mounted to the wall or a pedestal.
- Electrical Connections: The electrician will connect the wiring to the charger’s internal terminals, ensuring all connections are secure and properly insulated.
- Grounding: Proper grounding of the charger is a critical safety step.
Step 5: Testing and Commissioning
After the physical installation is complete, the system needs to be thoroughly tested.
- Powering On: The electrician will turn on the new circuit breaker and check for any immediate issues.
- Charger Functionality: They will connect your Tesla (if available at the time) or a testing device to confirm the charger is delivering power correctly and at the expected voltage and amperage.
- App Configuration (Tesla Wall Connector): If you’re installing a Tesla Wall Connector, the electrician might assist with the initial Wi-Fi setup and app configuration.
Step 6: Final Inspection and Permitting Closure
Once the installation is complete and tested, the final step is the official inspection.
- Building Department Inspection: A representative from the local building department will inspect the installation to ensure it meets all electrical codes and safety standards.
- Permit Closure: Upon successful inspection, the permit will be closed, signifying that the installation is compliant and legal.
Frequently Asked Questions and Considerations
Even with a comprehensive guide, some common questions arise when it comes to installing a Tesla charger.
How long does it take to install a Tesla charger?
The installation time can vary greatly depending on the complexity of the job. A straightforward installation, where the electrical panel is readily accessible and the wiring run is short, might take 2-4 hours. However, if the electrical panel needs upgrading, or the wiring run is extensive or requires significant wall work, it could take a full day or even longer.
What is the typical cost of installing a Tesla charger?
The cost of installing a Level 2 Tesla charger can range from $500 to $2,000 or more. This cost is heavily influenced by:
- The cost of the charger itself: Tesla Wall Connectors typically cost around $400-$500.
- Electrician’s labor rates: These vary by region and experience.
- The complexity of the electrical work: Panel upgrades, long wire runs, and difficult access will increase costs.
- Permit fees: These are set by local authorities.
It’s always advisable to get multiple quotes from different electricians to compare pricing and services.
Can I install a Tesla charger myself?
While it might be tempting to save money by attempting a DIY installation, it is strongly discouraged and often illegal. Installing a 240-volt circuit involves working with high-voltage electricity, which is inherently dangerous and can lead to electrocution, fires, and damage to your home and vehicle if not done correctly. Furthermore, most jurisdictions require a licensed electrician to perform this work for safety and code compliance, and you may not be able to get permits or inspections otherwise.
What about government incentives and rebates?
Many governments, states, and local utilities offer incentives, tax credits, or rebates to encourage the adoption of electric vehicles and the installation of charging infrastructure. These can significantly offset the cost of purchasing and installing a Level 2 charger. It’s essential to research available incentives in your area before starting the installation process. Your electrician may also be knowledgeable about these programs.
Does the Tesla Wall Connector require a specific type of electrical circuit?
Yes, the Tesla Wall Connector requires a 240-volt circuit. The amperage of this circuit will determine the maximum charging speed. Common options are 40-amp or 48-amp circuits, which are typically powered by a 50-amp or 60-amp breaker, respectively, to account for the 80% continuous load rule for electrical circuits.
What is the role of the Tesla mobile app in this process?
The Tesla mobile app is a powerful tool that enhances the charging experience. For the Tesla Wall Connector, it allows you to:
- Monitor charging status: See the current charging speed and estimated completion time.
- Schedule charging: Set specific times for your car to charge, which can be beneficial if your utility offers off-peak electricity rates.
- Receive notifications: Get alerts when charging starts, stops, or if there are any issues.
- Manage multiple chargers: If you have more than one Wall Connector, you can manage them all through the app.
- Access charging history: Track your energy consumption and costs.
Conclusion: Embracing the Future of Electric Mobility
Installing a Tesla charger at home is an investment in convenience, efficiency, and the future of sustainable transportation. By understanding your options, planning meticulously, and partnering with qualified professionals, you can ensure a safe, reliable, and seamless charging experience. As the EV landscape continues to evolve, the ability to charge your Tesla from the comfort of your own home will undoubtedly become an indispensable aspect of electric vehicle ownership, empowering you to drive further, cleaner, and smarter.
aViewFromTheCave is a participant in the Amazon Services LLC Associates Program, an affiliate advertising program designed to provide a means for sites to earn advertising fees by advertising and linking to Amazon.com. Amazon, the Amazon logo, AmazonSupply, and the AmazonSupply logo are trademarks of Amazon.com, Inc. or its affiliates. As an Amazon Associate we earn affiliate commissions from qualifying purchases.