
In an increasingly interconnected world, where our smartphones serve as our primary link to work, loved ones, information, and entertainment, understanding the fundamentals of mobile connectivity is crucial. At the heart of this connection lies the Subscriber Identity Module, or SIM card. This tiny chip, whether physical or digital, is the key that unlocks your phone’s ability to communicate with cellular networks, allowing you to make calls, send texts, and access mobile data wherever you go.
For many, installing a SIM card might seem like a straightforward task, but with the evolution of mobile technology, including various SIM card sizes and the advent of eSIMs, the process can sometimes present subtle nuances. Furthermore, ensuring correct installation isn’t just about getting a signal; it’s about optimizing your device’s performance, safeguarding your digital security, and making informed financial choices regarding your mobile service.

This comprehensive guide will walk you through everything you need to know about installing a SIM card, covering both traditional physical cards and the cutting-edge eSIM technology. We’ll delve into the “how-to” with clear, step-by-step instructions, discuss the critical preparation steps, explore common issues and their solutions, and provide insights into how your SIM card choice impacts everything from your travel budget to your digital privacy. Let’s ensure your device is always connected, securely and efficiently.
Understanding Your SIM Card: The Gateway to Your Mobile World
Before diving into the installation process, it’s essential to understand what a SIM card is and why it’s so pivotal. A SIM card is a small, smart card that securely stores the International Mobile Subscriber Identity (IMSI) number and related keys, which are used to identify and authenticate a subscriber on a mobile telephony device (such as a mobile phone or computer). It’s essentially your digital passport to your chosen cellular network, linking your phone to your service provider and enabling access to their infrastructure for calls, texts, and mobile internet.
The Evolution of Physical SIM Cards: From Credit Card to Nano
The journey of the physical SIM card is a testament to the continuous drive for miniaturization in tech. What started as a credit card-sized piece of plastic in the early 1990s has dramatically shrunk over the decades to accommodate sleeker, more compact devices.
- Standard SIM (1FF): The original, the size of a credit card. Rarely seen today outside of very old devices.
- Mini SIM (2FF): Introduced around 1996, this was the standard for many years, commonly found in feature phones and early smartphones. Its dimensions are 25x15mm.
- Micro SIM (3FF): With the rise of thinner smartphones like the iPhone 4, the Micro SIM (15x12mm) became prevalent. It reduced the plastic border around the chip.
- Nano SIM (4FF): The current dominant physical SIM card, introduced with the iPhone 5 in 2012. Measuring just 12.3×8.8mm, it’s almost entirely chip, minimizing the plastic footprint even further. Most modern smartphones, from flagships to budget models, utilize Nano SIMs.
The crucial aspect here is compatibility. Your device will only accept a specific physical SIM card size. While universal SIM cards often come with perforated edges allowing you to “punch out” the correct size (from standard to mini to micro to nano), forcing an incorrect size can damage both the SIM card and your phone’s SIM tray or slot. Always verify the required SIM size for your specific phone model before attempting installation. This ensures seamless integration and avoids unnecessary technical hurdles or, worse, costly repairs.
Embracing the Future: eSIM Technology
Beyond physical cards, the most significant recent leap in SIM technology is the embedded SIM, or eSIM. Instead of a removable plastic card, an eSIM is a small chip permanently embedded within your device’s hardware. It functions identically to a physical SIM but allows you to download and manage multiple carrier profiles digitally.
-
What is an eSIM? It’s a re-programmable chip (eUICC) that allows users to activate a cellular plan from a carrier without needing a physical SIM card. Your mobile network profile is downloaded onto the chip over the air.
-
Advantages (Tech & Money):
- Convenience: Switch carriers or plans instantly without needing to swap physical cards. Ideal for travelers or those who frequently switch between personal and business lines. Many modern phones support dual SIM functionality, combining an eSIM with a physical SIM, offering even greater flexibility.
- Space Saving: Eliminates the need for a physical SIM tray, allowing manufacturers to potentially utilize that internal space for other components or battery size. This contributes to sleeker device designs and potentially better waterproofing.
- Security: As the eSIM is embedded, it cannot be easily removed, making it more difficult for thieves to instantly disable tracking or switch carriers if your phone is stolen. It also reduces the risk of SIM card damage or loss.
- Environmental Benefits: Reduces plastic waste associated with traditional SIM cards.
- Cost Savings (Money): For international travelers, an eSIM often allows for easier and cheaper access to local data plans without the hassle of buying a physical SIM in a foreign country or incurring expensive roaming charges. You can activate a local plan before you even land, ensuring immediate connectivity.
-
Disadvantages:
- Carrier Support: Not all carriers worldwide fully support eSIM technology yet, though adoption is growing rapidly.
- Device Compatibility: Only newer smartphones, smartwatches, and tablets are eSIM compatible. Older devices will still require a physical SIM.
- Transferring: While easier to switch carriers, transferring an eSIM profile to a new device can sometimes require carrier assistance, as opposed to simply moving a physical card.
The shift towards eSIMs represents a significant step in mobile technology, offering unparalleled flexibility and potential for innovation in device design and connectivity management. Understanding both physical and eSIM options empowers you to choose the best solution for your needs, leveraging technology to your financial and lifestyle advantage.
Preparing for Installation: What You Need Before You Start
A smooth SIM card installation begins with proper preparation. Rushing the process can lead to frustration, potential damage to your device or SIM, or issues with network activation. Taking a few moments to gather the necessary tools and information will save you time and headaches in the long run.
Essential Tools and Information
- Your New SIM Card: Ensure it’s the correct size (Nano, Micro) or that you have the QR code/activation details for an eSIM.
- Your Mobile Device: The phone, tablet, or smartwatch into which you’ll be installing the SIM.
- SIM Ejector Tool: Most new phones come with a small, paperclip-like tool designed specifically for opening the SIM tray. If you don’t have one, a straightened paperclip or a small earring post can serve as an effective substitute. Caution: Do not use sharp objects like needles or push too hard, as this can damage the ejector mechanism.
- Good Lighting and a Clean, Flat Surface: This provides visibility for aligning the SIM card and prevents small components from getting lost.
- Your Carrier/Account Information: For a new SIM card, you might need your account number, PIN, or other activation details. Keep them handy.
- Wi-Fi Connection (for eSIM): An active internet connection is usually required to download and activate an eSIM profile.
Quick Pre-Installation Checks (Tech & Digital Security)
Before you even touch your phone, a few quick checks can prevent common pitfalls:
- Device Compatibility: Double-check the SIM card size required by your phone. If you’re using an older device or a less common model, a quick online search for “[your phone model] SIM card size” will confirm. If you’re dealing with an eSIM, ensure your device explicitly supports it (e.g., iPhone XS/XR and newer, most Samsung Galaxy S20 series and newer, Google Pixel 3 and newer).
- Phone Unlocking Status (Money & Brand Freedom): If you’re switching carriers with an existing phone, ensure your device is unlocked. A “locked” phone is tied to a specific carrier and will not accept a SIM card from another provider. Most carriers will unlock your phone after your contract is fulfilled, but you might need to contact them directly. An unlocked phone offers significant financial flexibility, allowing you to choose the best deal and switch providers without buying a new device, enhancing your brand freedom in the mobile market.
- Backup Your Old Device (Tech & Data Security): While installing a SIM card rarely affects existing phone data, if you’re upgrading to a new phone, now is the perfect time to back up your old device to cloud storage (Google Drive, iCloud) or a computer. This ensures all your contacts, photos, apps, and settings are preserved.
- Charge Your Device: Ensure your phone has at least a 50% charge. A drained battery during setup can interrupt activation or lead to unexpected shutdowns.
These preliminary steps are vital for a hassle-free installation and set the stage for immediate connectivity.
Step-by-Step Guide: Installing Your SIM Card
Whether you’re dealing with a traditional physical SIM or embracing the modern eSIM, the process requires attention to detail. Follow these steps carefully to ensure your device gets connected seamlessly.
Installing a Physical SIM Card
This is the most common scenario for many users. The process is generally similar across most smartphones, though the exact location of the SIM tray might vary.
-
Step 1: Power Off Your Device.
- Why: This is a critical first step. Powering off your phone prevents potential damage to the SIM card or the phone’s internal components during insertion/removal. It also ensures the phone correctly recognizes the new SIM upon startup, registering with the network without issues.
- How: Typically, hold down the power button (or power button + volume down on some Androids) until a power menu appears, then select “Power off” or “Shut down.”
-
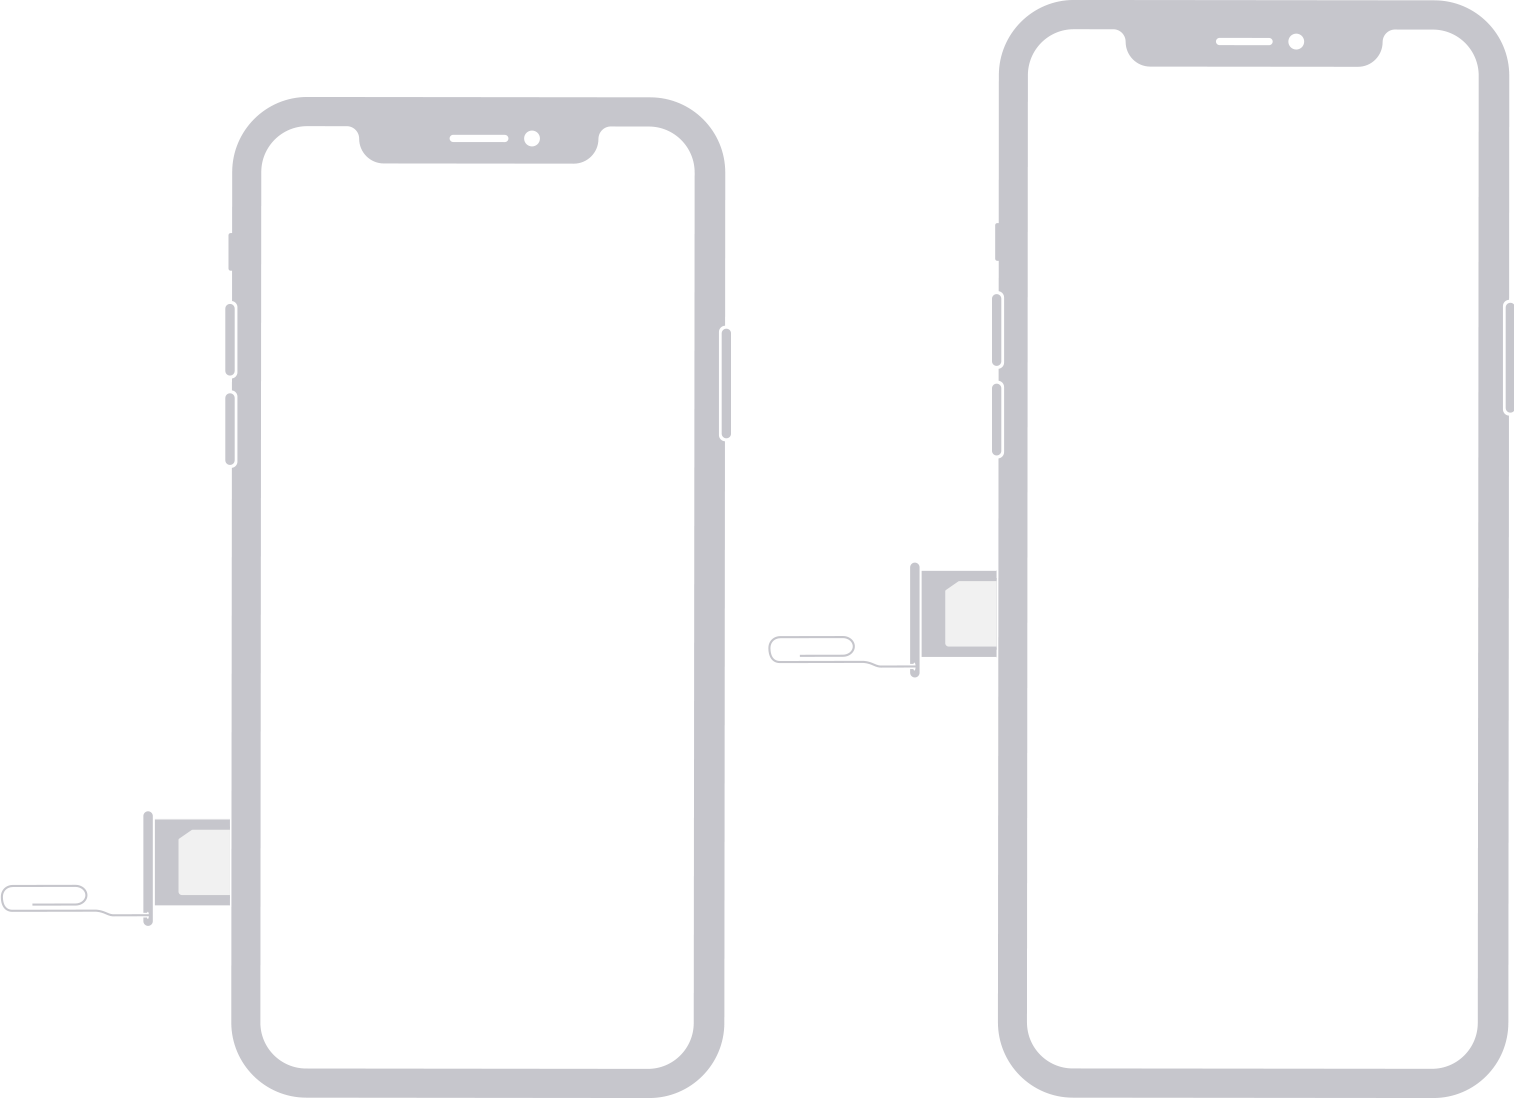
Step 2: Locate the SIM Tray.
- Where: On most modern smartphones (e.g., iPhones, Samsung Galaxy, Google Pixel), the SIM tray is usually located on one of the side edges of the device. Less commonly, it might be on the top or, in older models, underneath the battery cover (which requires removing the battery).
- Identify: Look for a small, thin outline with a tiny pinhole next to it. This is the SIM tray. Some phones might also have a second tray for a microSD card or a second SIM.
-
Step 3: Eject the SIM Tray.
- How: Insert the tip of your SIM ejector tool (or straightened paperclip) into the small pinhole. Apply gentle, steady pressure until the tray slightly pops out. Do not force it.
- Retrieve: Gently pull the entire tray out of the slot.
-
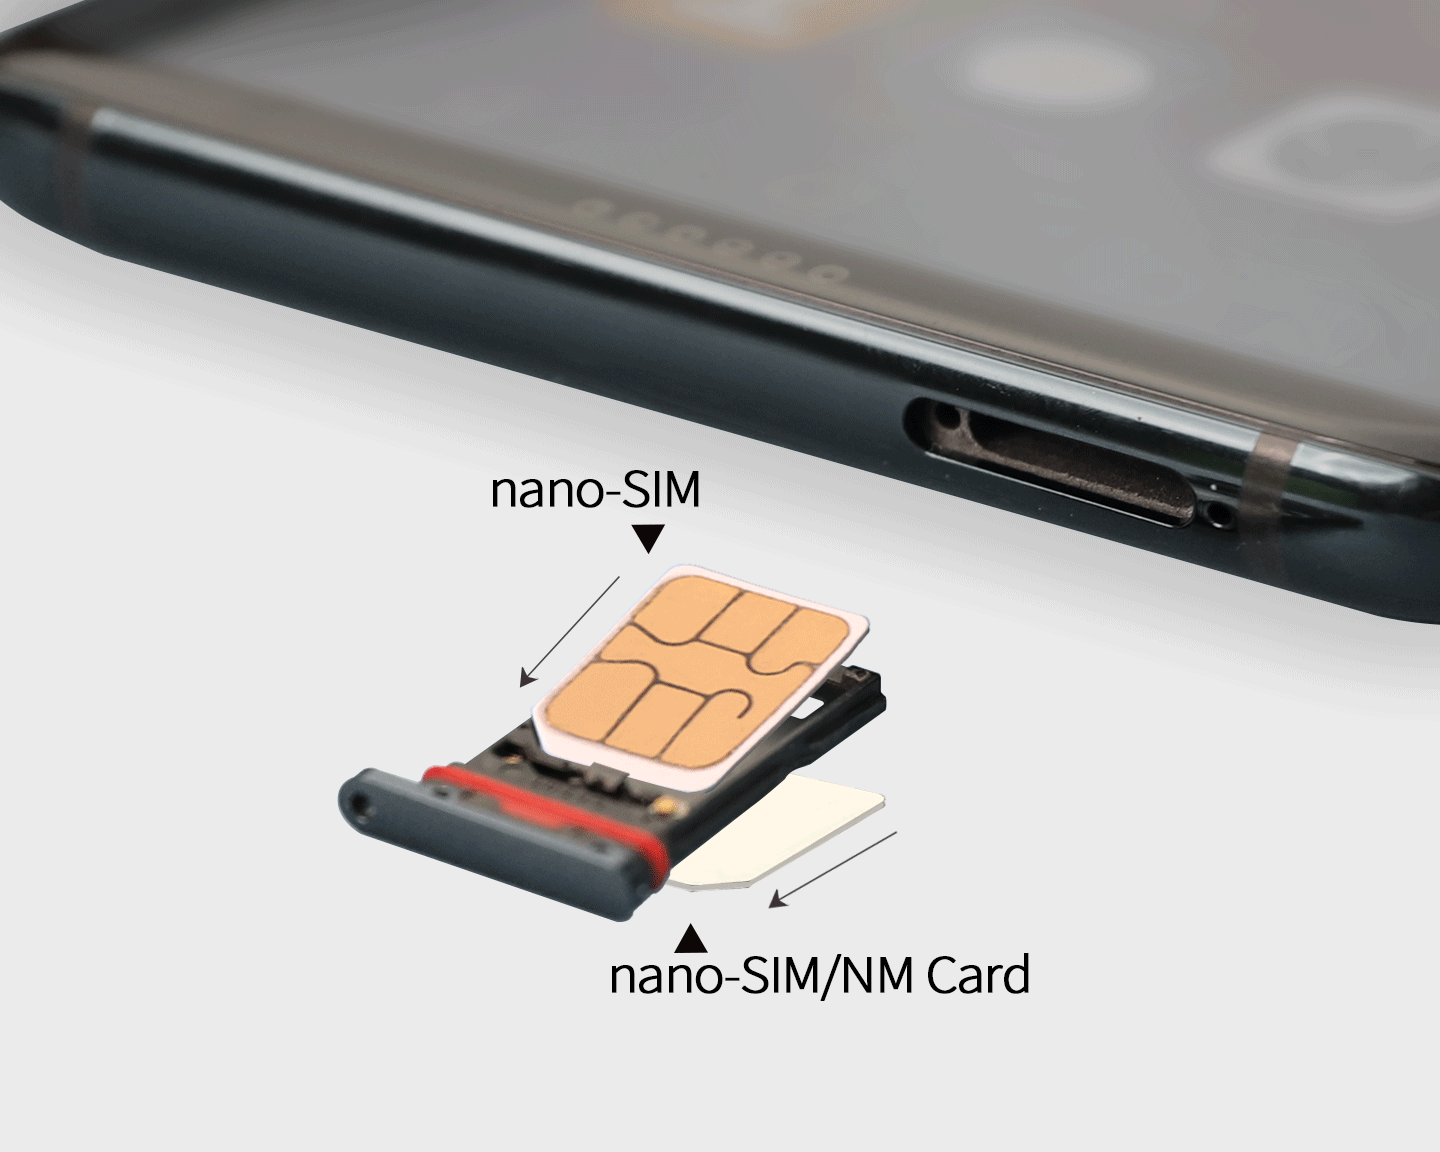
Step 4: Place the SIM Card.
- Orientation: Look at the SIM card and the tray. You’ll notice that the SIM card has a small cut-off corner on one side, and the tray has a corresponding shape. This is crucial for correct orientation. Align the SIM card so its cut-off corner matches the tray’s notch.
- Placement: Carefully place the SIM card into the tray. It should sit snugly and flat in its designated slot, without needing to be forced. If it doesn’t fit, double-check the size and orientation.
-
Step 5: Reinsert the SIM Tray.
- How: Carefully slide the tray back into the phone’s slot. Ensure it’s facing the correct way (it usually only goes in one direction). Push it in until it’s flush with the phone’s body. Do not force it; if there’s resistance, pull it out and re-check the SIM card’s placement.
-
Step 6: Power On and Activate.
- Power On: Press and hold the power button until your phone turns on.
- PIN Entry (Digital Security): If your SIM card has a PIN code (a security measure to prevent unauthorized use), the phone will prompt you to enter it. This PIN is usually provided by your carrier. If you enter it incorrectly too many times, the SIM will lock, requiring a PUK code (see troubleshooting section).
- Network Registration: Your phone should automatically detect the new SIM and register with the network. You should see a signal strength indicator (bars) at the top of your screen, often alongside the carrier’s name (e.g., “AT&T,” “Vodafone,” “T-Mobile”).
Setting Up an eSIM
Setting up an eSIM is a more digital process, relying on your phone’s software and an internet connection.
-
Step 1: Ensure Device Compatibility and Connectivity.
- Compatibility: Verify your phone supports eSIMs (as mentioned earlier, typically newer models).
- Wi-Fi: Connect your phone to a stable Wi-Fi network. This is usually necessary to download the eSIM profile from your carrier.
-
Step 2: Access SIM/Network Settings.
- iOS: Go to
Settings > Cellular > Add Cellular Plan. - Android: Go to
Settings > Network & internet > SIMs(orMobile network) >Add more.
- iOS: Go to
-
Step 3: Scan QR Code (Most Common Method).
- Carrier Provided: Your carrier will typically provide a QR code, either printed on a card, via email, or displayed in their app or website.
- Scan: Your phone’s camera will open to scan the QR code. Point the camera at the QR code.
- Confirmation: Follow the on-screen prompts to confirm and activate the new cellular plan. Your phone will download the profile and connect to the network.
-
Step 4: Manual Entry (Less Common).
- If a QR code isn’t available, your carrier might provide details for manual entry. This typically includes an “SM-DP+ Address” and an “Activation Code.”
- Input: Select the manual entry option in your phone’s settings and carefully type in the provided information.
-
Step 5: Complete Setup and Activate.
- Once the profile is downloaded, your phone may ask you to label the plan (e.g., “Personal,” “Work,” “Travel”) and set a default line for calls, messages, or data, especially if you have multiple SIMs (physical + eSIM, or multiple eSIMs).
- Your device should then connect to the cellular network, and you should see the signal bars.
Post-Installation Verification (Tech & Productivity)
After installing any SIM card, it’s crucial to verify that everything is working as expected. This ensures you’re fully connected and ready to use your device for communication, work, and leisure.
- Check for Network Signal: Look at the top of your screen for signal bars and your carrier’s name. If you see “No Service” or low signal, proceed to troubleshooting.
- Make a Test Call: Dial a known number (a friend, family member, or even your voicemail) to ensure you can make and receive calls.
- Send a Test Text Message: Send a quick SMS to confirm messaging functionality.
- Test Mobile Data: Turn off Wi-Fi and try browsing a website or opening an app that requires an internet connection. If data isn’t working, check your phone’s APN (Access Point Name) settings. These settings tell your phone how to connect to your carrier’s mobile data network and are usually configured automatically but sometimes require manual adjustment (information is available on your carrier’s support site).
- Productivity Link: With your SIM successfully installed and verified, your device is now a fully functional tool for productivity, communication, and digital engagement, linking you to your personal and professional networks without interruption.
Troubleshooting Common SIM Card Issues (Digital Security & Tech)
Even with careful installation, sometimes issues arise. Don’t panic; many common SIM card problems have straightforward solutions. This section provides a practical guide to diagnose and fix connectivity glitches, often leveraging your device’s tech capabilities.
SIM Not Detected or No Service
This is perhaps the most common and frustrating issue. Here’s a checklist:
- Reinsert the SIM Card: The first and simplest step. Power off your phone, remove the SIM tray, ensure the SIM card is correctly seated, and reinsert it. Sometimes a slight misalignment can prevent detection.
- Restart Your Phone: A fresh reboot can often resolve minor software glitches that might be preventing your phone from recognizing the SIM or connecting to the network.
- Toggle Airplane Mode: Turn on Airplane Mode for about 30 seconds, then turn it off. This forces your phone to re-scan for available networks.
- Check Network Settings:
- Automatic Network Selection: Go to your phone’s network settings (usually
Settings > Network & internet > Mobile network > Network operators). Ensure “Choose automatically” is selected. If not, select it and restart your phone. - Preferred Network Type: Ensure your preferred network type is set appropriately (e.g., 4G/LTE or 5G auto).
- Automatic Network Selection: Go to your phone’s network settings (usually
- Test SIM in Another Phone (Isolate the Problem): If possible, try your SIM card in a different, unlocked, and compatible phone.
- If it works in another phone, the problem is likely with your original device (hardware issue, software bug).
- If it doesn’t work in another phone, the SIM card itself is likely faulty, or there’s an issue with your carrier account.
- Check for Software Updates: Outdated software can sometimes cause connectivity problems. Ensure your phone’s operating system is up to date.
- Contact Your Carrier: If all else fails, reach out to your service provider. There might be an issue with your account, network outages in your area, or the SIM card itself might be defective and need replacement.
Data Not Working
You can make calls and texts, but mobile internet isn’t working.
- Check Mobile Data Settings: Ensure “Mobile data” is turned on in your phone’s settings.
- Data Roaming: If you’re abroad, ensure “Data roaming” is enabled (be aware of potential costs!).
- APN Settings: The Access Point Name (APN) settings tell your phone how to connect to your carrier’s internet services.
- Location: Find this under
Settings > Network & internet > Mobile network > Access Point Names(Android) orSettings > Cellular > Cellular Data Network(iOS, though less common to need manual adjustment). - Verification: Compare your phone’s APN settings with those provided by your carrier on their support website. If they differ, you may need to add a new APN or edit the existing one.
- Location: Find this under
- Data Limit: Have you reached your monthly data allowance? Check your carrier’s app or website.
- Network Congestion: Sometimes data can be slow or unavailable due to temporary network congestion in your area.
PIN/PUK Code Problems (Digital Security)
SIM PINs and PUKs are essential digital security features.
- SIM PIN: A 4-digit code that protects your SIM card. If enabled, your phone will ask for it every time it restarts or if you install the SIM into a new device. It prevents unauthorized use of your cellular plan if your phone is stolen.
- PUK (PIN Unblocking Key): If you enter your SIM PIN incorrectly three times, the SIM card will lock. You then need a PUK code to unlock it. The PUK is a longer, unique code for your SIM card.
- Retrieval: Never guess your PUK code! After several incorrect PUK entries, your SIM card will be permanently locked and unusable. You must obtain your PUK from your carrier (often found on the SIM card packaging, your online account, or by contacting customer support).
Understanding and correctly managing these codes is vital for both your access to service and your digital security.
Maximizing Your Connectivity: Tips for SIM Card Management (Money & Tech)
Beyond basic installation, managing your SIM card strategically can enhance your connectivity experience, save you money, and bolster your digital security.
International Travel and Roaming (Money Savings)
Traveling abroad often highlights the financial implications of your SIM card choice:
- Roaming: Using your home SIM card internationally can incur significant roaming charges for calls, texts, and data. While convenient, this is often the most expensive option.
- Local SIM Cards (Money Saver): Purchasing a local physical SIM card upon arrival in a foreign country is usually the most cost-effective solution for extended stays. You get a local number and local rates for data and calls.
- International eSIMs (Tech & Money Saver): For eSIM-compatible phones, services like Airalo, Holafly, or your home carrier’s international eSIM plans allow you to download a local data plan before you travel. This provides immediate, affordable connectivity upon landing, bypassing physical SIM hassle and often being cheaper than traditional roaming. This is a prime example of how tech advancements directly translate into financial benefits for the user.
Switching Carriers and Unlocked Phones (Money & Brand Freedom)
The ability to switch carriers at will offers immense financial and strategic advantages:
- Unlocked Phones: An unlocked phone is not tied to any single carrier, allowing you to insert a SIM from any compatible provider. This means you can:
- Shop for the Best Deals: Take advantage of competitive plans and promotions without being forced into an expensive contract.
- Greater Resale Value: Unlocked phones typically fetch a higher price on the secondary market.
- Freedom of Choice (Brand): You’re not beholden to a specific carrier’s service or brand; you can choose based on network quality, customer service, or price, giving you more control over your mobile experience.
- Dual SIM (Tech Feature): Many phones offer dual SIM capabilities (either two physical SIMs, or one physical + one eSIM). This allows you to have two active numbers simultaneously—e.g., a personal and a work number, or a home number and an international travel SIM—maximizing flexibility and potentially saving costs by using the most appropriate plan for each type of usage.
Protecting Your SIM Card and Digital Identity (Digital Security)
Your SIM card is a critical component of your digital identity, making its security paramount.
- SIM PIN: Always enable a SIM PIN. This adds a layer of security, preventing unauthorized persons from using your SIM card if your phone is lost or stolen.
- Awareness of SIM Swapping Fraud: SIM swapping is a serious form of identity theft where criminals trick your carrier into porting your phone number to a SIM card they control. Once they have your number, they can often access your bank accounts, email, and social media through two-factor authentication (2FA) codes sent to your phone.
- Mitigation: Use strong, unique passwords for your carrier account, enable multi-factor authentication for your carrier login, be wary of suspicious calls or texts purporting to be from your carrier, and consider using app-based authenticator apps instead of SMS for 2FA where possible.
- Keep Your Device Secure: Regular software updates, strong screen locks, and “Find My Device” features are crucial not only for your phone but indirectly for the security of your SIM and the digital identity it represents.
Conclusion
Installing a SIM card, whether it’s a traditional physical card or a modern eSIM, is a fundamental step in connecting your device to the vast world of mobile communication. While the process itself is generally straightforward, a thorough understanding of the different types of SIMs, careful preparation, and diligent troubleshooting can make all the difference between a seamless setup and a frustrating experience.
Beyond merely getting a signal, managing your SIM card effectively involves embracing technological advancements like eSIMs for financial savings during travel, leveraging unlocked phones for greater brand freedom and better deals, and critically, implementing robust digital security measures to protect your identity from threats like SIM swapping.
In an era where constant, reliable connectivity underpins our personal productivity, business operations, and global communication, mastering the basics of SIM card installation and management is an essential skill. By following this guide, you’re not just installing a piece of plastic or activating a digital profile; you’re unlocking your device’s full potential and ensuring you remain securely and efficiently connected to everything that matters.
aViewFromTheCave is a participant in the Amazon Services LLC Associates Program, an affiliate advertising program designed to provide a means for sites to earn advertising fees by advertising and linking to Amazon.com. Amazon, the Amazon logo, AmazonSupply, and the AmazonSupply logo are trademarks of Amazon.com, Inc. or its affiliates. As an Amazon Associate we earn affiliate commissions from qualifying purchases.