In the rapidly evolving world of technology, where every second counts and digital efficiency can directly impact productivity and even financial outcomes, upgrading your computer’s storage drive is one of the most impactful enhancements you can make. While Central Processing Units (CPUs) and Graphics Processing Units (GPUs) often grab the headlines, the Solid State Drive (SSD) has quietly revolutionized how we interact with our computers, offering unparalleled speed and responsiveness compared to traditional Hard Disk Drives (HDDs).
This comprehensive guide will walk you through the process of installing a new SSD, transforming your computing experience from sluggish to lightning-fast. Whether you’re looking to breathe new life into an aging laptop, build a high-performance gaming rig, or optimize your workstation for demanding applications like video editing or AI development, an SSD upgrade is a smart investment that pays dividends in performance, reliability, and overall user satisfaction.
Why Upgrade to an SSD? The Performance Revolution
For years, the spinning platters of Hard Disk Drives (HDDs) served as the backbone of digital storage. While cost-effective for mass storage, their mechanical nature imposed significant limitations on speed and durability. The advent of Solid State Drives changed everything. SSDs store data on flash memory chips, similar to a USB drive or smartphone storage, eliminating the mechanical components that bottleneck HDDs.
The immediate and most noticeable benefit of an SSD is speed. Imagine your computer booting up in mere seconds, applications launching instantly, and large files transferring in a fraction of the time. This isn’t just a convenience; it’s a profound boost to productivity. For professionals, faster load times mean less waiting and more doing, directly impacting workflow efficiency. For gamers, it translates to quicker loading screens and a smoother gaming experience. For general users, it means a more responsive and enjoyable interaction with their device. This technological leap addresses one of the primary frustrations of modern computing: waiting.
Beyond Speed: Other Benefits of SSDs
While speed is the headline feature, SSDs offer a host of other advantages that align perfectly with modern tech trends and user demands:
- Durability and Reliability: Without moving parts, SSDs are far more resistant to physical shock and vibration than HDDs. This makes them ideal for laptops and portable devices, where accidental drops are a common occurrence. The enhanced reliability contributes to greater digital security, reducing the risk of data loss from physical damage.
- Energy Efficiency: SSDs consume less power than HDDs, which translates to longer battery life for laptops and lower energy bills for desktop users. This not only aligns with environmental consciousness but also offers a subtle financial benefit over the lifespan of the drive.
- Silent Operation: The absence of moving parts means SSDs operate completely silently. Gone are the whirring and clicking sounds associated with traditional hard drives, contributing to a quieter and more pleasant working environment.
- Improved System Responsiveness: Beyond just boot times and application launches, an SSD significantly enhances overall system responsiveness. Multitasking becomes smoother, and the entire operating system feels snappier, reducing frustration and boosting effective working time. This can indirectly enhance personal branding by ensuring your tech always performs at its best, projecting an image of efficiency and reliability.
Understanding SSD Types: SATA vs. NVMe
Before you dive into the installation, it’s crucial to understand the different types of SSDs available, as compatibility with your existing system is key. The two primary interfaces you’ll encounter are SATA and NVMe.
-
SATA (Serial Advanced Technology Attachment) SSDs:
- Form Factor: Most commonly found in a 2.5-inch form factor, designed to fit into drive bays traditionally used by laptop HDDs. There are also M.2 SATA drives, which are smaller, gum-stick-sized modules.
- Interface: Connects via a SATA data cable and a SATA power cable to your motherboard and power supply, respectively.
- Performance: While significantly faster than HDDs, SATA SSDs are limited by the SATA III interface to a maximum theoretical speed of 600 MB/s. This is still ample for most everyday tasks and a vast improvement over HDDs.
- Compatibility: Highly compatible with nearly all modern motherboards, making them a safe and popular choice for upgrades.
-
NVMe (Non-Volatile Memory Express) SSDs:
- Form Factor: Primarily found in the M.2 form factor, which is a small, rectangular circuit board that plugs directly into a dedicated M.2 slot on your motherboard. There are also PCIe add-in cards for older systems lacking M.2 slots.
- Interface: Utilizes the PCI Express (PCIe) bus, which provides a direct, high-speed connection to the CPU, bypassing the slower SATA controller.
- Performance: NVMe drives leverage multiple PCIe lanes, offering dramatically higher speeds, often reaching 3,500 MB/s to over 7,000 MB/s for newer PCIe Gen 4.0 and Gen 5.0 drives. This makes them ideal for demanding applications, large file transfers, and gaming where every millisecond counts.
- Compatibility: Requires an M.2 slot on your motherboard that supports NVMe. Not all M.2 slots support NVMe; some are SATA-only. Always check your motherboard’s specifications.
Choosing between SATA and NVMe often comes down to budget, your motherboard’s capabilities, and your performance needs. For general use and significant improvement over an HDD, a SATA SSD is excellent value. For enthusiasts, professionals, and those seeking cutting-edge performance, NVMe is the way to go, assuming your system supports it.
Pre-Installation Checklist: Preparing for Your Upgrade
A smooth SSD installation starts with thorough preparation. Skipping these crucial steps can lead to frustration, data loss, or compatibility issues.
Compatibility Check: What Your System Needs
Before purchasing an SSD, confirm it will work with your computer:
- Motherboard and M.2 Slots (for NVMe): If you’re considering an NVMe M.2 SSD, check your motherboard manual or the manufacturer’s website to confirm it has an M.2 slot and that the slot supports NVMe (PCIe). Note the length of the supported M.2 drive (e.g., 2280 is common, meaning 22mm wide, 80mm long). Many motherboards have multiple M.2 slots, some supporting SATA M.2, some NVMe M.2, and some both.
- SATA Ports (for 2.5-inch SATA): For a 2.5-inch SATA SSD, ensure you have an available SATA data port on your motherboard and an available SATA power connector from your power supply. Most modern systems have multiple.
- Physical Space (for 2.5-inch SATA): Desktops will need an available 2.5-inch drive bay. If your case only has 3.5-inch bays, you might need a 2.5-inch to 3.5-inch adapter bracket. Laptops typically have a single 2.5-inch bay currently occupied by an HDD, which the SSD will replace.
- Operating System: Ensure you’re running a relatively modern operating system (Windows 7/8/10/11 or a recent macOS/Linux distribution) as they have better native support for SSD features like TRIM.
Backing Up Your Data: A Crucial Step
This is perhaps the most critical step in the entire process. Do not skip it. While installing an SSD is generally straightforward, hardware installations always carry a small risk of data corruption or loss. Moreover, if you plan to perform a clean installation of your operating system, you will erase your current drive.
- External Hard Drive: The simplest method is to copy all your important documents, photos, videos, and other personal files to an external hard drive or USB stick.
- Cloud Storage: Utilize services like Google Drive, Dropbox, OneDrive, or iCloud to back up critical files.
- System Image: For a more comprehensive backup, consider creating a full system image using Windows Backup and Restore, macOS Time Machine, or third-party software. This allows you to restore your entire operating system and files exactly as they were. This practice is also a cornerstone of good digital security, protecting against unforeseen hardware failures or cyber threats.
Gathering Your Tools
Having the right tools on hand will make the installation much smoother:
- Screwdriver: A Phillips head screwdriver is usually sufficient for most PC cases and drive mounts. Some laptops might require smaller Phillips or Torx bits.
- Anti-static Wrist Strap (Recommended): To prevent electrostatic discharge (ESD) from damaging sensitive components. If you don’t have one, regularly touch a metal part of your PC case (when it’s unplugged) to ground yourself.
- User Manuals: Your motherboard manual for desktop PCs or service manual for laptops can be invaluable for locating specific slots, connectors, and disassembly instructions.
- SSD Cloning Software (Optional): If you plan to migrate your existing operating system without a clean install, you’ll need cloning software. Many SSD manufacturers provide their own free utilities (e.g., Samsung Data Migration, Acronis True Image for Crucial).
- USB Drive (for Clean Install): If you opt for a clean operating system installation, you’ll need a USB drive (at least 8GB) to create bootable installation media.
Physical Installation: Hands-On with Your Hardware
With preparations complete, it’s time to get hands-on. Always work in a well-lit area and take your time.
Safety First: Power Down and Ground Yourself
- Shut Down and Unplug: Completely shut down your computer. For desktops, unplug the power cable from the wall outlet and from the back of the PC. For laptops, remove the battery if it’s external, or ensure it’s fully powered off and unplugged from the charger.
- Ground Yourself: Wear your anti-static wrist strap, attaching the clip to an unpainted metal part of your PC case. If you don’t have a strap, periodically touch an unpainted metal part of the case to discharge any static electricity. Static electricity is invisible but can severely damage electronic components.

Opening Your PC Case
- Desktops: Typically involve unscrewing two thumbscrews or standard screws on the rear panel, then sliding off one side panel (usually the left side when looking from the front). Consult your case manual if unsure.
- Laptops: This varies widely. Some have simple access panels for drives, others require removing the entire bottom cover, and some high-end ultrabooks might be more challenging. Refer to your laptop’s service manual or reputable online guides (e.g., iFixit) for specific disassembly instructions.
Installing a SATA SSD (2.5-inch)
- Locate Drive Bay: Find an empty 2.5-inch drive bay in your desktop case or the existing 2.5-inch HDD slot in your laptop. If your desktop only has 3.5-inch bays, use your adapter bracket to mount the SSD securely.
- Mount the SSD: Slide the SSD into the drive bay and secure it with screws. For laptops, simply place it into the slot and secure it with the bracket or screws that held the previous HDD.
- Connect Cables (Desktops Only): Connect one end of a SATA data cable to the SSD and the other end to an available SATA port on your motherboard. Then, connect a SATA power connector from your power supply unit (PSU) to the SSD. Laptops usually have integrated connectors, so this step is not applicable.
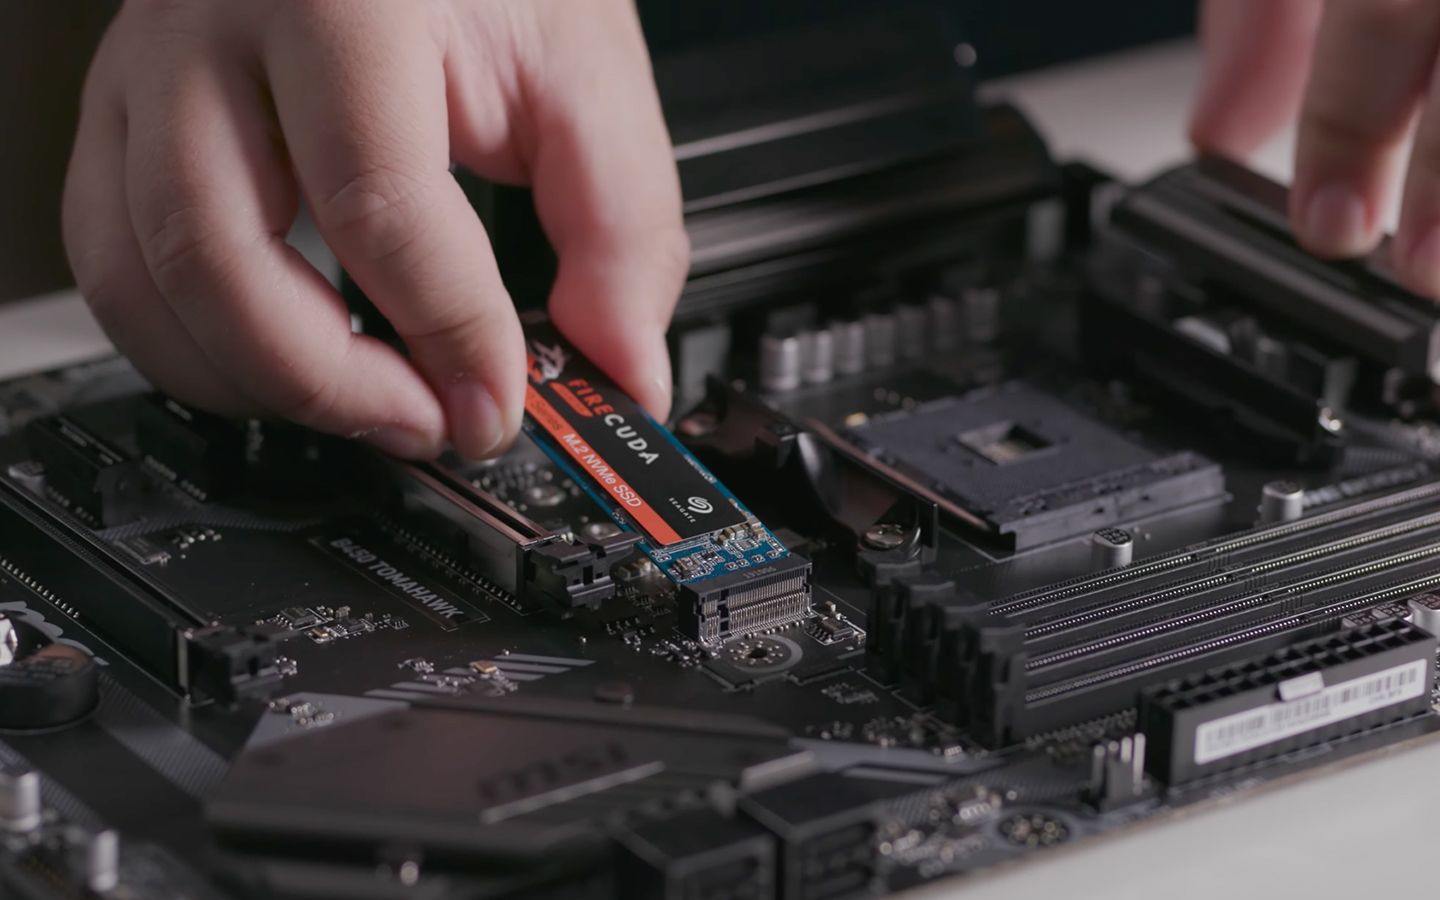
Installing an NVMe M.2 SSD
- Locate M.2 Slot: Identify the M.2 slot on your motherboard. It’s usually a small horizontal slot, often labeled “M.2” or “PCIe GenX.” There will typically be a small screw or plastic clip nearby, designed to hold the drive in place. Some M.2 slots are hidden under heatsinks, which you’ll need to remove carefully.
- Insert the SSD: Gently slide the M.2 SSD into the slot at a slight angle (around 30 degrees). It should slide in smoothly. Do not force it.
- Secure the SSD: Once fully seated, push the SSD down until it’s parallel with the motherboard. Secure it with the small screw or plastic clip provided by your motherboard manufacturer. If your motherboard came with an M.2 heatsink, reattach it over the SSD.
Securing Your New Drive
Double-check all connections. Ensure the SSD is firmly seated and screwed in. Replace the side panel of your desktop PC or the bottom cover of your laptop, and secure it with screws.
Software Configuration: Bringing Your SSD to Life
With the physical installation complete, the next step is to configure your SSD within the operating system.
Initializing and Formatting Your New SSD
When you first install a brand new SSD, your operating system won’t immediately recognize it as a usable drive. You’ll need to initialize and format it.
- Power On: Reconnect all cables and power on your computer.
- Access Disk Management:
- Windows: Right-click on the Start button (or press
Win + X) and select “Disk Management.” - macOS: Open Disk Utility (Applications > Utilities > Disk Utility).
- Linux: Use GParted or the Disks utility.
- Windows: Right-click on the Start button (or press
- Initialize Disk (Windows Only): In Disk Management, you should see your new SSD listed as “Disk X” with “Not Initialized.” Right-click on it and select “Initialize Disk.” Choose “GPT” (GUID Partition Table) for modern systems and drives larger than 2TB; “MBR” (Master Boot Record) is older but still works for smaller drives. GPT is generally recommended.
- Create Simple Volume / Format:
- Windows: After initialization, the disk will show as “Unallocated Space.” Right-click on this space and select “New Simple Volume.” Follow the wizard, assign a drive letter, and choose “NTFS” as the file system (default). Perform a “Quick Format.”
- macOS: Select your new SSD in Disk Utility, click “Erase,” give it a name, choose “APFS” for newer macOS versions or “Mac OS Extended (Journaled)” for older ones, and click Erase.
- Linux: Use the
Disksutility orGPartedto create a new partition table (GPT recommended), then create a new partition (e.g., ext4 file system).
Your SSD is now ready to store data!
Migrating Your Operating System (Cloning)
If you want to keep your current operating system, programs, and settings exactly as they are, cloning your old drive to the new SSD is the way to go. This is a common and highly convenient method.
- Install Cloning Software: As mentioned in the preparation, use cloning software provided by your SSD manufacturer (e.g., Samsung Data Migration, Acronis True Image for Crucial/WD) or a reputable third-party utility (e.g., Macrium Reflect Free, Clonezilla).
- Connect Both Drives: Ensure both your old drive (source) and the new SSD (destination) are connected to the computer simultaneously. For desktops, this is usually straightforward. For laptops, you might need an external USB-to-SATA adapter or an NVMe enclosure for one of the drives.
- Clone the Drive: Follow the instructions within your chosen cloning software. You’ll typically select your old HDD/SSD as the “source drive” and your new SSD as the “destination drive.” The software will copy all partitions and data. This process can take anywhere from 30 minutes to several hours, depending on the amount of data.
- Change Boot Order: Once the cloning is complete, shut down your computer. If you have both drives still connected, you’ll need to enter your BIOS/UEFI settings (usually by pressing DEL, F2, F10, or F12 during boot) and set your new SSD as the primary boot device.
- Remove Old Drive (Optional): Once you’ve confirmed your system boots successfully from the new SSD, you can remove the old drive. You can then format the old drive and use it for additional storage if desired.
Performing a Clean OS Installation
For the cleanest, most optimized performance, a fresh installation of your operating system is often recommended. This eliminates old junk files, ensures optimal SSD-specific settings are applied, and gives you a fresh start.
- Create Bootable USB:
- Windows: Download the Media Creation Tool from Microsoft’s website to create a bootable Windows installation USB drive (at least 8GB).
- macOS: Use the macOS installer from the App Store and the
createinstallmediacommand in Terminal to make a bootable USB. - Linux: Download your chosen distribution’s ISO and use a tool like Rufus (Windows) or BalenaEtcher (Windows/macOS/Linux) to create a bootable USB.
- Remove Old Drive (Recommended): To prevent accidental data loss and ensure the new OS installs correctly, it’s highly recommended to temporarily disconnect or remove your old HDD/SSD before installing the new OS.
- Boot from USB: Insert the bootable USB drive, power on your computer, and repeatedly press the key to enter your BIOS/UEFI settings or the boot menu (often F12, F10, F2, DEL). Select your USB drive as the boot device.
- Install OS: Follow the on-screen prompts for your operating system installation. When prompted, choose to install to your new SSD. Ensure you select the correct drive to avoid overwriting unintended data.
- Install Drivers: After the OS is installed, install any necessary motherboard chipset drivers, GPU drivers, and other peripheral drivers from your hardware manufacturers’ websites to ensure optimal performance.
Post-Installation Tips & Troubleshooting
Congratulations! Your new SSD is installed and running. To ensure longevity and peak performance, consider these final tips.
Optimizing Your SSD for Longevity
- TRIM Enablement: Modern operating systems (Windows 7+, macOS 10.6.8+, most Linux distros) automatically enable TRIM, which helps SSDs manage data and maintain performance over time. Verify it’s enabled if you experience slowdowns.
- Avoid Defragmentation: Unlike HDDs, SSDs do not benefit from defragmentation. In fact, it can reduce their lifespan by increasing write cycles unnecessarily. Windows automatically disables defragmentation for SSDs.
- Leave Some Free Space: It’s generally recommended to leave about 10-15% of your SSD capacity free. This allows the drive’s wear-leveling algorithms to work effectively and helps maintain performance.
- Firmware Updates: Occasionally, SSD manufacturers release firmware updates that can improve performance, stability, or add new features. Check your SSD manufacturer’s website for their utility software, which can usually manage firmware updates.

Common Issues and Solutions
-
SSD Not Detected:
- Check Cables (SATA): Ensure SATA data and power cables are securely connected to both the SSD and the motherboard/PSU.
- Check M.2 Seating (NVMe): Make sure the M.2 drive is fully seated in its slot and secured.
- BIOS/UEFI Settings: Enter your BIOS/UEFI and ensure the SATA port (for SATA SSDs) is enabled, or that the M.2 slot (for NVMe) is correctly configured. Some older motherboards might require specific PCIe lane configurations.
- Driver Issues: For NVMe, ensure you have the latest motherboard chipset drivers installed.
- Initialization/Formatting: Remember that a new SSD needs to be initialized and formatted in Disk Management before it appears in “My Computer” or “Finder.”
-
System Not Booting from SSD After Clone:
- BIOS Boot Order: Re-enter BIOS/UEFI and double-check that your new SSD is set as the primary boot device.
- Old Drive Still Connected: If the old drive is still connected, your system might be defaulting to it. Temporarily disconnect the old drive to force the system to boot from the SSD.
- Cloning Error: The cloning process might have failed. Try cloning again with different software or perform a clean install.
-
Slow Performance:
- TRIM: Ensure TRIM is enabled.
- Drivers: Make sure you have the latest chipset drivers for your motherboard, especially important for NVMe drives.
- Full Drive: If your SSD is nearly full, performance can degrade. Free up some space.
- SATA vs. NVMe: Ensure you haven’t mistakenly installed an NVMe drive into a SATA-only M.2 slot, or vice versa, which can cause compatibility issues or limit speeds.
By following these steps, you’ve not only installed a new SSD but also given your computer a significant performance overhaul. This upgrade is a testament to how intelligent technology choices can lead to greater productivity, enhanced digital security through reliability, and ultimately, a more satisfying and efficient computing experience. Enjoy the speed!
aViewFromTheCave is a participant in the Amazon Services LLC Associates Program, an affiliate advertising program designed to provide a means for sites to earn advertising fees by advertising and linking to Amazon.com. Amazon, the Amazon logo, AmazonSupply, and the AmazonSupply logo are trademarks of Amazon.com, Inc. or its affiliates. As an Amazon Associate we earn affiliate commissions from qualifying purchases.