The Central Processing Unit (CPU) is frequently described as the “brain” of the computer, a fitting analogy given that it handles every instruction and calculation required to keep your system running. Whether you are building a high-performance gaming rig, a professional workstation for video editing, or simply breathing new life into an aging office PC, the CPU is the most critical component you will handle.
However, for many enthusiasts and first-time builders, the prospect of installing a CPU is the most nerve-wracking part of the process. The hardware is expensive, the components are delicate, and the precision required is absolute. This guide provides a professional, step-by-step deep dive into the technical nuances of CPU installation, ensuring your hardware remains safe and your system reaches peak performance.
Phase 1: Preparation, Compatibility, and Safety
Before you even touch your hardware, you must ensure that your components are fundamentally compatible. In the world of modern computing, “plug and play” does not apply to the physical connection between a processor and a motherboard.
Checking Socket and Chipset Compatibility
The first technical hurdle is the socket type. Intel and AMD use entirely different mounting architectures. Intel currently utilizes the LGA (Land Grid Array) system, such as the LGA 1700 for its 12th, 13th, and 14th generation chips. AMD has transitioned from the PGA (Pin Grid Array) of the AM4 platform to the LGA-based AM5 platform for its Ryzen 7000 series and beyond.
Beyond the physical socket, you must verify chipset compatibility. Just because a CPU fits in a socket doesn’t mean the motherboard’s firmware (BIOS) can communicate with it. Always visit the motherboard manufacturer’s website to confirm that your specific CPU model is supported by the current BIOS version. If you are upgrading an older board to a newer chip within the same socket family, you may need to perform a BIOS update using your old processor before installing the new one.
Gathering Essential Tools and Materials
A professional installation requires more than just the processor. You should have the following on hand:
- A Phillips-head screwdriver: Usually a #2 size for most cooler brackets.
- High-purity Isopropyl Alcohol (70% or higher): Necessary for cleaning old thermal interface material (TIM).
- Lint-free wipes or coffee filters: These won’t leave fibers behind on sensitive surfaces.
- High-quality thermal paste: Unless your cooler comes with pre-applied paste.
- An anti-static wrist strap: While modern components have some ESD (Electrostatic Discharge) protection, it is best practice to remain grounded.
Safety First: Static Electricity and Environment
Static electricity is the silent killer of microelectronics. To minimize risk, work on a hard, flat surface like a wooden table. Avoid working on carpets or wearing wool clothing during the process. Before touching any component, touch a grounded metal object (like the metal chassis of your PC while it is plugged into a grounded outlet but turned off) to discharge any static buildup.
Phase 2: Removing the Old Processor and Site Prep
If you are performing an upgrade rather than a fresh build, the removal of the existing hardware must be handled with care to avoid damaging the motherboard’s pins.
Gaining Access to the Motherboard
If your motherboard is already inside a case, you may need to lay the tower on its side to prevent components from falling. Disconnect the CPU fan or AIO (All-In-One) pump cable from the motherboard header. If you are using a large air cooler, you may need to remove your RAM modules or GPU to gain enough clearance to work comfortably.
Detaching the Cooling Solution
Thermal paste can act like an adhesive over time, especially after years of heat cycles. If you try to pull a cooler straight off a processor—particularly on older AMD PGA sockets—you risk ripping the CPU out of the locked socket and bending the pins.
To avoid this, run your computer for a few minutes before shutting it down to soften the paste. When unscrewing the cooler, use a “cross” pattern (top-left, bottom-right, etc.) to even out the pressure. Once unscrewed, gently twist the cooler clockwise and counter-clockwise to break the vacuum seal before lifting it away.

Cleaning the Surfaces
Once the cooler is removed, use your lint-free wipe and isopropyl alcohol to clean the base of the heatsink and the top of the old CPU. Even if you are discarding the old CPU, cleaning it now prevents old, crusty paste from flaking off and falling into the delicate motherboard socket during the swap.
Phase 3: The Installation Process: Precision and Placement
This is the most critical stage. Whether you are working with Intel or AMD, the goal is “Zero Insertion Force” (ZIF). You should never have to push the CPU into the socket.
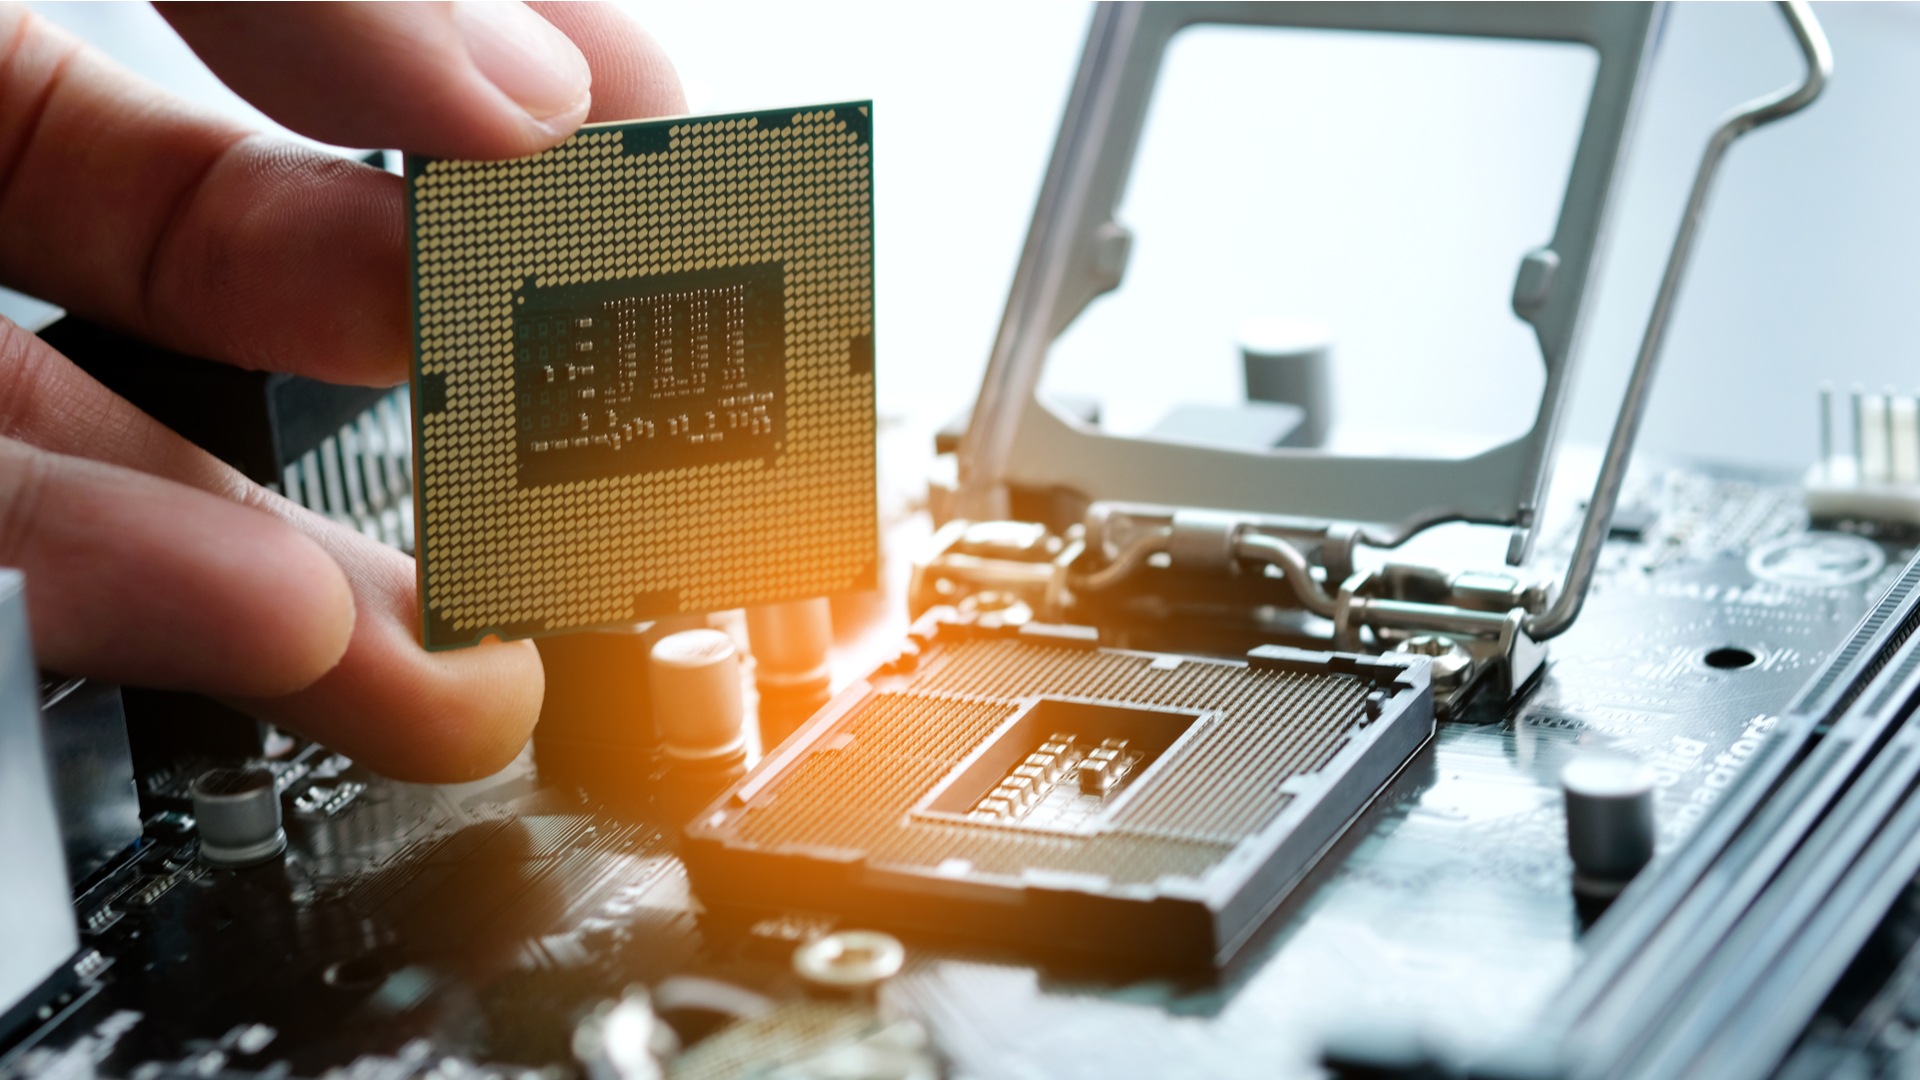
Handling the New CPU
Remove the new CPU from its plastic clamshell. Always hold the processor by its edges. Avoid touching the gold contact pads on the bottom (Intel/AMD AM5) or the pins (older AMD). Oils from your fingers can cause corrosion or interfere with electrical connectivity. Inspect the CPU briefly to ensure there are no manufacturing defects or pre-bent pins.
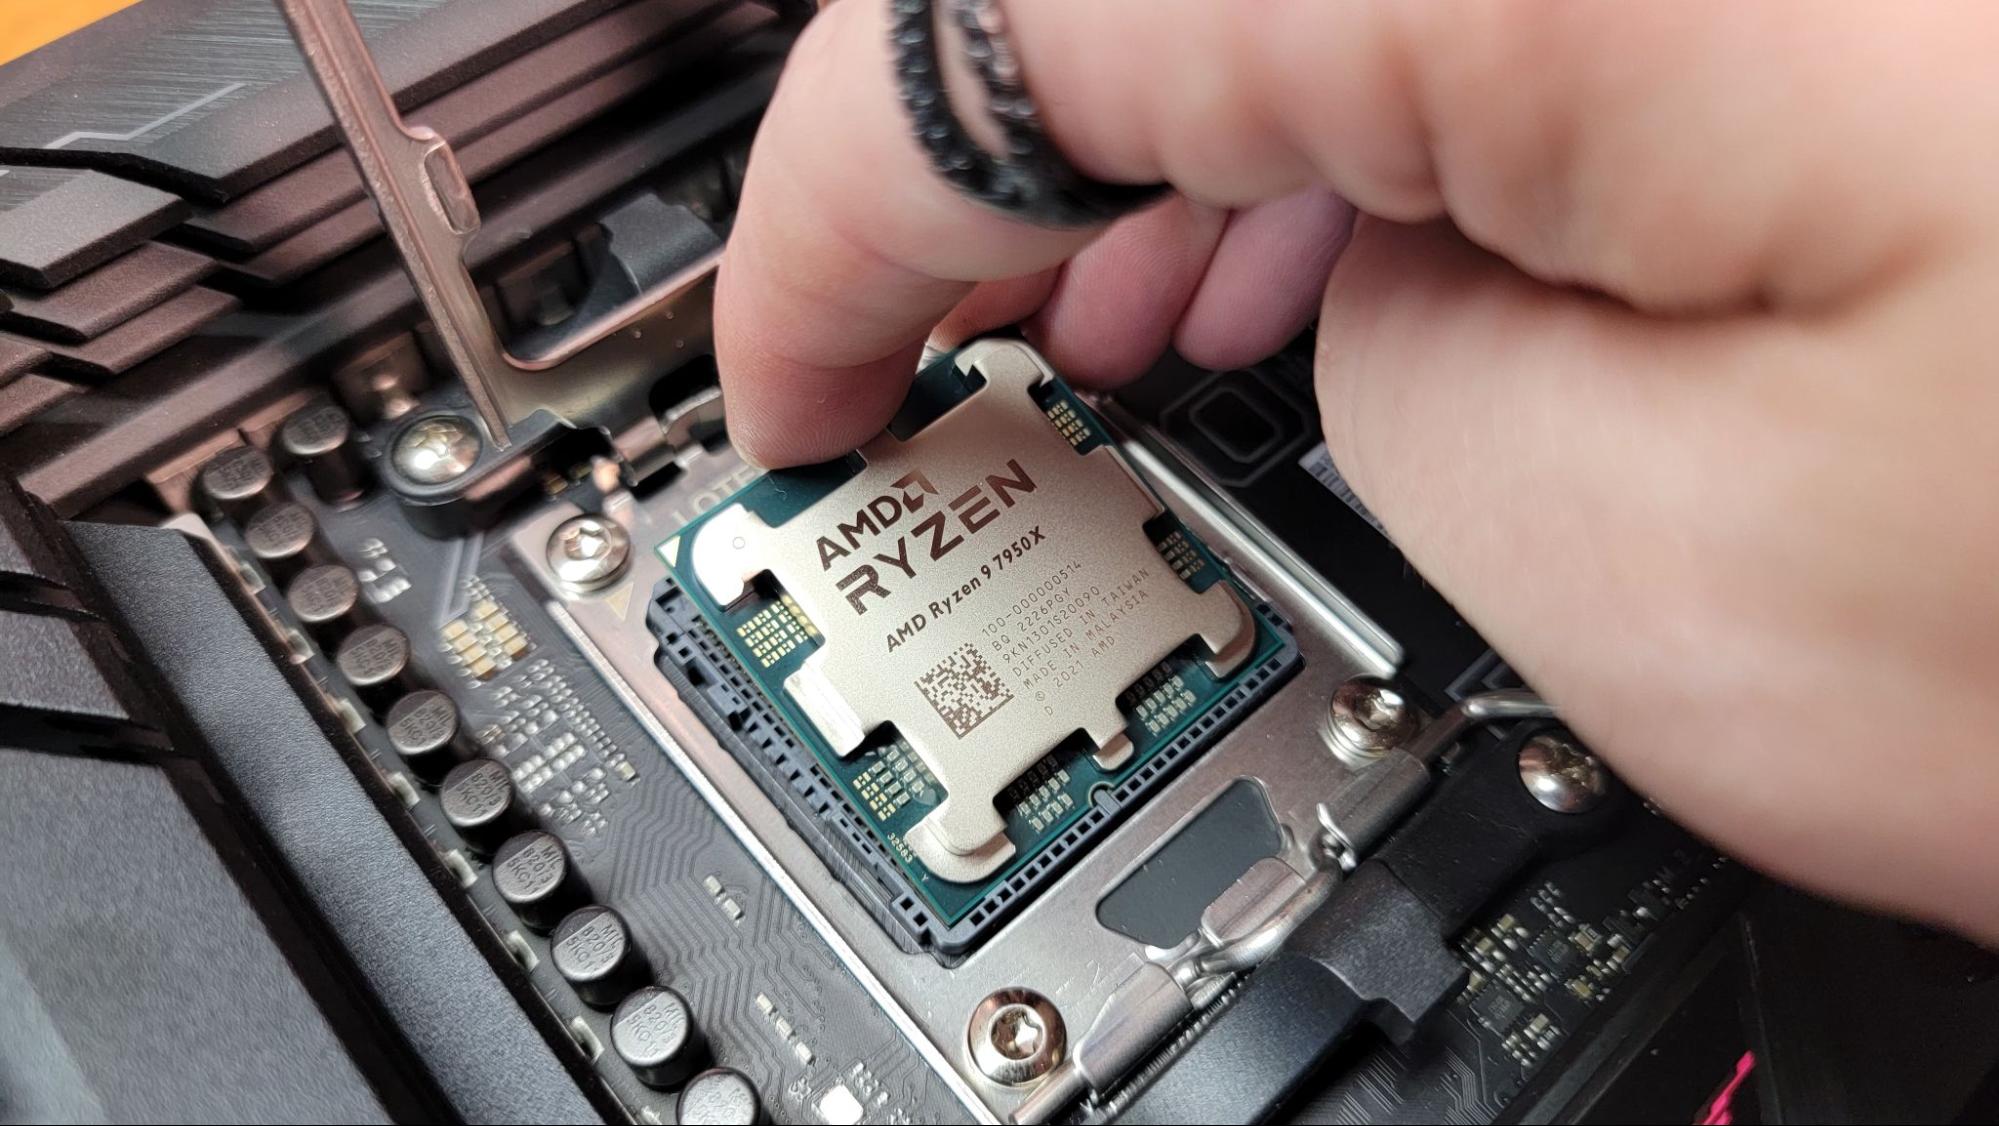
Aligning and Seating the Processor
Every CPU and socket has alignment markers. Usually, this is a small golden triangle in one corner of the CPU that matches a triangular mark on the motherboard’s socket housing. Some Intel CPUs also have small notches on the sides that act as keys, ensuring the chip can only be inserted in one orientation.
Lift the socket retention lever. If you are working on an Intel board, the protective plastic cover should remain in place for now. Gently lower the CPU into the socket. It should “drop” in perfectly. If it feels uneven or wobbles, do not apply pressure. Lift it back out, re-verify alignment, and try again.
Securing the Retention Arm
Once the CPU is seated flush, lower the metal retention frame (the load plate). Slide the lever back down and lock it under the plastic or metal catch.
- Note for Intel users: As you lower the lever, the protective plastic cover will pop off automatically. This is normal. Keep this cover in a safe place, as you will need it if you ever need to return the motherboard for warranty service.
- Note for AMD users: The lever on AM5 sockets requires a fair amount of force toward the end of its travel. This is normal, provided you are 100% sure the CPU is aligned correctly.
Phase 4: Thermal Management and Final Assembly
With the CPU physically installed, the focus shifts to heat dissipation. Without a proper thermal interface, a modern CPU will overheat and throttle within seconds of booting.
Applying Thermal Paste
Thermal paste exists to fill the microscopic air gaps between the CPU’s Integrated Heat Spreader (IHS) and the bottom of your cooler. Air is a terrible conductor of heat; thermal paste is much better.
The most common and effective method is the “pea-sized” drop. Place a small bead of paste (about 5-6mm in diameter) directly in the center of the CPU. When you tighten the cooler down, the pressure will naturally spread the paste into a thin, even circle. Avoid using too much; excess paste can spill over the sides and, if it is electrically conductive, cause a short circuit.
Reinstalling the Cooler
Place your cooler directly onto the CPU. Try to avoid sliding it around once it makes contact with the paste. Align the screws or clips with the motherboard’s mounting bracket. Just like when removing the cooler, tighten the screws in a diagonal “X” pattern. This ensures even pressure across the CPU die, which is vital for maintaining consistent temperatures. Finally, plug the CPU fan or pump cable into the “CPUFAN” or “AIOPUMP” header on the motherboard.
First Boot and BIOS Verification
Before closing the case and jumping into Windows, power on the system and enter the BIOS (usually by tapping the ‘Delete’ or ‘F2’ key). Navigate to the “Hardware Monitor” or “Status” tab to check two things:
- CPU Recognition: Ensure the BIOS correctly identifies the model and speed of your new processor.
- Temperatures: Watch the CPU temperature for a minute. At idle in the BIOS, it should typically sit between 30°C and 45°C. If you see the temperature rapidly climbing toward 80°C or 90°C, shut the system down immediately; this indicates that the cooler is not making proper contact or the thermal paste was applied incorrectly.
Conclusion
Installing a new CPU is a definitive milestone for any tech enthusiast. While the process requires a high degree of precision and a “measure twice, cut once” mentality, it is a manageable task that provides a deep sense of hardware literacy. By ensuring compatibility, maintaining a static-free environment, and focusing on the nuances of thermal management, you can maximize the lifespan and performance of your system. With the “brain” of your computer successfully installed, your PC is now ready to handle the rigors of modern software, AI-driven applications, and high-end digital tasks.
aViewFromTheCave is a participant in the Amazon Services LLC Associates Program, an affiliate advertising program designed to provide a means for sites to earn advertising fees by advertising and linking to Amazon.com. Amazon, the Amazon logo, AmazonSupply, and the AmazonSupply logo are trademarks of Amazon.com, Inc. or its affiliates. As an Amazon Associate we earn affiliate commissions from qualifying purchases.