In today’s hyper-connected world, a stable and fast internet connection isn’t a luxury; it’s a fundamental necessity. From powering our smart homes and streaming our favorite content to enabling remote work, online learning, and countless digital security measures, the modem stands as the unsung hero at the heart of our digital lives. Whether you’re setting up a new internet service, replacing an old or faulty device, or simply looking to optimize your home network, understanding how to properly install a modem is a vital skill. This comprehensive guide will walk you through every step, ensuring you establish a robust and secure foundation for all your online activities.

A well-installed modem is more than just a gateway to the internet; it’s the bedrock of your digital productivity. A flaky connection can derail important video calls, interrupt critical software updates, or even compromise your digital security by making you vulnerable to connection drops when security features are actively running. By taking control of your modem installation, you’re not just plugging in a device; you’re investing in the reliability, efficiency, and security of your entire digital ecosystem. This guide is designed to empower you, translating complex technical jargon into actionable steps, so you can enjoy uninterrupted connectivity and unlock the full potential of your online experience, supporting everything from your personal finance management tools to your latest online income ventures.
Pre-Installation Checklist: Gathering Your Essentials and Understanding Your Setup
Before you even unbox your new modem, a little preparation can save a significant amount of time and frustration. Think of this stage as laying the groundwork for a seamless build – much like a successful brand strategy requires thorough market research. Knowing what you need and understanding your specific internet service provider (ISP) requirements will streamline the entire installation process, ensuring you move from offline to online with maximum efficiency and minimal hiccups.
What You’ll Need
Gathering all necessary components beforehand prevents mid-installation pauses and ensures you have the right tools for the job. This organized approach reflects the productivity principles we apply to all digital tasks.
- Your New Modem: Ensure it’s the correct type for your internet service (e.g., cable modem for cable internet, DSL modem for DSL, fiber optic modem/ONT for fiber). Check the box for specifications and compatibility. Modern modems often support advanced DOCSIS standards (like DOCSIS 3.1) which are crucial for achieving higher speeds and better performance, aligning with current technology trends.
- Ethernet Cable (Category 5e or 6): These are essential for connecting your modem to your computer (for initial setup) or, more commonly, to your Wi-Fi router. A high-quality Ethernet cable ensures optimal data transfer speeds, which is vital for productivity and smooth streaming.
- Coaxial Cable (for cable internet): This cable connects your modem to the wall outlet. Often, a new one comes with the modem or is provided by your ISP. Ensure it’s in good condition with secure connectors.
- Power Adapter: This powers your modem. Always use the adapter specifically provided with your device to prevent damage.
- An Active Wall Outlet: For cable internet, this means a coaxial outlet. For DSL, it’s a phone jack. For fiber, it’s typically an optical network terminal (ONT) already installed by your ISP.
- Your Internet Service Provider (ISP) Account Information: This includes your account number and sometimes a specific activation phone number or website URL. Having this readily available will expedite the activation process.
- A Computer or Mobile Device: You’ll need this to access the modem’s setup page (if required) or to contact your ISP for activation. For initial setup, a wired connection to a computer is often more reliable than Wi-Fi.
- Optional: Wi-Fi Router: If your new modem doesn’t have built-in Wi-Fi (it’s a “modem only”), you’ll need a separate Wi-Fi router to create a wireless network for your devices. Many modern routers support Wi-Fi 6 or even Wi-Fi 7, offering enhanced speed and capacity for a growing number of smart home gadgets.
Understanding Your Internet Service Provider (ISP) and Modem Compatibility
This is a critical step that many overlook, leading to compatibility headaches down the line. Each ISP operates on specific network technologies and often maintains a list of approved modems.
- Check ISP Compatibility List: Before purchasing a new modem, always check your ISP’s official website for a list of compatible devices. Using an unapproved modem might lead to activation issues, suboptimal performance, or even complete failure to connect to the internet. This also ties into personal finance – buying an incompatible modem is a waste of money.
- Renting vs. Owning: Your ISP typically offers modem rental for a monthly fee. While convenient, owning your modem can save you significant money in the long run. Over a few years, the cost of renting often surpasses the purchase price of a high-quality modem. This is a smart financial decision, akin to evaluating the return on investment for a business venture or a personal finance tool. Just ensure the modem you buy is approved by your ISP.
- Service Type: Confirm your internet service type (cable, DSL, fiber, satellite). Modems are designed for specific types of connections. A cable modem, for instance, will not work with a DSL line. Understanding this technological distinction is fundamental to a successful setup.
- Speed Tier: Your modem should be capable of supporting the internet speed you pay for. A modem designed for 100 Mbps will bottleneck a 1 Gbps connection. Look for modems with appropriate DOCSIS standards (e.g., DOCSIS 3.1 for gigabit speeds on cable) to match your service tier and ensure you’re getting the performance you’re paying for.
By thoroughly preparing and understanding these nuances, you’re setting yourself up for a smooth installation, minimizing the potential for troubleshooting and maximizing your immediate connectivity.
The Step-by-Step Installation Process: From Unboxing to Online
With your checklist complete and your understanding of ISP requirements solidified, it’s time to roll up your sleeves and get your new modem connected. This section provides a detailed, sequential guide to physically installing and activating your modem, ensuring a clear path to getting online. Follow these steps meticulously, just as you would a crucial software installation, to ensure optimal performance and digital security from the outset.
Connecting Your Modem
This phase involves the physical connections that link your modem to your internet service and, subsequently, to your network devices.
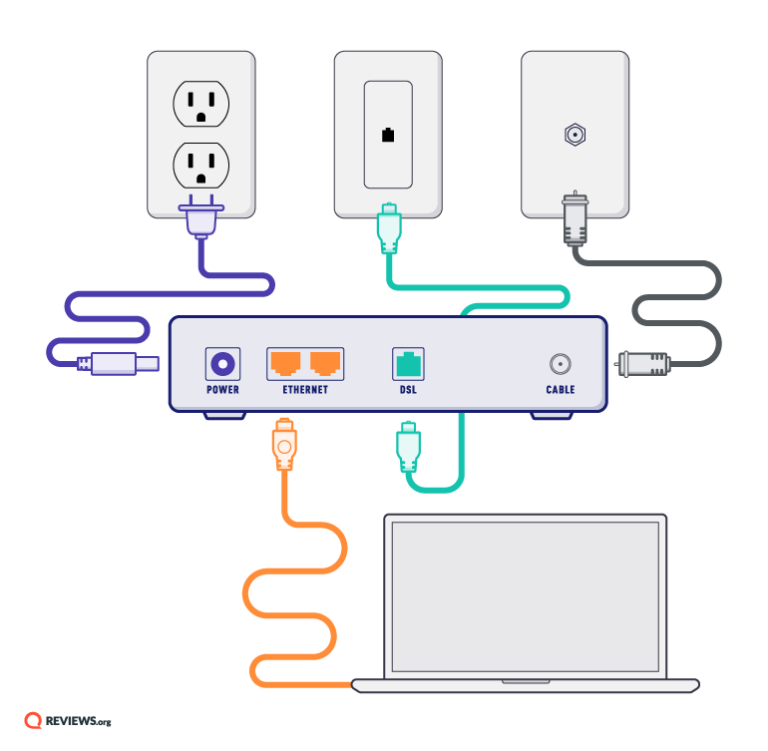
- Unpack Your Modem: Carefully remove the modem, power adapter, and any included cables from the box. Keep the instruction manual handy, as it may contain specific details for your model.
- Choose a Strategic Location: Place your modem in a central location, preferably off the floor and away from large metal objects, appliances that emit strong electromagnetic fields (like microwaves or cordless phones), and direct sunlight. If your modem also acts as a Wi-Fi router, this placement is even more critical for optimal wireless signal distribution throughout your home, ensuring consistent productivity in all areas. For more details on placement, refer to the “Optimizing Your Home Network” section.
- Connect the Coaxial/DSL/Fiber Cable:
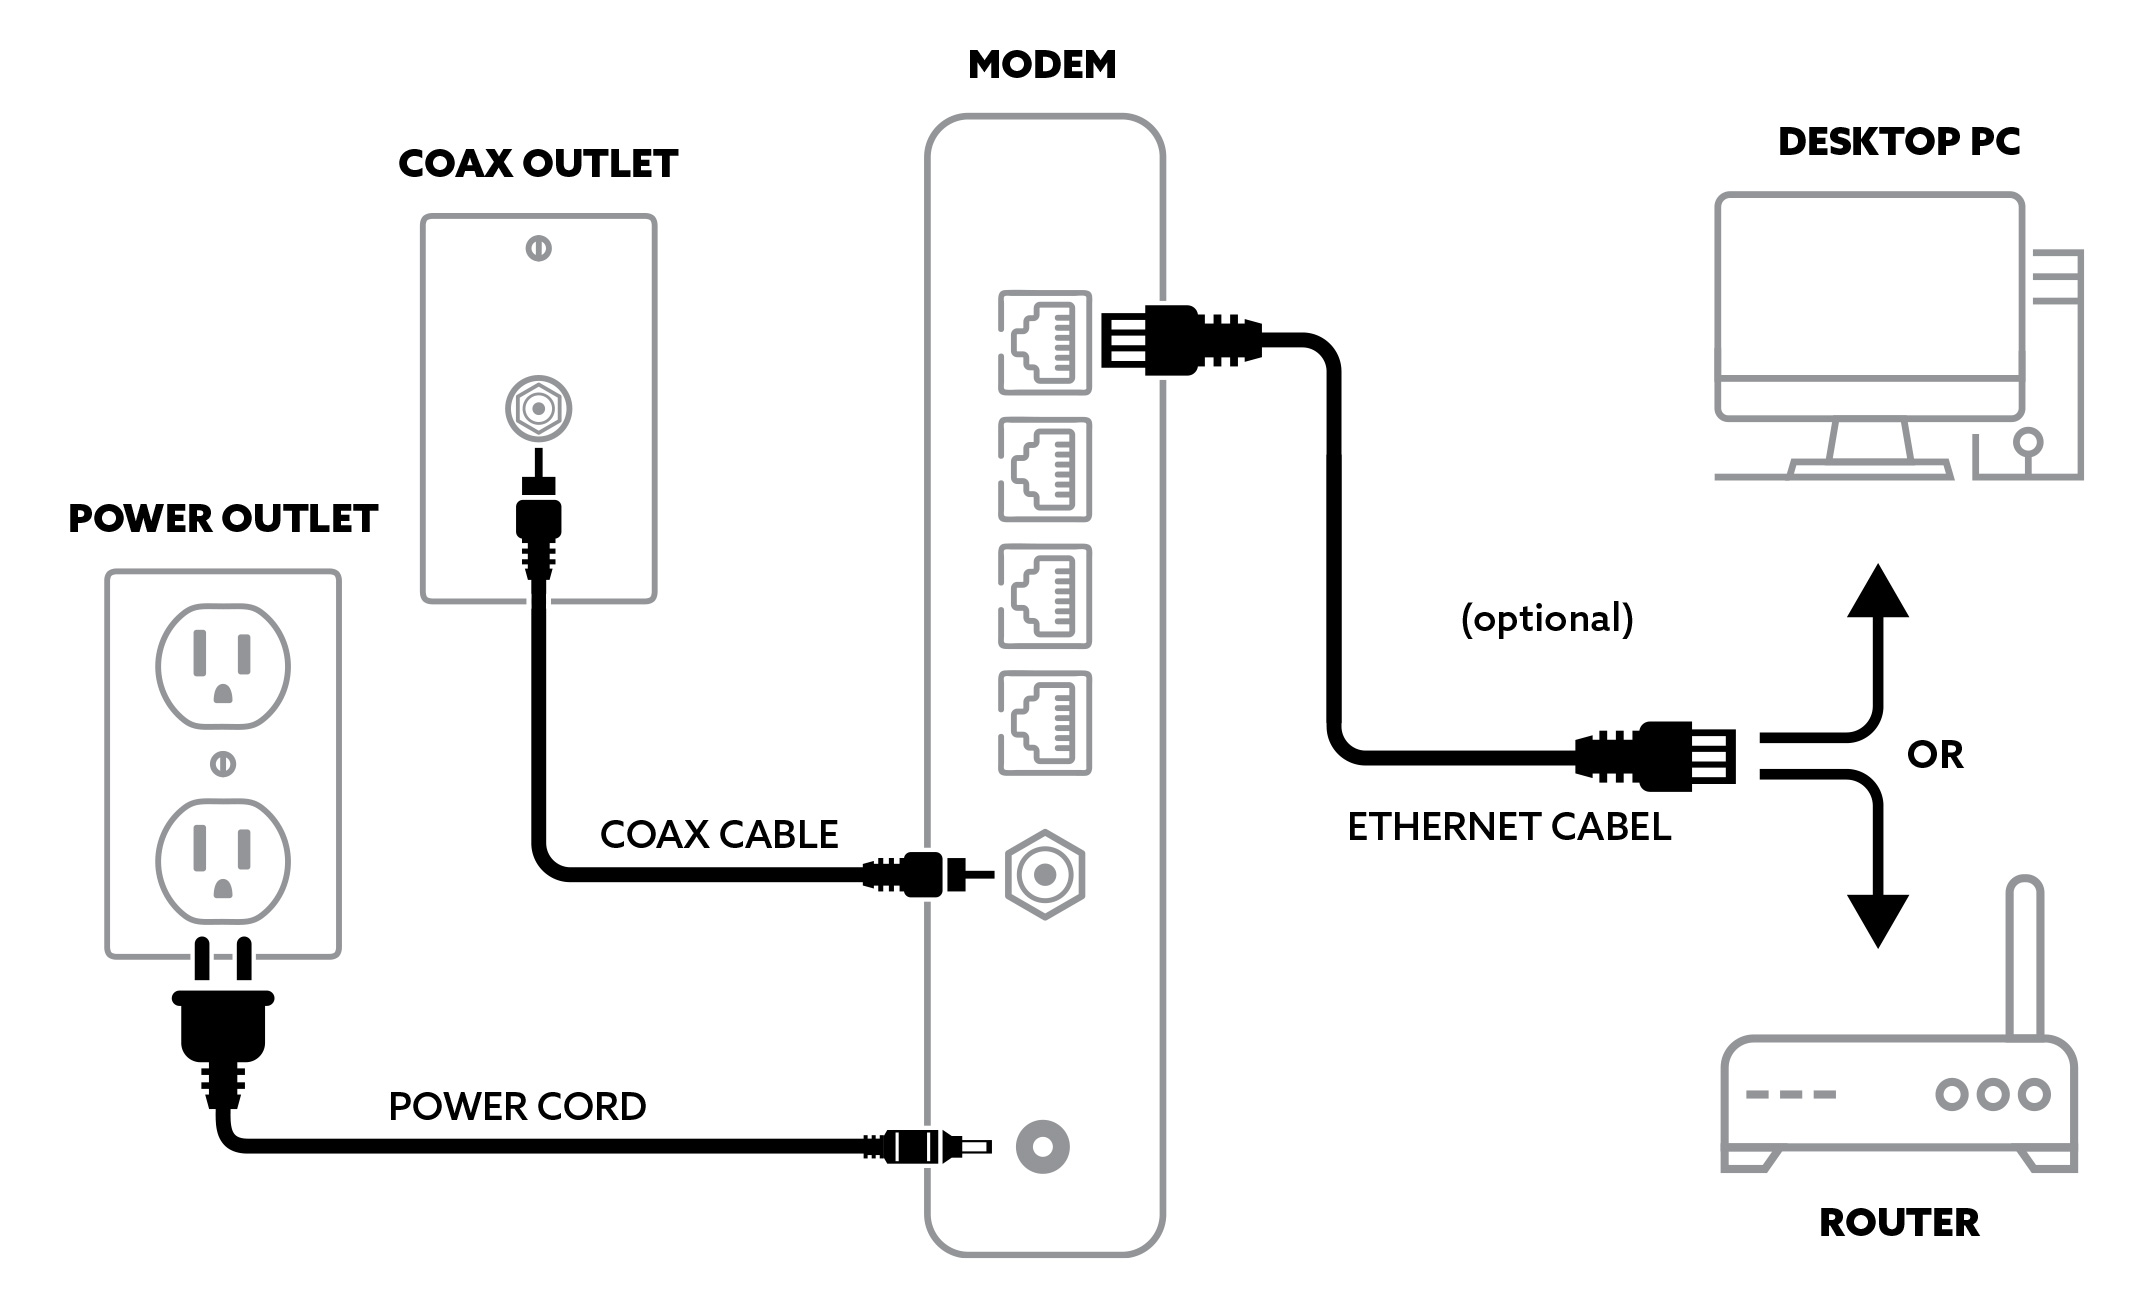
- For Cable Internet: Screw one end of the coaxial cable into the “Cable In” or “RF In” port on your modem. Gently tighten it by hand until snug – do not overtighten. Connect the other end of the coaxial cable to an active coaxial wall outlet. If you have multiple outlets, try the one closest to where the main service enters your home for the strongest signal.
- For DSL Internet: Connect one end of the DSL cable (looks like a phone cord, often grey or black) into the “DSL” port on your modem. Plug the other end into a DSL-enabled phone jack on your wall. If you have traditional phone service on the same line, you might need a DSL filter.
- For Fiber Optic Internet: Your fiber optic connection will usually terminate at an Optical Network Terminal (ONT) installed by your ISP. Your modem will then connect to this ONT via an Ethernet cable, plugging into the “WAN” or “Internet” port on your modem (if it’s a router-modem combo) or directly to the dedicated “Ethernet” port on the ONT.
- Connect the Ethernet Cable (to Router or Computer):
- If you have a separate Wi-Fi Router: Connect one end of an Ethernet cable to the “Ethernet” or “LAN” port on your modem (there’s usually only one of these). Connect the other end to the “WAN” or “Internet” port on your Wi-Fi router.
- If you’re connecting directly to a computer (for initial setup or if your modem has built-in Wi-Fi): Connect one end of the Ethernet cable to the “Ethernet” or “LAN” port on your modem. Connect the other end to the Ethernet port on your computer. This direct connection often simplifies the initial activation process and troubleshooting.
Powering Up and Activation
Once all cables are securely in place, it’s time to bring your modem to life and establish its connection with your ISP’s network. This is where the magic happens, transforming mere hardware into a gateway to the digital world.
- Connect the Power Adapter: Plug the small end of the power adapter into the “Power” port on your modem. Then, plug the other end into a functioning electrical outlet. Avoid using outlets controlled by a wall switch, which could accidentally power down your modem.
- Power On the Modem: Press the power button on your modem, if it has one. Most modems will power on automatically when plugged in.
- Monitor the Indicator Lights: This is a crucial step for troubleshooting. Your modem will begin a sequence of self-tests and attempts to connect to your ISP.
- Power Light: Should be solid green (or blue). If it’s off or blinking, check the power connection.
- Downstream/Receive/DS Light (Cable Modems): This light indicates the modem is receiving data from your ISP. It will typically blink during connection and then become solid green or blue.
- Upstream/Send/US Light (Cable Modems): This light indicates the modem is sending data to your ISP. Similar to the downstream light, it will blink and then turn solid.
- Internet/Online Light: This is the most important light. Once solid green (or blue), it indicates that your modem has successfully established an internet connection with your ISP. This light might take several minutes (5-15 minutes) to become solid. Be patient.
- Activity/LAN Light: This light will blink when data is being transferred between your modem and the connected device (router or computer).
- Wi-Fi Light (if built-in): Will be solid or blinking when Wi-Fi is active.
- Troubleshooting Light States: If any critical light (especially Downstream, Upstream, or Internet) remains blinking or turns red after an extended period, it indicates a problem. Refer to your modem’s manual for specific light meanings, or consult the “Troubleshooting Common Issues” section of this guide.
- Activate Your Service: Once the Internet/Online light is solid, your modem is online, but your service might still need to be activated with your ISP. There are usually a few ways to do this:
- Self-Activation Portal: Many ISPs have an online self-activation portal. If you connected a computer directly to the modem and try to open a web browser, it might automatically redirect you to this page. Follow the on-screen instructions, which typically involve entering your account number and modem’s MAC address (found on a sticker on the modem).
- Call Your ISP: This is often the most reliable method. Use the dedicated activation phone number provided by your ISP. You’ll need your account information and the modem’s MAC address (a long alphanumeric code, often labeled “MAC ID,” “CM MAC,” or “HFC MAC” on a sticker on the modem). The representative will register your new modem on their network.
- Mobile App: Some modern ISPs offer activation through their dedicated mobile apps.
- Test Your Connection: After activation, restart your computer and/or router. Open a web browser and try to visit a few websites. If successful, congratulations! Your modem is installed and active.
Setting Up Your Wi-Fi Router (If Applicable)
If your modem is a standalone unit and you’ve connected it to a separate Wi-Fi router, the next step is to configure your wireless network. This is crucial for seamless connectivity across all your gadgets and for implementing digital security measures.
- Power On Your Router: Plug in your router’s power adapter and turn it on.
- Access Router Setup: Connect a computer to one of the router’s LAN ports using an Ethernet cable. Open a web browser and enter the router’s default IP address (e.g., 192.168.1.1 or 192.168.0.1). This information is usually found on a sticker on the router itself or in its manual.
- Log In: Enter the default username and password (e.g., admin/admin, admin/password). Immediately change these default credentials to strong, unique passwords. This is a fundamental digital security practice, protecting your home network from unauthorized access and aligning with best practices for all your online accounts, from financial tools to social media.
- Configure Wi-Fi Settings:
- SSID (Network Name): Change the default Wi-Fi network name to something unique and recognizable to you. Avoid using personal information.
- Security Type: Always use WPA2-PSK (AES) or WPA3 for the strongest security. Avoid WEP or WPA as they are outdated and insecure.
- Wi-Fi Password (Passphrase): Create a strong, complex password for your Wi-Fi network. A mix of uppercase and lowercase letters, numbers, and symbols is ideal. This is another critical digital security step.
- Save Settings and Reboot: Save your changes and reboot the router. Once it restarts, your new Wi-Fi network should be broadcasting. Connect your devices using the new SSID and password.
By meticulously following these steps, you’ve not only installed your modem but also laid the groundwork for a secure and efficient home network, crucial for maximizing your productivity and leveraging online income opportunities.
Troubleshooting Common Issues: Getting Back Online
Even with careful preparation, unforeseen glitches can occur during modem installation. Don’t be discouraged if your internet connection doesn’t light up immediately. Many common issues can be resolved with a few simple troubleshooting steps. Addressing these swiftly ensures minimal downtime and maintains your productivity, much like promptly resolving software bugs to keep AI tools running smoothly.
No Internet Connection
If your modem’s “Internet” or “Online” light isn’t solid, or if you can’t access websites despite the light being solid, here’s what to check:
- Check All Cables:
- Power Cable: Ensure it’s firmly plugged into both the modem and a working electrical outlet. Try a different outlet if necessary.
- Coaxial/DSL/Ethernet Cable (from wall to modem): Confirm it’s securely connected at both ends. Remove and re-attach to ensure a snug fit.
- Ethernet Cable (modem to router/computer): Verify it’s firmly connected to the correct ports (modem’s LAN/Ethernet port to router’s WAN/Internet port, or directly to your computer).
- Monitor Modem Lights Again: Power off your modem, wait 30 seconds, and then power it back on. Watch the indicator lights as it boots up. Pay close attention to the Power, Downstream/Receive, Upstream/Send, and Internet/Online lights.
- If the Downstream/Upstream lights keep blinking and never become solid, it indicates a problem communicating with your ISP’s network. This could be due to a service outage in your area, a faulty cable, or a problem with the signal coming into your home.
- If these lights are solid but the Internet/Online light remains off or blinking, it often means the modem is physically connected but hasn’t successfully registered or been activated on the ISP’s network.
- Verify ISP Service Activation:
- Did you call your ISP or use their self-activation portal? Sometimes the activation process needs to be re-initiated, or there might have been a delay on their end.
- Ensure you provided the correct MAC address (CM MAC) of your new modem to the ISP.
- Check for ISP Outages: Use your mobile data to check your ISP’s website, social media pages, or a service like DownDetector to see if there are reported outages in your area. If there’s an outage, all you can do is wait for the service to be restored.
- Bypass the Router (if applicable): If you have a separate Wi-Fi router, temporarily disconnect it. Connect a computer directly to the modem using an Ethernet cable. If you can get online this way, the issue lies with your router’s configuration or hardware, not the modem.
- Restart Connected Devices: Sometimes your computer or router needs a fresh start to recognize the new internet connection. Reboot any device connected to your modem.
- Contact Your ISP’s Technical Support: If you’ve tried all the above and still have no internet, it’s time to contact your ISP. Be prepared to describe the status of your modem’s lights and the troubleshooting steps you’ve already taken. They can diagnose problems on their end, such as signal issues or account provisioning problems.
Slow Speeds or Intermittent Connectivity
Even if you have an internet connection, you might experience frustratingly slow speeds or frequent disconnections. This impacts productivity severely, turning simple tasks into frustrating ordeals.
- Run a Speed Test: Use a reputable online speed test (e.g., Speedtest.net) with a wired connection to your modem (or router) to accurately measure your download and upload speeds. Compare these results to the speeds you’re paying for in your ISP plan.
- Check for Router Bottlenecks (if applicable):
- Old Router: An old Wi-Fi router, especially one using older Wi-Fi standards (like Wi-Fi 4/802.11n), might not be able to handle the speeds your modem provides, creating a bottleneck. Upgrading to a Wi-Fi 6 or 7 router can significantly improve wireless performance.
- Router Placement: As mentioned earlier, poor router placement can lead to weak Wi-Fi signals and slow speeds.
- Overcrowded Wi-Fi Channels: In dense urban areas, many Wi-Fi networks might be on the same channels, causing interference. Access your router’s settings to try different Wi-Fi channels (especially on the 2.4 GHz band, try 1, 6, or 11; the 5 GHz band has more channels and less interference).
- Interference (Wireless): Other electronic devices (microwaves, cordless phones, baby monitors) can interfere with Wi-Fi signals. Try moving your modem/router away from such devices.
- Too Many Devices/Bandwidth Hogs: If many devices are simultaneously streaming, gaming, or downloading large files, it will naturally slow down the connection for everyone. Consider upgrading your internet plan if this is a constant issue, especially if you rely on online income or productivity tools.
- Outdated Firmware: Ensure both your modem and router have the latest firmware. Firmware updates often include performance improvements, bug fixes, and critical digital security patches. Check the manufacturer’s website for your specific models.
- Malware/Viruses: A computer infected with malware or a virus can consume bandwidth and slow down your entire network. Run a full system scan with reputable antivirus software on all connected devices. This is a critical aspect of digital security.
- Overheating: Ensure your modem and router have adequate ventilation. Overheating can lead to performance degradation and instability.
- Contact Your ISP: If slow speeds persist even with a wired connection directly to the modem, and you’ve ruled out all internal network issues, contact your ISP. There might be line issues, network congestion, or a need for a signal strength adjustment on their end.
By systematically addressing these common troubleshooting scenarios, you can quickly identify and resolve most internet connectivity problems, restoring your network to optimal performance and ensuring uninterrupted productivity for your digital endeavors.
Optimizing Your Home Network for Performance and Security
Installing your modem is just the first step. To truly unlock its potential and ensure a reliable, fast, and secure internet experience, you need to optimize your home network. This proactive approach not only enhances your daily productivity but also strengthens your digital security posture, safeguarding your personal data and online financial transactions. It’s about building a robust digital foundation that supports your tech-driven lifestyle and any online income streams you might pursue.
Best Practices for Modem and Router Placement
The physical location of your network hardware significantly impacts its performance. Thoughtful placement can mean the difference between blazing-fast Wi-Fi and frustrating dead zones.
- Central Location: Place your modem/router in the most central part of your home, especially if it’s a combo unit providing Wi-Fi. This helps distribute the signal evenly. Avoid placing it in corners, closets, or basements where signals are easily absorbed or blocked.
- Elevated Position: Wi-Fi signals tend to spread outwards and downwards. Placing your router on a high shelf or desk, rather than on the floor, helps its signal travel further and more efficiently, minimizing interference from furniture and other obstacles.
- Avoid Obstacles and Interference:
- Physical Obstacles: Walls (especially brick or concrete), metal objects, large appliances (refrigerators, washing machines) can block or degrade Wi-Fi signals. Keep your router away from these.
- Electronic Interference: Devices operating on similar frequencies (like microwaves, cordless phones, Bluetooth speakers, baby monitors) can interfere with your Wi-Fi signal. Maintain a distance between your router and these gadgets.
- Orient Antennas (if applicable): If your router has external antennas, experiment with their orientation. Often, one vertically and one horizontally can help cover both horizontal and vertical spaces in your home.
- Consider Mesh Wi-Fi Systems: For larger homes or those with multiple floors and thick walls, a single router may not be enough. Mesh Wi-Fi systems, a popular technology trend, use multiple nodes to create a seamless, strong Wi-Fi network throughout your entire property, eliminating dead spots and ensuring consistent connectivity for all your devices.
Router Security Settings
Your router is the gatekeeper of your home network, making its security paramount. Neglecting these settings leaves your network vulnerable to unauthorized access, potential data breaches, and reduced productivity due to bandwidth theft.
- Change Default Admin Credentials: As mentioned during setup, this is non-negotiable. The default username and password for accessing your router’s settings are widely known and a major security risk. Create a strong, unique password.
- Enable Strong Wi-Fi Encryption (WPA2-PSK AES or WPA3): Always use the strongest available encryption for your Wi-Fi network. WPA2-PSK (AES) is the minimum standard, and WPA3 offers even better security. Avoid WEP and WPA. Your Wi-Fi password should also be strong and unique.
- Disable WPS (Wi-Fi Protected Setup): While convenient, WPS can have security vulnerabilities that allow attackers to guess your Wi-Fi password. It’s generally safer to disable it and manually connect devices.
- Enable a Firewall: Most routers have a built-in firewall. Ensure it’s enabled to protect your network from external threats and filter unwanted traffic.
- Disable Remote Management: Unless you specifically need to manage your router from outside your home network, disable this feature. It prevents unauthorized access attempts from the internet.
- Guest Network: Many routers allow you to set up a separate “Guest Network.” Use this for visitors or smart home devices that don’t need access to your main network. This isolates potentially less secure devices from your critical data, enhancing overall digital security.
- Regular Firmware Updates: Firmware is the operating system for your router. Manufacturers frequently release updates to fix bugs, improve performance, and patch security vulnerabilities. Check your router’s settings or the manufacturer’s website regularly for the latest firmware and install them.
Firmware Updates and Maintenance
Keeping your network hardware up-to-date is analogous to updating your operating system or critical apps – it’s essential for performance, stability, and security.
- Why Firmware Updates are Crucial:
- Security Patches: Firmware updates often contain critical patches for newly discovered security vulnerabilities, protecting your network from evolving threats.
- Performance Improvements: Updates can optimize performance, leading to faster speeds and more stable connections.
- New Features: Sometimes, updates introduce new features or improve compatibility with newer devices and technologies (like new Wi-Fi standards or AI tools).
- Bug Fixes: Updates resolve bugs that might cause crashes, dropped connections, or other issues.
- How to Update Firmware:
- Automatic Updates: Some newer modems and routers (especially mesh systems) offer automatic firmware updates. Check if this feature is enabled in your device’s settings.
- Manual Updates: For most devices, you’ll need to manually check for and apply updates. Visit the manufacturer’s support website, locate your specific modem/router model, and download the latest firmware file. Follow the instructions provided by the manufacturer carefully. Never interrupt a firmware update, as it can brick your device.
- Regular Reboots: Periodically restarting your modem and router (once a month or so) can clear out temporary glitches, refresh network connections, and sometimes improve performance. It’s a simple yet effective maintenance step.
- Monitor Performance: Pay attention to your network’s performance. If you notice persistent slowdowns, frequent disconnections, or strange behavior, it could be a sign of an issue that might require troubleshooting or further optimization.
By diligently implementing these optimization and security practices, you transform your basic modem installation into a high-performing, secure, and reliable home network. This not only ensures seamless browsing, streaming, and gaming but also establishes a robust digital environment essential for modern productivity, digital security, and effectively managing your personal finance and online income pursuits. A well-maintained network is a testament to savvy tech management, reflecting a forward-thinking approach to all your digital interactions.
aViewFromTheCave is a participant in the Amazon Services LLC Associates Program, an affiliate advertising program designed to provide a means for sites to earn advertising fees by advertising and linking to Amazon.com. Amazon, the Amazon logo, AmazonSupply, and the AmazonSupply logo are trademarks of Amazon.com, Inc. or its affiliates. As an Amazon Associate we earn affiliate commissions from qualifying purchases.