In the dynamic world of PC building, where performance and aesthetics often go hand-in-hand, choosing the right cooling solution is paramount. Whether you’re a seasoned enthusiast pushing the limits of your hardware, a gamer seeking silent yet powerful thermal management, or a content creator demanding consistent performance during intensive tasks, the stock air cooler simply won’t cut it. This is where liquid cooling, particularly All-in-One (AIO) liquid coolers, steps in as a superior alternative, offering a compelling blend of efficiency, quiet operation, and sleek design. While the idea of liquid inside your precious computer might sound daunting to some, installing an AIO liquid cooler is a surprisingly straightforward process that even a novice builder can accomplish with a little guidance. This comprehensive guide will walk you through every step, from understanding why liquid cooling is beneficial to the final cable management, ensuring your CPU runs cool and your system performs optimally. Get ready to transform your PC’s thermal performance and unlock its full potential, enhancing both its longevity and its visual appeal.
Why Choose Liquid Cooling for Your PC?
The decision to move from traditional air cooling to a liquid cooling solution is often driven by a desire for improved performance, reduced noise, and a cleaner aesthetic. While high-end air coolers can be very effective, liquid coolers offer distinct advantages that make them a popular choice for modern PC builds. Understanding these benefits will help you appreciate the value that a well-installed liquid cooler brings to your setup.
The Edge of All-in-One (AIO) Systems
All-in-One (AIO) liquid coolers have democratized liquid cooling, making it accessible and easy for the average PC builder. Unlike complex custom loop systems that require careful planning, tube bending, and specialized components, AIOs come pre-filled, sealed, and ready to install. They consist of a pump integrated into the CPU block, a radiator, and tubes connecting the two. This closed-loop design eliminates the need for maintenance, refilling, or worrying about leaks, offering a “set it and forget it” experience similar to an air cooler but with superior performance capabilities. The simplicity of AIOs makes them an ideal entry point for anyone considering liquid cooling, providing a significant upgrade without the steep learning curve of a custom solution.
Performance, Acoustics, and Aesthetics
The primary draw of liquid cooling is its exceptional thermal performance. Water, with its higher thermal conductivity and specific heat capacity compared to air, is far more efficient at absorbing and transferring heat away from your CPU. This translates to lower core temperatures, especially under heavy loads, which is crucial for overclocking enthusiasts looking to squeeze every last megahertz out of their processors. Lower temperatures also contribute to greater system stability and can potentially extend the lifespan of your CPU by reducing thermal stress.
Beyond raw performance, liquid coolers often excel in acoustics. While air coolers rely on large heatsinks and sometimes noisy fans to dissipate heat, AIOs move heat to a radiator that can be mounted away from the CPU, allowing for larger, slower-spinning fans that move more air with less noise. The pump itself is usually very quiet, often imperceptible over other system components. This results in a much quieter computing experience, which is particularly appealing for those who value a serene workspace or an immersive gaming environment without the constant drone of high-RPM fans.
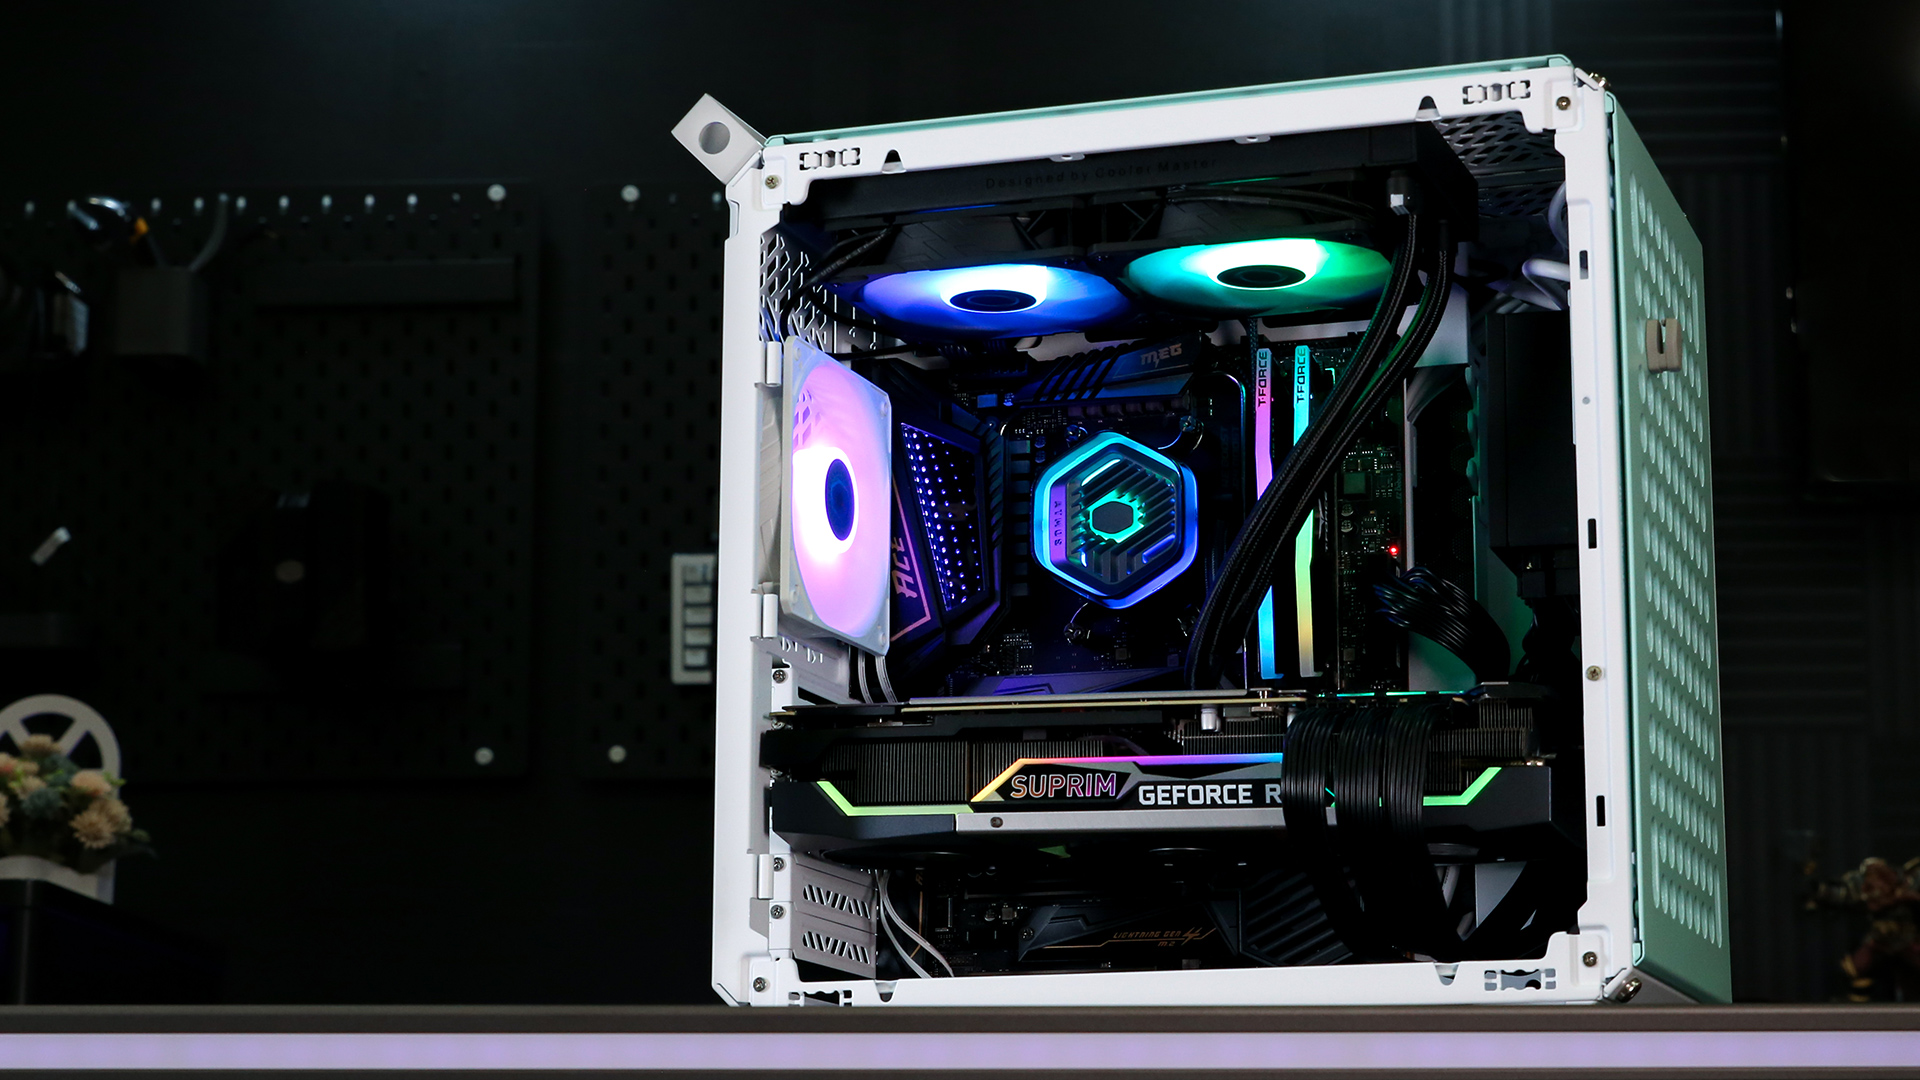
Aesthetically, liquid coolers undeniably elevate the look of a PC. The sleek CPU block, often equipped with customizable RGB lighting, the elegant tubing, and the ability to showcase more of your motherboard and RAM without a massive air cooler obstructing the view, contribute to a much cleaner and more modern internal layout. Many AIOs also come with addressable RGB fans and pump covers, allowing you to synchronize lighting effects with the rest of your system, creating a truly personalized and visually stunning build. This combination of superior cooling, quiet operation, and enhanced visual appeal makes liquid cooling a compelling choice for any modern PC.
Essential Preparations Before You Begin
Before you even think about unscrewing a single panel or touching a component, proper preparation is key. Rushing into an installation without adequate planning can lead to compatibility issues, damaged parts, or a frustrating experience. Taking the time to check compatibility, gather your tools, and understand safety precautions will ensure a smooth and successful installation process.
Checking Compatibility: A Crucial First Step
The most critical aspect of preparation is ensuring your chosen liquid cooler is compatible with your existing PC components. There are several factors to consider:
- CPU Socket: Liquid coolers come with mounting hardware for specific CPU sockets (e.g., Intel LGA1700, LGA1200, AMD AM5, AM4). Verify that your cooler supports your CPU’s socket type. Most modern AIOs are multi-socket compatible, but it’s always best to double-check.
- Case Clearance: This is perhaps the most common compatibility hurdle. Radiators come in various sizes (120mm, 140mm, 240mm, 280mm, 360mm, 420mm). You need to ensure your PC case has adequate space to mount the radiator, typically at the front, top, or rear. Measure the available mounting points and confirm that the radiator, along with its fans, will fit without obstructing other components like RAM, VRM heatsinks, or your GPU. Pay attention to the thickness of the radiator and fans combined.
- RAM Clearance: While not as common with AIOs as with large air coolers, some larger pump designs or specific radiator placements (especially top-mounted in smaller cases) can potentially interfere with tall RAM heatsinks. Visually inspect or check your case specifications to ensure sufficient clearance.
- Motherboard VRM Heatsinks: Similar to RAM, ensure the pump block won’t interfere with large VRM heatsinks around the CPU socket. This is rare but worth a quick visual check.
Consult your motherboard manual, case manual, and the liquid cooler’s specifications for precise dimensions and supported configurations. A few minutes spent verifying compatibility can save you hours of frustration later.
Gathering Your Tools and Taking Precautions
Having the right tools at hand will make the installation process much smoother. Here’s a list of what you’ll typically need:
- Phillips Head Screwdriver: Essential for mounting components, case panels, and the cooler itself. A magnetic tip can be very helpful for tiny screws.
- Thermal Paste: While most AIOs come with pre-applied thermal paste on the cold plate, or a small tube included, having an extra tube of high-quality thermal paste on hand is always a good idea, especially if you need to remount the cooler later.
- Rubbing Alcohol (Isopropyl Alcohol 90%+): Used with a lint-free cloth or coffee filter to clean off old thermal paste from your CPU and the cooler’s cold plate (if applicable).
- Lint-Free Cloth/Coffee Filters: For cleaning. Avoid paper towels as they can leave fibers.
- Cable Ties or Velcro Straps: For neat cable management.
- Anti-Static Wrist Strap (Optional but Recommended): To prevent electrostatic discharge (ESD) which can damage sensitive components. Alternatively, regularly touch a grounded metal object (like your PC case’s bare metal) before and during the installation.
- Flashlight/Headlamp: Helpful for illuminating cramped spaces inside the case.
Safety Precautions:
- Power Down and Unplug: Always ensure your PC is completely powered off and disconnected from the wall outlet before you start working inside it.
- Ground Yourself: As mentioned, use an anti-static wrist strap or regularly touch a grounded metal object to discharge any static electricity.
- Work in a Clean, Well-Lit Area: A clean workspace prevents dust or foreign objects from contaminating components. Good lighting ensures you can clearly see what you’re doing.
- Handle Components with Care: Avoid touching the gold contacts on RAM sticks, the pins on your CPU, or the integrated circuits on your motherboard. Hold components by their edges.
- Organize Screws: Use small containers or a magnetic mat to keep track of different types of screws. This makes reassembly much easier.
By meticulously checking compatibility and preparing your workspace and tools, you’ll be well-equipped for a successful and stress-free liquid cooler installation.
Step-by-Step Guide to Your Liquid Cooler Installation
With preparations complete, it’s time to dive into the core of the process: installing your liquid cooler. Each step is crucial for optimal performance and longevity. Follow these instructions carefully to ensure a smooth setup.
Preparing Your CPU and Motherboard

The first physical step involves getting your CPU and motherboard ready for the new cooler. If you’re replacing an existing cooler, this means removing it and cleaning the CPU.
- Remove Existing Cooler (if applicable): Carefully unmount your old CPU cooler. This usually involves unscrewing it from the motherboard and unplugging its fan header. If it’s an old air cooler, give the thermal paste a minute to warm up by running the PC briefly, then gently twist the cooler before lifting to prevent the CPU from coming out of its socket (CPU delid).
- Clean the CPU: Use isopropyl alcohol and a lint-free cloth to thoroughly clean off any old thermal paste from the top of your CPU’s integrated heat spreader (IHS) and the base of your old cooler (if you plan to reuse it or just for tidiness). Ensure no residue remains.
- Install Backplate (if needed): Most AIOs require a backplate behind the motherboard to provide secure mounting for the pump. Refer to your cooler’s manual for the correct backplate orientation and secure it in place by inserting the standoffs from the front of the motherboard. For some sockets like AMD AM4/AM5, you might use the existing motherboard backplate.
Mounting the Radiator and Fans
This is often the trickiest part, as it involves fitting the radiator and fans into your case.
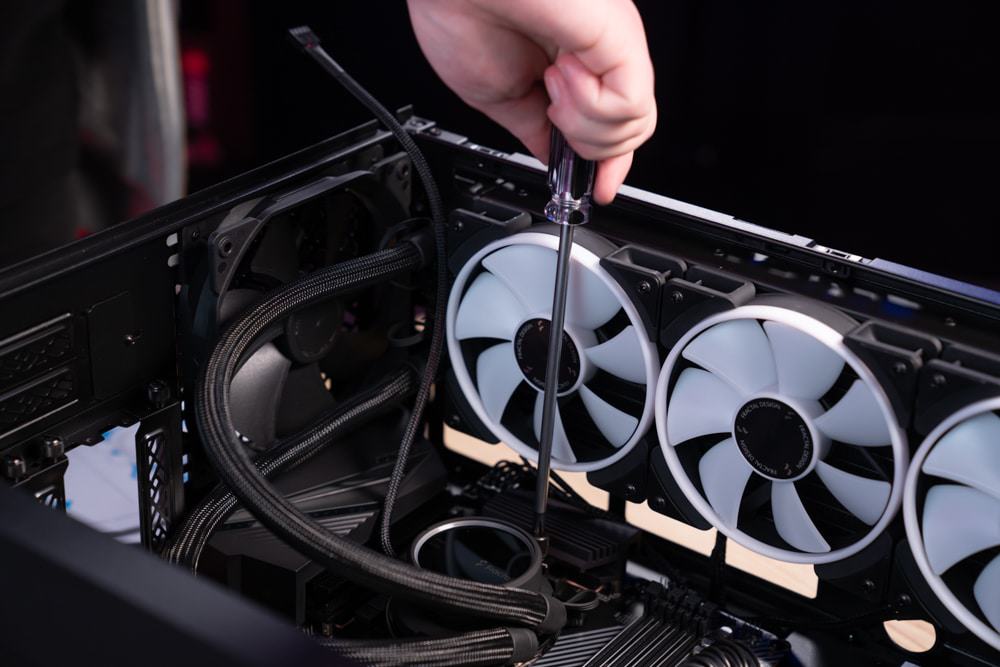
- Attach Fans to Radiator: Decide on your fan configuration. Most common is an “intake” configuration, where fans push air through the radiator into the case, or “exhaust,” where they pull air from the case through the radiator and out. For top or rear mounts, exhaust is common. For front mounts, intake is typical. Orient the fans correctly – usually, the side with the manufacturer’s label or the bracket bars indicates the exhaust side. Secure the fans to the radiator using the longer screws provided with the cooler. Ensure the screw heads are flush.
- Mount Radiator in Case: Carefully position the radiator-fan assembly in your chosen mounting location (front, top, or rear). Use the shorter screws provided with the cooler to secure the radiator to your case. It’s often easier to maneuver the radiator with the tubes extending towards the RAM or the front of the case, depending on your case’s layout. Do not overtighten the screws.
Securing the Pump/Cold Plate to Your CPU
This is the heart of the cooling system, directly making contact with your CPU.
- Apply Thermal Paste (if not pre-applied): If your cooler’s cold plate doesn’t have thermal paste pre-applied, apply a small, pea-sized dot to the center of your CPU’s IHS. There are various application methods (dot, line, X), but a central pea-sized blob is generally effective for AIOs as the pressure from mounting will spread it evenly.
- Mount Pump Block: Carefully align the pump block with the standoffs on your motherboard. Lower it gently onto the CPU, ensuring the screws pass through the mounting holes. Wiggle it slightly to help spread the thermal paste.
- Secure Pump Block: Using the thumb screws or nuts provided, tighten the pump block onto the standoffs in a diagonal or “X” pattern. Tighten gradually and evenly until snug. Do not overtighten, as this can damage the CPU or motherboard. The goal is firm contact without crushing.
Wiring Up Your New Cooling System
Proper cable management and connections are vital for functionality and aesthetics.
- Pump Power: Connect the pump’s power cable to the designated “AIOPUMP” or “CPUOPT” header on your motherboard. If neither is available, use a standard “SYS_FAN” header, but ensure it’s configured in your BIOS to run at 100% speed continuously. The pump needs constant, full power.
- Fan Power: Connect the radiator fans to the “CPUFAN” header on your motherboard. If your AIO has a fan splitter, connect all radiator fans to the splitter, then the splitter to the “CPUFAN” header. This allows the motherboard to control fan speeds based on CPU temperature.
- RGB/ARGB Connections (if applicable): If your cooler features RGB lighting on the pump or fans, connect the RGB cables to the appropriate 3-pin (ARGB/5V) or 4-pin (RGB/12V) header on your motherboard or to a dedicated RGB controller provided with the cooler. Consult your motherboard manual for header locations and types.
- Cable Management: Carefully route all cables behind the motherboard tray or along existing cable channels to keep them tidy and out of the airflow path. Use zip ties or Velcro straps to secure them. A clean build not only looks better but also promotes better airflow.
Post-Installation Checks and Optimization
Once all the components are in place and wired up, your job isn’t quite finished. The next crucial steps involve verifying everything is working correctly and optimizing your system for peak performance and cooling efficiency.
The Maiden Boot: Monitoring Temperatures
This is the moment of truth. Reconnect your PC to power, connect your monitor, keyboard, and mouse, and power it on.
- Initial Boot-Up: Pay close attention during the initial boot. Ensure all fans on the radiator are spinning and that you don’t hear any unusual grinding or rattling noises from the pump. You might hear a brief gurgling sound as air bubbles trapped in the loop settle, which is normal and usually dissipates after a few minutes of operation.
- BIOS Check: Immediately enter your motherboard’s BIOS/UEFI. Navigate to the hardware monitor or fan control section. Here, you should see your CPU temperature. It should be relatively low (e.g., 25-40°C at idle, depending on ambient temperature). Also, verify that the pump speed (RPM) is detected and running at a constant, high speed, and that the radiator fan speeds are being reported.
- Operating System Monitoring: Once in your operating system, install a monitoring software like HWMonitor, Core Temp, or MSI Afterburner. Let your PC idle for a few minutes and note the CPU temperatures. Then, run a CPU-intensive task or a game for 15-30 minutes and monitor the temperatures under load. Compare these temperatures to typical values for your CPU model. Optimal load temperatures for most CPUs are usually below 80°C, with ideal scenarios seeing them below 70°C. If temperatures are excessively high, immediately power down and recheck your installation, especially the thermal paste application and pump contact.
Fine-Tuning with Software and Fan Curves
Most motherboard manufacturers provide software for fan control and RGB customization within Windows. Your AIO brand might also have its own dedicated software.
- Fan Curves: Adjust fan curves in your motherboard BIOS or software. Create a profile that balances cooling performance with noise levels. For instance, you might want fans to spin quietly at low temperatures and ramp up aggressively as the CPU heats up.
- Pump Speed: Ensure your pump is running at its maximum or near-maximum speed (e.g., 2000-3000 RPM). AIO pumps are designed to run at a consistent high speed for optimal flow and cooling. Running them slower can reduce cooling efficiency and potentially shorten their lifespan.
- RGB Control: If your cooler has RGB lighting, use your motherboard’s RGB software (e.g., ASUS Aura Sync, MSI Mystic Light, Gigabyte RGB Fusion, Razer Chroma) or the cooler’s dedicated software to synchronize lighting effects with the rest of your system or customize them to your preference.
Troubleshooting Common Installation Hiccups
Even with careful installation, issues can arise. Here are some common problems and their solutions:
- High CPU Temperatures:
- Poor Thermal Paste Application/Contact: Power down, remove the pump block, clean CPU and cold plate, reapply thermal paste, and re-mount, ensuring even pressure.
- Pump Not Running: Check pump power connection (to AIOPUMP/CPUOPT header). Ensure it’s receiving full power. Check BIOS for pump RPM.
- Fans Not Spinning/Incorrect Orientation: Verify fan power connections. Ensure fans are oriented correctly (pushing/pulling air in the desired direction).
- Trapped Air: Let the PC run for a while, as air bubbles often work their way out. Gently tilt the case to help dislodge bubbles.
- Loud Pump Noise:
- Air Bubbles: Often resolves over time. Tilting the case can help.
- Pump Not Running at Full Speed: Ensure it’s connected to an appropriate header and set to 100% speed in BIOS.
- Fans Constantly Ramping Up/Down:
- Aggressive Fan Curve: Adjust your fan curve in BIOS or software to be less reactive to minor temperature fluctuations.
- RGB Not Working:
- Incorrect Header: Ensure RGB cables are connected to the correct 3-pin (ARGB) or 4-pin (RGB) header and that the voltage matches (5V vs 12V). Incorrect voltage can damage components.
- Software Issues: Ensure the correct RGB software is installed and updated.
If you encounter persistent issues, consult your cooler’s manual, your motherboard manual, or online forums for specific troubleshooting advice.
Elevate Your PC’s Performance with Liquid Cooling
Installing a liquid cooler is a significant upgrade for any PC, offering tangible benefits that enhance your computing experience. From the moment you power on your freshly cooled system, you’ll notice the difference: lower CPU temperatures, quieter operation, and a visually striking internal aesthetic that elevates your entire build. By following this detailed guide, you’ve not only mastered a technical skill but also unlocked the full potential of your processor, allowing for more stable performance during demanding tasks and providing headroom for future overclocking adventures.
Beyond the immediate performance gains, a well-cooled system contributes to the longevity of your components, protecting your investment in high-end hardware. The peace of mind that comes with knowing your CPU is running efficiently and effectively makes the installation process a truly rewarding endeavor. Whether you’re a gamer pushing frame rates, a content creator rendering complex projects, or simply someone who appreciates a finely tuned machine, liquid cooling is an upgrade that delivers on all fronts. Embrace the cool, quiet power of liquid cooling and enjoy your optimized PC for years to come.
aViewFromTheCave is a participant in the Amazon Services LLC Associates Program, an affiliate advertising program designed to provide a means for sites to earn advertising fees by advertising and linking to Amazon.com. Amazon, the Amazon logo, AmazonSupply, and the AmazonSupply logo are trademarks of Amazon.com, Inc. or its affiliates. As an Amazon Associate we earn affiliate commissions from qualifying purchases.