In an age defined by digital data, having sufficient and speedy storage is not merely a luxury but a fundamental necessity. From personal photos and videos to critical work documents, sprawling game libraries, and an ever-expanding collection of software, our digital lives demand robust storage solutions. Over time, even the most capacious hard drives can fill up, or perhaps you’re seeking a significant performance boost for your system. Installing a new hard drive, whether a traditional Hard Disk Drive (HDD) for mass storage or a lightning-fast Solid State Drive (SSD) for unparalleled speed, is one of the most impactful and cost-effective upgrades you can make to your computer.
This comprehensive guide will walk you through every step of the process, from understanding the different types of drives and preparing for the installation to physically integrating the drive into your system and configuring it within your operating system. Far from being an intimidating task reserved for IT professionals, installing a hard drive is a straightforward DIY project that empowers you with greater control over your technology. By the end of this tutorial, you’ll not only have successfully upgraded your system’s storage but also gained valuable insight into the internal workings of your computer, boosting your overall tech literacy and productivity. Let’s dive in and unlock the full potential of your machine.
Understanding Your Storage Options and Essential Preparations
Before you even think about opening your computer case, it’s crucial to understand the different types of storage available and prepare adequately for the installation. Making the right choice of drive and taking necessary precautions will ensure a smooth and successful upgrade.
HDD vs. SSD: Making the Right Choice
The first and most important decision revolves around the type of drive you’ll install. The two primary contenders are Hard Disk Drives (HDDs) and Solid State Drives (SSDs), each with distinct advantages and disadvantages.
- Hard Disk Drives (HDDs): HDDs are the traditional storage solution, relying on spinning platters and read/write heads to store and retrieve data magnetically.
- Pros: Significantly lower cost per gigabyte, making them ideal for storing large volumes of data where speed isn’t the absolute top priority (e.g., photo archives, video libraries, backup drives). They are available in larger capacities, often reaching many terabytes (TB).
- Cons: Slower than SSDs, particularly in boot times, application loading, and large file transfers. They contain moving parts, making them more susceptible to mechanical failure if dropped or subjected to heavy vibration. They also consume more power and generate more heat and noise compared to SSDs.
- Form Factors: Typically 3.5-inch for desktops and 2.5-inch for laptops.
- Solid State Drives (SSDs): SSDs represent a newer generation of storage, using flash memory to store data, similar to USB drives. Without any moving parts, they offer a dramatic performance boost.
- Pros: Blazing fast speeds for booting the operating system, launching applications, and transferring files. They are significantly more durable, silent, energy-efficient, and generate less heat. An SSD as your primary (boot) drive will transform the responsiveness of your entire system.
- Cons: Higher cost per gigabyte compared to HDDs, meaning you’ll get less raw capacity for your money. While prices have fallen considerably, this remains a factor for very large storage needs.
- Form Factors & Interfaces:
- SATA SSDs: These look similar to 2.5-inch laptop HDDs and connect via a SATA data cable and a SATA power cable. They offer speeds far superior to HDDs but are limited by the SATA III interface (up to 600 MB/s).
- NVMe SSDs (Non-Volatile Memory Express): These are the fastest SSDs available, typically resembling a stick of RAM (M.2 form factor). They connect directly to the motherboard via a PCIe slot, bypassing the SATA bottleneck and offering speeds many times faster than SATA SSDs (often 3,500 MB/s to over 7,000 MB/s). M.2 is a physical connector, and while most M.2 drives are NVMe, some older M.2 drives might still be SATA-based, so always check the specifications.
Choosing Your Drive:
- For a primary drive (OS, programs, games): An NVMe SSD (if your motherboard supports it) is the absolute best choice for performance. If not, a SATA SSD is still a massive upgrade from an HDD.
- For secondary storage (large media files, backups): A high-capacity HDD offers the best value.
- A common hybrid setup: An SSD for the operating system and frequently used applications, coupled with a larger HDD for bulk storage.
Essential Pre-Installation Checks and Tools
Once you’ve decided on your drive type, it’s time for some crucial checks and preparations.
- Compatibility Check:
- Motherboard: Ensure your motherboard has the necessary ports/slots. For SATA drives, you need available SATA data ports on your motherboard and corresponding SATA power connectors from your power supply. For NVMe M.2 SSDs, you need an M.2 slot that supports NVMe (and often PCIe Gen 3 or Gen 4, depending on your SSD’s capabilities). Consult your motherboard’s manual for details.
- Form Factor: If you’re installing a 3.5-inch HDD or a 2.5-inch SSD/HDD, ensure your PC case has available drive bays of the correct size. Some 2.5-inch drives might require a 3.5-inch adapter bracket if your case only has 3.5-inch bays.
- Power Supply Unit (PSU): Confirm your PSU has enough wattage and available SATA power connectors for the new drive. Most modern PSUs have ample connectors.
- Gather Your Tools:
- Phillips-head screwdriver: The most common tool you’ll need for opening the case and securing drives.
- Anti-static wrist strap: Highly recommended to prevent electrostatic discharge (ESD) from damaging sensitive components. If you don’t have one, regularly touch a grounded metal object (like the unpainted metal of your PC case while it’s still plugged into the wall but powered off) to discharge static electricity.
- SATA data cables: If you’re installing a SATA drive, you’ll need one cable per drive. These usually come with new motherboards or can be purchased cheaply.
- Optional: Zip ties or Velcro straps for cable management, a flashlight for better visibility inside the case.
- Critical Data Backup: This cannot be stressed enough. Before performing any hardware upgrade, especially one involving storage, always back up all your critical data. While the process is generally safe, unforeseen issues can occur. Use an external hard drive, cloud storage, or another reliable method to ensure your precious files are secure.
- Static Electricity Precautions: ESD is a silent killer of computer components.
- Unplug your computer from the wall outlet.
- Work on a hard, non-carpeted surface.
- Wear an anti-static wrist strap connected to an unpainted metal part of your PC case. If you don’t have one, frequently touch the metal chassis to ground yourself.
- Avoid wearing wool or synthetic clothing that can generate static.
Step-by-Step Physical Installation
With your preparations complete, it’s time to open up your computer and physically install the new hard drive. This section will guide you through the process, primarily focusing on desktop PCs, as laptop installations can vary significantly by model and often involve more intricate disassembly.
Opening Your Computer Case and Locating Bays
Safety is paramount when working inside your computer.
- Power Down and Unplug: Ensure your computer is completely shut down, not just in sleep mode. Then, disconnect the power cable from the wall outlet and the back of your PC. Disconnect all other peripherals (monitor, keyboard, mouse, etc.) for easier access.
- Move to a Well-Lit, Clean Workspace: A table with good lighting is ideal.
- Open the Case: Most modern PC cases have a side panel that can be removed. This usually involves unscrewing two thumb screws or standard Phillips head screws at the back of the case, then sliding the panel backward and lifting it off. Refer to your case’s manual if you’re unsure.
- Orient Yourself: Once the side panel is off, you’ll see the internal components. Identify the motherboard, power supply, and existing drives.
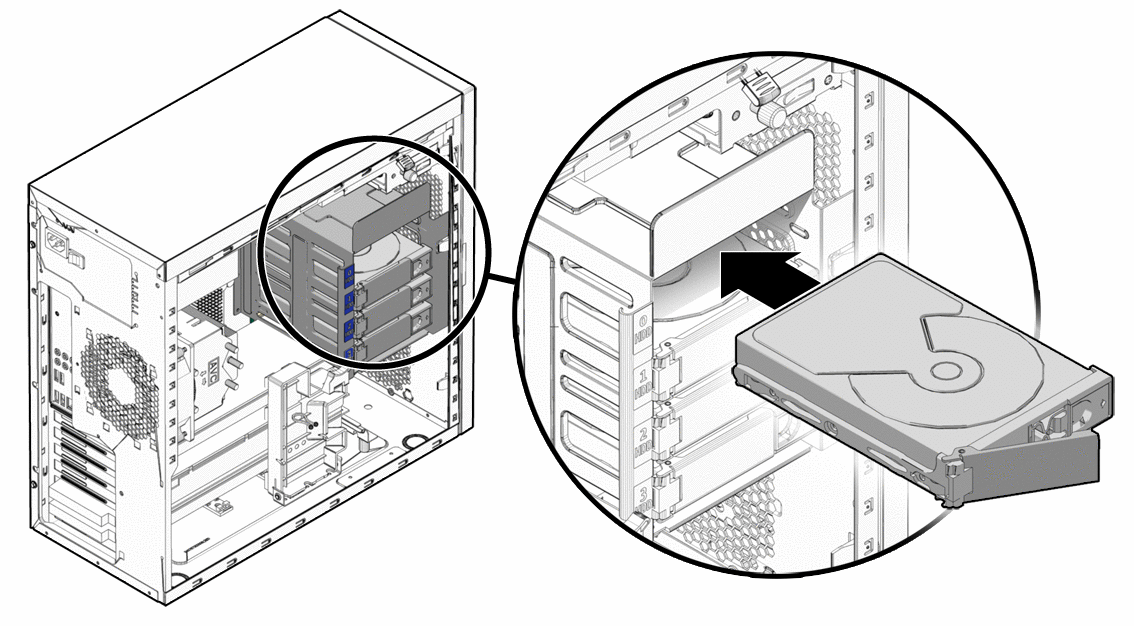
- Locate Available Drive Bays:
- 3.5-inch bays: These are typically found at the front or bottom of the case, often arranged in a cage. They are used for standard HDDs.
- 2.5-inch bays: Smaller bays or mounting points, sometimes located behind the motherboard tray or on dedicated brackets, are for 2.5-inch HDDs and SATA SSDs. If your case only has 3.5-inch bays, you might need a 2.5-inch to 3.5-inch adapter bracket for your SSD.
- M.2 slots: For NVMe SSDs, these are small horizontal slots directly on the motherboard itself, often near the CPU or graphics card, and usually labeled “M.2.” They typically have a small screw point at the end.
Mounting the New Drive
The method for mounting depends on the drive type and your case’s design.
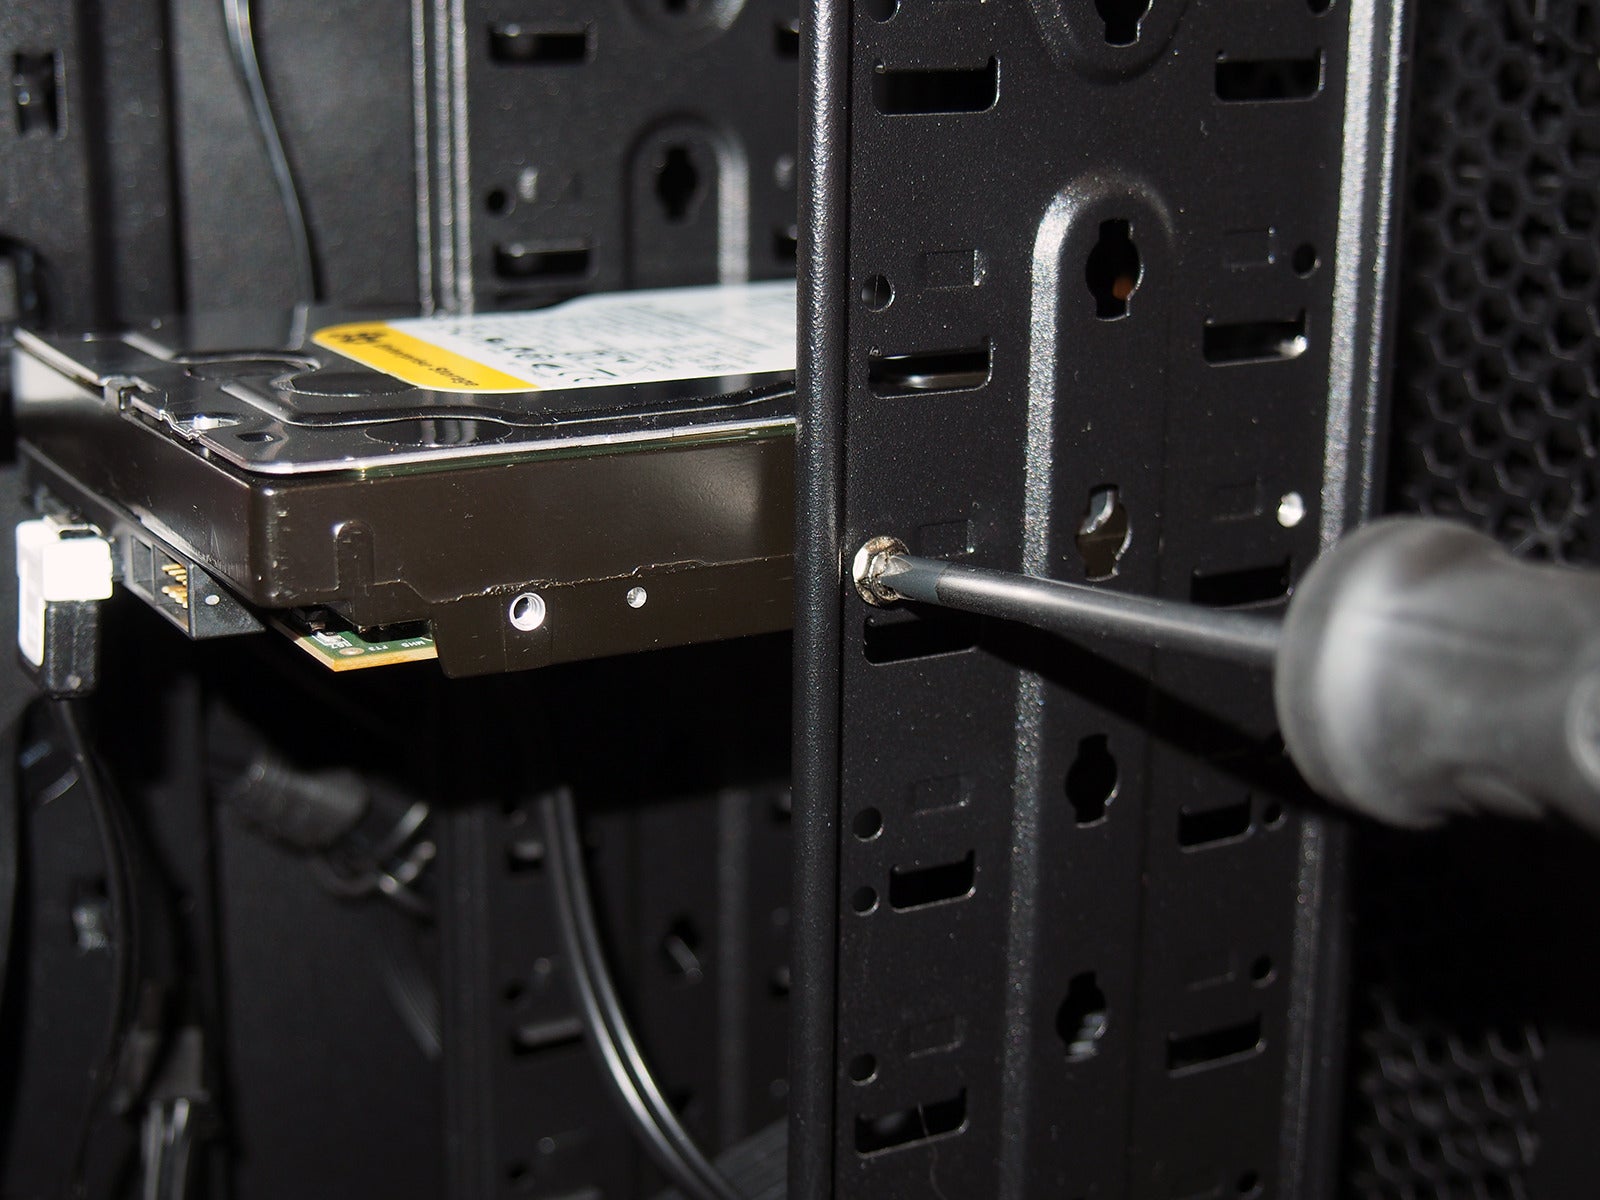
- For 3.5-inch HDDs:
- Slide the HDD into an available 3.5-inch bay.
- Many cases use tool-less designs with plastic trays or clips that snap into place.
- If your case uses screws, align the screw holes on the side of the drive with those on the drive bay and secure it with two to four screws. Ensure it’s firmly held to prevent vibration.
- For 2.5-inch SATA SSDs/HDDs:
- If using a 3.5-inch adapter bracket: Mount the 2.5-inch drive into the adapter bracket first, then treat it as a 3.5-inch drive and slide it into a 3.5-inch bay.
- If your case has dedicated 2.5-inch bays: Slide or screw the drive into place. These bays might be behind the motherboard tray for better cable management.
- For NVMe M.2 SSDs:
- Locate an empty M.2 slot on your motherboard. If there’s a small screw already in the standoff, remove it.
- Gently insert the M.2 SSD into the slot at a slight angle, ensuring the gold contacts are fully engaged. It should slide in without excessive force.
- Once seated, push the drive down gently until it’s parallel with the motherboard.
- Secure the drive with the small screw into the standoff at the end of the M.2 slot. Some motherboards have tool-less plastic clips. Be careful not to overtighten.
Connecting Power and Data Cables
This step is critical for your drive to receive power and communicate with the motherboard.
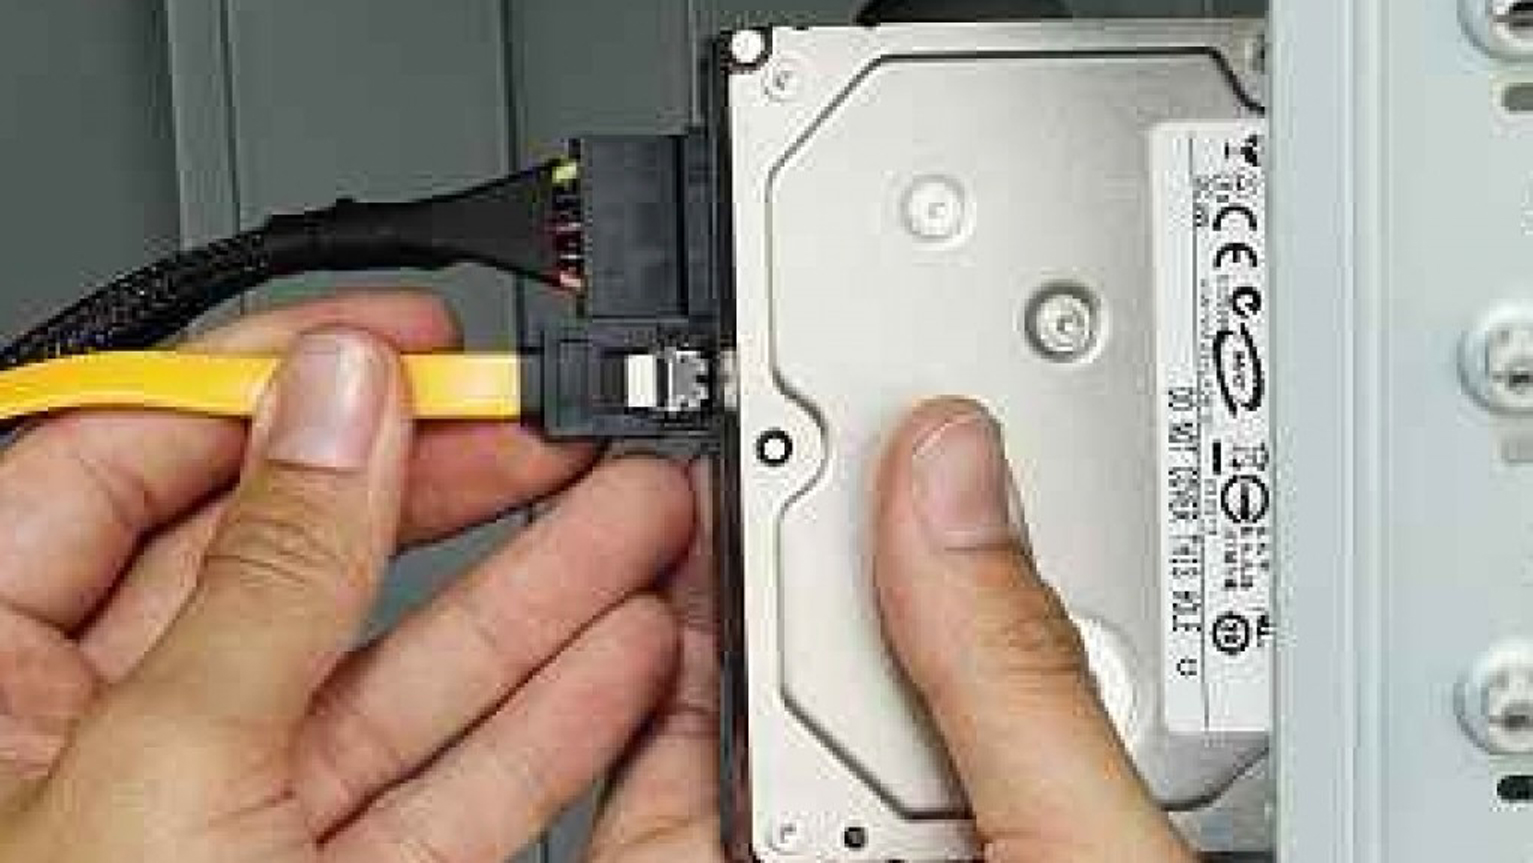
- SATA Power Connection (for HDDs and SATA SSDs):
- Locate an available SATA power connector from your Power Supply Unit (PSU). These are flat, wide connectors, usually black, with five or six wires leading to them.
- Align the L-shaped connector from the PSU with the L-shaped port on the back of your new drive.
- Gently push the connector firmly into place until it clicks or feels secure. Do not force it.
- SATA Data Connection (for HDDs and SATA SSDs):
- Take one end of a SATA data cable (usually a thinner, L-shaped cable, often red or black).
- Connect it to the corresponding L-shaped port on your new drive, next to the power connector.
- Connect the other end of the SATA data cable to an available SATA port on your motherboard. These ports are typically labeled “SATA0,” “SATA1,” etc. For optimal performance, especially if using a SATA SSD as a boot drive, check your motherboard manual for the fastest SATA ports, which are usually the lowest numbered ones.
- NVMe M.2 SSDs: These drives do not require separate power or data cables. All power and data transfer happen directly through the M.2 slot on the motherboard.
Securing and Reassembling
Once all connections are made, perform a final check and close your system.
- Cable Management (Optional but Recommended): Use zip ties or Velcro straps to bundle cables and route them neatly. This improves airflow, makes future maintenance easier, and gives your PC a cleaner look. Ensure cables are not obstructing fans or interfering with other components.
- Double-Check Connections: Verify that all power and data cables are firmly seated on both the drive and the motherboard/PSU.
- Close the Case: Carefully slide the side panel back into place and secure it with the screws you removed earlier.
- Reconnect Peripherals: Plug back in your monitor, keyboard, mouse, and any other peripherals.
- Power On: Finally, reconnect the main power cable to the wall outlet and the back of your PC. You’re ready to boot up and configure the new drive.
A Quick Note on Laptops: Installing a hard drive in a laptop is generally more challenging due to compact designs and often requires disassembling more components (keyboard, palm rest, battery). The principles of connecting the drive (usually a 2.5-inch SATA drive, sometimes M.2) are similar, but the access points vary greatly by model. Always consult your laptop’s service manual or a reputable online teardown guide specific to your model before attempting.
Software Configuration: Bringing Your New Drive Online
Physically installing the drive is only half the battle. Your operating system needs to recognize, initialize, partition, and format the drive before it can be used for storage. This process varies slightly between Windows, macOS, and Linux.
Initializing and Partitioning in Windows
Once your PC boots up, Windows won’t immediately recognize the new drive as usable storage. You’ll need to prepare it.
- Boot Your PC: Turn on your computer and let it boot into Windows as usual.
- Open Disk Management:
- Right-click the “Start” button (Windows icon) and select “Disk Management.”
- Alternatively, press
Windows Key + R, typediskmgmt.msc, and press Enter.
- Initialize the New Disk:
- Disk Management should automatically detect the new, uninitialized disk and prompt you to initialize it. If not, look for a disk labeled “Not Initialized” or with unallocated space (usually with a black bar).
- Right-click on the disk number (e.g., “Disk 1”) and select “Initialize Disk.”
- Choose a Partition Style:
- MBR (Master Boot Record): Older standard, typically used for drives up to 2TB. If your drive is larger than 2TB, MBR will only be able to utilize the first 2TB.
- GPT (GUID Partition Table): Newer, more robust standard, supports drives larger than 2TB, allows for more partitions, and is required for UEFI-based boot drives. For any modern drive, especially those 2TB or larger, GPT is the recommended choice.
- Select your preferred partition style (GPT is usually best) and click “OK.”
- Create a New Simple Volume (Partition and Format):
- After initialization, the disk will show as “Online” but with “Unallocated” space (black bar).
- Right-click on the “Unallocated” space.
- Select “New Simple Volume…” This will launch a wizard.
- Wizard Steps:
- Welcome: Click “Next.”
- Specify Volume Size: By default, it will use the maximum available space for a single partition. You can create multiple partitions if desired by entering a smaller size, but for most users, using the full capacity is fine. Click “Next.”
- Assign Drive Letter: Choose an available drive letter (e.g., E:, F:, etc.). This is how Windows will identify the drive. Click “Next.”
- Format Partition: This is where you prepare the drive for storing data.
- File system: NTFS is the standard for Windows drives.
- Allocation unit size: Leave as “Default.”
- Volume label: Give your drive a descriptive name (e.g., “Data Drive,” “Game Storage,” “SSD Games”).
- Perform a quick format: This is usually sufficient. Uncheck it only if you want to perform a more thorough, but much slower, check for bad sectors (rarely necessary for new drives).
- Enable file and folder compression: Leave unchecked unless you specifically need it.
- Click “Next,” then “Finish.”
- Your Drive is Ready! After the quick format completes, the new drive will appear with its assigned drive letter in “This PC” (formerly “My Computer”) and be ready for use.
macOS and Linux Considerations
While the principles are the same (initialize, partition, format), the tools differ.
- macOS:
- Once the drive is installed, boot into macOS.
- Open “Disk Utility” (found in Applications > Utilities).
- Select your new drive from the sidebar. It will likely show as uninitialized.
- Click “Erase” from the toolbar.
- Scheme: Choose “GUID Partition Map” (equivalent to GPT).
- Format: Choose “APFS” for an SSD (recommended for modern macOS versions) or “Mac OS Extended (Journaled)” for an HDD or older macOS.
- Give it a name and click “Erase.”
- Linux:
- Boot into your Linux distribution.
- Tools like
GParted(a graphical partition editor, often pre-installed or easily installed via your package manager) or command-line tools likefdiskorpartedcan be used. - Identify the new drive (e.g.,
/dev/sdb,/dev/nvme0n1). Be extremely careful to select the correct drive to avoid wiping existing data. - Partition Table: Create a new partition table (GPT is generally preferred for modern systems).
- Create Partition(s): Create one or more partitions.
- Format Partition(s): Format them with a suitable Linux file system like
ext4. - Mount Point: You’ll then need to create a mount point (e.g.,
/mnt/newdrive) and add an entry to/etc/fstabto automatically mount the drive on boot.
Troubleshooting Common Issues and Final Thoughts
Even with careful preparation, issues can sometimes arise. Knowing how to troubleshoot common problems can save you time and frustration.
What If Your Drive Isn’t Detected?
- Check Cables: The most frequent culprit. Power off, unplug, and physically re-seat both the SATA power and SATA data cables at both ends (drive, PSU, motherboard). For M.2 drives, ensure it’s firmly seated in the slot and the retaining screw is in place.
- Check BIOS/UEFI Settings: Enter your computer’s BIOS/UEFI settings during startup (usually by pressing DEL, F2, F10, or F12 repeatedly after pressing the power button).
- Look for sections related to “Storage,” “SATA Configuration,” or “Boot Devices.”
- Ensure the SATA port the drive is connected to is enabled.
- Verify that your drive is listed under detected storage devices. If it’s an NVMe drive, check the M.2 settings; sometimes, enabling an M.2 slot disables certain SATA ports.
- Try a Different Port/Cable: If available, try connecting the drive to a different SATA port on the motherboard or using a different SATA data cable.
- Power Supply Issues: Ensure your PSU has enough wattage and that the SATA power connector is supplying power. You can test with another known-working drive if possible.
- Driver Updates: For NVMe drives, sometimes chipset drivers from your motherboard manufacturer need to be updated, especially for newer drives on older motherboards.
- Faulty Drive: In rare cases, the new drive itself might be defective. If all else fails, consider returning or exchanging the drive.
Maximizing Your New Storage
Once your drive is up and running, consider these tips to get the most out out of your upgrade:
- Organize Your Files: Take the opportunity to declutter and organize your data. Move large media files to your new HDD (if applicable) and keep frequently used applications and your OS on the SSD for speed.
- Regular Backups: The new drive gives you more space, but it doesn’t replace the need for regular backups. Implement a robust backup strategy.
- Monitor Health: Use tools like CrystalDiskInfo (Windows) or S.M.A.R.T. utilities to monitor the health of your drives.
Installing a new hard drive is a tangible step towards enhancing your computer’s performance and longevity. Whether it’s the lightning-fast responsiveness of an SSD making your daily tasks more productive or the vast capacity of an HDD safeguarding your digital memories, this upgrade offers significant benefits. By following this guide, you’ve not only performed a valuable maintenance task but also deepened your understanding of computer hardware. Enjoy your expanded and faster storage!
aViewFromTheCave is a participant in the Amazon Services LLC Associates Program, an affiliate advertising program designed to provide a means for sites to earn advertising fees by advertising and linking to Amazon.com. Amazon, the Amazon logo, AmazonSupply, and the AmazonSupply logo are trademarks of Amazon.com, Inc. or its affiliates. As an Amazon Associate we earn affiliate commissions from qualifying purchases.