
Ubuntu, a widely popular and user-friendly Linux distribution, is built upon the robust foundation of Debian. This lineage means that Ubuntu benefits immensely from Debian’s well-established package management system. At its core, this system revolves around .deb files – the standardized archives that contain compiled software, libraries, and scripts needed to install applications on Debian-based systems. While most users interact with software through Ubuntu’s official repositories and the convenient Ubuntu Software Center, there are frequent scenarios where installing a .deb package manually becomes not just a preference, but a necessity.
This comprehensive guide will demystify the process of installing Debian packages on Ubuntu, providing you with both graphical and command-line methods. We’ll explore why you might need to take this route, the tools at your disposal, and crucial best practices to ensure a smooth, secure, and efficient software management experience. Whether you’re a seasoned Linux user seeking advanced control or a newcomer looking to expand your software horizons, mastering .deb package installation is a fundamental step in fully leveraging the power and flexibility of your Ubuntu system.

Navigating the Linux Software Landscape: Understanding Debian Packages and Ubuntu
The world of Linux software can seem daunting at first, but understanding its underlying structure is key to efficient system management. For Debian and its derivatives like Ubuntu, this structure is heavily reliant on a sophisticated package management system that streamlines software installation, updates, and removal.
The Ecosystem of Linux Software Management
At the heart of Debian and Ubuntu’s software ecosystem are Debian Packages, identifiable by their .deb file extension. Think of a .deb file as a self-contained installer, much like an .exe file on Windows or a .dmg on macOS. However, .deb packages are specifically designed for the Debian format, bundling not just the application itself, but also metadata, dependencies (other software components required for the main application to run), installation scripts, and configuration files, all organized in a specific hierarchical structure.
Ubuntu leverages this mature packaging system developed by Debian because it offers significant advantages. It provides a standardized way to distribute software, ensures system stability by managing dependencies meticulously, and offers robust tools for system administrators and users alike. This shared heritage means that a .deb package designed for Debian is typically compatible with Ubuntu, making the software landscape quite interconnected.
So, if most software is available through Ubuntu’s official repositories, why would you ever need to manually install a .deb file? Several common scenarios necessitate this approach:
- Software Not in Official Repositories: Many niche applications, specialized developer tools, or proprietary software are not included in Ubuntu’s official repositories. Developers or vendors often provide these as
.debfiles directly on their websites. - Newer Versions of Software: Sometimes, the version of an application available in the official repositories might be older than the latest release. Manually installing a newer
.debcan grant you access to the latest features, bug fixes, or performance improvements before they are officially packaged for Ubuntu. - Custom Builds or Beta Releases: For users testing bleeding-edge features or specific custom-compiled versions of software, a
.debfile provided by the developer is often the only way to install it. - Offline Installations: If you need to install software on a machine without internet access, downloading the
.debfile and its dependencies on another machine and transferring them is a viable strategy.
Ensuring a Smooth Installation Experience
Before diving into the installation process, a couple of crucial considerations can prevent headaches down the line and ensure the integrity of your system:
- Importance of Trustworthy Sources: This is paramount for digital security. Just as you wouldn’t download an
.exefrom an untrusted source, the same caution applies to.debfiles. Only download.debpackages from the official websites of software developers, reputable open-source projects, or well-known third-party repositories. Installing packages from unknown sources can introduce malware, unstable software, or even compromise your system’s security. Always verify the source. - Checking System Architecture: Linux distributions come in different architectures, primarily 64-bit (amd64) for most modern computers and occasionally 32-bit (i386) for older systems. When downloading a
.debfile, ensure it matches your system’s architecture. Installing a package for the wrong architecture will fail and can lead to errors. You can check your system’s architecture by opening a terminal and typingdpkg --print-architecture. This simple check helps avoid common installation errors.
Graphical User Interface (GUI) Methods: User-Friendly Package Installation
For users who prefer a visual approach and minimal interaction with the command line, Ubuntu offers straightforward GUI-based methods for installing .deb packages. These methods are intuitive and often handle simpler installations seamlessly.
Effortless Installation with Ubuntu Software Center
The Ubuntu Software Center is your go-to application for discovering, installing, and managing software from the official Ubuntu repositories. It’s also surprisingly capable of handling local .deb files, making it the most accessible entry point for package installation.
Step-by-step guide for using Ubuntu Software Center:
- Locate the
.debfile: First, download the.debpackage to your computer. It will typically land in yourDownloadsfolder. - Open with Software Center: Navigate to the folder where you saved the
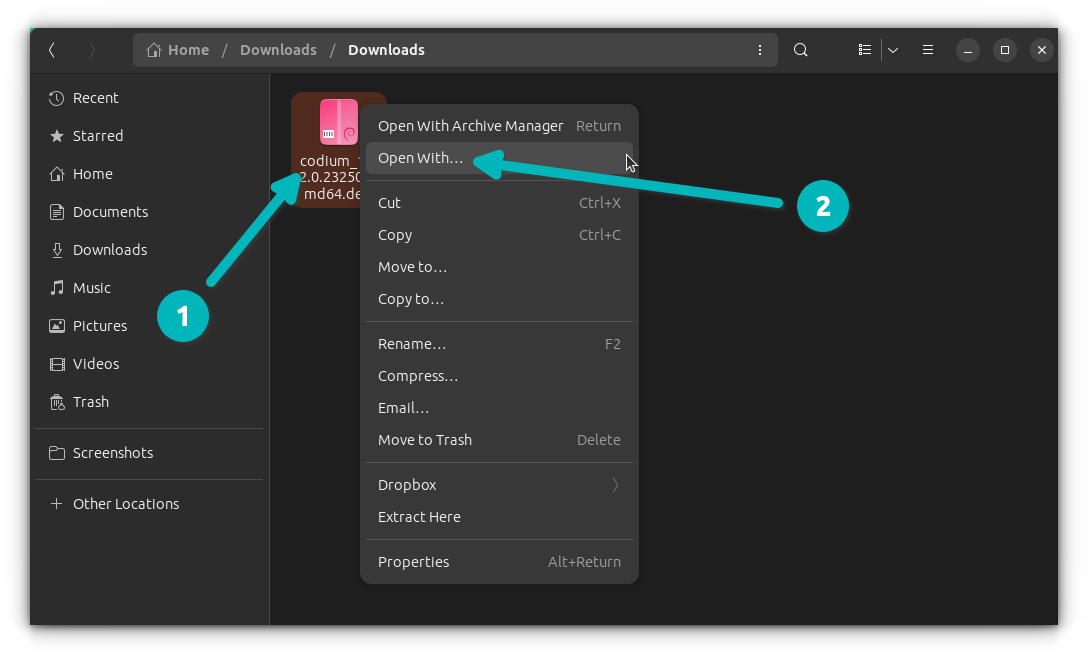
.debfile. Right-click on the.debfile. From the context menu, select “Open With” and then choose “Software Install” or “Ubuntu Software”. - Initiate Installation: The Ubuntu Software Center will open, displaying details about the package, such as its name, description, and version. It will also indicate if the software is already installed or if there are any conflicts. Look for an “Install” button (or “Reinstall” if it’s already present).
- Authenticate: Click the “Install” button. You will be prompted to enter your administrative password to authorize the installation.
- Wait for Completion: The Software Center will then proceed to install the package. A progress bar or spinner might indicate the ongoing process. Once finished, the button might change to “Remove” or “Launch”.
Advantages and Limitations:
The primary advantage of using the Ubuntu Software Center is its simplicity and familiarity for most users. It abstracts away the complexities of the underlying package management system. However, its main limitation is its dependency resolution capabilities. While it often handles common dependencies, for more complex or intricate dependency chains, especially when an internet connection is unavailable or repositories are configured unconventionally, it might struggle or provide less detailed error messages compared to dedicated tools.
Enhancing Control with GDebi Package Installer
For a slightly more robust GUI experience, particularly when dealing with dependencies, GDebi Package Installer is an excellent alternative. GDebi’s strength lies in its ability to automatically detect and install missing dependencies, which the Ubuntu Software Center might sometimes overlook or handle less gracefully for local .deb files.
Why GDebi is often preferred (dependency handling):
GDebi acts as a front-end to dpkg (the low-level Debian package manager) but significantly improves upon it by integrating apt‘s dependency resolution capabilities. When you try to install a .deb file with GDebi, it scans the package for required dependencies and, if they are not installed on your system, it will attempt to fetch and install them from your configured repositories before installing the main .deb package. This proactive approach significantly reduces “dependency hell” scenarios.
Installation of GDebi itself:
GDebi is usually not pre-installed on Ubuntu by default, but it’s readily available in the official repositories.
Open a terminal (Ctrl+Alt+T) and run:
sudo apt update
sudo apt install gdebi
Enter your password when prompted.
Step-by-step guide for using GDebi (GUI):
- Locate the
.debfile: Similar to the Software Center, download your.debpackage first. - Open with GDebi: Navigate to the folder with the
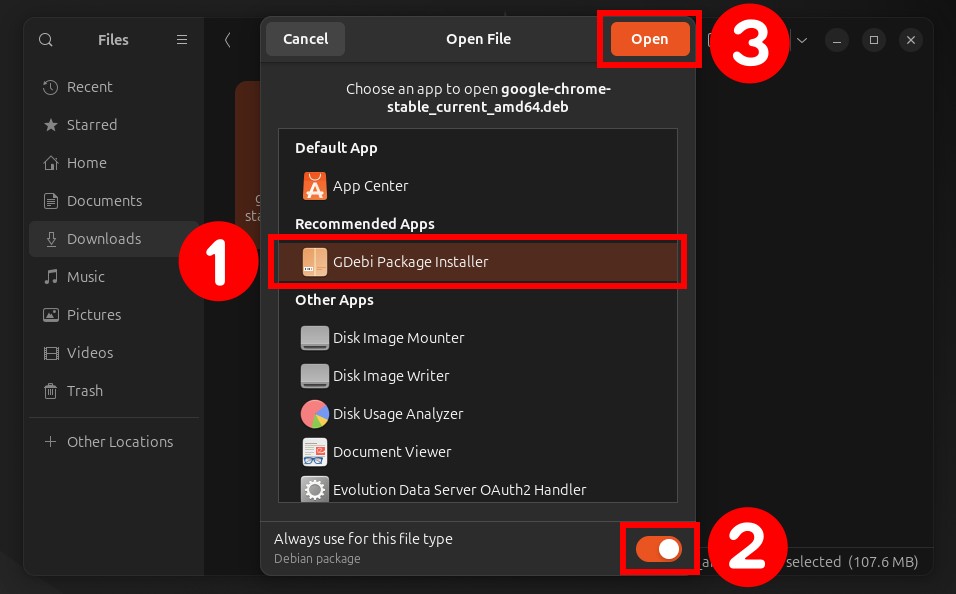
.debfile. Right-click on the.debfile. Select “Open With” and then choose “GDebi Package Installer”. If “GDebi Package Installer” isn’t immediately visible, you might need to click “Open With Other Application” and search for it. - Review and Install: GDebi will open a window displaying package details. Crucially, it will list “Dependencies satisfied” or “Dependencies not satisfied.” If dependencies are missing, GDebi will indicate how many are needed and offer to install them.
- Initiate Installation: Click the “Install Package” button.
- Authenticate and Confirm: Enter your administrative password. GDebi will then download and install any required dependencies, followed by the main
.debpackage. - Completion: Once the process is complete, the button will change to “Reinstall Package” or “Remove Package.”
GDebi offers a great balance between ease of use and powerful dependency management, making it a highly recommended tool for installing .deb packages via GUI.
Command Line Interface (CLI) Methods: Precision and Power
For those who prefer the speed, control, and scripting capabilities of the command line, Ubuntu provides several robust tools to manage .deb packages. While potentially more intimidating for newcomers, CLI methods offer unparalleled precision and are often preferred by power users and system administrators.
The Foundational dpkg Command
The dpkg command is the low-level package manager for Debian-based systems. It directly interacts with .deb files. Understanding dpkg is fundamental, as other higher-level tools like apt and gdebi build upon its capabilities.
Understanding dpkg‘s role:
dpkg can install, remove, and provide information about .deb packages. However, dpkg itself does not resolve dependencies. This is its most significant limitation. If a .deb package requires other software that isn’t already installed, dpkg will fail, reporting dependency errors without attempting to fetch them.
Syntax and usage: To install a .deb package using dpkg, you use the -i (or --install) option.
First, navigate to the directory where your .deb file is located using the cd command in your terminal, or provide the full path to the file.
cd ~/Downloads (if your package is in the Downloads folder)
sudo dpkg -i package_name.deb
Replace package_name.deb with the actual name of your file. sudo is necessary because installing software requires administrative privileges.
The dependency challenge with dpkg:
If package_name.deb has unmet dependencies, dpkg will likely report an error similar to:
dpkg: dependency problems prevent configuration of package-name: package-name depends on dependency-name; however: Package dependency-name is not installed.
The installation will be marked as “broken.”
Resolving dependencies after dpkg:
Fortunately, apt can come to the rescue after dpkg has highlighted dependency issues. After a failed dpkg installation due to dependencies, you can run:
sudo apt install -f (or sudo apt --fix-broken install)
This command tells apt to find and install all missing dependencies for any broken packages on your system. Once apt has resolved the dependencies, the installation of your original .deb package will often complete successfully. This two-step process (dpkg -i followed by apt install -f) is a common workaround when directly using dpkg.
Modern Management with apt
The apt command-line utility is a higher-level package manager that significantly simplifies software management on Ubuntu. It combines the functionality of dpkg with powerful dependency resolution and repository management. While primarily used for packages from repositories, apt can also install local .deb files directly, offering a more streamlined experience than dpkg.
How apt simplifies dpkg and dependency resolution:
When apt installs a local .deb file, it automatically checks for and attempts to install any required dependencies from your configured repositories, much like GDebi does. This eliminates the need for the two-step dpkg and apt --fix-broken install process.
Syntax and usage: To install a local .deb package using apt, you need to specify the local path to the file. It’s crucial to prefix the file name with ./ if you are in the same directory as the .deb file, or provide the full absolute path.
cd ~/Downloads
sudo apt install ./package_name.deb
Alternatively, from any directory:
sudo apt install /path/to/your/package_name.deb
Advantages of using apt for local packages:
- Automatic Dependency Resolution: This is the biggest advantage, simplifying the installation process significantly.
- Familiar Interface: Users accustomed to
aptfor installing repository packages will find this method intuitive. - Robust Error Handling:
aptgenerally provides clear error messages and suggestions if issues arise.
For most modern users, apt install ./package_name.deb is the preferred command-line method for installing local .deb packages due to its efficiency and dependency-handling capabilities.
CLI GDebi: Bridging GUI Simplicity with CLI Efficiency
Just as GDebi offers a user-friendly GUI, there’s also a command-line version of GDebi, known as gdebi-core. This tool provides the same excellent dependency resolution as its graphical counterpart but within the terminal environment, making it ideal for scripts or server environments where a GUI might not be available.
Installation of gdebi-core:
Like the GUI version, gdebi-core might not be pre-installed. You can install it via apt:
sudo apt update
sudo apt install gdebi-core
Syntax and usage: Once installed, using gdebi from the command line is straightforward:
cd ~/Downloads
sudo gdebi package_name.deb
Benefits: Automatic dependency resolution in the terminal:
The primary benefit of gdebi (CLI) is its seamless handling of dependencies. When you execute sudo gdebi package_name.deb, it will first scan the .deb file, identify all missing dependencies, and then prompt you to confirm their installation from the repositories before proceeding with the main package. This makes it incredibly powerful for automated scripts or when you need reliable installation without manual dependency hunting. It asks for confirmation, giving you control over what gets installed.
Managing Your Installed Packages: Removal and Troubleshooting
Installing software is only one part of the equation; knowing how to remove it and troubleshoot common issues is equally vital for maintaining a healthy and efficient Ubuntu system.
Removing Debian Packages
Just as there are multiple ways to install, there are also various commands to uninstall.
-
Using
dpkg -randdpkg -P:sudo dpkg -r package_name: This command removes the specified package but leaves behind its configuration files. This can be useful if you plan to reinstall the package later and want to retain your settings.sudo dpkg -P package_name: This command performs a “purge” – it removes the package and all its associated configuration files. This is useful for a complete removal or to free up disk space when you no longer need the software.
Note:
dpkgrequires the exact package name, not the.debfile name. You can find installed package names usingdpkg -l | grep package_name. -
Using
sudo apt removeandsudo apt purge:
These are the recommended modern methods for removing packages, as they also handle dependencies effectively.sudo apt remove package_name: Removes the package but leaves configuration files behind, similar todpkg -r.sudo apt purge package_name: Removes the package and its configuration files, similar todpkg -P.sudo apt autoremove: After removing a package, this command is invaluable. It removes any automatically installed dependency packages that are no longer required by any other installed software on your system, helping to keep your system clean.
aptgenerally works better thandpkgfor removal because it can also clean up unnecessary dependencies.
Common Installation Hurdles and Solutions
Even with the right tools, you might encounter issues. Here are some common problems and their solutions:
- Dependency errors: This is the most frequent issue. If you use
dpkg -iand it fails, follow up withsudo apt install -f. If you usedapt install ./package.deborgdebiand still got dependency errors, it usually means that a required dependency is either not available in your configured repositories or there’s a version conflict. You might need to add a specific PPA or repository to resolve this. - Permission denied errors: If you forget to use
sudoor your user account doesn’t have administrative privileges, you’ll encounter permission errors. Always remember to prefix installation commands withsudo. - Architecture mismatches: As mentioned earlier, trying to install a 32-bit
.debon a 64-bit system (or vice-versa, though rarer now) will fail. The error message will usually explicitly state an architecture mismatch. Double-check the.debfile you downloaded and ensure it matches your system’s architecture (dpkg --print-architecture). - Corrupted packages: If a
.debfile was incompletely downloaded or corrupted during transfer, the installation will fail with checksum errors or similar. Try re-downloading the package from a reliable source. - Broken system state: If multiple installations have failed, your package manager might enter a “broken” state. Running
sudo apt update,sudo apt --fix-broken install, andsudo apt autoremovesequentially can often resolve many such issues. - Checking logs: When installation fails and the error message isn’t clear, checking system logs can provide more detailed insights. Relevant logs might be found in
/var/log/dpkg.logor by usingjournalctl -xe.
Best Practices for Robust Software Management on Ubuntu
Effective software management goes beyond just knowing the commands; it involves adopting practices that ensure system stability, security, and personal productivity.
Prioritizing System Stability and Security
- Always prefer official repositories: Whenever possible, install software directly from Ubuntu’s official repositories. These packages are tested, maintained, and secure, ensuring compatibility and stability within the Ubuntu ecosystem. They also receive automatic updates.
- Understand the risks of third-party packages: While
.debfiles from external sources are often necessary, be aware that they bypass some of the rigorous testing and integration efforts of official repositories. They might conflict with other software, introduce vulnerabilities, or be less stable. Always evaluate the necessity and trustworthiness of the source before installing. - Regularly update your system: Keep your system up-to-date by running
sudo apt update && sudo apt upgraderegularly. This ensures you have the latest security patches, bug fixes, and compatible versions of libraries, which can prevent dependency issues with new installations. - Be cautious with PPAs (Personal Package Archives): PPAs are often used to get newer versions of software or applications not in official repos. While many are reputable, adding too many or untrusted PPAs can lead to “dependency hell” or introduce security risks. Only add PPAs you trust and actively use.
Maximizing Productivity with Smart Package Handling
- Knowing when to use GUI vs. CLI:
- GUI (Software Center, GDebi GUI): Ideal for new users, quick one-off installations, or when you prefer visual feedback. Great for discovery.
- CLI (
apt,gdebi-coreCLI,dpkg): Preferred by experienced users for speed, automation, scripting, server environments, and advanced troubleshooting. It offers more verbose output and fine-grained control. Choose the tool that best fits your comfort level and the specific task.
- Documenting custom installations: If you frequently install
.debfiles or use PPAs, keep a simple record of what you’ve installed and from where. This makes it easier to replicate your setup on a new machine or troubleshoot issues if they arise later. A simple text file or a wiki page can be invaluable. - Backup strategies for critical configurations: When installing software that heavily modifies system settings or involves complex configurations, consider backing up relevant configuration files (often found in
/etcor in your home directory’s hidden files, e.g.,~/.config). This allows for easy restoration if an installation goes awry.
Conclusion: Empowering Your Ubuntu Experience
Mastering the installation of Debian packages on Ubuntu is a foundational skill that significantly expands your control over your operating system. From leveraging the intuitive graphical tools like the Ubuntu Software Center and GDebi to harnessing the power and precision of command-line utilities like apt and gdebi, you now have a comprehensive toolkit at your disposal.
Understanding when and why to use these different methods, coupled with a vigilant approach to source trustworthiness and system maintenance, ensures that your Ubuntu environment remains robust, secure, and tailored precisely to your needs. This knowledge not only enhances your productivity by granting access to a wider array of software but also deepens your understanding of Linux package management, a critical aspect of effective technical stewardship.
By embracing these insights and best practices, you’re not just installing software; you’re actively shaping a more powerful and personalized computing experience, fully aligned with the spirit of flexibility and customization that defines the Linux ecosystem.
aViewFromTheCave is a participant in the Amazon Services LLC Associates Program, an affiliate advertising program designed to provide a means for sites to earn advertising fees by advertising and linking to Amazon.com. Amazon, the Amazon logo, AmazonSupply, and the AmazonSupply logo are trademarks of Amazon.com, Inc. or its affiliates. As an Amazon Associate we earn affiliate commissions from qualifying purchases.