Upgrading or building a personal computer can be one of the most rewarding experiences for tech enthusiasts. At the very core of this endeavor lies the Central Processing Unit (CPU) – often referred to as the “brain” of your computer. It dictates processing speed, multitasking capabilities, and overall system responsiveness. Successfully installing a CPU is a critical step, one that can seem daunting to beginners but is entirely manageable with the right guidance. This comprehensive guide will walk you through every aspect of CPU installation, from crucial preparations to post-installation checks, ensuring your new system runs smoothly and efficiently.
The Heart of Your PC: Understanding the CPU and Its Importance
The CPU is arguably the most vital component in any computer system. It performs calculations, executes instructions, and manages the flow of data between all other hardware components. Whether you’re a gamer seeking higher frame rates, a content creator demanding faster rendering times, or a professional needing seamless multitasking, the CPU is the engine that drives your digital experience.
Why a New CPU Matters: Performance and Future-Proofing
Investing in a new CPU, whether as part of a fresh build or an upgrade, offers substantial benefits. A more powerful CPU translates directly to snappier application launches, smoother transitions between tasks, and significantly improved performance in demanding software like video editors, CAD programs, or the latest video games. For gamers, a high-end CPU paired with a capable GPU prevents bottlenecks, ensuring your graphics card can operate at its full potential.
Beyond immediate performance gains, a modern CPU can also future-proof your system to a certain extent. Newer generations often introduce architectural improvements, better power efficiency, and support for emerging technologies like faster RAM (DDR5) or PCIe 5.0. While no computer component is truly future-proof indefinitely, a well-chosen CPU can extend the viable lifespan of your rig, delaying the need for another costly overhaul. From a ‘Money’ perspective, this strategic investment can reduce the total cost of ownership over several years.
Choosing the Right CPU for Your Needs: Compatibility and Value
Selecting the correct CPU is paramount before you even begin the installation process. The primary consideration is compatibility with your motherboard. CPUs from major manufacturers like Intel and AMD use different “sockets,” which are physical interfaces on the motherboard designed to house specific CPU generations. For example, an Intel CPU designed for an LGA 1700 socket will not fit into an AMD AM5 socket. Always verify your motherboard’s socket type and ensure your chosen CPU is compatible. If you’re upgrading, check your motherboard’s official QVL (Qualified Vendor List) or CPU support list to ensure compatibility with specific CPU models, as BIOS updates might be required for newer chips on older boards.
Beyond physical compatibility, consider your primary use case and budget.
- For Gaming: Look for CPUs with high single-core clock speeds and a reasonable number of cores. Both Intel Core i5/i7/i9 and AMD Ryzen 5/7/9 series offer excellent gaming performance.
- For Productivity/General Use: CPUs with a good balance of cores and threads will excel. Intel Core i3/i5 or AMD Ryzen 3/5 series are often more than sufficient and offer great value.
- For Content Creation/Heavy Workloads: CPUs with a high core count and multithreading capabilities are crucial for tasks like video editing, 3D rendering, or compiling large codebases. Intel Core i7/i9 (especially those with many E-cores) or AMD Ryzen 7/9/Threadripper lines are ideal here.
Considering the ‘Brand’ aspect, both Intel and AMD offer compelling products, often trading blows in performance metrics with each generation. Research benchmarks for specific tasks you perform to make an informed decision. Remember, a more expensive CPU isn’t always necessary if your workload doesn’t demand it. Striking the right balance between performance and cost is a key financial decision for any PC build.
Essential Preparations and Safety First
Before you even think about touching your new CPU, proper preparation is non-negotiable. This stage is critical not only for a smooth installation but also for protecting your valuable components. Rushing or neglecting safety precautions can lead to irreversible damage, turning an exciting upgrade into a costly mistake.
Gathering Your Tools and Components
Having all necessary items at hand before you begin will streamline the process and prevent interruptions. Here’s a checklist:
- Your New CPU: Carefully unboxed and ready for installation.
- Motherboard: Either freshly out of its box or already mounted in your PC case. If it’s in the case, ensure you have good access to the CPU socket.
- CPU Cooler: This is essential, as CPUs generate significant heat. It could be an aftermarket air cooler (like those from Cooler Master, Noctua) or an All-in-One (AIO) liquid cooler (e.g., Corsair, Arctic). Some CPUs come with a stock cooler, which is generally sufficient for basic use but may not be ideal for heavy loads or overclocking.
- Thermal Paste: If your cooler doesn’t have it pre-applied (many do), you’ll need a tube of high-quality thermal compound (e.g., Arctic MX-4, Noctua NT-H1). This paste is crucial for efficient heat transfer from the CPU to the cooler.
- Phillips Head Screwdriver: For mounting the cooler and potentially other components.
- Anti-static Wrist Strap (Recommended): Or at least ensure you frequently ground yourself by touching a bare metal part of your PC case (if it’s plugged into a grounded outlet, but switched off).
- Clean, Well-Lit Workspace: A flat, stable surface where you can work comfortably without clutter.
- Isopropyl Alcohol and Lint-Free Cloth (Optional but Recommended): For cleaning off old thermal paste if you’re replacing a CPU or cooler.
Prioritizing Safety: Mitigating Risks During Installation
Handling sensitive electronic components requires careful attention to safety, primarily concerning Electrostatic Discharge (ESD). Static electricity, invisible and often unfelt by humans, can easily damage delicate microelectronics within your CPU and motherboard.
- ESD Prevention: The most effective way to prevent ESD is by wearing an anti-static wrist strap, which connects you to a grounded object (like your PC’s metal chassis, if it’s plugged in but off). If you don’t have one, regularly touch a grounded metal object before and during component handling. Work on a non-carpeted surface if possible, and avoid wearing wool clothing, which can generate static.
- Power Off and Unplug: Always ensure your power supply unit (PSU) is switched off at the wall socket and unplugged from the wall. Even if the PC is off, some components might still hold a residual charge.
- Handle with Care: The CPU’s pins (or pads on the CPU itself, if it’s an LGA type) are incredibly fragile. Never touch the gold contacts or pins directly. Hold the CPU by its edges. Similarly, handle the motherboard by its edges, avoiding direct contact with circuits or chips.
- Organized Workspace: A cluttered space increases the risk of dropping components or accidental damage. Keep tools and packaging orderly.
By taking these precautions, you significantly reduce the risk of damaging your expensive components, safeguarding your ‘Money’ investment and ensuring a successful ‘Tech’ installation.
Step-by-Step CPU Installation: A Seamless Process
With preparations complete and safety protocols in mind, you’re ready to embark on the actual CPU installation. Follow these steps meticulously, and remember: never force anything. If a component isn’t fitting, re-evaluate its orientation or the instructions.
Preparing the Motherboard Socket
Your motherboard’s CPU socket is protected by a plastic cover and held shut by a retention mechanism.
- Locate the Socket: Identify the large, square socket near the center of your motherboard. It will have a metal lever on one side.
- Open the Retention Mechanism (Intel LGA Sockets): For Intel CPUs (LGA), push the metal lever down and away from the socket to release it. Lift the lever all the way up. This will also lift a metal retention frame that covers the socket. The plastic protective cover on the socket will either pop off automatically or can be gently removed now. Do not discard this cover; it’s good practice to keep it for potential future resale or RMA (Return Merchandise Authorization) of the motherboard.
- Open the Retention Mechanism (AMD AM4/AM5 Sockets): For AMD CPUs (PGA for AM4, LGA for AM5), there’s typically a single metal lever. Push it down and pull it sideways to release it, then lift it straight up. For AM4, this will expose the array of holes for the CPU pins. For AM5, it will lift the retention frame just like Intel LGA sockets.
Once the socket is open, be extremely careful not to touch the delicate pins (AMD AM4) or contact pads (Intel LGA, AMD AM5) within the socket. Any damage here means a damaged motherboard.
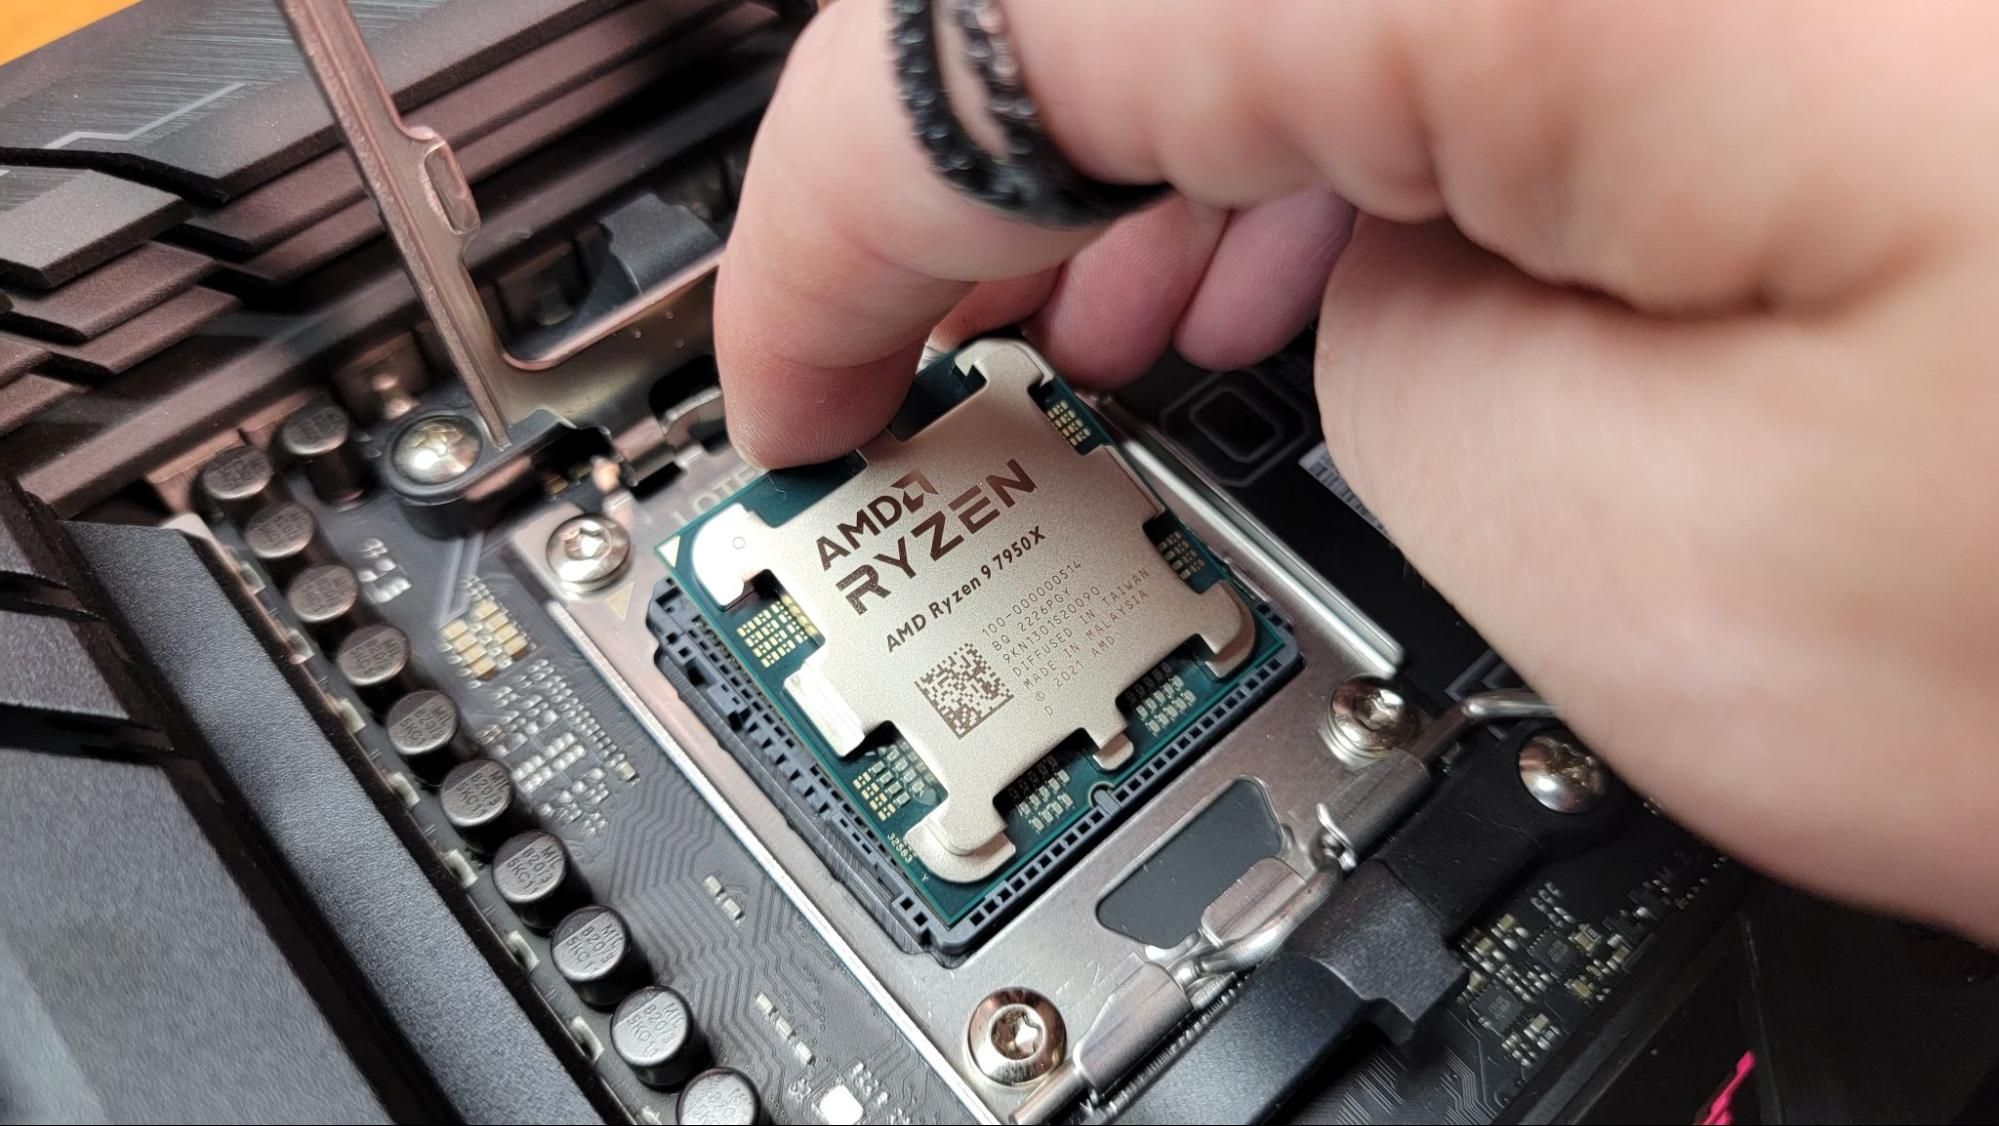
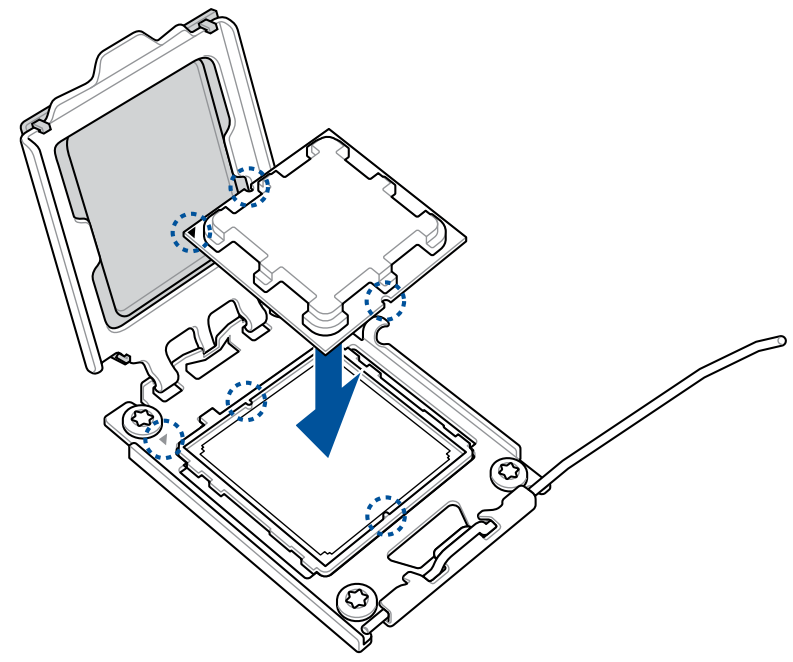
Orienting and Placing the CPU
This is the most critical step for correctly installing the CPU. Improper orientation can bend pins or damage contact pads, rendering the CPU or motherboard useless.
- Identify Alignment Marks: Both the CPU and the socket have clear indicators for correct orientation.
- Intel CPUs (LGA): Look for a small golden triangle or arrow on one corner of the CPU. Match this with a corresponding triangle or arrow etched into the CPU socket on the motherboard. There might also be two notches on the sides of the CPU that align with nubs on the socket frame.
- AMD CPUs (PGA for AM4): Look for a golden triangle or arrow on one corner of the CPU. Match this with a corresponding triangle or arrow on the CPU socket.
- AMD CPUs (LGA for AM5): Similar to Intel, look for a golden triangle/arrow on the CPU and a matching one on the socket, along with notches.
- Gentle Placement: Carefully align the CPU with the socket, ensuring the alignment marks match perfectly. Lower the CPU straight down into the socket.
- For Intel LGA and AMD AM5 (LGA): The CPU should drop effortlessly into the socket, resting flat without any force. If it doesn’t, do not push. Lift it, re-check the alignment, and try again.
- For AMD AM4 (PGA): The CPU’s pins should slide smoothly into the corresponding holes in the socket. It should fall into place under its own weight with barely any resistance. If you feel any significant resistance, lift the CPU immediately, verify the alignment, and check for any bent pins on the CPU itself. Bent pins are a common and critical issue; if found, they can sometimes be very carefully straightened with a fine-tipped tool like a mechanical pencil (with the lead retracted) or tweezers, but this is risky.
Securing the CPU in the Socket
Once the CPU is perfectly seated:
- Close the Retention Mechanism (Intel LGA, AMD AM5): Lower the metal retention frame back over the CPU. Then, push the metal lever back down and under the hook to secure it. This will require a bit of force, which is normal as it firmly clamps the CPU into place. Don’t be afraid of the slight crunching sound; it’s the CPU making full contact.
- Close the Retention Mechanism (AMD AM4): Gently push the metal lever back down into its original locked position. This secures the CPU in the socket.
Your CPU is now physically installed!
Applying Thermal Paste for Optimal Cooling
Thermal paste is a critical interface material that fills microscopic air gaps between the CPU’s Integrated Heat Spreader (IHS) and the base of the CPU cooler. Air is a poor heat conductor, so filling these gaps with thermal paste ensures maximum heat transfer to the cooler.
- If your cooler has pre-applied thermal paste: You can skip this step unless you plan to remove and re-install the cooler, in which case you’ll need to clean it off and apply new paste.
- If applying thermal paste:
- Ensure the CPU’s surface is clean and free of dust or fingerprints. If replacing an old CPU/cooler, use isopropyl alcohol and a lint-free cloth to clean both surfaces thoroughly.
- Apply a small amount of thermal paste – about the size of a pea or a grain of rice – directly to the center of the CPU’s IHS.
- Do NOT spread the paste. The pressure from installing the cooler will spread it evenly. Spreading it manually can trap air bubbles, which are detrimental to thermal performance.
Mounting the CPU Cooler
The final step in CPU installation is attaching the cooler. This is where the ‘Tech’ aspect of cooling solutions truly comes into play. The process varies significantly between different cooler brands and types (air vs. AIO liquid), so always consult your specific cooler’s instruction manual. However, the general principles are similar:
- Install Backplate (if applicable): Many aftermarket coolers require a backplate to be installed on the backside of the motherboard. This provides structural support and helps distribute mounting pressure.
- Attach Mounting Brackets: Secure the appropriate mounting brackets to the motherboard around the CPU socket, as per your cooler’s instructions.
- Position the Cooler: Carefully lower the heatsink (for air coolers) or the pump block (for AIO liquid coolers) onto the CPU, aligning it with the mounting screws or clips.
- Secure the Cooler: Tighten the screws in a cross pattern (e.g., top-left, bottom-right, top-right, bottom-left) to ensure even pressure and prevent warping of the CPU or cooler. Tighten until snug, but do not overtighten, as this can damage the motherboard or CPU.
- Connect Fan Header(s): Locate the “CPUFAN” header on your motherboard (usually near the CPU socket) and plug in the CPU cooler’s fan cable. If you have an AIO liquid cooler, you’ll likely have a pump header to connect as well (e.g., “AIOPUMP” or “CPU_OPT”).
- Cable Management: Tidy up the fan cables to prevent them from interfering with other components or airflow.
Congratulations! Your CPU and cooler are now successfully installed.
Post-Installation Verification and Troubleshooting
After the physical installation, it’s time to test your work. This verification step is crucial to confirm that your new CPU is recognized and functioning correctly.
Initial Power-Up and BIOS/UEFI Check
- Connect Essential Peripherals: Connect your monitor, keyboard, and mouse to the motherboard’s I/O ports.
- Power Up: Plug in your PC’s power cable, switch on the PSU, and press the power button on your case.
- Observe Boot Process: Your PC should power on, and you should see an image on your monitor. Many motherboards display a POST (Power-On Self-Test) screen or the BIOS/UEFI splash screen.
- Enter BIOS/UEFI: Repeatedly press the designated key (often DEL, F2, F10, or F12) during startup to enter your motherboard’s BIOS/UEFI settings.
- Verify CPU Recognition: Within the BIOS/UEFI, navigate to the “Main,” “System Info,” or “CPU” section. Here, you should see your newly installed CPU model and its clock speed. Check the CPU temperature reading as well; it should be within safe operating limits (typically below 50-60°C at idle).
If your system boots into Windows or your operating system, that’s a great sign. However, verifying in the BIOS/UEFI ensures proper hardware detection. Install the latest chipset drivers from your motherboard manufacturer’s website once in your OS to ensure optimal performance.
Common Pitfalls and Solutions
Even with careful installation, issues can sometimes arise. Here are some common problems and their solutions:
- No POST (Power-On Self-Test), No Display: This is the most common and concerning issue.
- Check Power Connections: Ensure the 24-pin ATX power cable and the 8-pin (or 4+4-pin) CPU power cable are securely connected to the motherboard.
- Reseat Components: Carefully remove and re-seat the RAM sticks, CPU, and any installed GPU.
- Clear CMOS: Use the motherboard’s CMOS clear jumper or button to reset BIOS settings.
- Troubleshooting LEDs/Beep Codes: Many motherboards have diagnostic LEDs (CPU, DRAM, VGA, BOOT) or emit beep codes to indicate where the issue lies. Consult your motherboard manual.
- Overheating CPU: If your CPU temperature in BIOS/OS is immediately very high.
- Check Cooler Installation: Ensure the CPU cooler is firmly seated and making good contact with the CPU.
- Thermal Paste: Verify that thermal paste was applied correctly. Too little or uneven paste can lead to hotspots.
- Fan Connection: Ensure the CPU fan is plugged into the correct “CPU_FAN” header and is spinning.
- CPU Fan Error: Message appears during boot.
- Fan Connection: Confirm the CPU fan is correctly plugged into the “CPU_FAN” header.
- Fan Speed: Some BIOS settings might detect a “low RPM” error. Adjust the fan speed settings in BIOS or disable the error message if the fan is indeed spinning.
- System Instability/Crashes: If the system boots but is unstable under load.
- Drivers: Ensure all chipset and other essential drivers are installed and up-to-date.
- BIOS Update: Your motherboard’s BIOS might need an update to fully support your new CPU, especially if it’s a newer generation on an older board. Check the manufacturer’s website.
Addressing these issues systematically will usually resolve most post-installation problems, saving you time and potential stress.
Optimizing Your New CPU
Once your new CPU is up and running, a few steps can help you maximize its potential. Install the latest drivers from your motherboard manufacturer and CPU manufacturer (e.g., AMD’s chipset drivers). Consider installing monitoring software like HWMonitor or HWiNFO to keep an eye on CPU temperatures, clock speeds, and utilization. For advanced users, exploring mild overclocking (if your CPU and motherboard support it) can yield additional performance gains, though this requires careful research and understanding of voltage and thermal limits.
Beyond Installation: Maximizing Your Investment
Installing a CPU is more than just a technical task; it’s an investment in your digital future. By following best practices during installation and taking subsequent steps, you ensure both optimal performance and longevity for your system.
The Long-Term Value of a Smart Upgrade
A well-executed CPU upgrade offers significant long-term value. From a ‘Money’ perspective, it can extend the useful life of your existing PC, allowing you to defer the much larger expense of a completely new system. A powerful CPU not only handles current software efficiently but also provides headroom for future applications and operating system updates. Should you decide to sell your PC later, a modern, well-maintained CPU can significantly boost its resale value, making the initial investment more financially sound. Furthermore, understanding the ‘Tech’ behind CPU selection and installation empowers you to make informed decisions for future upgrades, saving you from potentially costly compatibility mistakes or underperforming components.

Staying Current: Software and Security Updates
Your journey with a new CPU doesn’t end after installation. To maintain peak performance, stability, and security, regularly update your system’s software. This includes:
- Operating System Updates: Microsoft Windows, macOS, or Linux distributions frequently release updates that include performance optimizations, bug fixes, and crucial security patches.
- Motherboard BIOS/UEFI Updates: Motherboard manufacturers periodically release BIOS updates that can improve CPU compatibility, system stability, and even offer new features. While typically not done frequently, it’s wise to check for these if you experience any issues or if a new major CPU generation is released.
- Chipset Drivers: Install the latest chipset drivers from your CPU manufacturer (Intel or AMD) to ensure optimal communication between your CPU and motherboard, maximizing performance.
- Security Software: Keep your antivirus and anti-malware software up-to-date to protect your system and data from evolving cyber threats.
By staying proactive with these updates, you safeguard your ‘Brand’ – your personal computing experience and the reliability of your system – ensuring it continues to run smoothly and securely for years to come.
In conclusion, installing a CPU is a foundational skill for any PC builder or enthusiast. While requiring precision and careful attention to detail, it’s a rewarding process that unlocks the full potential of your computer. By understanding the importance of your CPU, preparing diligently, executing each step meticulously, and performing thorough post-installation checks, you can confidently upgrade your machine and enjoy a powerful, high-performance computing experience.
aViewFromTheCave is a participant in the Amazon Services LLC Associates Program, an affiliate advertising program designed to provide a means for sites to earn advertising fees by advertising and linking to Amazon.com. Amazon, the Amazon logo, AmazonSupply, and the AmazonSupply logo are trademarks of Amazon.com, Inc. or its affiliates. As an Amazon Associate we earn affiliate commissions from qualifying purchases.