
In the intricate world of personal computing, few components are as critical yet often overlooked by the casual user as the CPU heatsink. This vital piece of hardware stands as the silent guardian of your processor, diligently dissipating the intense heat generated during operation. Without an efficiently installed heatsink, your powerful CPU risks thermal throttling, performance degradation, and even permanent damage, ultimately cutting short the lifespan of your valuable hardware.
Whether you’re embarking on your first PC build, upgrading an existing system, or simply replacing a faulty cooler, understanding the nuances of heatsink installation is a fundamental skill for any tech enthusiast. This comprehensive guide will walk you through every step of the process, from preparation to post-installation checks, ensuring your CPU runs cool, stable, and at its peak performance. We’ll delve into the different types of coolers, the crucial role of thermal paste, and provide detailed instructions to empower you with the confidence to tackle this essential task.
The Critical Role of CPU Cooling: Why It Matters for Performance and Longevity
Your Central Processing Unit (CPU) is the brain of your computer, responsible for executing instructions, performing calculations, and managing vast amounts of data. This intensive workload generates a significant amount of heat. Modern CPUs are equipped with sophisticated thermal sensors and protective mechanisms that reduce clock speeds (thermal throttling) or even shut down the system entirely if temperatures climb too high, preventing irreparable damage.
However, relying on these emergency measures means your CPU isn’t performing at its best. Consistent high temperatures can lead to:
- Performance Bottlenecks: Your CPU will automatically reduce its speed to cool down, leading to stuttering, slow application loading, and reduced frame rates in games.
- System Instability: Overheating can cause crashes, freezes, and the dreaded “Blue Screen of Death,” disrupting your workflow and potentially corrupting data.
- Reduced Hardware Lifespan: While CPUs are robust, prolonged exposure to high temperatures accelerates the degradation of their internal components, significantly shortening their overall operational life. This is where the “Money” aspect subtly comes into play; a properly cooled CPU lasts longer, protecting your investment.
A well-installed and efficient heatsink, combined with quality thermal paste, acts as the primary defense against these issues. It creates a highly conductive pathway for heat to transfer away from the CPU’s integrated heat spreader (IHS) to fins, where fans then dissipate that heat into the surrounding air. Understanding this process underscores the importance of a meticulous installation.
Pre-Installation Essentials: Gathering Your Tools and Preparing Your Workspace
Before you even think about touching your delicate PC components, preparation is key. A tidy workspace and the right tools will not only make the installation process smoother but also minimize the risk of damaging anything.
Gathering Your Toolkit
Most heatsink installations are straightforward and don’t require specialized tools beyond what you likely already have around the house. Here’s a checklist:
- Phillips Head Screwdriver: This is your primary tool. Ensure you have one with a magnetic tip if possible, which can prevent dropped screws in tight spaces.
- Isopropyl Alcohol (90% or higher): Essential for cleaning old thermal paste from your CPU and heatsink. High purity ensures no residue is left behind.
- Lint-Free Cloths or Coffee Filters: Used with isopropyl alcohol to gently wipe surfaces clean. Avoid paper towels, which can leave fibers.
- Thermal Paste: Many new heatsinks come with pre-applied thermal paste or a small tube. If yours doesn’t, or if you’re reinstalling an old cooler, you’ll need a fresh tube. Reputable brands like Arctic MX-4, Noctua NT-H1, or Cooler Master MasterGel provide excellent thermal conductivity.
- Anti-Static Wrist Strap or Mat (Recommended): While not strictly mandatory for experienced builders, electrostatic discharge (ESD) can fry sensitive components. An anti-static strap connected to a grounded metal object (like your PC case) is cheap insurance.
- Zip Ties or Velcro Cable Ties: Useful for managing fan cables and ensuring they don’t interfere with fan blades or airflow after installation.
- Your Heatsink Kit: Ensure all parts—backplate, mounting brackets, standoffs, screws, fans—are present according to the manufacturer’s instructions.
Workspace Setup and Safety Protocols
Your environment plays a crucial role in a successful installation.
- Clean and Well-Lit Area: Work on a flat, stable surface that is free of clutter. Good lighting will help you see small screws and connectors.
- Static Prevention: Before touching any internal components, ground yourself. This means touching a large, unpainted metal object like your PC case (with the power supply plugged in but switched off). If you have an anti-static wrist strap, wear it and attach it to the case. Avoid working on carpet, which can generate static electricity.
- Power Down and Unplug: Always ensure your computer is completely powered off and unplugged from the wall outlet before opening the case and handling internal components. This prevents electrical shorts and protects you from accidental shock.
Understanding Your Heatsink Type: Air vs. Liquid Cooling
Heatsinks come in various designs, each with its own installation quirks. Familiarizing yourself with the common types will prepare you for the specific steps ahead.
1. Stock (Boxed) Coolers
These are the coolers typically included with retail-boxed CPUs (like Intel’s “stock” cooler or AMD’s Wraith series).
- Pros: Cost-effective, compact, pre-applied thermal paste, generally sufficient for non-overclocked CPUs.
- Cons: Limited cooling capacity, can be noisy under load, less aesthetically pleasing.
- Installation: Often use simple push-pins (Intel) or clip-on mechanisms (AMD), making them relatively easy to install.
2. Aftermarket Air Coolers
These range from moderately sized tower coolers to massive dual-tower behemoths. They feature large fin stacks and heat pipes, often paired with one or two high-performance fans. Brands like Noctua, Cooler Master, be quiet!, and Arctic offer popular options.
- Pros: Excellent cooling performance, quiet operation (especially larger models), no risk of liquid leaks.
- Cons: Can be very large and heavy, potentially interfering with RAM clearance or case side panels. Requires manual thermal paste application.
- Installation: Typically involve a backplate that goes behind the motherboard, mounting brackets, and screw-down pressure for secure contact.
3. All-in-One (AIO) Liquid Coolers
AIOs are sealed liquid cooling systems consisting of a CPU block/pump combo, tubing, a radiator, and fans. They circulate coolant to transfer heat from the CPU to the radiator, where fans dissipate it. Brands like Corsair, NZXT, and Arctic are prominent in this space.
- Pros: Superior cooling performance (especially for heavily overclocked CPUs), often quieter than high-end air coolers under full load, aesthetically pleasing with RGB lighting. Allows for better RAM clearance.
- Cons: More complex installation, higher cost, small risk of leaks (though rare with modern AIOs).
- Installation: The pump/block mounts similarly to an air cooler, while the radiator and fans need to be mounted to an available fan location within the PC case (top, front, or rear).
Step-by-Step Installation Guide: From Bare CPU to Optimal Cooling
This section details the practical steps for installing a CPU heatsink, covering the nuances of thermal paste application and mounting different cooler types.
Step 1: Clearing the Way – Removing an Old Heatsink (If Applicable)
If you’re upgrading or replacing an existing cooler, the first step is to carefully remove the old one.
- Disconnect Power and Open Case: Ensure the PC is powered off and unplugged. Open the side panel of your PC case.
- Unplug Fan/Pump Cables: Locate the CPU_FAN header on your motherboard and gently disconnect the fan cable from the old heatsink. If it’s an AIO, also disconnect the pump and any RGB cables.
- Unmount the Heatsink:
- Stock Intel Coolers: Gently twist each of the four push-pins 90 degrees counter-clockwise to unlock them, then pull them upwards.
- Stock AMD Coolers: Unclip the metal retention arms from the plastic brackets on either side of the CPU socket.
- Aftermarket/AIO Coolers: Unscrew the four mounting screws, usually in a diagonal pattern, until the cooler is loose.
- Carefully Remove the Heatsink: With the mounting mechanism disengaged, gently twist the heatsink a few degrees left and right to break the seal of the old thermal paste, then lift it straight up. Avoid pulling directly without twisting, as the CPU might stick to the heatsink.
- Clean the CPU and Old Heatsink: Using a lint-free cloth and isopropyl alcohol, thoroughly clean all traces of old thermal paste from both the CPU’s integrated heat spreader (IHS) and the base of the old heatsink (if you plan to reuse it). The goal is a mirror-clean, residue-free surface.
Step 2: The Crucial Layer – Applying Thermal Paste

Thermal paste is the bridge that ensures efficient heat transfer. Even the smoothest metal surfaces have microscopic imperfections that trap air, which is a poor thermal conductor. Thermal paste fills these gaps, creating a direct heat pathway.
- Ensure Surfaces are Clean: Double-check that both the CPU’s IHS and the base of your new heatsink are impeccably clean and dry.
- Apply the Paste: A common misconception is that more paste is better. Too much can hinder heat transfer or even spill onto the motherboard. Too little can leave air gaps.
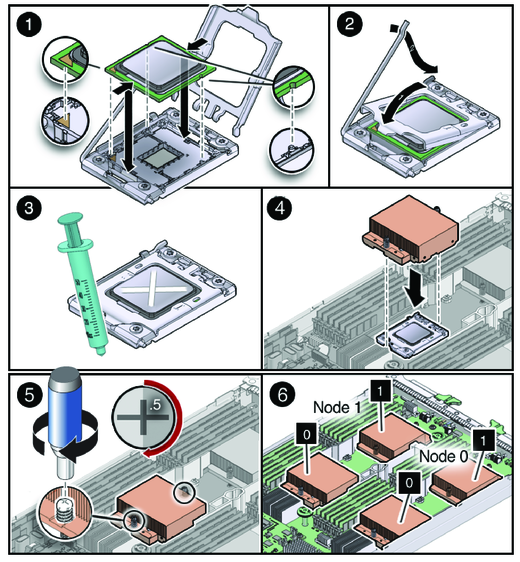
- “Pea Dot” Method (Recommended for most CPUs): Apply a small, pea-sized (about 4-5mm diameter) dot of thermal paste directly in the center of the CPU’s IHS.
- Other Methods: A single thin line (good for rectangular CPUs), an “X” shape, or pre-spreading with a spatula are also viable, but the pea dot is generally foolproof as the pressure from the heatsink will spread it evenly.
- Do Not Pre-Spread (Unless Specified): For most pastes and coolers, the pressure from the heatsink will spread the paste adequately. Pre-spreading can introduce air bubbles. If your heatsink comes with pre-applied paste, simply ensure it’s intact and skip this step.
Step 3: Mounting the Heatsink – Secure and Even Pressure
This is the core of the installation. The exact steps will vary based on your cooler type and CPU socket (Intel LGA or AMD AM4/AM5). Always refer to your cooler’s specific manual, as mounting hardware differs.
For Stock/Push-Pin Intel Coolers:
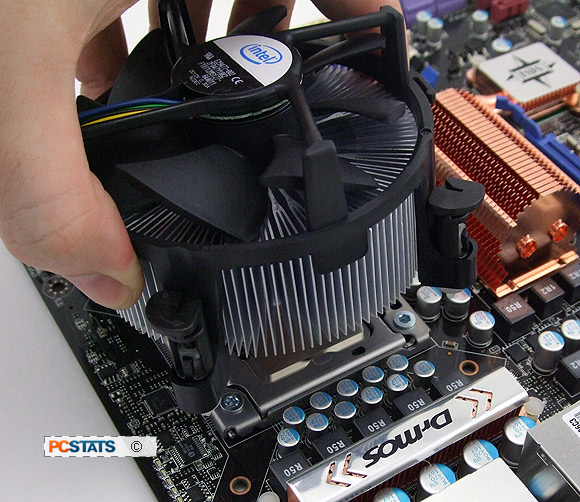
- Align Pins: Position the heatsink over the CPU, aligning the four push-pins with the holes around the CPU socket on the motherboard.
- Push Down: Firmly push down on two diagonal pins until you hear a click, then push the remaining two diagonal pins until they also click. Ensure all four pins are securely locked.
For AMD Stock/Clip-on Coolers:
- Pre-Mount Brackets: If your motherboard has the standard AMD plastic retention brackets around the CPU socket, ensure they are in place.
- Position Heatsink: Place the heatsink over the CPU, aligning the metal clips on the heatsink with the tabs on the plastic brackets.
- Secure Clips: Hook one side of the clip onto its bracket tab, then push down the lever on the other side to secure the second clip. This requires firm, even pressure.
For Aftermarket Air Coolers (Most Common Scenario):
- Install Backplate (If Required): Many aftermarket coolers use a backplate that goes behind the motherboard to provide structural support for the mounting pressure. Carefully position the backplate, aligning its holes with the screw holes around the CPU socket.
- Attach Standoffs/Mounting Arms: From the front side of the motherboard, screw in the provided standoffs or attach the mounting arms/brackets to the backplate.
- Position Heatsink: Place the heatsink squarely over the CPU, aligning the mounting screws on the heatsink (or its mounting frame) with the standoffs/brackets.
- Screw Down Evenly: This is critical. Using your screwdriver, tighten the screws in a diagonal or “X” pattern, turning each screw only a few turns at a time before moving to the next. Continue this pattern until all screws are finger-tight, then give each screw a final quarter-turn to ensure even pressure. This prevents uneven contact and ensures optimal heat transfer. Do not overtighten.
For AIO Liquid Coolers:
- CPU Block Mounting: The CPU block mounts very similarly to an aftermarket air cooler, often using a backplate, standoffs, and screw-down pressure in an “X” pattern. Refer to the AIO manual for exact details.
- Radiator and Fan Installation:
- Mount Fans to Radiator: Attach the fans to the radiator using the longer screws provided, ensuring the fans are oriented for desired airflow (e.g., pulling air through the radiator into the case, or pushing hot air out).
- Mount Radiator to Case: Mount the radiator (with fans attached) to an available fan mount in your PC case (typically the top, front, or rear). Use the shorter screws for this. Consider optimal airflow paths for your case.
- Orient Tubing: Position the radiator and CPU block so that the tubing has a natural, gentle curve without kinks or excessive tension.
Step 4: Connecting the Cables
Once the cooler is physically mounted, you need to provide power to its fans and pump.
- CPU Fan Header: Locate the “CPU_FAN” header on your motherboard (usually a 4-pin header near the CPU socket). Connect the fan cable from your heatsink (or the primary fan of your AIO, if applicable) to this header. This allows the motherboard to monitor and control CPU fan speed.
- AIO Pump Header (If Applicable): For AIO coolers, the pump typically has its own power cable. Connect this to a dedicated “AIOPUMP” header if your motherboard has one, or a “CPUOPT” (optional) header, or even a chassis fan header. It’s crucial that the pump runs at full speed constantly, so ensure the BIOS settings reflect this.
- RGB/ARGB Cables (If Applicable): If your cooler features RGB lighting, connect its cables to the appropriate RGB or Addressable RGB (ARGB) headers on your motherboard or to a dedicated RGB controller.
Post-Installation Checks and Troubleshooting: Ensuring Optimal Performance
You’ve installed the heatsink, but the job isn’t done until you’ve verified its proper function.
Visual Inspection
Before closing your case, take a moment for a final visual check:
- Heatsink Seated: Is the heatsink sitting flush and securely on the CPU?
- Cables Clear: Are all fan and pump cables connected correctly? Are they tucked away, clear of any fan blades?
- No Loose Parts: Are there any stray screws or forgotten tools inside the case?
First Boot and BIOS Check
- Close Case and Power Up: Reconnect all peripherals and power, then power on your PC.
- Enter BIOS/UEFI: Immediately after powering on, repeatedly press the key to enter your motherboard’s BIOS/UEFI (often DEL, F2, F10, or F12).
- Monitor CPU Temperature: Navigate to the hardware monitor or system information section. Check the reported CPU temperature. It should be relatively low (e.g., 25-45°C) at idle. If it’s alarmingly high (e.g., 70°C+ at idle), something is wrong, and you should power down immediately.
- Verify Fan/Pump Speeds: Ensure your CPU fan(s) and AIO pump (if applicable) are detected and spinning. Adjust fan curves if desired, but for the pump, ensure it’s set to run at 100%.
- Save and Exit: Exit the BIOS, saving any changes.
Stress Testing for Stability
Once Windows (or your OS) loads, it’s wise to perform a stress test to ensure your cooler can handle a full CPU load.
- Monitoring Software: Install CPU temperature monitoring software (e.g., HWMonitor, HWiNFO64, Core Temp).
- Stress Test Utility: Use a CPU stress testing utility like Prime95, Cinebench, or AIDA64. Run a stress test for 15-30 minutes.
- Monitor Temps: Observe your CPU temperatures during the stress test. Under full load, temperatures are expected to rise but should generally remain below 80-85°C, depending on your CPU and cooler. Sustained temperatures above 90°C indicate a problem.
Common Issues and Troubleshooting
- High Temperatures:
- Loose Heatsink: The most common culprit. Power down, remove the heatsink, clean, and reapply thermal paste, then re-mount, ensuring even pressure.
- Insufficient Thermal Paste: Not enough paste or poor application. Redo step 2.
- Incorrect Fan Orientation: Fans blowing in the wrong direction, fighting case airflow.
- Cables Not Connected: CPU fan or pump not powered.
- Poor Case Airflow: Ensure your case has adequate intake and exhaust fans.
- No Fan Spin:
- Cable Disconnected: Check the CPU_FAN header.
- Wrong Header: Ensure it’s connected to the correct, powered header.
- Faulty Fan: Rare, but possible.
- PC Won’t Boot:
- Component Dislodged: Carefully recheck all cable connections (RAM, GPU, power cables).
- Short Circuit: Ensure no metal components are touching the motherboard in unintended places.
Conclusion: Investing in Your PC’s Health and Performance
Installing a CPU heatsink might seem daunting at first, but by following these detailed steps, you’ve not only successfully completed a critical PC building task but also significantly contributed to the longevity and performance of your computer. A properly installed heatsink ensures your CPU operates within safe temperature limits, preventing thermal throttling, system instability, and premature hardware failure. This attention to detail protects your investment, maximizing the “Money” you’ve put into your components by allowing them to perform at their best for years to come.
Embracing DIY tech tasks like this empowers you with a deeper understanding of your machine and the confidence to tackle future upgrades or repairs. Keep your system clean, monitor your temperatures periodically, and you’ll enjoy a reliable and high-performing PC for all your computing needs. Stay tuned to our “Tech” section for more in-depth tutorials and insights into optimizing your digital life!
aViewFromTheCave is a participant in the Amazon Services LLC Associates Program, an affiliate advertising program designed to provide a means for sites to earn advertising fees by advertising and linking to Amazon.com. Amazon, the Amazon logo, AmazonSupply, and the AmazonSupply logo are trademarks of Amazon.com, Inc. or its affiliates. As an Amazon Associate we earn affiliate commissions from qualifying purchases.