In our increasingly connected world, reliable internet, crisp television signals, and seamless communication are not just luxuries, but necessities. At the heart of many of these connections lies the humble coaxial cable. While Wi-Fi has become ubiquitous, coax cables remain the backbone for high-speed broadband internet, cable TV, and satellite installations, especially for the “last mile” into your home or office. Understanding how to properly install a coax cable connector is a fundamental skill for any tech-savvy individual, empowering you to troubleshoot signal issues, customize cable lengths, or set up new entertainment systems without relying on external technicians.
This comprehensive guide will walk you through every step of the process, from selecting the right tools and materials to ensuring a perfect, professional-grade connection. By the end of this tutorial, you’ll be equipped with the knowledge and confidence to tackle any coaxial cable installation with precision and ease, safeguarding your digital security and enhancing your overall tech productivity.
The Indispensable Role of Coaxial Cables and Their Connectors
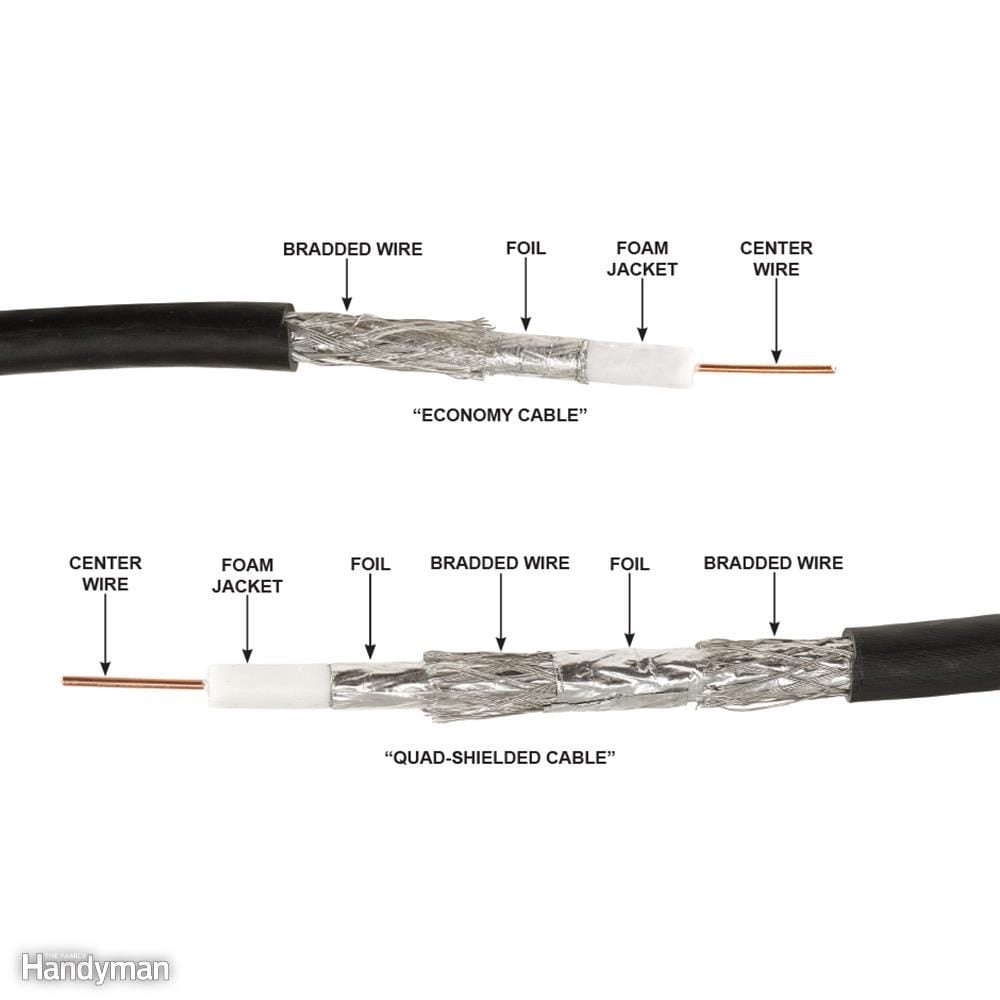
Before diving into the practical steps, it’s essential to appreciate why coaxial cables are so prevalent and why a good connector installation is paramount. Unlike standard electrical wires, coaxial cables are specifically designed to transmit high-frequency electrical signals with minimal signal loss or interference. Their unique construction – a central conductor surrounded by an insulating dielectric layer, a metallic shield, and an outer insulating jacket – makes them highly effective at rejecting electromagnetic interference (EMI) and radio-frequency interference (RFI), ensuring a clean and stable signal transmission.
Common Applications of Coaxial Cables
Coaxial cables power a surprisingly wide array of devices and services in our daily lives:
- Cable Television (CATV): This is perhaps their most well-known application, delivering hundreds of channels into millions of homes globally.
- Broadband Internet (Cable Modem): Internet service providers (ISPs) heavily rely on coax infrastructure for high-speed data delivery, often reaching gigabit speeds.
- Satellite TV and Radio: While the primary signal comes from a dish, coaxial cables connect the dish to the receiver indoors.
- Video Surveillance (CCTV): Many analog and some older digital security camera systems use coax for video transmission.
- Radio Communication: Ham radio operators and professional communication systems often utilize 50-ohm coaxial cables.
- Networking (Legacy Ethernet): Historically, coax (ThickNet and ThinNet) was used for early Ethernet networks, though largely replaced by twisted-pair (Ethernet) and fiber optics.
For most residential applications involving internet and TV, you’ll encounter 75-ohm coaxial cables, primarily RG6 and sometimes RG59. RG6 is thicker and offers better signal quality over longer distances and at higher frequencies, making it the preferred choice for modern broadband and HD TV. RG59, being thinner, is suitable for shorter runs or lower-frequency applications.
Navigating the World of Coaxial Connectors
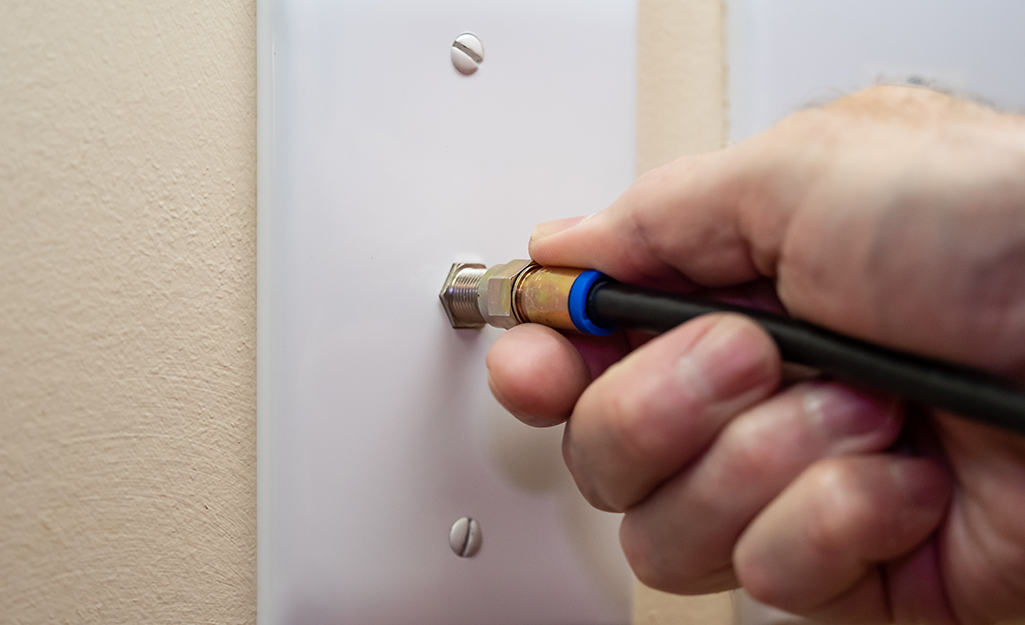
While various types of coaxial connectors exist (BNC, TNC, SMA, N-type), the most common for home entertainment and internet use is the F-type connector. This is what you’ll find on the back of your TV, cable modem, satellite receiver, and wall plates. F-type connectors come in several varieties, but for DIY installations, you’ll typically be working with compression connectors or, less commonly today, crimp connectors.
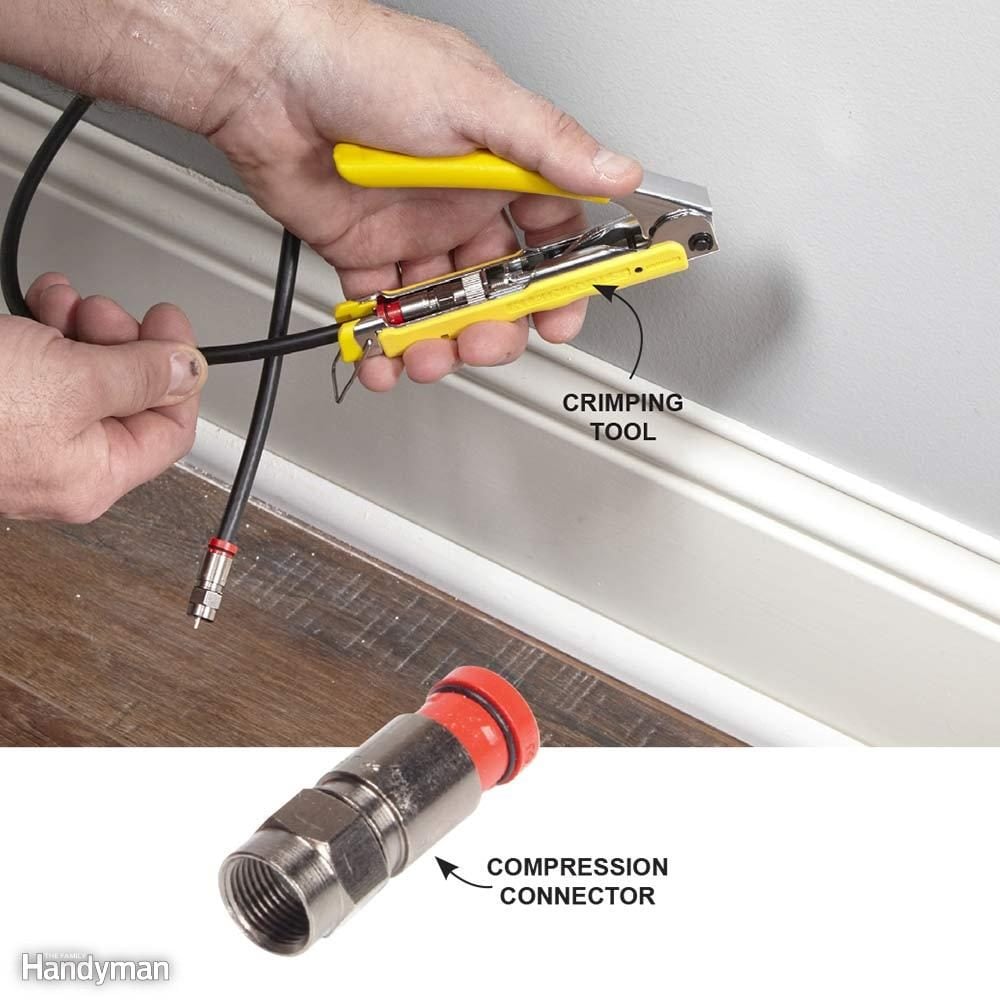
- Compression Connectors: These are the gold standard for modern installations. They provide a watertight, secure, and highly reliable connection by “compressing” the connector onto the cable jacket. This method minimizes signal loss, prevents moisture ingress (critical for outdoor runs), and offers superior long-term stability compared to older crimp or twist-on types.
- Crimp Connectors: These connectors are secured by “crimping” a metal sleeve around the cable jacket and braid using a specific crimping tool. While still used, they are generally less reliable and more susceptible to environmental factors than compression connectors.
- Twist-on Connectors: These are the least recommended type for any permanent installation. They simply twist onto the cable, offering a weak mechanical and electrical connection prone to signal degradation and complete failure. Avoid them whenever possible.
For this tutorial, we will focus on installing the more robust and reliable compression F-type connectors, as they represent the best practice for high-quality, long-lasting connections.
Gathering Your Essential Toolkit and Materials
A successful coax cable connector installation hinges on having the right tools and materials. Skimping on quality here can lead to frustrating signal issues, intermittent connectivity, or even damaged equipment. Investing in proper tools will save you time and headaches in the long run.
The Indispensable Toolkit for Coax Installation
- Coaxial Cable Stripper: This is non-negotiable. A specialized coax stripper ensures precise, clean cuts through the outer jacket, braid, and dielectric without damaging the vital center conductor. Universal strippers often have adjustable blades for different cable types (RG6, RG59). Precision is key here; incorrect stripping is the leading cause of connection failure.
- Compression Tool: If you’re using compression connectors (which you should be!), a dedicated compression tool is essential. It applies even pressure to compress the connector onto the cable, creating a secure, weatherproof seal. Ensure the tool is compatible with the type of connector you’re using (e.g., F-type compression connectors).
- Cable Cutter/Utility Knife: A clean, straight cut is the first step to any good connection. A sharp cable cutter or a utility knife can be used to trim the cable to the desired length. Avoid using household scissors, as they can pinch and deform the cable.
- Coaxial Cable: As discussed, choose the appropriate cable type – typically RG6 for modern applications. Ensure it’s of good quality, ideally with quad shielding for optimal performance, especially in areas with high interference.
- F-Type Compression Connectors: Purchase high-quality connectors compatible with your chosen cable type (RG6 or RG59). Many connectors are universal for both, but always double-check.
- Optional but Recommended:
- Continuity Tester/Coax Tester: This device can quickly verify if your newly installed connector has a short or an open circuit, saving you significant troubleshooting time later.
- Electrical Tape or Weatherproofing Sealant: For outdoor installations, additional weatherproofing around the connection point (e.g., between the connector and a splitter or wall plate) is crucial to prevent moisture ingress, which can rapidly degrade signal quality.
- Pencil/Marker: For marking cable lengths.
- Small Pliers (Needle-nose): Can be useful for gently adjusting the center conductor if needed, though rarely necessary with proper stripping.
Selecting the Right Coax Cable and Connectors
When purchasing your materials, consider the following:
- Cable Type (RG6 vs. RG59): For most new installations, especially for internet and HD TV, RG6 is superior due to its thicker gauge, lower signal attenuation, and better shielding.
- Shielding: Look for cables with good shielding – dual shielding is standard, but quad shielding offers enhanced protection against interference.
- Jacket Material: For outdoor runs, ensure the cable has a UV-resistant, weather-rated jacket (e.g., burial-grade or direct-burial cable).
- Connector Quality: Don’t buy the cheapest connectors. Higher-quality connectors offer better metal composition, more precise manufacturing, and superior sealing mechanisms, leading to a more reliable connection.
- Connector Compatibility: Always confirm that your connectors are specifically designed for the RG type of your cable (e.g., “RG6 F-type compression connector”).
Step-by-Step Guide to Installing a Coax Cable Connector
With your tools and materials ready, let’s proceed to the practical steps of installing a compression F-type connector. Precision and attention to detail are vital at each stage.
1. Preparing the Coaxial Cable
a. Cut the Cable to Length:
Measure the required length of your coaxial cable, adding a little extra for slack, especially if you’re routing it around corners or through walls. Use your cable cutters or utility knife to make a clean, straight cut across the cable. A clean cut prevents deformation of the cable’s internal structure, which can lead to signal issues.
b. Prepare for Stripping:
The most critical step in this entire process is stripping the cable correctly. The goal is to expose the center conductor, the dielectric, and the braid/foil shield at precise lengths to match the internal structure of your compression connector. Most modern coax strippers are designed to perform a two-stage strip in one action, exposing the inner conductor by about 1/4 to 5/16 inch (6-8 mm) and the dielectric/braid by about 1/4 inch (6 mm) further. Always check the specific measurements recommended by your connector or stripper manufacturer, as slight variations can occur.
Insert the cut end of the coaxial cable into the designated opening of your coax stripper. Ensure the cable is fully seated and rests against the internal stop within the tool.
2. Stripping the Coaxial Cable with Precision
a. Rotate the Stripper:
With firm but gentle pressure, rotate the stripper several full rotations (usually 3-5 times) around the cable. You’ll hear and feel the blades cutting through the outer jacket and then the dielectric.
- Blade 1: Cuts through the outer jacket and the metallic braid/foil shield, down to the dielectric.
- Blade 2: Cuts through the dielectric, exposing the center copper conductor.
b. Remove the Stripped Sections:
Carefully remove the cable from the stripper. The cut pieces of the outer jacket and dielectric should slide off easily. If they don’t, rotate the stripper a few more times.
- Inspect the Strip: You should now see approximately 1/4 to 5/16 inch (6-8 mm) of the bare copper center conductor, followed by about 1/4 inch (6 mm) of the white dielectric material with the braid and foil shield neatly exposed beneath it. The outer jacket should be cleanly cut and intact up to this point.
c. Fan Out and Fold Back the Braid:
Gently peel back the exposed braid (the loose metallic strands) over the outer jacket of the cable. The foil shield, if present, should also be peeled back. The goal is to ensure that no stray strands of the braid or foil are touching the center conductor, as this would cause a short circuit and signal loss. The center conductor should be perfectly straight and undamaged. If it’s bent, carefully straighten it; if it’s nicked or damaged, recut and re-strip the cable.
3. Attaching the Compression Connector
a. Insert the Center Conductor:
Take your F-type compression connector. Gently push the stripped end of the coaxial cable into the back of the connector. The center conductor should slide smoothly into the small hole in the front of the connector. Continue pushing until the dielectric material is flush with the internal collar of the connector.
- Crucial Check: The center conductor should protrude cleanly from the front of the connector by approximately 1/8 to 1/16 inch (3-1.5 mm). If it’s too short, it won’t make proper contact; if it’s too long, it might bend or bottom out in the female port, potentially damaging it. If it’s not right, remove the connector and trim/re-strip as necessary. Ensure no braid or foil strands are trapped under the center pin inside the connector body.
b. Compress the Connector:
Once the cable is properly seated in the connector, open your compression tool. Place the connector, with the cable attached, into the appropriate slot on the tool. Different tools may have slightly different loading methods, so consult your tool’s instructions if unsure.
- Engage and Squeeze: Squeeze the handles of the compression tool firmly and completely until the tool cycles and releases, or until you feel a distinct click. This action slides the outer sleeve of the connector down the cable jacket, securing it tightly and creating a robust, weatherproof seal.
- Inspect the Compression: Remove the cable and connector from the tool. Visually inspect the connection. The outer sleeve of the connector should be fully compressed onto the cable jacket, leaving no gaps. The connector should feel securely attached, and you should not be able to pull it off the cable by hand.
4. Securing and Testing the Connection
a. Final Visual Inspection:
Perform one last thorough visual check:
- Is the center conductor straight, clean, and protruding by the correct amount?
- Are there any stray strands of braid or foil touching the center conductor or protruding where they shouldn’t be?
- Is the connector fully compressed and securely attached to the cable?
b. Test the Cable (Recommended):
If you have a continuity tester or a dedicated coax cable tester, now is the time to use it. Attach the tester to both ends of your newly terminated cable. The tester will confirm that there are no shorts (where the center conductor touches the shield) and no open circuits (where the center conductor is broken or not making contact). This step is invaluable for preventing future troubleshooting headaches.
c. Weatherproof Outdoor Connections:
For any connections exposed to the elements (e.g., at a satellite dish, antenna, or exterior wall box), apply electrical tape or a specialized weatherproofing sealant/boot over the connection point. Moisture is the enemy of coax cables, causing corrosion and significant signal degradation over time.
Tips for a Professional-Grade Coax Installation
Achieving a high-quality, reliable coaxial connection goes beyond just following the steps. Here are some additional tips to ensure your installation performs optimally and lasts for years.
Common Pitfalls to Avoid
- Damaged Center Conductor: Nicks, bends, or breaks in the center conductor will severely degrade or completely block the signal. Always handle it with care.
- Stray Braids/Foil: Any metallic strands touching the center conductor will create a short circuit. Be meticulous in folding back the braid and ensuring cleanliness.
- Improper Strip Lengths: If the center conductor is too short, it won’t make good contact. If it’s too long, it can be damaged or damage the equipment port. If the jacket is not adequately stripped, the connector won’t properly compress.
- Loose Connections: A connector that isn’t fully compressed will allow signal leakage, ingress of interference, and moisture. Always ensure a firm, complete compression.
- Kinks and Sharp Bends: Coaxial cables should never be bent at sharp angles. This can deform the internal structure, changing the impedance and causing signal reflections and loss. Maintain a generous bend radius, typically no less than 10 times the cable’s diameter.
- Poor Quality Materials: Cheap cables and connectors are a false economy. They are more prone to failure, signal loss, and interference. Invest in reputable brands.
Maintenance and Longevity
- Regular Inspections: Periodically check outdoor connections for signs of wear, corrosion, or moisture intrusion.
- Cable Management: Secure cables neatly with clips or ties to prevent accidental pulling, kinking, or damage. Avoid running cables where they can be tripped over or crushed.
- Grounding: Ensure your coaxial cable system, especially outdoor components like satellite dishes or antennas, is properly grounded according to local electrical codes. This protects against lightning strikes and static buildup.
- Avoid Over-Tightening: When connecting to devices, finger-tighten the F-connector, then use a wrench to snug it an additional quarter turn. Over-tightening can strip threads or damage equipment ports.
Conclusion
Mastering the art of installing a coax cable connector is a practical skill that provides tangible benefits in the digital age. By following the detailed steps and tips outlined in this guide, you can confidently create reliable, high-performance connections for your internet, television, and other tech devices. This DIY approach not only saves you money on technician calls but also empowers you with a deeper understanding of your home’s technological infrastructure. A well-installed coaxial connector translates directly into a more stable internet connection, clearer TV pictures, and overall enhanced digital productivity and security. So, grab your tools, embrace the process, and enjoy the satisfaction of a job well done, knowing you’ve built a robust foundation for your connected lifestyle.
aViewFromTheCave is a participant in the Amazon Services LLC Associates Program, an affiliate advertising program designed to provide a means for sites to earn advertising fees by advertising and linking to Amazon.com. Amazon, the Amazon logo, AmazonSupply, and the AmazonSupply logo are trademarks of Amazon.com, Inc. or its affiliates. As an Amazon Associate we earn affiliate commissions from qualifying purchases.