
In the intricate world of PC building and high-performance computing, safeguarding your components is paramount. Among the most critical parts of your system is the Central Processing Unit (CPU), the “brain” that orchestrates every operation. While Intel’s CPUs are renowned for their power and efficiency, the physical mounting mechanism on modern motherboards, particularly the LGA (Land Grid Array) sockets, can sometimes lead to slight bowing or uneven pressure on the CPU’s Integrated Heat Spreader (IHS). This subtle deformation, often imperceptible to the naked eye, can potentially compromise thermal transfer and, in rare cases, even the long-term integrity of the chip.
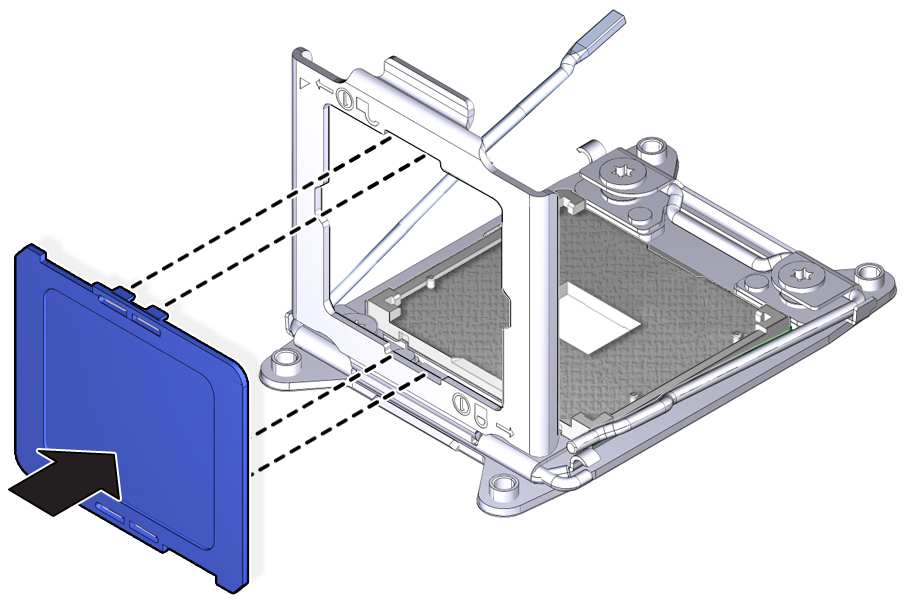
This is where the concept of an “Intel CPU Protector,” often referred to as a CPU Contact Frame or Anti-Bending Frame, comes into play. Far from being a mere aesthetic addition, this accessory aims to provide a more even and robust mounting pressure across the CPU’s surface, potentially leading to improved thermal performance and enhanced physical protection. For enthusiasts, overclockers, and anyone investing in a high-end Intel processor, understanding how to properly install such a protector is an invaluable skill. This guide will walk you through the entire process, from understanding its purpose to the meticulous steps of installation, ensuring your investment is well-protected and performs optimally within its technological ecosystem.
Understanding the Intel CPU Protector: More Than Just a Frame
Before delving into the “how-to,” it’s crucial to grasp “what” an Intel CPU protector is and “why” it has gained traction among PC builders. The term “CPU protector” in this context typically refers to an aftermarket retention frame designed to replace the motherboard’s stock Integrated Loading Mechanism (ILM). The standard ILM uses a levered mechanism that applies pressure at specific points to secure the CPU in its LGA socket. While generally effective, this design has been observed by some in the enthusiast community to cause a slight concave bend in the CPU’s IHS, especially with newer, hotter-running Intel processors.
The Challenge with Standard ILMs and the Solution
The slight bending of the IHS can create microscopic gaps between the CPU’s surface and the base of the CPU cooler. Even with thermal paste, these tiny air pockets can impede efficient heat transfer, leading to slightly higher CPU temperatures. For users pushing their systems to the limit—whether through gaming, content creation, or professional workloads—even a few degrees Celsius can impact performance, stability, and the lifespan of the chip.
A CPU contact frame addresses this by providing a solid, flat frame that secures the CPU within the socket. Unlike the stock ILM, which clamps down on the CPU’s edges with a lever, the contact frame often distributes pressure more evenly across the entire perimeter of the CPU. This design minimizes the risk of IHS bending, allowing for more consistent and optimized contact between the CPU and the cooler. The result is often a modest but measurable improvement in thermal performance, contributing to system stability and potentially extending the life of your valuable Intel processor. It’s a prime example of a niche tech gadget designed to optimize a core computing component, appealing directly to those who value every ounce of performance and reliability from their hardware investments.
Is It Necessary for Everyone?
While beneficial, it’s important to clarify that an Intel CPU protector is not strictly essential for every build. Millions of PCs operate perfectly fine with the stock ILM. However, for those seeking to maximize thermal efficiency, minimize risk, or simply fine-tune their high-performance systems, it represents a worthy consideration. It’s an investment in the long-term health and stability of a critical component, aligning with the principles of digital security through hardware integrity and optimal performance.
Essential Preparations: Setting the Stage for a Seamless Installation
Installing a CPU protector, while not overly complex, requires precision, patience, and a methodical approach. Rushing through the process or neglecting proper preparation can lead to costly mistakes. Before you even think about touching your motherboard, ensure you have everything you need and understand the critical safety protocols. This section details the necessary tools, safety precautions, and environmental considerations to ensure a smooth installation.
Gathering Your Arsenal: Tools and Components
Having the right tools at hand will make the installation process significantly easier and safer.
- Intel CPU Protector Kit: This will include the contact frame itself, usually a custom-fit backplate (though some designs reuse the original), and often a small Torx or Phillips screwdriver specific for the retention screws. Ensure it’s compatible with your specific Intel CPU socket (e.g., LGA1700 for 12th/13th/14th Gen Intel Core processors).
- Thermal Paste: You will need to reapply thermal paste to your CPU. Even if your cooler came with pre-applied paste, it’s best to use a fresh application after dismounting and remounting the cooler. High-quality thermal paste can make a noticeable difference in cooling performance.
- Isopropyl Alcohol (90% or higher) and Lint-Free Cloths: Essential for cleaning off old thermal paste from both your CPU and your cooler’s cold plate.
- Phillips Head Screwdriver: For removing and reinstalling your CPU cooler, and potentially other components of your PC case.
- Anti-Static Wrist Strap or Grounding Mat: Crucial for preventing electrostatic discharge (ESD), which can permanently damage sensitive electronic components.
- Work Area: A clean, well-lit, and spacious work surface is vital. Avoid carpets, which generate static electricity, and ensure no drinks or liquids are near your open PC.
- Zip Ties or Velcro Straps (Optional): For cable management once the installation is complete.
Safety First: Mitigating Risks
Working inside an open computer requires adherence to strict safety protocols. These aren’t mere suggestions; they are essential to protect both you and your hardware.
1. Power Down and Disconnect
Before opening your PC case, always power down your computer completely and unplug it from the wall outlet. Press the power button a few times after unplugging to discharge any residual power in the system’s capacitors.
2. Static Electricity Prevention
ESD is an invisible killer of electronics. An anti-static wrist strap, clipped to an unpainted metal part of your PC case, is the most effective way to ground yourself. Alternatively, periodically touch a grounded metal object before touching any components. Avoid wearing wool socks or clothing that can generate static.
3. Handle with Care
CPUs, motherboards, and other components are delicate. Always handle them by their edges. Avoid touching the gold contacts on the CPU or the pins in the LGA socket. Even a slight bend in a pin can render your motherboard or CPU unusable.
4. Document Your Steps
Taking photos or even a short video with your phone before and during disassembly can be incredibly helpful for reassembly, especially if you’re new to PC building. It serves as a visual reference for cable routing, screw placements, and component orientation.
By meticulously preparing and prioritizing safety, you’ll create an environment conducive to a successful and stress-free installation, protecting your initial investment and ensuring future functionality.
Step-by-Step Installation Guide: Securing Your Intel CPU Protector
With preparations complete, it’s time to embark on the installation process. This guide assumes your CPU is already installed in the motherboard, and we are replacing the existing ILM with the new contact frame. If you are building a new PC, some steps might be slightly different, but the core process of installing the frame remains the same.
1. Gaining Access: Opening Your PC and Removing the Cooler
- Open the PC Case: Carefully remove the side panel(s) of your PC case. Place them aside in a safe location where they won’t be scratched or damaged.
- Locate the CPU Cooler: Identify your CPU cooler mounted on top of your CPU.
- Disconnect Cooler Cables: Unplug any fan headers or RGB cables connected from your CPU cooler to the motherboard.
- Remove the CPU Cooler: This step varies greatly depending on your cooler type (air cooler, AIO liquid cooler, custom loop).
- Air Coolers: Typically involve unscrewing mounting screws or releasing clips. For large coolers, you might need to loosen screws in a specific pattern (e.g., diagonally) to prevent uneven pressure.
- AIO Liquid Coolers: Involve unscrewing the four mounting screws around the CPU block. You may need to carefully disconnect the radiator from the case if the tubing is too short to move the block aside.
- Carefully Lift: Once unscrewed or unclipped, gently twist the cooler slightly to break the seal of the old thermal paste, then lift it straight up. Avoid yanking it to prevent damage to the CPU or socket.
- Clean Old Thermal Paste: Using isopropyl alcohol and lint-free cloths, meticulously clean off all old thermal paste from both the top of your CPU’s IHS and the cold plate of your CPU cooler. Ensure both surfaces are spotless.

2. Disassembling the Stock ILM: The Delicate Removal
This is the most critical and delicate part of the process. Proceed with extreme caution.
- Open the ILM Lever: Gently lift the metal loading lever of the stock ILM. This will release the clamping pressure on the CPU. Do NOT remove the CPU at this point.
- Identify ILM Screws: The stock ILM is usually held in place by four small Torx or Phillips head screws around the CPU socket. These screws go through the ILM frame and into the motherboard’s backplate.
- Carefully Unscrew: Using the appropriate screwdriver (often a Torx T20 or a small Phillips), carefully unscrew these four screws. Keep the screws in a safe place, as you may need them for the new contact frame or if you ever decide to revert to the stock ILM.
- Remove the Stock ILM: Once all four screws are loose, you can gently lift the entire stock ILM assembly (the metal frame and the lever) off the CPU socket. Set it aside. Now, your CPU will be exposed, sitting loosely in the LGA socket, held only by gravity and friction. Ensure you do not touch the CPU’s contacts or the motherboard’s socket pins.
3. Installing the New Intel CPU Protector: The Upgrade
Now, it’s time to install your new contact frame.
- Position the CPU Protector: Carefully align the new CPU protector frame over the CPU socket. It should perfectly encircle the CPU, with the screw holes aligning with the holes on the motherboard. Most contact frames have a specific orientation, so check for any markings or cutouts that match the CPU or socket.
- Align the CPU (if necessary): If you had to temporarily remove the CPU, reinsert it into the socket, aligning the gold triangle on the CPU with the corresponding marker on the socket. Ensure it drops in perfectly flat without any force.
- Secure the Protector: Take the screws (either the original ones you removed or the new ones provided with the contact frame, depending on the kit) and carefully thread them into the holes.
- Hand-Tighten First: Start by hand-tightening all four screws a few turns to ensure they are properly seated and not cross-threaded.
- Tighten Diagonally: Using the appropriate screwdriver, tighten the screws gradually in a diagonal pattern (e.g., top-left, bottom-right, top-right, bottom-left). This ensures even pressure distribution.
- Do Not Overtighten: Tighten until snug, but do not overtighten. Excessive force can damage the motherboard or the CPU. The goal is firm, even pressure, not crushing force. The frame should feel securely attached and not wobble.
4. Reassembly: Thermal Paste, Cooler, and Beyond
With the new CPU protector securely in place, the remainder of the installation involves reassembling your cooling solution and PC.
- Apply Thermal Paste: Apply a fresh, pea-sized (or X-pattern, or line-pattern, depending on preference and paste viscosity) amount of thermal paste to the center of your CPU’s IHS. The new contact frame ensures a flat surface, optimizing paste spread.
- Reinstall CPU Cooler: Carefully place your CPU cooler back onto the CPU, aligning it properly.
- Air Coolers: Re-mount the cooler, ensuring firm and even pressure. Tighten mounting screws gradually in a diagonal pattern until snug.
- AIO Liquid Coolers: Reinstall the CPU block, tightening the four mounting screws in a diagonal pattern. Don’t forget to reinstall the radiator if you removed it.
- Reconnect Cooler Cables: Plug all fan headers, pump headers, and RGB cables back into their respective ports on the motherboard.
- Cable Management: Neatly route all cables, using zip ties or Velcro straps, to ensure good airflow and a clean build aesthetic. This contributes to better overall system performance and ease of maintenance, reflecting good tech practices.
- Close the PC Case: Reattach the side panel(s) of your PC case.
5. Final Checks and Initial Boot
- Double-Check Connections: Before plugging anything in, perform a visual inspection. Ensure all cables are securely connected, especially power cables to the motherboard and GPU, and that no tools or stray screws are left inside the case.
- Connect Peripherals and Power: Plug in your monitor, keyboard, mouse, and finally, the power cable to your PC.
- First Boot: Press the power button. Your PC should boot normally. Monitor the boot process and ensure no error messages appear.
- BIOS/UEFI Check: Once in the operating system, or preferably in the BIOS/UEFI, check your CPU temperatures. Ensure they are within normal idle ranges (typically 30-45°C). Run a stress test (e.g., Prime95, Cinebench) for a short period to verify temperatures under load. This is a critical step in digital security and hardware integrity verification.
If temperatures are unusually high, immediately shut down your PC and double-check your cooler mounting and thermal paste application. An improperly mounted cooler is the most common cause of high CPU temperatures.
Benefits and Long-Term Considerations: Why This Matters
Installing an Intel CPU protector is more than just a DIY project; it’s a strategic move to optimize your hardware investment. The benefits extend beyond immediate thermal improvements, touching upon longevity, stability, and even the financial wisdom of protecting high-value components.
Enhanced Thermal Performance and Stability
The primary benefit, as discussed, is a potentially flatter CPU IHS and more even contact with the cooler. This translates to more efficient heat transfer away from the CPU. For power users and enthusiasts, this can mean:
- Lower Operating Temperatures: Even a few degrees reduction can prevent thermal throttling, allowing your CPU to maintain higher clock speeds for longer durations.
- Increased Overclocking Headroom: Cooler temperatures provide more thermal budget for pushing your CPU’s performance boundaries, which is a key aspect of advanced tech utilization.
- Improved System Stability: A cooler CPU is a more stable CPU. Reducing temperature fluctuations can lead to fewer crashes or unexpected reboots, especially under heavy load.
Protecting Your Investment: Longevity and Value
Intel CPUs, particularly high-end Core i7 and i9 models, represent a significant financial investment. Protecting this investment through proper installation and maintenance is paramount.
- Mitigating IHS Deformation: While the extent of IHS bending with stock ILMs is often debated, a contact frame effectively negates this concern. This peace of mind is invaluable for those who frequently upgrade or move their systems.
- Extended Component Lifespan: While CPUs rarely fail due to thermal issues alone (they usually throttle first), consistently lower operating temperatures contribute to the overall longevity of the chip. This aligns with smart money management by reducing the likelihood of premature hardware replacement.
- Resale Value: A CPU that has been well-maintained and protected, especially one that hasn’t undergone potential IHS bending, may hold its value better on the secondary market.
Considerations and Potential Drawbacks
While beneficial, there are a few points to consider:
- Warranty: Some manufacturers might consider replacing the stock ILM a modification that could void the motherboard warranty. It’s wise to check your motherboard’s specific warranty terms. Most aftermarket frame kits are designed to be reversible, meaning you can reinstall the original ILM if needed.
- Skill Level: This installation requires a degree of technical comfort and precision. If you are uncomfortable working inside a PC, it might be best to seek assistance from an experienced builder.
- Cost: While generally affordable, the cost of a contact frame is an additional expenditure. Weigh the benefits against the investment. For many, the peace of mind and potential performance gains easily justify the small financial outlay.

Conclusion: Empowering Your PC’s Core
The journey to installing an Intel CPU protector is one of meticulous care, technical understanding, and ultimately, enhanced system optimization. By replacing the motherboard’s standard Integrated Loading Mechanism with a specialized contact frame, you are proactively addressing potential thermal inefficiencies and physical stress on your CPU. This seemingly minor modification can contribute to lower operating temperatures, improved system stability, and potentially extend the lifespan of your valuable Intel processor.
This guide, rooted in practical tech tutorials and digital security best practices, empowers you to take control of your hardware’s integrity. Whether you’re an avid gamer, a professional content creator, or simply someone who appreciates a finely tuned machine, the proper installation of an Intel CPU protector is a testament to your commitment to maximizing performance and protecting your technological investment. Remember, precision and patience are your greatest tools throughout this process. With your Intel CPU now cradled in enhanced protection, you can confidently push the boundaries of your system’s capabilities, knowing its core is secured for optimal performance and longevity.
aViewFromTheCave is a participant in the Amazon Services LLC Associates Program, an affiliate advertising program designed to provide a means for sites to earn advertising fees by advertising and linking to Amazon.com. Amazon, the Amazon logo, AmazonSupply, and the AmazonSupply logo are trademarks of Amazon.com, Inc. or its affiliates. As an Amazon Associate we earn affiliate commissions from qualifying purchases.