Embarking on the journey of building your own PC is an incredibly rewarding experience. At the heart of every computer lies the motherboard – the central nervous system that connects all other components and allows them to communicate. Its proper installation is not just a critical step; it’s the foundation upon which your entire system’s performance, stability, and longevity will rest. This guide will walk you through every essential step, from initial preparation to the exhilarating first boot, ensuring a smooth and successful build. Whether you’re upgrading an existing system or constructing a brand-new one, mastering motherboard installation is a fundamental skill that empowers you to control your tech, optimize your investments, and build a machine perfectly tailored to your productivity needs.
Laying the Foundation: Pre-Installation Preparations
Before you even think about placing components, meticulous preparation is key. This initial phase sets the stage for a seamless installation process, minimizing potential pitfalls and protecting your valuable hardware.
Gathering Your Arsenal: Tools and Components
A successful build requires the right tools and, of course, all your components ready and accounted for. Having everything organized before you begin will save you significant time and frustration.
-
Essential Tools:
- Phillips Head Screwdriver: A magnetic tip is highly recommended for securely handling tiny screws.
- Anti-Static Wrist Strap: Crucial for discharging static electricity, which can severely damage sensitive electronics.
- Zip Ties or Velcro Straps: For efficient cable management, improving airflow and aesthetics.
- Thermal Paste: If your CPU cooler doesn’t come with pre-applied thermal paste, you’ll need a tube for optimal heat transfer.
- Flashlight: Handy for illuminating tight spaces within the PC case.
- Small Bowl or Tray: To keep track of all the tiny screws.
- Your Motherboard Manual: An invaluable resource specific to your board’s layout and connectors.
-
Your Core Components: Ensure all these are unboxed and ready for installation.
- Motherboard: The star of the show, compatible with your chosen CPU. Note its form factor (ATX, Micro-ATX, Mini-ITX) which dictates its size and the number of expansion slots.
- CPU (Central Processing Unit): The “brain” of your computer. Ensure its socket type (e.g., LGA 1700 for Intel, AM5 for AMD) matches your motherboard.
- CPU Cooler: Whether it’s the stock cooler included with your CPU, an aftermarket air cooler, or an All-in-One (AIO) liquid cooler, it’s vital for heat dissipation.
- RAM (Random Access Memory): Typically two or four sticks. Check your motherboard’s specifications for supported RAM types (DDR4, DDR5) and maximum speeds.
- PSU (Power Supply Unit): The component that supplies power to all your hardware. Its wattage should be sufficient for your system’s power requirements.
- PC Case: The enclosure for all your components. Ensure it supports your motherboard’s form factor.
- Storage Devices: SSDs (SATA or NVMe M.2) or HDDs.
- Graphics Card (GPU): If you’re building a gaming or content creation PC, this will be one of your most significant components.
Safety First: Static Electricity and Workspace Setup
Protecting your investment begins before you even touch a component. Electrostatic Discharge (ESD) is an invisible threat that can instantly fry sensitive electronics.
-
Combatting ESD:
- Anti-Static Wrist Strap: Connect one end to your wrist and the other to a bare metal part of your PC case or another grounded object. This continuously equalizes your electrical potential with the system.
- Grounding Mat (Optional but Recommended): Place components on an anti-static mat connected to a ground point.
- Minimize Static-Generating Materials: Avoid working on carpeted floors. Remove synthetic clothing (like fleece sweaters).
- Touch Grounded Metal Frequently: If you don’t have a wrist strap, periodically touch an unpainted metal surface on your PC case before handling components.
-
Workspace Setup:
- Clean and Organized: A well-lit, clutter-free surface (like a wooden or plastic table) provides ample space to work and prevents tiny screws from getting lost.
- Accessibility: Arrange your components logically around your workspace. Keep the motherboard box nearby; its anti-static bag can serve as a temporary safe surface for the motherboard during CPU and RAM installation.
- Ventilation: While not directly safety-related for installation, good ventilation in your workspace is always a plus.
By taking these preliminary steps, you not only safeguard your valuable components but also create an efficient and stress-free environment for the build process, leading to a more reliable and productive system in the long run.
The Heart of the Machine: Motherboard and Core Component Installation
This is where your PC truly starts to take shape. Installing the motherboard and its core components requires precision and careful handling.
Preparing the Case and Installing the I/O Shield
Before the motherboard goes in, the case needs a bit of preparation.
- Open the Case: Remove the side panels of your PC case. Most cases have thumb screws or latches for easy access.
- Install Standoffs: Locate the small metal risers, called standoffs, that come with your case. These lift the motherboard away from the metal case to prevent short circuits and allow airflow. Your motherboard manual will show you which standoff holes align with your specific board’s form factor (ATX, Micro-ATX, etc.). Screw them firmly into the case, but don’t overtighten. Many cases come with some standoffs pre-installed.
- Install the I/O Shield: This is perhaps the most commonly forgotten step! The I/O shield is a rectangular metal plate that snaps into the rectangular opening at the back of your PC case. It covers the gaps around your motherboard’s ports (USB, Ethernet, audio, etc.). Orient it correctly (ports facing inward) and firmly press it into place from the inside of the case until it clicks securely. Forgetting this means having to remove the motherboard later, which is a major hassle.
Mounting the Motherboard
With the standoffs and I/O shield in place, it’s time for the motherboard.
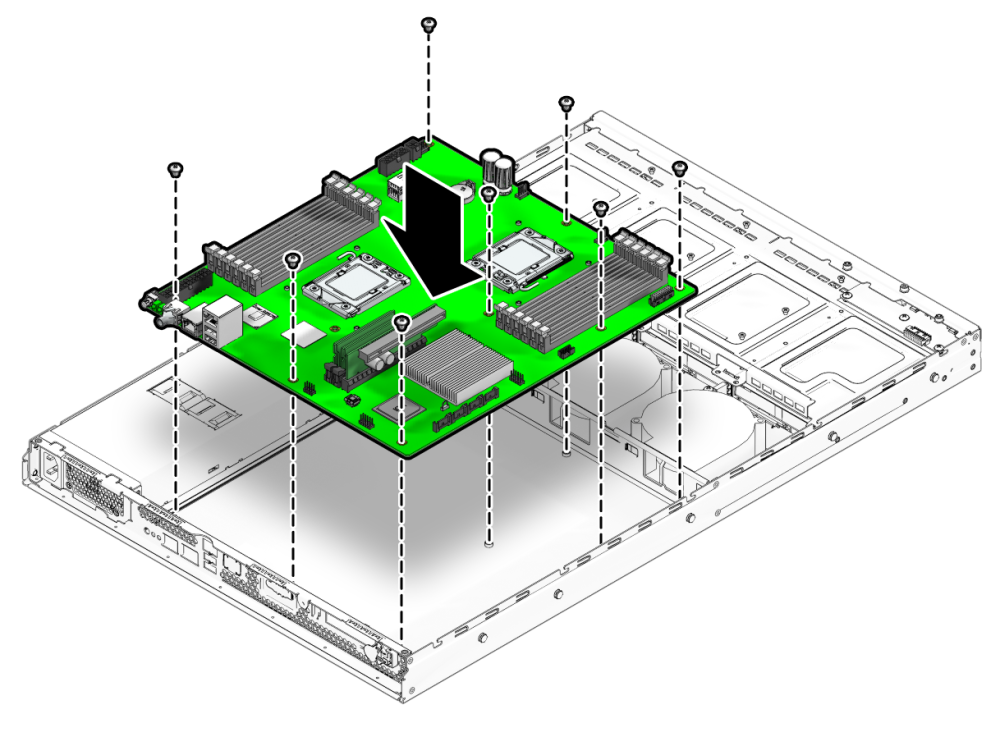
- Align and Lower: Carefully pick up the motherboard, holding it by its edges to avoid touching sensitive components. Align the screw holes on the motherboard with the installed standoffs. Gently lower the motherboard into the case, ensuring the ports align perfectly with the I/O shield opening.
- Secure with Screws: Once aligned, use your Phillips head screwdriver to secure the motherboard to the standoffs with the provided screws (usually 6-9 screws, depending on the form factor). Tighten them until snug, but do not overtighten, as this can damage the board. Start with a screw in the center, then work your way out in a cross pattern.
CPU, Cooler, and RAM: The Power Trio
These components are typically installed before the motherboard is fully mounted in the case, as it’s easier to access the socket and RAM slots. However, if your case has a large cutout behind the motherboard tray, you can do some of these steps with the motherboard already installed. For this guide, we’ll assume installation after mounting for general accessibility.
-
CPU Installation:
- Open the CPU Socket: Gently lift the metal retention arm and swing open the metal load plate or cover. Be careful not to touch the delicate pins inside the socket (on Intel boards) or the pads on the CPU itself (on AMD boards).
- Align the CPU: Look for a small golden triangle or notch on one corner of your CPU and match it with the corresponding mark on the CPU socket. For Intel CPUs, there are also two notches on the sides.
- Place the CPU: Carefully lower the CPU straight down into the socket. It should drop in without any force. Do NOT push or force it. If it doesn’t fit, double-check your alignment.
- Secure the CPU: Close the metal load plate over the CPU and push the retention arm back down until it clicks into place. This might require a little force, and it’s normal for a plastic cover to pop off from an Intel socket.
-
CPU Cooler Installation:
- Apply Thermal Paste: If your cooler doesn’t have pre-applied thermal paste, apply a pea-sized dot to the center of the CPU’s integrated heat spreader (IHS). This fills microscopic gaps for efficient heat transfer.
- Mount the Cooler: Follow the instructions specific to your CPU cooler. This usually involves attaching a backplate to the motherboard (from behind), then mounting the heatsink/pump assembly and securing it with screws or clips. For AIO coolers, you’ll also mount the radiator and fans to a designated spot in your case.
- Connect Fan Header: Plug the CPU cooler’s fan (and pump, if AIO) cable into the “CPU_FAN” header on your motherboard.
-
RAM (Random Access Memory) Installation:
- Identify Slots: Your motherboard manual will show you which RAM slots to use for dual-channel or quad-channel configurations (e.g., A2 and B2 for two sticks).
- Open Clips: Push open the clips at each end of the designated RAM slots.
- Align and Insert: Align the notch on your RAM stick with the notch in the slot. Place the RAM stick directly over the slot.
- Press Firmly: Apply firm, even pressure to both ends of the RAM stick until it clicks into place and the clips snap shut automatically. If they don’t, manually push them closed. Do not force it if it doesn’t align correctly.
This phase is foundational. Taking your time with each step ensures that the core components are correctly seated, allowing your system to function optimally and providing a stable base for the operating system and applications. Proper cooling and RAM configuration are crucial for performance and system stability, directly impacting your daily productivity.
Connecting the Nerves: Wiring and Peripherals
With the motherboard and core components installed, the next critical step is connecting all the necessary cables. This stage is often perceived as daunting due to the sheer number of wires, but a systematic approach makes it manageable. Good cable management here not only improves aesthetics but also enhances airflow and makes future upgrades or troubleshooting much easier.
Powering Up: PSU Connections
The Power Supply Unit (PSU) is responsible for delivering electricity to all your components. Correctly connecting its cables is paramount for system stability and longevity.
- 24-pin ATX Power: This is the largest connector from your PSU and provides primary power to the motherboard. Locate the long, rectangular socket on the edge of your motherboard (usually on the right side). Align the clip on the connector with the latch on the socket and push firmly until it clicks into place. It might require significant force.
- 8-pin EPS/CPU Power: This connector (sometimes 4+4 pin) supplies dedicated power to your CPU. It’s typically located at the top-left edge of the motherboard. Plug it in firmly.
- PCIe Power (for GPU): If you’re installing a dedicated graphics card, it will likely require one or more PCIe power connectors (6-pin, 8-pin, or 6+2 pin) directly from the PSU. Connect these to the corresponding sockets on your graphics card.
- SATA Power: These flat, wide connectors power your SATA SSDs, HDDs, and any optical drives. Connect one end to the drive and the other to the PSU.
- Cable Management Basics: As you connect cables, route them through the back of the case (behind the motherboard tray) whenever possible. Use zip ties or Velcro straps to bundle them neatly. This keeps the main compartment clear, improving airflow, which in turn helps keep components cool and extends their lifespan. A tidy interior also speaks to a focused approach to your tech, reflecting good productivity habits.
Front Panel Connectors and Other Essentials
These small, fiddly connectors might seem minor, but they enable essential functions like turning your PC on and off, using USB ports, and hearing audio from the front of your case.
- Front Panel Connectors: This is often the trickiest part due to their small size and the need for precise placement. Your motherboard manual is your best friend here, as the pin layout varies.
- Power Button (PWR_SW): Connects your case’s power button to the motherboard.
- Reset Button (RESET_SW): Connects the reset button.
- HDD LED (HDD_LED): Lights up when your storage drive is active.
- Power LED (PWR_LED): Indicates when your PC is on.
- Polarity: For the LED connectors (HDDLED, PWRLED), polarity matters (+ and -). If they don’t light up, try flipping them. For the switches (PWRSW, RESETSW), polarity doesn’t matter.
- USB Headers:
- USB 2.0/3.0/3.2 Headers: Connect your case’s front USB ports to the corresponding headers on your motherboard. These are usually clearly labeled (e.g., USBF1, USBF2). Ensure the connector is aligned correctly to avoid bending pins.
- USB-C (Type-C) Header: If your case has a front USB-C port, connect its larger header to the motherboard.
- HD Audio Header (F_AUDIO): Connects your case’s front headphone and microphone jacks to the motherboard. It’s typically a single block connector.
- SATA Data Cables: Connect your SATA SSDs or HDDs to the SATA ports on your motherboard. These are thin, flat cables. Ensure they are securely clicked into both the drive and the motherboard. Your motherboard will have multiple SATA ports, often numbered; connect your primary boot drive to SATA0 or SATA1 for best practice.
- Case Fan Headers: Connect your case fans to the “CHAFAN” or “SYSFAN” headers on your motherboard. Consult your manual for their locations. Proper fan placement and connection are vital for maintaining optimal internal temperatures, which directly affects component performance and lifespan.
Graphics Card (GPU) Installation (If Applicable)
If you’re building a system for gaming, video editing, or other graphically intensive tasks, installing a dedicated GPU is a key step.
- Locate the PCIe Slot: Identify the primary PCIe x16 slot on your motherboard (usually the top-most, reinforced slot). Open the small retention clip at the end of the slot.
- Insert the GPU: Carefully align the GPU’s PCIe connector with the slot. Push down firmly and evenly until the card is fully seated and the retention clip snaps back into place.
- Secure the GPU: Secure the GPU to the case with one or two screws at the back, where the GPU’s display outputs protrude. This prevents sagging and ensures stability.
- Connect PCIe Power: If your GPU requires external power, connect the appropriate PCIe power cables from your PSU (6-pin, 8-pin, or 6+2 pin) to the sockets on the card. Never mix and match power cables from different PSUs.
Completing the wiring phase signifies that all your hardware components are now physically connected and ready to receive power and data. The attention to detail here, particularly with front panel connectors and cable management, will greatly enhance your user experience and the overall reliability of your new system.
First Boot and Beyond: Post-Installation Procedures
The moment of truth arrives when you’re ready to power on your newly assembled PC for the first time. This phase involves initial system checks, operating system installation, and fine-tuning.
The Moment of Truth: Initial Power-On and BIOS/UEFI Setup
This is the most exciting (and sometimes nerve-wracking) part of the build.
- Final Checks: Before plugging in, take a deep breath and perform one last visual inspection.
- Are all power cables securely connected? (24-pin ATX, 8-pin EPS, PCIe for GPU).
- Are all components (CPU, RAM, GPU) firmly seated?
- Are all front panel connectors correctly installed?
- Is the I/O shield in place?
- Is your CPU cooler making good contact and its fan plugged into “CPU_FAN”?
- Are there any loose screws or tools inside the case?
- Connect Peripherals: Plug in your monitor, keyboard, and mouse to the appropriate ports on the I/O shield.
- Power On: Plug your PC into a wall outlet or surge protector. Flip the switch on the back of your PSU to the ‘ON’ position. Press the power button on the front of your case.
- Monitor for Signs of Life:
- Do the fans spin? (CPU cooler, case fans, GPU fans).
- Do any LEDs light up on the motherboard or components?
- Does your monitor display anything? Ideally, you should see the motherboard’s splash screen or a prompt to enter the BIOS/UEFI.
- Enter BIOS/UEFI: Press the designated key (often DEL or F2) repeatedly during startup to enter your motherboard’s BIOS/UEFI settings.
- Initial BIOS/UEFI Setup:
- Date and Time: Set these correctly.
- Boot Order: Configure your system to boot from your USB drive or DVD containing the operating system installer.
- XMP/DOCP Profile: If you have high-speed RAM, enable its XMP (Intel) or DOCP (AMD) profile to ensure it runs at its advertised speed. Otherwise, it will likely default to a slower speed.
- Fan Curves: Adjust fan speeds for optimal cooling and noise levels.
- Save and Exit: Save your changes and exit the BIOS/UEFI.
Operating System Installation and Driver Setup
Once your hardware is confirmed to be working, it’s time to bring your system to life with an operating system.
- Install OS: Follow the on-screen prompts to install your chosen operating system (Windows, Linux, etc.) from your bootable USB drive or DVD. Format your primary storage drive during this process.
- Install Drivers: After the OS is installed, you’ll need to install essential drivers. These are critical software components that allow your hardware to communicate effectively with the operating system.
- Chipset Drivers: Download these first from your motherboard manufacturer’s website.
- Graphics Drivers: Download the latest drivers from NVIDIA, AMD, or Intel, depending on your GPU.
- Network Drivers: Ensure your Ethernet or Wi-Fi is working so you can access the internet to download other drivers. If not, you might need to use another computer to download these to a USB stick.
- Audio Drivers: For optimal sound quality.
- Other Peripheral Drivers: For any specialized peripherals you might have.
- Software Updates: Run Windows Update or your Linux distribution’s update manager to get the latest security patches and system improvements.
Troubleshooting Common Issues
Even experienced builders encounter hiccups. Don’t panic; most issues have straightforward solutions.
- No Power / Nothing Happening:
- Check PSU switch (on).
- Verify all PSU cables (24-pin, 8-pin EPS, PCIe) are fully seated.
- Ensure front panel power switch connector is correct.
- Test wall outlet.
- No Display:
- Confirm monitor is plugged into the graphics card (not motherboard I/O, unless using integrated graphics).
- Reseat RAM modules firmly.
- Reseat GPU.
- Try one RAM stick at a time in different slots.
- System Not Booting / Strange Beeps:
- Consult your motherboard manual for “POST codes” or “Beep codes.” These diagnostic signals indicate specific hardware problems (e.g., RAM issue, GPU issue).
- Clear CMOS (reset BIOS settings to default) using the motherboard’s jumper or by removing the CMOS battery for a few minutes.
- Operating System Not Installing:
- Check boot order in BIOS.
- Recreate bootable USB drive.
- Ensure storage drive is detected.
Patience and systematic testing are your best friends during troubleshooting. Building a PC is an exercise in problem-solving, and overcoming these challenges gives you a deeper understanding of your machine, enhancing your digital security by ensuring a stable, well-configured foundation.
Why Build Your Own? The Benefits of DIY Motherboard Installation
Beyond the technical steps, understanding the broader advantages of installing your own motherboard and building your PC underscores the value of this endeavor. It’s not just about assembling parts; it’s about empowerment, optimization, and smart financial decisions.
Cost-Effectiveness and Component Selection Freedom
One of the primary drivers for many PC enthusiasts is the significant financial saving compared to buying pre-built systems.
- Saving on Assembly Labor: When you buy a pre-built PC, you’re paying for the components and the labor involved in assembling it, along with a profit margin for the manufacturer. By doing it yourself, you eliminate these additional costs. This means more of your budget can go directly towards higher-quality components.
- Maximizing Value for Money (Money Focus): Building your own PC allows you to allocate your budget precisely where it matters most for your specific needs. If you’re a gamer, you can invest more in a powerful GPU. If you’re a content creator, a high core-count CPU and abundant RAM might be your priority. Pre-builts often include compromises in certain areas to meet a price point or use proprietary parts that limit future upgrades. DIY gives you the freedom to choose every component, ensuring you get the best performance per dollar. You avoid bloatware and unnecessary pre-installed software, which can often hinder performance and privacy.
Learning and Empowerment
Building a PC is an incredibly educational experience that transcends the mere act of assembly.
- Understanding Your Machine (Tech Focus): The process forces you to learn about the function of each component, how they interact, and the critical role of the motherboard. This foundational knowledge empowers you to understand troubleshooting, future upgrades, and performance bottlenecks. You’re no longer just a user; you’re an informed owner.
- Confidence in Future Upgrades and Repairs: Once you’ve successfully built a PC, upgrading components like RAM, storage, or even the GPU becomes a far less daunting task. You’ll have the confidence and skills to perform maintenance, diagnose issues, and keep your system running optimally for years, saving you money on professional repair services. This self-reliance fosters a sense of accomplishment and greater control over your technology.
Performance and Optimization
A custom-built PC, where you’ve personally overseen every installation detail, often outperforms a similarly priced pre-built system due to several factors.
- Tailored Performance for Specific Use Cases: You can select components that are perfectly optimized for your primary tasks. Whether it’s a workstation for intense video editing, a high-refresh-rate gaming rig, or a quiet office PC, you can make component choices that directly contribute to peak performance in those areas.
- Superior Airflow and Cable Management (Productivity Focus): During the build, you have complete control over cable routing and fan placement. Proper cable management isn’t just for aesthetics; it significantly improves airflow within the case, leading to lower component temperatures. Cooler components run more efficiently, often for longer periods, and can even achieve higher boost clocks, translating directly into better and more consistent performance for your productivity and entertainment. A well-organized interior also makes future maintenance or upgrades much more straightforward, saving you time and effort.
- Quality Control: By selecting reputable brands for each component and carefully installing them yourself, you have a direct hand in the quality control of your system. You know exactly what’s inside and how it was put together, which can lead to a more reliable and stable machine compared to mass-produced systems.
In conclusion, installing a motherboard and building your own PC is a journey that offers profound benefits. It’s an investment in your technical literacy, a powerful way to maximize your financial outlay, and a direct path to owning a truly optimized, high-performing machine. The initial challenge is quickly overshadowed by the immense satisfaction and long-term advantages of having a system meticulously crafted by your own hands.
aViewFromTheCave is a participant in the Amazon Services LLC Associates Program, an affiliate advertising program designed to provide a means for sites to earn advertising fees by advertising and linking to Amazon.com. Amazon, the Amazon logo, AmazonSupply, and the AmazonSupply logo are trademarks of Amazon.com, Inc. or its affiliates. As an Amazon Associate we earn affiliate commissions from qualifying purchases.