
Ubuntu, a popular Linux distribution, is celebrated for its stability, security, and open-source flexibility. While it comes bundled with Firefox, many users, particularly those deeply embedded in the Google ecosystem or requiring specific web development tools, find themselves needing Google Chrome. Chrome offers a unique blend of performance, extensive extension support, and seamless integration with Google services that can significantly enhance productivity and streamline digital workflows. This guide will walk you through two reliable methods to install Google Chrome on your Ubuntu system, ensuring a smooth and secure setup. We’ll also delve into why Chrome might be the right choice for you, its implications for digital security, and how it can contribute to a more efficient tech stack, potentially impacting your online endeavors and even financial well-being through optimized workflows.

Why Google Chrome on Ubuntu? Unpacking the Browser’s Appeal for Tech, Brand, and Productivity
Choosing a web browser is more than just picking a tool; it’s selecting a gateway to your digital life, influencing everything from your daily productivity to your digital security posture. For Ubuntu users, Google Chrome presents a compelling package, particularly when considering its integration with the broader tech landscape, its brand presence, and its potential impact on your work efficiency.
A Dive into Performance and User Experience
Google Chrome has long been lauded for its speed and responsive user interface. Built on the Chromium open-source project, Chrome offers a streamlined experience with rapid page loading times and smooth navigation, even on complex web applications. For developers, designers, or anyone frequently engaging with resource-intensive online tools, this performance can be a critical factor. The intuitive layout, tab management features, and integrated search bar contribute to a user experience designed for efficiency. While it’s often perceived as a resource-heavy browser, continuous optimizations have made it more competitive, especially on modern Ubuntu systems. This focus on performance directly translates into time saved, which for many professionals, ties back to the “Money” aspect – time is money, and a faster browser means more efficient work.
Ecosystem Integration, Developer Tools, and the Google Brand
One of Chrome’s most significant advantages lies in its deep integration with the vast Google ecosystem. For users heavily reliant on Gmail, Google Drive, Google Calendar, YouTube, or Google Workspace applications, Chrome offers unparalleled synchronization and seamless functionality. This extends to cross-device syncing of bookmarks, history, and passwords, making the transition between your Ubuntu desktop, Android phone, or other devices effortless. From a “Brand” perspective, Google’s pervasive presence ensures a familiar and consistent experience across platforms, reinforcing user trust and loyalty.
Furthermore, Chrome is an indispensable tool for web developers. Its robust set of built-in Developer Tools provides powerful capabilities for inspecting elements, debugging JavaScript, analyzing network performance, and simulating mobile devices. This makes it a cornerstone for anyone building or maintaining websites, directly linking to the “Tech” aspect of software development and innovation. The sheer volume of extensions available in the Chrome Web Store also caters to nearly every conceivable need, from productivity boosters and design aids to SEO tools and digital marketing utilities, further cementing its role in enhancing diverse workflows.
Navigating Digital Security and Privacy Considerations
Digital security is paramount in today’s interconnected world, and Chrome offers several built-in features to protect users. These include Safe Browsing technology, which warns against malicious websites and phishing attempts, automatic updates that patch vulnerabilities swiftly, and sandboxing architecture that isolates tabs to prevent malicious code from affecting your entire system. The browser also encrypts data transmitted between your device and Google’s servers, enhancing the security of your online activities.
However, the “privacy” aspect of Google Chrome often draws scrutiny due to Google’s data collection practices. While Chrome provides settings to manage cookies, site permissions, and sync options, users concerned about their digital footprint should be aware of the trade-offs. It’s a balance between convenience, powerful features, and personal privacy preferences. For those whose work involves sensitive data or strict compliance, understanding these aspects is crucial. For businesses, the choice of browser can even impact their “Brand” reputation regarding data handling and privacy compliance.
Preparing Your Ubuntu System for a Seamless Installation
Before diving into the installation process, it’s crucial to ensure your Ubuntu system is ready. A few preparatory steps will help prevent common issues and ensure a smooth setup for Google Chrome. These are fundamental practices in digital security and maintaining a healthy operating system, tying into our “Tech” focus.
Essential Prerequisites and System Checks
First, confirm you have an active internet connection. Chrome’s installation package is downloaded from the internet, and an unstable connection can lead to corrupted files or failed installations.
Second, you’ll need sudo privileges. The installation process requires administrative rights to modify system files and install software packages. Typically, if you’re the primary user of your Ubuntu desktop, your user account already has sudo access.
Third, while Google Chrome is designed to be lightweight, ensure your Ubuntu system meets basic requirements. Modern versions of Ubuntu (e.g., Ubuntu 20.04 LTS, 22.04 LTS, 24.04 LTS) are well-supported. Minimal hardware typically includes 2GB RAM and 400MB free disk space, though more is always better for optimal performance, especially when running multiple tabs or resource-intensive web apps.
Updating Your Package Lists for Stability
Before installing any new software, it’s a best practice to update your system’s package lists and upgrade any outdated packages. This ensures you have the latest security patches and dependencies, reducing the likelihood of conflicts during the installation. Open your terminal (you can usually find it by searching for “Terminal” in your applications menu or pressing Ctrl + Alt + T) and run the following commands:
sudo apt update
sudo apt upgrade
sudo apt update refreshes the list of available packages from your configured repositories, while sudo apt upgrade installs the newest versions of all packages currently installed on your system. This proactive step is vital for system stability and digital security, ensuring that your operating system itself is up-to-date, providing a solid foundation for new applications like Chrome.
Method 1: Installing Google Chrome via the Official .deb Package
This method is straightforward and often preferred by users who want a quick, one-time installation without adding new repositories to their system. It involves downloading the .deb package directly from Google’s website and installing it using either a graphical installer or the command line.
Step-by-Step: Downloading the Chrome .deb File
- Open your existing web browser (e.g., Firefox).
- Navigate to the official Google Chrome download page: https://www.google.com/chrome/
- Click the “Download Chrome” button.
- A pop-up window will appear, asking you to “Choose your package.” Select the “64 bit .deb (For Debian/Ubuntu)” option.
- Click “Accept and Install.”
- Your browser will prompt you to save the file. Choose a location, such as your “Downloads” folder, and click “Save File.”
The.debfile, typically named something likegoogle-chrome-stable_current_amd64.deb, will begin downloading. This file contains all the necessary components for Chrome’s installation on Debian-based systems like Ubuntu.
Option A: GUI Installation with GDebi Package Installer
For users who prefer a graphical user interface (GUI), GDebi is an excellent tool for installing .deb packages and automatically handling dependencies.
-
Install GDebi (if not already installed):
Open your terminal and type:sudo apt install gdebi-core gdebiThis command installs the GDebi package installer, which simplifies the process.
-
Navigate to your Downloads folder:
Open your file manager (Nautilus) and go to the directory where you saved thegoogle-chrome-stable_current_amd64.debfile. -
Right-click on the
.debfile:
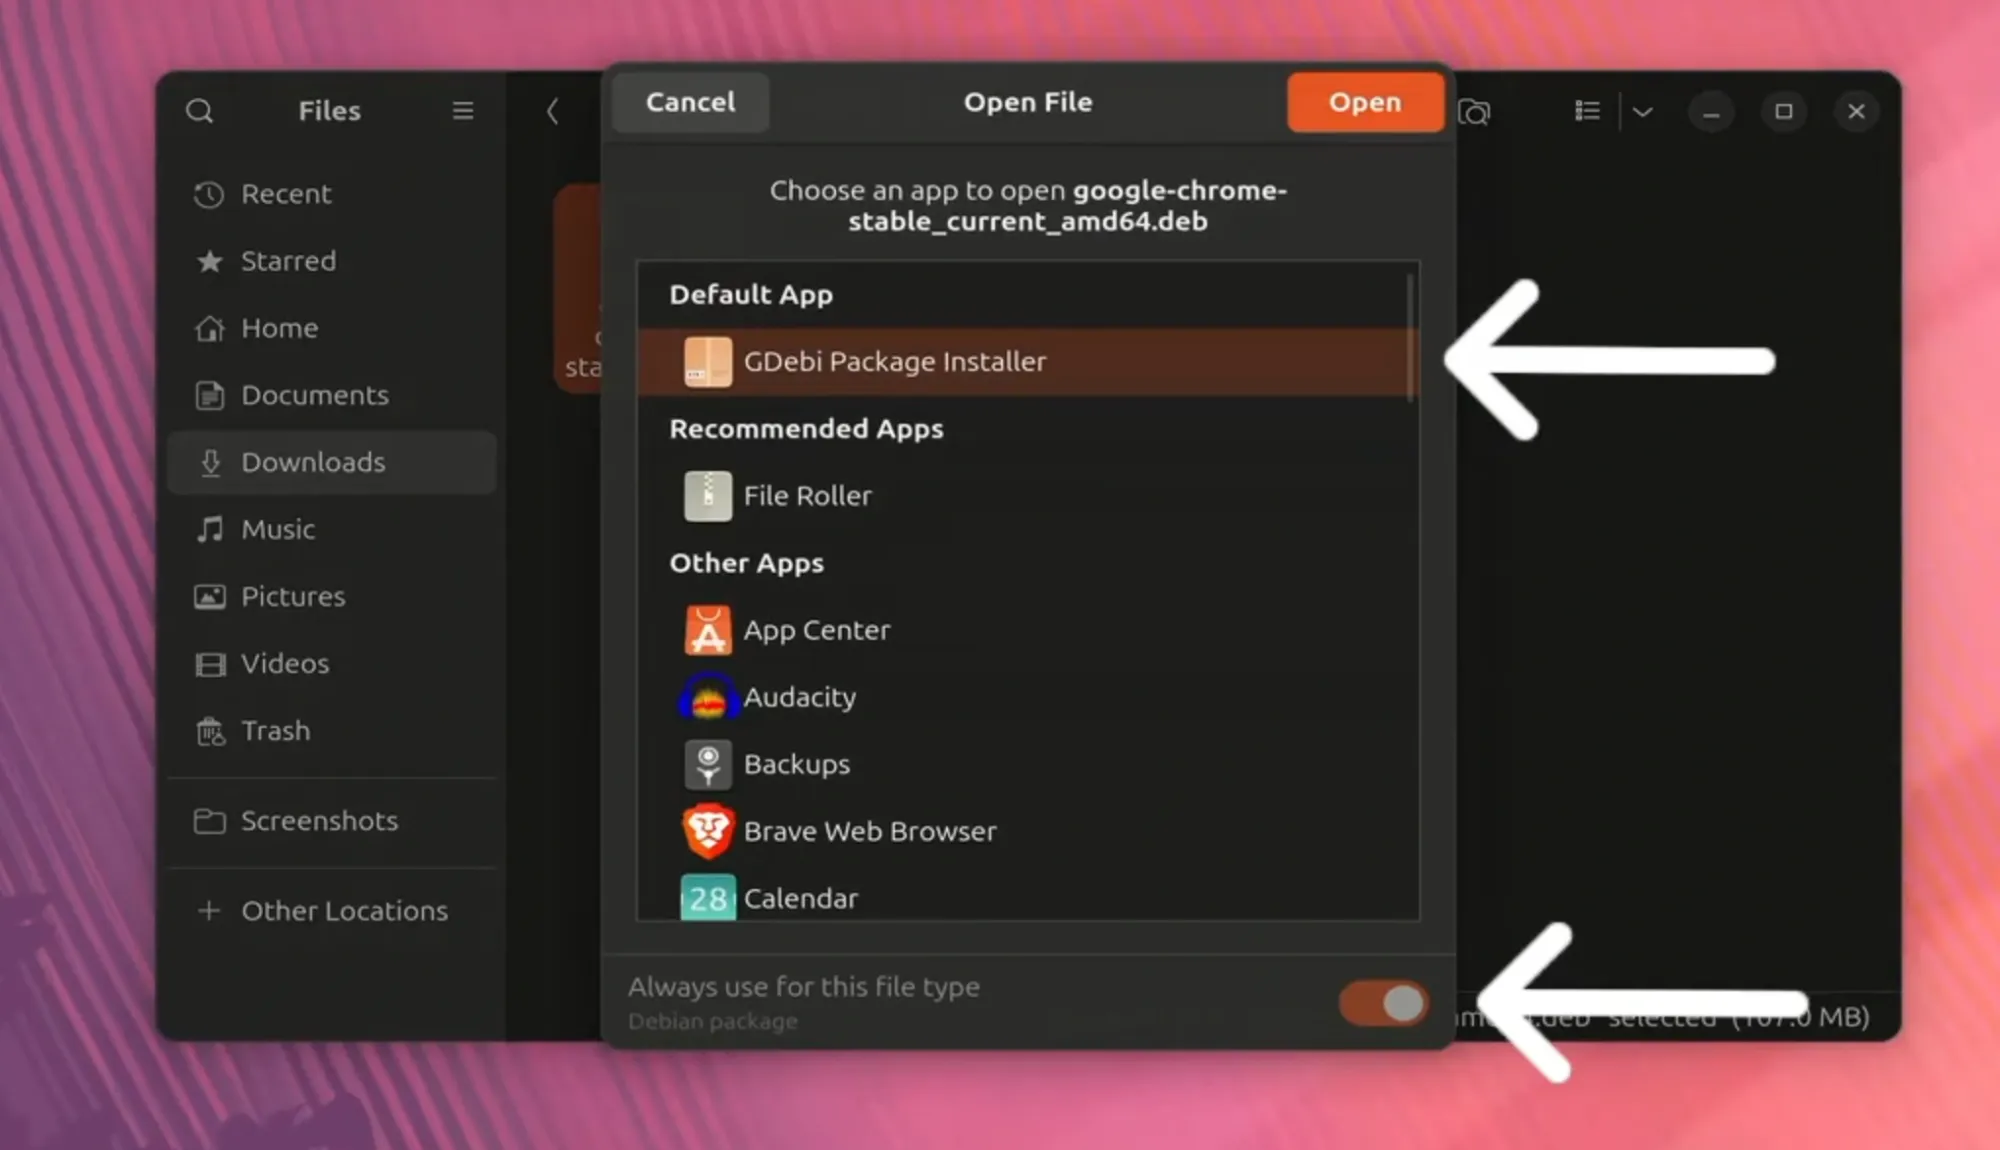
From the context menu, select “Open With Other Application.” -
Choose “GDebi Package Installer”:
Select GDebi from the list of applications and click “Select.” -
Click “Install Package”:
GDebi will display information about the Chrome package, including its dependencies. Click the “Install Package” button. -
Enter your password:
You’ll be prompted to enter your administrator password to authorize the installation.
GDebi will then proceed to install Google Chrome and any required dependencies. Once completed, you’ll see “Status: Same version is already installed.”
Option B: Terminal Installation with dpkg and apt-get
For those comfortable with the command line, installing via dpkg and apt-get offers a robust and transparent method. This is a common method for tech-savvy users and fits well into our “Tech” segment.
-
Open your terminal.
-
Navigate to your Downloads directory:
cd ~/Downloads(Replace
~/Downloadswith the actual path if you saved the file elsewhere). -
Install the
.debpackage usingdpkg:sudo dpkg -i google-chrome-stable_current_amd64.debYou may encounter dependency errors at this stage. This is normal, as
dpkginstalls the package but doesn’t resolve dependencies automatically. -
Resolve dependencies with
apt-get:
To fix any missing dependencies, run:
bash

sudo apt --fix-broken install
This command tellsaptto find and install any missing packages that Google Chrome requires. It will also complete the Chrome installation if it was halted due to dependency issues.
After either of these sub-methods, Google Chrome will be successfully installed on your Ubuntu system.
Method 2: Integrating Google Chrome Through Its Official Repository
This method is generally preferred for long-term use because it adds the official Google Chrome repository to your system’s apt sources. This means Chrome will receive automatic updates along with your other system packages, ensuring you always have the latest features and, crucially, the most recent security patches. This approach strongly aligns with best practices for “Digital Security” and system maintenance within the “Tech” domain.
Adding the Google Signing Key for Authenticity
Before adding a new repository, it’s essential to add its GPG key. This key is used to authenticate the packages downloaded from the repository, ensuring they are genuine and haven’t been tampered with.
- Download the Google Linux signing key:
bash

wget -O- https://dl.google.com/linux/linux_signing_key.pub | gpg --dearmor | sudo tee /etc/apt/keyrings/google-chrome.gpg > /dev/null
This command downloads the public key, processes it to a suitable format, and then securely adds it to your system’s keyring directory. The> /dev/nullpart prevents verbose output fromtee.
Registering the Chrome APT Repository
Now that the signing key is in place, you can add the Google Chrome repository to your system’s apt sources. This tells your package manager where to find Chrome packages.
echo deb [arch=amd64 signed-by=/etc/apt/keyrings/google-chrome.gpg] http://dl.google.com/linux/chrome/deb/ stable main | sudo tee /etc/apt/sources.list.d/google-chrome.list
This command creates a new file named google-chrome.list within your /etc/apt/sources.list.d/ directory. This file contains the repository URL and specifies that it’s for amd64 architecture, stable releases, and that packages should be signed by the google-chrome.gpg key we just added.
After adding a new repository, you must update your package lists so apt is aware of the new software available:
sudo apt update
This command will fetch the package lists from the newly added Google Chrome repository, among others.
Finalizing the Installation and Keeping Chrome Updated
With the repository added and package lists updated, you can now install Google Chrome using the standard apt command. We recommend installing the google-chrome-stable package for the most reliable experience.
sudo apt install google-chrome-stable
This command will download and install Google Chrome, automatically resolving all its dependencies.
The key benefit of this method is that Chrome will now be automatically updated whenever you run sudo apt upgrade, ensuring you always have the latest version with the newest features and, critically, the most up-to-date security patches. This passive maintenance greatly contributes to your “Digital Security” and overall “Tech” hygiene without requiring manual intervention, saving you time and effort that can be better spent on productive tasks.
Post-Installation: Verification, Management, and Optimizing Your Chrome Experience
Once Google Chrome is installed, a few final steps will help you verify its successful integration, understand ongoing management, and optimize your browser for maximum productivity and security. This section brings together elements of “Tech,” “Brand,” and “Money” by focusing on maintenance, leveraging the Google ecosystem, and enhancing efficiency.
Confirming Your Installation and First Launch
To verify that Google Chrome has been installed correctly, you can search for “Chrome” or “Google Chrome” in your Ubuntu applications menu. Click on the icon to launch the browser. The first time you open Chrome, it might ask if you want to set it as your default browser and offer to sign in to your Google account.
You can also verify the installation and check the version from the terminal:
google-chrome --version
This command will output the installed version of Google Chrome, confirming its presence on your system.
Keeping Chrome Updated and Ensuring Digital Security
As discussed, if you used Method 2 (repository installation), Chrome will automatically update with your system. If you used Method 1 (.deb package) and want to maintain manual control, you would periodically revisit the Google Chrome download page to download and install newer .deb packages. However, the repository method is strongly recommended for continuous “Digital Security.” Regular updates patch vulnerabilities and introduce performance enhancements, which are critical for protecting your data and ensuring a smooth user experience. Neglecting updates can leave your system exposed to known exploits, a significant risk for both personal and corporate “Brand” reputation.
Uninstalling Google Chrome: When It’s Time to Move On
Should you ever need to remove Google Chrome from your Ubuntu system, the process is straightforward:
sudo apt purge google-chrome-stable
sudo rm -f /etc/apt/sources.list.d/google-chrome.list
sudo rm -f /etc/apt/keyrings/google-chrome.gpg
The sudo apt purge google-chrome-stable command removes the browser and its configuration files. The subsequent rm commands remove the repository entry and the GPG key, ensuring no leftover traces of the Google Chrome repository affect your system’s package manager. This clean uninstallation is good “Tech” practice, preventing clutter and potential conflicts.
Elevating Productivity: Extensions, Sync, and Beyond
With Chrome successfully installed, the real power lies in customizing it to your workflow.
- Google Account Sync: Sign in with your Google account to sync bookmarks, history, passwords, and extensions across all your devices. This seamless experience is a hallmark of Google’s “Brand” and significantly boosts productivity, saving time and effort.
- Essential Extensions: Explore the Chrome Web Store for extensions that align with your “Money” and “Productivity” goals. Tools for password management (e.g., LastPass, Bitwarden), ad blocking (uBlock Origin), task management (Todoist, Notion Web Clipper), SEO analysis, or financial tracking can dramatically enhance your efficiency and even contribute to managing online income streams. Developers can find extensions for color pickers, responsiveness testers, and more.
- Digital Security Best Practices: While Chrome has built-in security, consider extensions like a VPN or privacy-focused add-ons (e.g., Privacy Badger, Decentraleyes) if your “Digital Security” concerns are high. Always be judicious about which extensions you install, as poorly coded or malicious ones can pose security risks.

Conclusion
Installing Google Chrome on Ubuntu is a straightforward process that opens up a world of possibilities for enhanced productivity, seamless integration with Google’s ecosystem, and access to a vast array of web applications and developer tools. Whether you opt for the direct .deb package installation or integrate the official Google repository for automatic updates, you’re now equipped with a powerful browser that caters to diverse needs. By understanding the “Tech” underpinnings, appreciating the “Brand” advantages, and leveraging its features for “Money”-making or saving opportunities through efficiency, your Ubuntu-Chrome setup is ready to tackle the digital world. Enjoy a faster, more integrated, and highly customizable browsing experience on your robust Linux desktop.