
Going live on YouTube offers an immediate and engaging way to connect with an audience, whether for tutorials, gaming, Q&A sessions, or live events. Mastering the technical aspects of broadcasting ensures a smooth, high-quality stream that captivates viewers. This guide delves into the essential technical steps, hardware, software, and optimization techniques required to successfully launch and manage your YouTube Live streams.
Preparing Your YouTube Account and Environment
Before you can broadcast, your YouTube account and physical setup must meet specific requirements and standards. A robust foundation is critical for a stable and high-quality stream.
Account Eligibility and Verification
To activate live streaming, your YouTube account must be in good standing, meaning it has no live stream restrictions from community guideline strikes. Additionally, your account needs to be verified.
- Mobile Verification: Navigate to
youtube.com/verifyand follow the prompts to verify your account using a phone number. This process usually involves receiving a verification code via SMS. - Activation Period: After verification, there is typically a 24-hour waiting period before you can initiate your first live stream. This is a one-time activation.
- Mobile Streaming Eligibility: For streaming directly from a mobile device, YouTube generally requires channels to have at least 50 subscribers. Historically, it was 1,000, but YouTube frequently adjusts these thresholds. It’s always best to check YouTube’s current policies in their help documentation.
Essential Hardware Requirements
The quality of your live stream is significantly influenced by your hardware. Investing in suitable equipment can dramatically improve your broadcast.
- Camera:
- Webcams: Convenient and affordable for desktop use. Look for 1080p resolution and good low-light performance.
- DSLR/Mirrorless Cameras: Offer superior image quality, depth of field, and control. Requires a capture card to connect to a computer.
- Smartphones: Modern smartphones have excellent cameras and can be used for mobile streaming or as an input source for a computer setup with appropriate apps.
- Microphone: Audio quality is paramount. A poor microphone can deter viewers faster than subpar video.
- Built-in Mics: Generally acceptable for casual use but often pick up ambient noise.
- USB Microphones: Plug-and-play convenience with significantly better sound than built-in options.
- XLR Microphones: Professional-grade microphones that require an audio interface (mixer or preamp) but offer the best audio fidelity and control.
- Computer Specifications: Your computer encodes your video and audio in real-time.
- CPU: A quad-core processor (Intel Core i5/i7 or AMD Ryzen 5/7 equivalent or better) is recommended for 1080p streaming. More cores are beneficial, especially if using CPU-intensive encoding (e.g., x264 ‘medium’ preset).
- RAM: 8GB is a minimum, but 16GB or more is ideal for smooth multitasking and encoding.
- GPU: A dedicated graphics card (NVIDIA GeForce or AMD Radeon) is highly recommended, particularly if using hardware encoders like NVENC or AMF/VCE, which offload encoding from the CPU, reducing system strain.
- Reliable Internet Connection: Upload speed is critical, not download speed.
- Minimum Upload Speed: For stable 720p streams, aim for at least 3-5 Mbps upload. For 1080p streams, 6-10 Mbps upload is recommended. 4K streaming demands 20-50 Mbps or higher.
- Wired Connection: Always use an Ethernet cable if possible. Wi-Fi can be prone to interference and inconsistent speeds, leading to dropped frames and buffering.
Software Selection for Streaming
Depending on your complexity needs, you’ll choose between YouTube’s built-in tools or third-party encoding software.
- YouTube Studio (Webcam/Mobile): Ideal for quick, simple streams directly from your webcam or mobile device. It’s user-friendly but lacks advanced customization.
- Third-Party Encoders: For professional streams with multiple cameras, overlays, custom graphics, and complex audio routing, encoding software is essential. Popular options include:
- OBS Studio: Free, open-source, highly customizable, and widely used.
- Streamlabs Desktop: Built on OBS, with a more user-friendly interface and integrated features like alerts and widgets.
- XSplit Broadcaster/Gamecaster: Commercial software offering powerful features and support, often preferred by professional streamers.
These encoders capture your audio and video inputs, compress them into a streamable format (encoding), and send them to YouTube’s servers.
Choosing Your Live Stream Method
YouTube offers several ways to go live, each suited for different scenarios and levels of technical expertise.
Direct Streaming via YouTube Studio (Webcam)
This is the simplest method, requiring minimal setup and no additional software.
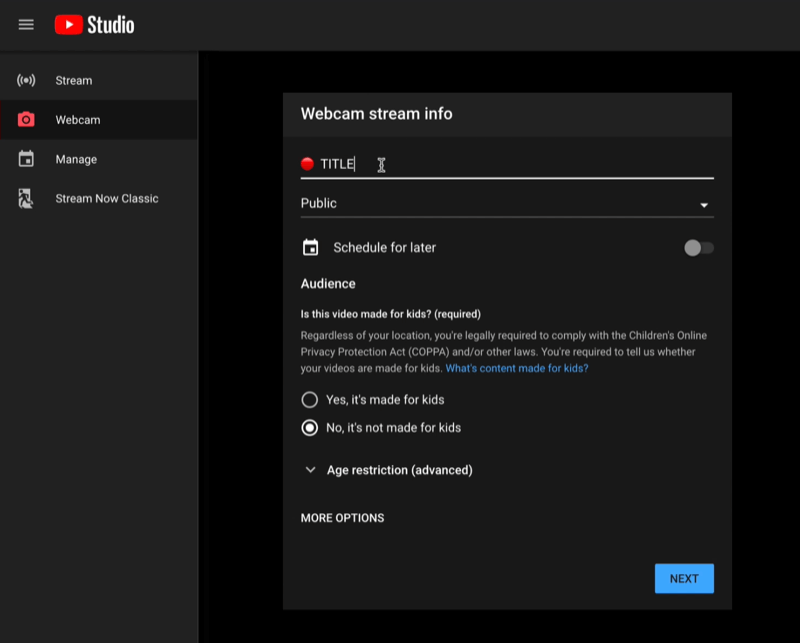
- Access YouTube Studio: Go to
studio.youtube.com. - Click “Create” > “Go live”: In the top right corner, click the “Create” button (camera icon) and select “Go live.”
- Choose “Webcam”: Select the “Webcam” option from the available streaming methods.
- Configure Stream Details:
- Title: Give your stream a descriptive title.
- Description: Provide details about what your stream entails.
- Privacy: Set to Public, Unlisted, or Private.
- Audience: Specify if the content is “Made for Kids” or not.
- Thumbnail: Upload a custom thumbnail for better visibility.
- Camera/Microphone Selection: Ensure your desired camera and microphone are selected from the dropdown menus.
- Go Live: Click “Go Live.” You’ll see a preview of your stream before it starts broadcasting to the public.
This method is excellent for quick Q&A sessions, informal chats, or short announcements. Its limitations include no custom overlays, multi-camera support, or advanced scene management.
Mobile Live Streaming
Streaming directly from your YouTube app is convenient for on-the-go content.
- Open YouTube App: Launch the YouTube app on your smartphone or tablet.
- Tap “Create” > “Go live”: Tap the “+” icon at the bottom of the screen, then select “Go live.”
- Grant Permissions: If it’s your first time, you’ll need to grant camera and microphone permissions.
- Enter Stream Details:
- Title: Add a clear title.
- Privacy: Choose Public, Unlisted, or Private.
- Audience: Designate if it’s “Made for Kids.”
- More Options: Access advanced settings for chat, monetization (if eligible), and location.
- Take Thumbnail: Orient your phone to landscape or portrait, then tap “Take Photo” for your stream thumbnail.
- Go Live: Tap “Go Live” to start broadcasting. You can interact with chat, switch cameras, and use basic filters during the stream.
Mobile streaming is fantastic for vlogs, event coverage, or casual interactions, but it’s heavily reliant on a stable mobile data or Wi-Fi connection and battery life.
Advanced Streaming with Encoding Software (OBS Studio Example)
For full control, professional presentation, and complex setups, an encoding software like OBS Studio is the go-to choice.
- Installation and Initial Setup: Download OBS Studio from
obsproject.comand install it. Run the “Auto-Configuration Wizard” to optimize settings for your system and internet speed. - Connecting to YouTube:
- In OBS, go to
File > Settings > Stream. - Select
Service: YouTube - RTMP. - Go to YouTube Studio (
studio.youtube.com), click “Create” > “Go live,” then select “Stream” (rather than Webcam). - Under “Stream settings,” find and copy your Stream Key.
- Paste the Stream Key into OBS. Leave the Server URL as
Primary YouTube Ingest Server.
- In OBS, go to
- Scene and Source Management:
- Scenes: Think of scenes as different layouts (e.g., “Starting Soon” screen, “Main Camera,” “Gaming Overlay”). You can switch between them during your stream.
- Sources: These are the individual elements within a scene.
- Video:
Video Capture Device(for webcam/capture card),Display Capture(for your screen),Game Capture(for games),Image(for logos/backgrounds),Media Source(for pre-recorded videos). - Audio:
Audio Input Capture(for microphone),Audio Output Capture(for desktop audio).
- Video:
- Arranging Elements: Drag, resize, and layer sources in the preview window. Use filters for chroma keying (green screen) or noise suppression.
- Output Settings Configuration:
- Encoder: Under
Settings > Output, choose your encoder.Hardware (NVENC, AMF/VCE, Quick Sync)is generally preferred as it uses dedicated GPU hardware, freeing up your CPU.Software (x264)uses your CPU and can offer higher quality at the cost of CPU utilization. - Bitrate: This determines the amount of data sent per second. Higher bitrate equals better quality but requires more upload speed. Follow YouTube’s recommendations (e.g., 4,500-9,000 Kbps for 1080p at 60fps).
- Keyframe Interval: Set to 2 seconds for YouTube.
- Resolution and Frame Rate: Match your base canvas resolution to your output resolution if possible (e.g., 1920×1080) and set your frame rate (30 or 60 fps).
- Encoder: Under
- Monitoring and Control: Use the audio mixer in OBS to adjust individual source volumes. Practice scene transitions and source visibility before going live.
Optimizing Your Live Stream for Quality and Stability
A professional-looking and sounding stream requires attention to detail in connectivity, audio, and video.
Internet Connection: The Foundation
Your internet connection is the single most critical factor for stream stability.
- Wired Ethernet: Always prioritize a wired connection. It minimizes latency and packet loss compared to Wi-Fi.
- Upload Speed: Use an online speed test (e.g.,
speedtest.net) to verify your actual upload speed. Ensure it consistently exceeds your desired bitrate. As a rule, aim for an upload speed that is 1.5 to 2 times your streaming bitrate to allow for overhead. - Minimize Network Usage: Before going live, close all unnecessary applications and ensure no other devices on your network are hogging bandwidth (e.g., large downloads, other streaming services).
Audio Excellence
Clear audio keeps viewers engaged.
- Microphone Placement: Position your microphone correctly. For most condenser mics, this means close to your mouth (4-8 inches) to minimize room echo and maximize voice clarity.
- Gain Staging: Adjust your microphone’s gain (input volume) to be high enough to be heard clearly but low enough to avoid clipping (distortion). Monitor the audio meter in OBS; aim for peaks in the yellow range.
- Noise Reduction:
- Acoustic Treatment: Use foam panels or heavy blankets to reduce echoes in your room.
- Software Filters: OBS offers noise suppression (RNNoise or Speex) and noise gate filters to reduce background hums or quiet sounds.
- Audio Monitoring: Wear headphones to monitor your own audio and ensure it sounds good to your audience.
Visual Fidelity
High-quality video makes your stream more appealing.
- Lighting: Good lighting makes a huge difference.
- Key Light: Place a primary light source slightly off to one side in front of you.
- Fill Light: Use a softer light on the opposite side to reduce harsh shadows.
- Back Light: (Optional) A light behind you can separate you from the background.
- Natural Light: If using natural light from a window, ensure it illuminates your face evenly and doesn’t create harsh backlighting.
- Camera Settings:
- Resolution and Frame Rate: Set your camera and OBS to match your desired output (e.g., 1080p at 30 or 60 fps).
- White Balance: Ensure colors are accurate by setting the white balance correctly on your camera.
- Focus: Maintain sharp focus on yourself. If using a DSLR/mirrorless, manual focus often works best, or use reliable autofocus.
- Background: Keep your background clean, uncluttered, and professional. Avoid distractions. Consider a physical or virtual green screen for custom backgrounds if you have the space and lighting.
Encoding Software Advanced Settings
Fine-tuning your encoder settings can balance quality, performance, and stability.
- Bitrate Adjustment: If experiencing dropped frames, try slightly lowering your video bitrate. If your internet and CPU can handle it, increasing bitrate generally improves quality.
- Hardware Encoders: Always prefer hardware encoders (NVENC for NVIDIA, AMF/VCE for AMD, Quick Sync for Intel) if your GPU supports them, as they significantly reduce CPU load.
- CPU Usage Preset (x264 only): For software (x264) encoding, lower presets like
veryfastorsuperfastuse less CPU but result in a larger file size (and thus require higher bitrate for the same quality). Higher presets likemediumorslowoffer better quality at lower bitrates but demand much more CPU power. - Testing Your Stream: Before going public, do a test stream to an unlisted or private YouTube video. This allows you to check audio/video sync, quality, and stability without an audience.
Live Stream Management and Troubleshooting
Even with perfect preparation, issues can arise. Knowing how to monitor and troubleshoot your stream is essential for a smooth broadcast.
Going Live and Monitoring
Once your setup is configured and tested, it’s time to broadcast.
- Start Stream in Encoder: Click “Start Streaming” in OBS Studio (or your chosen software).
- Verify in YouTube Studio: Navigate back to YouTube Studio (
studio.youtube.com), go to “Go live” > “Stream” and look for the “Stream Health” panel. - Go Live on YouTube: Once “Stream Health” shows a “Good” connection and your preview looks correct, click “Go Live” in YouTube Studio. This formally starts your public broadcast.
- Monitor Stream Health: Keep an eye on the “Stream Health” tab in YouTube Studio during your broadcast. It provides real-time data on your connection, dropped frames, and encoding quality.
- Chat Moderation: Use YouTube Studio’s live chat panel to monitor and moderate comments, pin messages, or timeout/hide users.
Common Technical Issues and Solutions
Proactive troubleshooting can prevent minor glitches from becoming major problems.
- Buffering/Lag:
- Cause: Insufficient upload speed, network congestion, or too high a bitrate.
- Solution: Reduce your video bitrate in OBS, check your internet speed, ensure a wired connection, and close other bandwidth-intensive applications.
- Audio Issues (No Sound, Distortion, Echo):
- Cause: Incorrect microphone selection, muted mic, incorrect gain, or audio loop.
- Solution: Verify the correct audio input is selected in OBS, check OBS audio mixer levels, ensure microphone is not muted, and wear headphones to prevent echoes.
- Video Issues (Black Screen, Frozen Image):
- Cause: Incorrect source selected in OBS, camera not connected, outdated drivers, or GPU overload.
- Solution: Ensure the correct video source is active in OBS, check camera connections, update graphics drivers, and reduce resolution/bitrate if GPU is struggling.
- Dropped Frames:
- Cause: CPU overload, internet instability, or too high a bitrate/resolution for your system.
- Solution: Use a hardware encoder, reduce CPU usage preset (if using x264), lower resolution/frame rate, or decrease bitrate. Check your network stability.
- Stream Key Problems:
- Cause: Incorrect stream key, incorrect server URL.
- Solution: Always copy-paste the latest stream key from YouTube Studio. Ensure the server URL in OBS matches YouTube’s primary ingest server.

Post-Stream Procedures
After your live broadcast concludes, there are a few important steps.
- End Stream in Encoder: Click “Stop Streaming” in OBS.
- End Stream on YouTube: In YouTube Studio, click “End Stream.” Your stream will become an on-demand video available on your channel.
- Review Analytics: Access YouTube Studio’s analytics to review viewer engagement, peak concurrent viewers, chat activity, and revenue data. This data is invaluable for improving future streams.
- Download VODs: You can download a copy of your full live stream (VOD) from YouTube Studio for archival purposes or to repurpose content.
By diligently following these technical guidelines and continuously optimizing your setup, you can create a professional, engaging, and stable live streaming experience on YouTube.
aViewFromTheCave is a participant in the Amazon Services LLC Associates Program, an affiliate advertising program designed to provide a means for sites to earn advertising fees by advertising and linking to Amazon.com. Amazon, the Amazon logo, AmazonSupply, and the AmazonSupply logo are trademarks of Amazon.com, Inc. or its affiliates. As an Amazon Associate we earn affiliate commissions from qualifying purchases.