
Google Earth has long been celebrated as one of the most sophisticated geospatial tools available to the public, offering a digital twin of our planet composed of satellite imagery, aerial photography, and GIS data. However, tucked away within the desktop version of this software lies a powerful, hidden feature that transforms the globe-trotting experience from a static observation into an immersive aeronautical adventure: the integrated flight simulator.
Whether you are a tech enthusiast looking to push the limits of software or an aspiring pilot wanting to practice basic navigation over photorealistic terrain, the Google Earth flight simulator provides a unique intersection of high-end mapping technology and interactive entertainment. This guide explores the technical requirements, control schemes, and advanced maneuvers necessary to master the skies within Google Earth Pro.
Getting Started: Technical Configuration and Access
Before taking to the skies, it is essential to understand the platform requirements. While the web-based version of Google Earth and the mobile application offer stunning visuals, the robust flight simulator feature is a core component of Google Earth Pro for Desktop. This version is free to download and remains the preferred environment for professional-grade exploration and high-resolution rendering.
Activating the Simulator Mode
Accessing the simulator is straightforward, but it is often considered an “Easter egg” because of its discreet placement within the user interface. There are two primary ways to initiate the flight mode:
-
Menu Navigation: Open Google Earth Pro and navigate to the “Tools” menu in the top navigation bar. From the dropdown, select “Enter Flight Simulator.”
-
Keyboard Shortcuts: For faster access, users on Windows can press
Ctrl + Alt + A. On macOS, the command isCommand + Option + A.
Once the command is triggered, a dialogue box appears, presenting the pilot with their first set of technical choices: aircraft selection and starting location.
Choosing Your Aircraft
Google Earth provides two distinct flight models, each catering to different levels of skill and objectives:
-
The Cirrus SR22: This is a high-performance single-engine piston aircraft. It is the ideal choice for beginners due to its slower speeds and more forgiving handling. If your goal is to tour the 3D architecture of Manhattan or the Grand Canyon at a leisurely pace, the SR22 is the superior tool.
-
The F-16 Fighting Falcon: Designed for users seeking speed and high-altitude maneuvers, the F-16 is significantly more difficult to control. It responds rapidly to inputs and requires precise throttle management. This jet is perfect for long-distance travel across continents or performing high-speed flybys of iconic landmarks.
Selecting a Starting Point
The simulator allows you to start from your current view on the map or from a selection of global airports. For the most realistic experience, selecting a major international hub—such as LAX in Los Angeles or Heathrow in London—will position your aircraft on the runway, ready for a standard takeoff procedure.
Mastering the Flight Controls and HUD
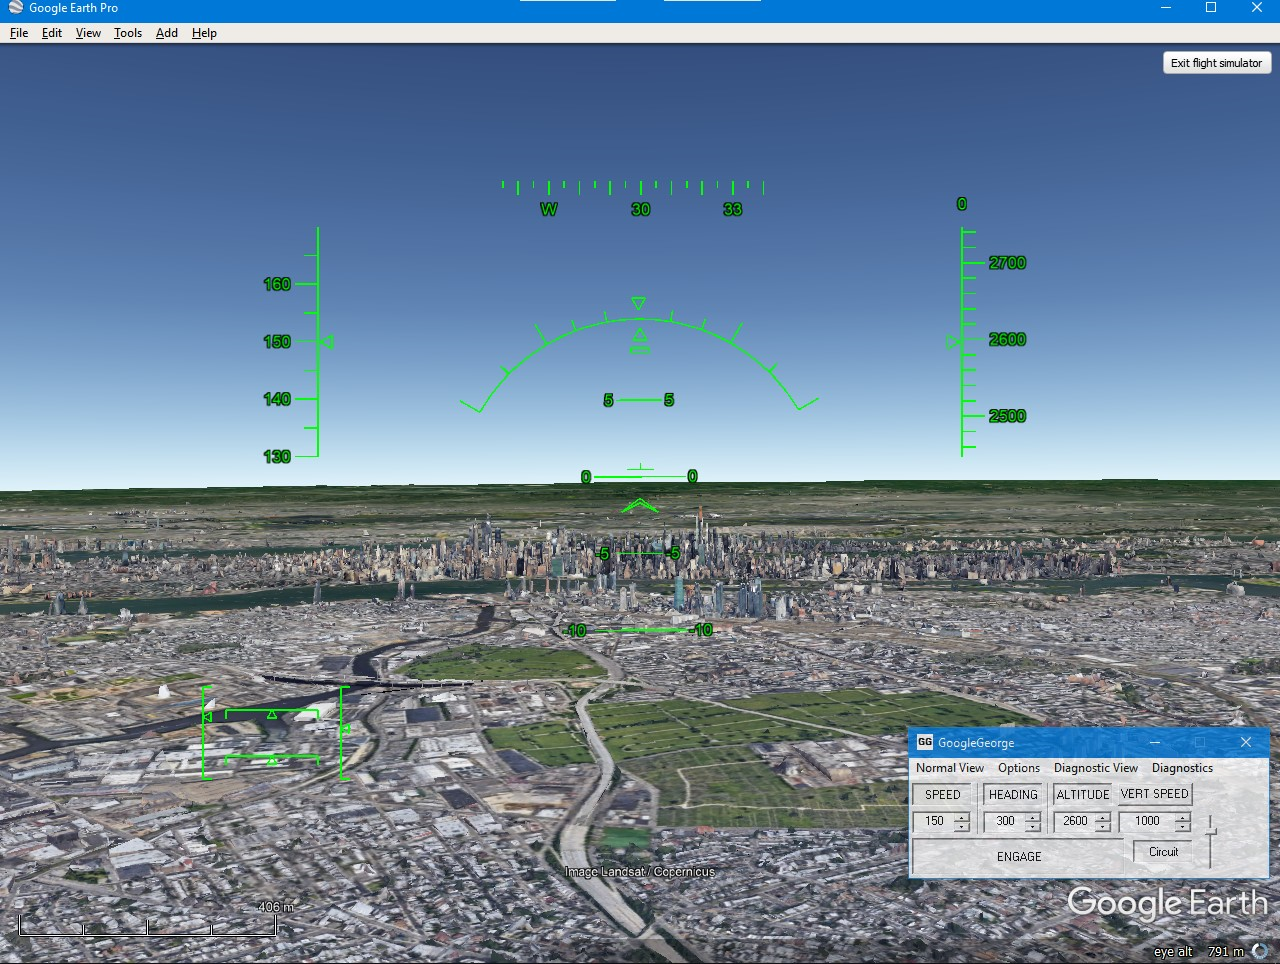
Once the simulation begins, the interface shifts from a standard map view to a specialized Head-Up Display (HUD). Understanding the data displayed on the HUD is critical for maintaining stable flight and navigating successfully.
Interpreting the Head-Up Display (HUD)
The HUD overlays real-time telemetry data onto the screen. Key components include:
-
Airspeed (Knots): Displayed on the left, this indicates the aircraft’s speed relative to the air.
-
Heading: Located at the top of the screen, showing your direction (0 to 360 degrees).
-
Pitch Angle: Represented by the horizontal lines in the center, indicating the nose’s orientation relative to the horizon.
-
Bank Angle: Shows the degree of tilt during a turn.
-
Vertical Speed (Feet per minute): Indicates how fast you are climbing or descending.
-
Altitude (Feet above sea level): Displayed on the right side of the HUD.
Keyboard and Mouse Navigation
While the simulator supports joysticks and external controllers, many users rely on the keyboard and mouse. The control logic is inverted, mimicking the physics of a real yoke or flight stick.
-
Thrust Control: Use the
Page Upkey to increase power andPage Downto decrease it. For takeoff, you will generally need to apply 100% thrust. -
Pitch and Roll: These are managed via the arrow keys or the mouse. Pressing the
Down Arrowpulls the nose up (climbing), while theUp Arrowpushes the nose down (descending). TheLeftandRightarrows control the roll/ailerons. -
Rudder Control: The
InsertandEnter(orNumeric 0andEnter) keys manage the rudder, allowing for coordinated turns and alignment during landings. -
Flaps and Gear: Use
Fto increase flap settings for extra lift at low speeds andGto retract or extend the landing gear.
To use the mouse for control, click in the center of the screen. The cursor will change to a small crosshair, and your aircraft will follow the movement of the mouse. This mode offers smoother, more granular control than the incremental taps of a keyboard.
Advanced Flight Techniques and Procedures
Flying in Google Earth is not merely about staying airborne; it involves understanding the physics of flight and the limitations of the software’s rendering engine.
Takeoff and Initial Climb
To take off from a runway, ensure your flaps are set to 20% (press F once) and apply full thrust. As the airspeed indicator reaches approximately 100 knots for the SR22 or 150 knots for the F-16, gently pull back on the controls (Down Arrow). Once the aircraft is stabilized in a climb and has cleared the ground by several hundred feet, retract the landing gear (G) to reduce aerodynamic drag.
Navigation and 3D Rendering
One of the primary benefits of the Google Earth flight simulator is the ability to leverage the platform’s massive database of 3D buildings and terrain. To maximize the visual experience:
-
Enable 3D Buildings: In the “Layers” panel of Google Earth Pro, ensure that “3D Buildings” and “Terrain” are checked. This allows you to fly through photorealistic cityscapes.
-
Adjust Cache Settings: Because flight happens at high speeds, the software must stream data rapidly. Increasing the memory cache in the “Options” menu can help prevent “pop-in” of textures and ensure a smoother visual experience.
-
Coordinate Navigation: Experienced users often find specific latitude and longitude coordinates for remote wonders, such as the pyramids of Giza or the Himalayas, and start their flight directly at those locations to bypass long travel times.
The Art of the Landing
Landing is the most challenging aspect of the simulation. It requires a delicate balance of airspeed, descent rate, and alignment.
-
The Approach: Line up with the runway from several miles out. Reduce thrust to slow the aircraft down.
-
Configuration: Extend the landing gear and deploy full flaps to increase drag and lift, allowing for a slower stable approach speed.
-
Touchdown: Maintain a shallow angle of descent. Just before the wheels touch the tarmac, perform a “flare” by gently pulling back on the controls to bring the nose up slightly. This ensures the rear wheels touch first.
-
Braking: Once on the ground, reduce thrust to zero and use the comma (
,) and period (.) keys to apply the left and right wheel brakes respectively.
Hardware Optimization and Performance
To achieve a professional-grade simulation experience, the underlying hardware must be configured to handle the rapid data throughput required by Google Earth.
Graphics and Performance Tuning
Flight simulation is resource-intensive because the software must render new tiles of imagery every second. For the best performance:
-
Graphics Mode: Toggle between DirectX and OpenGL (found in the “Tools” > “Options” menu) to see which performs better on your specific GPU. Generally, DirectX is more stable on Windows systems, while OpenGL is preferred for Mac.
-
Atmosphere Effects: Disabling the “Atmosphere” layer can significantly boost frame rates if you are experiencing lag, though it does reduce the realism of the horizon and lighting.
-
Joystick Integration: If you have a USB flight stick, Google Earth Pro will typically detect it automatically. Calibrating your joystick through your operating system’s controller settings will provide a much more intuitive flying experience than a keyboard, allowing for subtle adjustments that are crucial for landing high-performance jets like the F-16.
The Role of High-Speed Connectivity
Since Google Earth Pro streams its imagery from Google’s servers in real-time, your internet connection is as important as your CPU. A high-bandwidth connection ensures that the 3D meshes for mountains and buildings load before you fly past them. For users with slower connections, it is advisable to “pre-cache” an area by flying over it slowly in standard map mode before engaging the flight simulator.

Conclusion: The Value of the Simulation
The Google Earth flight simulator is more than just a hidden feature; it is a testament to the power of modern geospatial technology. By combining a global database of imagery with a functional physics engine, Google provides a tool that allows users to explore the world from a perspective once reserved for pilots. From the technical mastery of the HUD to the strategic management of airspeeds and descent rates, this built-in software offers a comprehensive, educational, and visually stunning way to interact with the digital Earth. Whether you are navigating the dense urban canyons of Tokyo or soaring over the desolate beauty of the Sahara, the simulator remains one of the most effective ways to visualize the scale and complexity of our planet.
aViewFromTheCave is a participant in the Amazon Services LLC Associates Program, an affiliate advertising program designed to provide a means for sites to earn advertising fees by advertising and linking to Amazon.com. Amazon, the Amazon logo, AmazonSupply, and the AmazonSupply logo are trademarks of Amazon.com, Inc. or its affiliates. As an Amazon Associate we earn affiliate commissions from qualifying purchases.