
Understanding the specific graphics processing unit (GPU) installed in your personal computer is fundamental for a wide array of tasks, from optimizing gaming performance to ensuring software compatibility and planning hardware upgrades. The GPU, often referred to as the graphics card, is a specialized electronic circuit designed to rapidly manipulate and alter memory to accelerate the creation of images, video, and animations. Knowing its exact model allows users to download the correct drivers, troubleshoot issues, and make informed decisions about their system’s capabilities. This guide will walk you through various reliable methods to identify your GPU on Windows, macOS, and Linux systems, along with a discussion on why this information is crucial for any PC user.
Why Knowing Your GPU is Essential
Your GPU is the powerhouse behind visual experiences on your computer. Its specifications dictate much of what your PC can achieve graphically.
Gaming Performance & Compatibility
For gamers, the GPU is arguably the most critical component. Its model directly impacts frame rates, resolution support, and graphical settings in games. Knowing your GPU helps you determine if a new game will run smoothly on your system and at what quality settings. It also informs decisions on whether an upgrade is necessary to play the latest titles without compromise.
Software Requirements & Updates
Many professional applications, such as video editing suites, 3D rendering software, and CAD programs, heavily leverage GPU acceleration. These programs often have minimum GPU requirements, and knowing your hardware ensures compatibility. Furthermore, keeping your GPU drivers updated is vital for unlocking performance improvements, new features, and critical bug fixes, all of which require knowing your GPU’s manufacturer and model.
Troubleshooting & Upgrades
If you’re experiencing graphical glitches, slow performance, or crashes, knowing your GPU model is the first step in diagnosing the problem. It allows you to search for specific solutions, check for driver conflicts, or determine if the card itself might be failing. When considering an upgrade, identifying your current GPU helps you assess its performance tier and choose a successor that offers a significant improvement compatible with your existing system’s power supply and motherboard.
Selling or Buying Used Components
Whether you’re selling your old GPU or looking to buy a used one, accurate identification is key. Precise model numbers, VRAM specifications, and manufacturer details ensure transparency in transactions and help you confirm the authenticity and performance tier of the component.
Method 1: Software-Based Detection
The easiest and most common way to identify your GPU is through software utilities built into your operating system or via third-party applications. These methods are non-invasive and provide detailed information without requiring you to open your computer case.
Task Manager (Windows)
For Windows 10 and 11 users, the Task Manager offers a quick overview of your GPU.
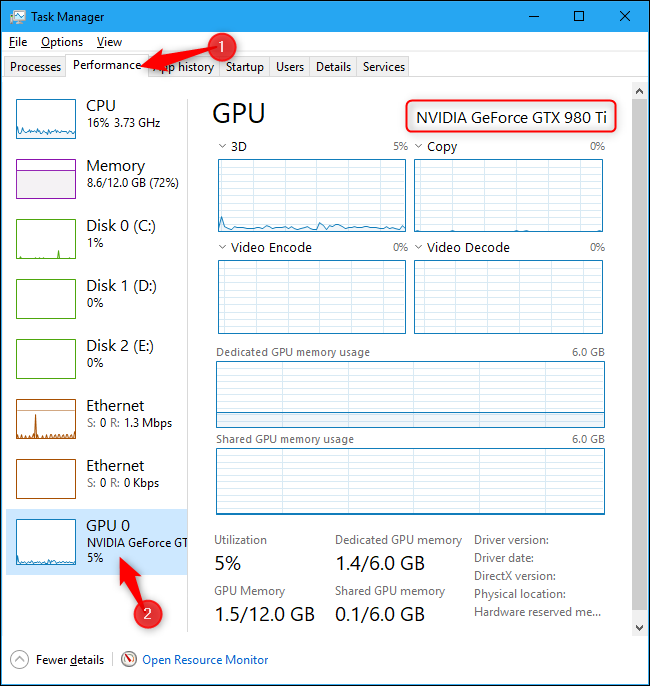
- Steps: Press
Ctrl + Shift + Escto open Task Manager. Navigate to the “Performance” tab. In the left sidebar, you’ll see “GPU” listed, potentially multiple times if you have integrated and dedicated graphics. Clicking on one will display its name, real-time usage, and other basic statistics. - Details: This method is excellent for a quick glance at the GPU’s name and its current load, but it doesn’t provide in-depth specifications like VRAM type or driver version.
Device Manager (Windows)
The Device Manager is a core Windows tool for managing all hardware components.
- Steps: Press
Win + Xand select “Device Manager” from the power user menu. Expand the “Display adapters” section. Here, you will see the name(s) of your installed GPU(s). - Details: This provides the exact model name and indicates if there are any driver issues (e.g., an exclamation mark). It’s a reliable method for basic identification and driver status checks.
DirectX Diagnostic Tool (DxDiag)
DxDiag is a powerful diagnostic tool that gathers information about your system’s multimedia hardware and software.
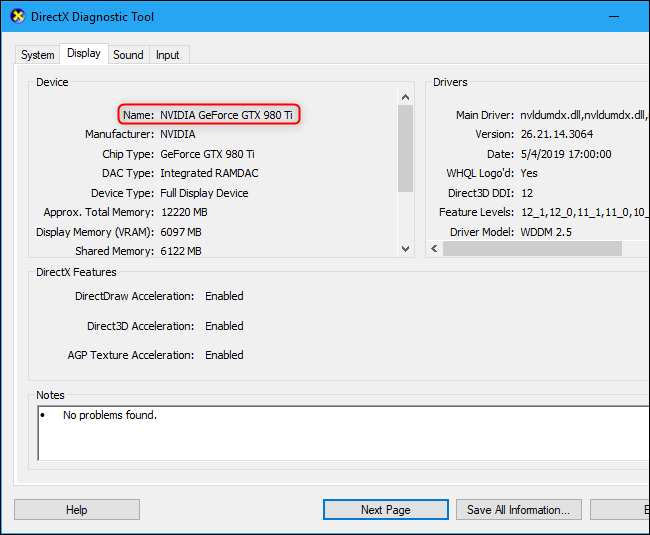
- Steps: Press
Win + Rto open the Run dialog, then typedxdiagand press Enter. Click “Yes” if prompted to check for digital driver signatures. Once the tool loads, navigate to the “Display” tab (or “Display 1,” “Display 2,” etc., if you have multiple GPUs/monitors). Under the “Device” section, you’ll find the “Name” of your GPU, along with its manufacturer, chip type, DAC type, and approximate total memory (VRAM). - Details: DxDiag provides a more comprehensive overview, including not just the GPU name and VRAM, but also the current driver version and date, which is crucial for driver updates and troubleshooting.
System Information (Windows)
Another built-in Windows utility, System Information provides a detailed overview of your system’s hardware and software environment.
- Steps: Press
Win + R, typemsinfo32, and press Enter. In the System Information window, navigate through the categories on the left: “Components” > “Display.” You’ll find entries for “Name,” “Adapter Type,” “Adapter Description,” and “Adapter RAM,” among others. - Details: Similar to Device Manager and DxDiag, this tool offers clear identification of the GPU and its associated memory, though it might be less comprehensive than DxDiag for graphics-specific details.
Third-Party Tools
For the most comprehensive details about your GPU, third-party software tools are invaluable.
- GPU-Z: A free, lightweight utility specifically designed to display information about your graphics card. It shows the GPU name, die size, transistors, release date, BIOS version, memory type, memory size, memory bandwidth, driver version, and much more, including real-time sensor readings for temperatures and clock speeds. It’s highly recommended for enthusiasts and those needing in-depth specs.
- Speccy: From the creators of CCleaner, Speccy provides detailed statistics on every piece of hardware in your computer, including CPU, motherboard, RAM, and storage, in addition to your GPU. It offers a user-friendly interface to quickly find your GPU’s model, manufacturer, VRAM, and operating temperatures.
- HWiNFO: This professional hardware information and diagnostic tool provides extensive details about every component in your system, including extremely granular data about your GPU, such as power consumption, detailed clock speeds for various components within the GPU, and fan speeds. It’s often used for overclocking and deep system monitoring.
- Details: These tools go far beyond basic identification, offering insights into the GPU’s architecture, specific memory configuration, and real-time operational parameters, which are invaluable for performance tuning, troubleshooting, and verifying specifications.
On macOS: About This Mac
macOS provides a straightforward way to check your GPU information.
- Steps: Click the Apple menu in the top-left corner of your screen and select “About This Mac.” In the overview window, you’ll see basic information about your Mac, including its graphics card listed next to “Graphics.” For more details, click “System Report…” and then navigate to “Graphics/Displays” in the sidebar.
- Details: This will show the GPU model, VRAM, and display resolutions. Macs with integrated and dedicated GPUs will list both.
On Linux: Terminal Commands
Linux users can leverage terminal commands to identify their graphics hardware.
- Steps: Open a terminal (
Ctrl + Alt + T).- To list PCI devices, including graphics cards:
lspci -k | grep -EA3 'VGA|3D|Display' - To get OpenGL renderer information (which usually identifies the GPU):
glxinfo | grep "OpenGL renderer"(You might need to installmesa-utilswithsudo apt install mesa-utilsifglxinfois not found). - For NVIDIA-specific details:
nvidia-smi(if NVIDIA drivers are installed).
- To list PCI devices, including graphics cards:
- Details: These commands provide the GPU model, kernel driver in use, and sometimes memory information. They are highly effective for advanced users and server environments.

Method 2: Physical Inspection
While software methods are preferred for their convenience, physically inspecting your GPU is sometimes necessary, especially when troubleshooting a non-booting system or verifying a component before purchase. This method is primarily applicable to desktop PCs.
Opening Your PC Case (Desktop)
- Steps: Ensure your computer is completely shut down and unplugged from the power outlet. For safety, touch an unpainted metal surface on the case to discharge any static electricity. Carefully remove the side panel of your PC case, typically held by a few thumbscrews or regular screws at the back.
- Details: Once the case is open, you’ll be able to see the internal components.
Identifying Labels and Model Numbers
- Details: Locate the GPU. It’s usually the largest expansion card plugged into the longest slot (a PCIe x16 slot) on your motherboard, often near the bottom of the case. It typically has large fans and may require external power cables. Look for stickers or engravings on the shroud or the PCB (printed circuit board) itself. You’ll usually find the manufacturer (e.g., NVIDIA, AMD, ASUS, MSI, Gigabyte, Sapphire) and the specific model number (e.g., GeForce RTX 3070, Radeon RX 6700 XT). Sometimes, the model number is located on the backplate or a sticker on the side facing the front of the case. You might need to use a flashlight or even carefully remove the card from its slot (after disconnecting power and unlatching it) for a clearer view, but only do this if you are comfortable with hardware handling.
Laptops and Integrated Graphics
- Details: For laptops, physical inspection of the GPU is generally not feasible or recommended as components are often integrated into the motherboard or difficult to access. Laptops commonly use integrated graphics (e.g., Intel Iris Xe, AMD Radeon Graphics built into the CPU) or smaller, specialized discrete GPUs (e.g., NVIDIA GeForce RTX Laptop GPUs, AMD Radeon RX Mobile Series) that are often soldered directly onto the motherboard. In these cases, software-based detection is the only practical method.
Understanding Your GPU’s Specifications
Once you’ve identified your GPU, understanding its key specifications will help you gauge its capabilities.
GPU Model Name
This is the primary identifier (e.g., NVIDIA GeForce RTX 4080, AMD Radeon RX 7900 XT). The series number often indicates its performance tier and generation.
VRAM (Video RAM)
VRAM, or video random-access memory, is dedicated memory for your GPU. Its capacity (e.g., 12GB GDDR6) directly impacts performance at higher resolutions and with demanding textures. More VRAM allows the GPU to store more graphical data, preventing bottlenecks.
Core Clocks & Boost Clocks
These figures, measured in MHz or GHz, indicate the speed at which the GPU’s processing cores operate. A higher clock speed generally translates to better performance. “Boost Clock” refers to the maximum speed the GPU can reach under optimal conditions.
CUDA Cores / Stream Processors
These are the parallel processing units within the GPU. NVIDIA cards use “CUDA Cores,” while AMD cards use “Stream Processors.” More of these units generally mean better performance in tasks that benefit from parallel processing, like gaming and rendering.
Driver Version
The driver is software that allows your operating system to communicate with your GPU. Knowing the driver version is crucial for updates. Always download the latest stable drivers directly from NVIDIA or AMD’s official websites for optimal performance and stability.
Troubleshooting Common GPU-Related Issues
Identifying your GPU is the first step in resolving many common PC problems related to graphics.
Driver Updates
Outdated or corrupted drivers are frequent culprits for performance issues, crashes, and visual artifacts. Once you know your GPU, regularly check the manufacturer’s website (NVIDIA or AMD) for the latest drivers. A clean installation of new drivers often resolves many problems.
Performance Problems
If your PC is lagging in games or applications, identify your GPU and then use monitoring tools (like GPU-Z or Task Manager) to check its usage, temperature, and VRAM consumption. High temperatures can lead to thermal throttling, reducing performance. High VRAM usage can indicate that the GPU is struggling to manage the assets.
Display Issues
Problems like flickering screens, incorrect resolutions, or monitors not being detected can sometimes be related to the GPU or its drivers. Ensure your GPU is properly seated in its PCIe slot, power cables are securely connected, and monitor cables are firmly plugged into the GPU’s display outputs. Verifying and updating your GPU drivers is also a key step in diagnosing display-related issues.
By utilizing these methods, you can confidently identify your PC’s GPU and leverage that information to maintain, optimize, and upgrade your system effectively, ensuring a smooth and powerful visual experience.
aViewFromTheCave is a participant in the Amazon Services LLC Associates Program, an affiliate advertising program designed to provide a means for sites to earn advertising fees by advertising and linking to Amazon.com. Amazon, the Amazon logo, AmazonSupply, and the AmazonSupply logo are trademarks of Amazon.com, Inc. or its affiliates. As an Amazon Associate we earn affiliate commissions from qualifying purchases.