In the fast-evolving landscape of technology, keeping your digital environment optimized is paramount for productivity, security, and overall user experience. While modern operating systems like Windows 11 are designed for robustness, even the most advanced software can benefit from a periodic reset. A “fresh install” of Windows 11 means completely wiping your system drive and installing a clean copy of the operating system from scratch. This isn’t just a technical procedure; it’s a strategic move to reclaim performance, eliminate digital clutter, and fortify your system against the myriad of issues that accumulate over time.
Think of it as decluttering your digital workspace or giving your computer a complete overhaul. Over months and years of use, installations, uninstallations, temporary files, registry entries, and remnants of old software can bog down even the most powerful machines. This leads to slower boot times, unresponsive applications, and sometimes, unexplained crashes. For professionals, content creators, or anyone relying on their PC for work or income generation, these issues aren’t just frustrating; they represent lost time and potential financial impact. A fresh install not only resolves these performance bottlenecks but also ensures you’re starting with a pristine, secure, and highly responsive system, setting a new benchmark for your digital productivity. This comprehensive guide will walk you through every step, from meticulous preparation to post-installation optimization, ensuring your Windows 11 fresh install is seamless and successful.
Preparation is Key: Before You Begin Your Digital Refresh
Embarking on a fresh installation of Windows 11 is a significant undertaking that, if not approached methodically, can lead to frustration or, worse, data loss. The success of your fresh install hinges almost entirely on the thoroughness of your preparation. This isn’t merely about gathering tools; it’s about safeguarding your digital assets, understanding your system’s foundation, and setting yourself up for an efficient and error-free process. This preparatory phase is your crucial first investment, ensuring that the time and effort you dedicate to the installation yield maximum returns in terms of system performance and personal data security.
Backup Your Precious Data
This is, without exaggeration, the single most critical step in the entire process. A fresh install will erase everything on the drive where Windows is installed. Failure to back up your data means permanent loss of documents, photos, videos, projects, and any other personal or professional files. Consider your data as valuable digital assets; protecting them is a direct investment in your peace of mind and continuity.
- External Hard Drive: The most straightforward method. Copy all critical folders (Documents, Pictures, Videos, Downloads, Desktop) to an external USB drive. Ensure the drive has sufficient space and is reliable.
- Cloud Storage: Services like Microsoft OneDrive, Google Drive, or Dropbox offer excellent solutions for backing up data, especially for files you access frequently. Many Windows 11 users already have OneDrive integrated, making synchronization seamless. This method also provides an offsite backup, adding an extra layer of security.
- System Imaging (Optional): For those who want an absolute fallback, creating a full system image using tools like Macrium Reflect Free or even Windows’ built-in (though somewhat hidden) System Image Backup feature allows you to restore your entire previous system in case something goes wrong, though this isn’t necessary for a fresh install goal.
Remember to double-check your backups. Plug in your external drive, navigate to a few folders, and ensure files are accessible. For cloud backups, verify synchronization status.
Gather Necessary Tools and Information
Just as a craftsman prepares his workbench, you need to assemble the right components for your Windows 11 installation.
- Windows 11 Installation Media: This will typically be a USB flash drive (8GB or larger) containing the Windows 11 installer. You’ll create this in the next section using Microsoft’s Media Creation Tool or by manually writing an ISO to the USB.
- Windows 11 Product Key (If Applicable): If your current Windows 11 license is not digitally linked to your Microsoft account or embedded in your system’s firmware (common for OEM PCs), you might need your 25-character product key. For most modern systems, especially those upgraded from Windows 10, the license is digital and will reactivate automatically upon signing in with your Microsoft account.
- Internet Connection: Essential during and after installation for updates, driver downloads, and account setup.
- Essential Drivers (Optional, but Recommended): While Windows 11 has a good repository of built-in drivers, it’s a good practice to download critical drivers beforehand, especially for your network adapter (Ethernet/Wi-Fi) and chipset, directly from your PC or motherboard manufacturer’s website. This ensures you can get online immediately post-installation and avoid compatibility issues.
- List of Essential Software: Make a note of all the applications you use daily (web browser, office suite, creative software, security tools) so you can systematically reinstall them. This helps in maintaining your productivity workflow.
Verify System Compatibility
Before proceeding, ensure your hardware meets the minimum system requirements for Windows 11. While most PCs running Windows 10 are compatible, Windows 11 introduced stricter requirements, notably:
- Processor: 1 GHz or faster with 2 or more cores on a compatible 64-bit processor or System on a Chip (SoC).
- RAM: 4 GB or greater.
- Storage: 64 GB or greater available storage.
- System Firmware: UEFI, Secure Boot capable.
- TPM: Trusted Platform Module version 2.0.
- Graphics Card: Compatible with DirectX 12 or later with WDDM 2.0 driver.
- Display: High definition (720p) display greater than 9” diagonally, 8 bits per color channel.
You can use Microsoft’s PC Health Check app (available on their website) to quickly assess your system’s readiness. Encountering compatibility issues mid-installation can be a significant roadblock, so confirming this upfront saves time and effort.
Understanding Your License and Activation
The licensing model for Windows has evolved, and understanding it can save you hassle. Most modern Windows licenses are “digital licenses” tied to your Microsoft account or your device’s hardware.
- Digital License (Recommended): If your previous Windows 10 or 11 was activated and linked to your Microsoft account, the fresh install should automatically activate once you sign in with the same account. This is the most common scenario for retail purchases or free upgrades.
- OEM License: Pre-installed Windows on brand-name PCs (Dell, HP, Lenovo, etc.) often has the product key embedded in the UEFI firmware. The installer usually detects this key automatically.
- Retail Product Key: If you purchased a standalone copy of Windows, you’ll have a physical product key. Keep this handy.
Knowing your activation method is part of smart digital asset management, ensuring your investment in the OS is preserved.
Creating Your Windows 11 Installation Media
With your data backed up and essential information gathered, the next step is to prepare the actual tool that will perform the installation: a bootable USB drive containing the Windows 11 setup files. This media acts as the gateway to a pristine operating system, and Microsoft provides straightforward tools to create it.
Using the Windows 11 Media Creation Tool
This is Microsoft’s official and recommended method for creating installation media. It’s user-friendly and handles the download and preparation automatically.
- Download the Tool: Go to the official Microsoft Windows 11 download page (search “Download Windows 11”) and locate the section “Create Windows 11 Installation Media.” Click “Download Now” to get the Media Creation Tool.
- Run the Tool: Execute the downloaded
MediaCreationToolW11.exefile. Accept the license terms. - Language and Edition: The tool will usually detect your current Windows settings and suggest the recommended options for language and edition (Windows 11). If you need different options, uncheck “Use the recommended options for this PC.”
- Choose Media Type: Select “USB flash drive” and click “Next.” Ensure your USB drive (minimum 8GB) is plugged in and recognized. All data on the USB drive will be erased.
- Select USB Drive: Choose the correct USB drive from the list. Be extremely careful to select the right one to avoid accidentally formatting another drive.
- Download and Create: The tool will now download the Windows 11 files and create the bootable USB drive. This process can take some time depending on your internet speed. Once complete, you’ll have a ready-to-use bootable USB.
Downloading an ISO and Creating a Bootable USB (Advanced Option)
For users who prefer more control, need to create multiple bootable drives, or are using a different operating system to prepare the USB, downloading the ISO file directly and using a third-party tool is an alternative.
- Download Windows 11 ISO: On the same Microsoft Windows 11 download page, scroll down to “Download Windows 11 Disk Image (ISO).” Select “Windows 11 (multi-edition ISO)” and confirm your product language. Click “Download.” This will download a large
.isofile (typically 5-6 GB). - Use a Third-Party Tool (e.g., Rufus):
- Download Rufus from its official website (
rufus.ie). It’s a small, portable utility. - Plug in your USB flash drive (8GB+).
- Open Rufus. It should automatically detect your USB drive.
- Under “Boot selection,” click “SELECT” and browse to your downloaded Windows 11 ISO file.
- For “Image option,” “Standard Windows installation” is usually sufficient.
- For “Partition scheme,” generally “GPT” is used for UEFI systems, and “MBR” for older BIOS systems. Most modern PCs use UEFI/GPT. If unsure, check your current system’s partition style (Disk Management > Right-click disk > Properties > Volumes tab).
- Click “START.” Rufus will warn you that all data on the USB will be destroyed. Confirm, and it will create the bootable drive.
- Download Rufus from its official website (
Both methods result in a bootable USB drive ready to kickstart your fresh Windows 11 installation.
The Fresh Installation Process: A Step-by-Step Guide
With your bootable USB drive prepared, you’re ready to initiate the transformation of your system. This is the core of the fresh install, involving several crucial steps that will erase your old operating system and lay the foundation for a new, optimized Windows 11 environment.
Booting from Your USB Drive
To start the installation, your computer needs to boot from the USB drive instead of your internal hard drive.
- Insert USB: Plug your bootable Windows 11 USB drive into an available USB port on your computer.
- Restart and Enter BIOS/UEFI: Restart your computer. As it powers on, you’ll need to repeatedly press a specific key to enter your computer’s BIOS or UEFI firmware settings, or to access a “boot menu.” Common keys include
Del,F2,F10,F12,Esc. The key varies by manufacturer (e.g., Dell, HP, Lenovo, ASUS). - Change Boot Order: Once in the BIOS/UEFI, navigate to the “Boot” or “Boot Options” section. You’ll need to set your USB drive as the primary boot device. Alternatively, if your system has a “Boot Menu” (accessed via
F12or similar), you can select the USB drive directly without changing the permanent boot order. - Save and Exit: Save your changes (if in BIOS/UEFI settings) and exit. Your computer should now restart and boot from the USB drive, launching the Windows 11 setup.
Windows Setup: Initial Configuration
The first few screens are straightforward setup prompts.
- Language, Time, Keyboard: Select your preferred language, time and currency format, and keyboard or input method. Click “Next.”
- Install Now: Click the “Install now” button.
- Enter Product Key: If prompted, enter your Windows 11 product key. If you have a digital license or plan to activate later, you can click “I don’t have a product key.” The system will usually activate automatically once you connect to the internet and sign in with your Microsoft account if your license is linked.
- Select Operating System: If your ISO contains multiple editions (e.g., Home, Pro), choose the version you are licensed for. Click “Next.”
- License Terms: Accept the Microsoft Software License Terms by checking the box and clicking “Next.”
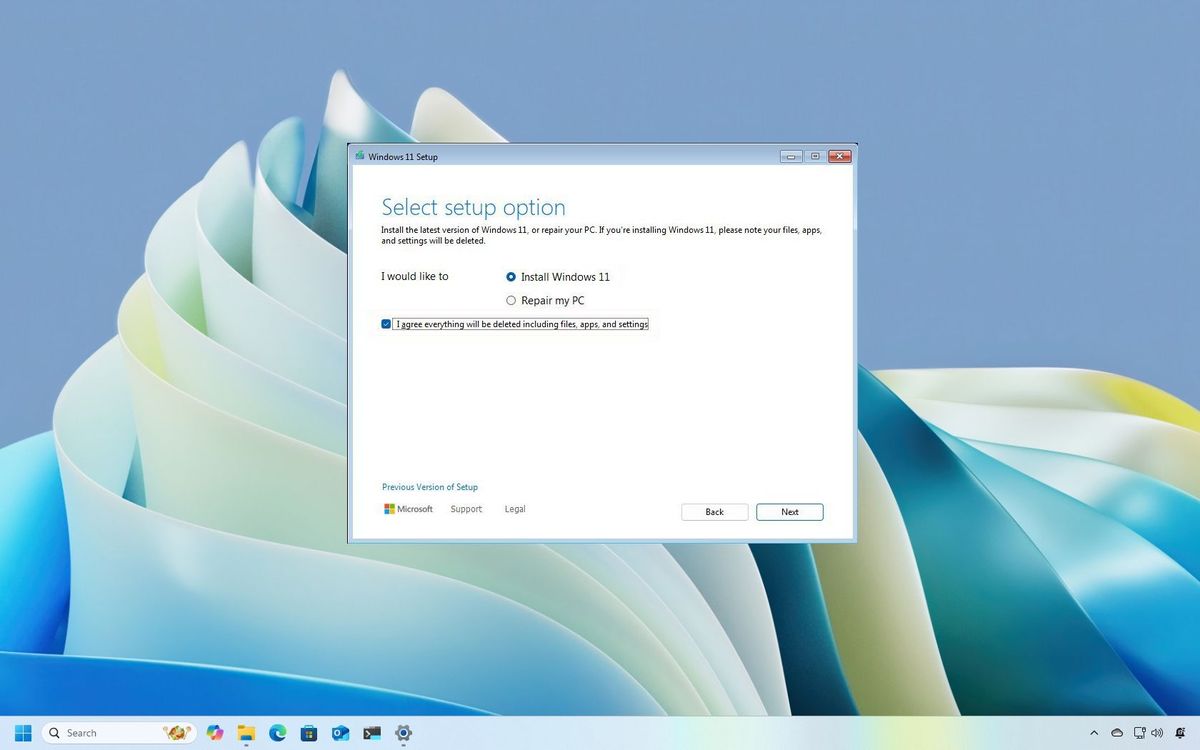
Choosing Installation Type: The “Fresh” Part
This is where you make the critical decision for a fresh install.
- Which type of installation do you want?: Select “Custom: Install Windows only (advanced).” Do NOT choose “Upgrade,” as that will keep your files and settings, defeating the purpose of a fresh install.
- Where do you want to install Windows?: This is the most crucial step. You’ll see a list of drives and partitions.
- Identify Your Main Drive: Locate the drive where your previous Windows installation resided (usually “Drive 0”). Be extremely careful here.
- Delete Partitions: For a truly fresh install, you want to delete all existing partitions on your main drive (e.g., “Drive 0 Partition 1,” “Drive 0 Partition 2,” “Recovery,” “System,” etc.). Select each partition on the target drive and click “Delete.” This will free up all space on that drive, creating “Unallocated Space.”
- Create New Partition: Select the “Unallocated Space” on your target drive and click “New.” You can accept the default size to use the entire drive for Windows, or specify a smaller size if you plan to create other partitions later (e.g., for data storage). Click “Apply.” Windows will often create a few small system partitions automatically.
- Select Installation Partition: Choose the largest partition you just created (it will likely be named “Drive 0 Partition X”) and click “Next.” This is where Windows 11 will be installed.
Windows Installation and Initial Setup
The installer will now copy files and install Windows. Your computer will restart several times during this process.
- Copying Files: The installer will copy Windows files, install features, and install updates.
- OOBE (Out-of-Box Experience): After the final restart, you’ll be greeted by the Windows 11 Out-of-Box Experience.
- Region and Keyboard Layout: Confirm your region and keyboard layout.
- Network Connection: Connect to a Wi-Fi network or plug in an Ethernet cable.
- Name Your Device: Give your computer a name.
- Microsoft Account Sign-in: Sign in with your Microsoft account. This is important for digital license activation and syncing settings. If you prefer a local account, there are methods to bypass Microsoft account creation during OOBE, but they are often more complex and not recommended for typical users.
- PIN Creation: Create a PIN for faster sign-ins.
- Privacy Settings: Review and adjust privacy settings according to your preferences.
- Customize Your Experience: Windows may ask you what you plan to use your computer for (gaming, creativity, work, etc.) to tailor app suggestions.
- Check for Updates: The system might perform a final check for updates before presenting your desktop.
Congratulations! You’ve successfully performed a fresh install of Windows 11. Your system is now clean, lean, and ready for optimization.
Post-Installation Essentials: Optimizing Your New System
A fresh install is just the beginning. To truly harness the power and efficiency of your new Windows 11 environment, a series of post-installation steps are crucial. These steps ensure all hardware functions correctly, the system is secure, and you have all the necessary tools to be productive. This phase is about transitioning from a bare-bones OS to a personalized, robust digital workspace.
Install Device Drivers
While Windows 11 has improved driver support, relying solely on generic drivers can lead to suboptimal performance or missing functionality.
- Check Device Manager: Right-click the Start button, select “Device Manager.” Look for any devices with yellow exclamation marks, indicating missing or problematic drivers.
- Manufacturer Websites: The most reliable source for drivers is your PC or motherboard manufacturer’s support website. Download the latest drivers for your:
- Chipset: Crucial for overall system stability and communication.
- Graphics Card (GPU): Essential for display performance, gaming, and video editing.
- Network Adapter (Ethernet/Wi-Fi): Ensures stable internet connectivity.
- Audio Driver: For sound output and input.
- Other Peripherals: Webcam, printer, specialized input devices.
- Install Drivers Systematically: Install them one by one, restarting your computer when prompted. Installing drivers from official sources enhances system stability and can unlock advanced features, directly impacting your user experience and productivity.
Update Windows 11
Keeping your operating system up-to-date is non-negotiable for security and performance.
- Windows Update: Go to Start > Settings > Windows Update. Click “Check for updates” and install all available updates. This may require multiple restarts.
- Optional Updates: Sometimes, “Optional updates” (including drivers and non-critical updates) are available. Review these and install any that seem relevant to your hardware.
Regularly updating Windows protects your system from vulnerabilities, introduces new features, and resolves bugs, strengthening your digital security posture.
Restore Your Backed-Up Data
Now that your system is stable and updated, it’s time to bring back your personal files.
- Copy from External Drive: If you backed up to an external hard drive, simply plug it in and copy your files back to the respective folders (Documents, Pictures, etc.) on your new C: drive.
- Synchronize Cloud Storage: If you used cloud services like OneDrive, sign in to your account, and your files should automatically begin to synchronize. Ensure the “Files On-Demand” setting is configured to your preference to save local storage space if needed.
Restoring your data seamlessly brings your personal “brand” and work back into your new environment.
Install Essential Software and Applications
Your clean slate needs the tools that drive your productivity and entertainment.
- Web Browser: Download and install your preferred web browser (Chrome, Firefox, Edge, etc.).
- Office Suite: Install Microsoft Office, LibreOffice, or other productivity software.
- Security Software: While Windows Defender is robust, if you prefer a third-party antivirus, install it now.
- Creative Tools: Photoshop, GIMP, video editors, etc.
- Communication Apps: Microsoft Teams, Zoom, Discord, etc.
- Utilities: Archivers (7-Zip), media players (VLC), PDF readers.
Consider installing a password manager to securely manage your login credentials for all these new applications.
Personalize and Optimize Settings
Tailoring Windows 11 to your preferences enhances your daily interaction and efficiency.
- Personalization: Go to Start > Settings > Personalization. Customize your desktop background, themes, colors, and lock screen.
- Privacy Settings: Review and adjust privacy settings (Start > Settings > Privacy & security) to control what data is shared.
- Notifications: Configure notification preferences to minimize distractions.
- Power & Sleep Settings: Adjust power plans for optimal performance or energy saving, especially for laptops.
- Startup Apps: Go to Start > Settings > Apps > Startup. Disable unnecessary apps from launching with Windows to improve boot times and system responsiveness.
Optimizing these settings ensures your new system not only performs well but also aligns with your personal workflow and digital identity.
Maximizing Your Windows 11 Experience: Beyond the Basics
With your fresh installation complete and optimized, it’s time to delve deeper into leveraging Windows 11’s capabilities and adopting best practices for long-term system health. This phase focuses on embracing new features, solidifying security, and maintaining the peak performance achieved through your fresh install.
Embracing Windows 11 Features for Enhanced Productivity
Windows 11 introduced several innovative features designed to streamline workflows and boost productivity. Take the time to explore and integrate them into your routine.
- Snap Layouts and Snap Groups: Master these multitasking tools (hover over the maximize button on any window) to efficiently arrange multiple applications on your screen. This is a game-changer for professionals managing several tasks simultaneously, boosting efficiency in the digital workspace.
- Widgets: The personalized feed of news, weather, and calendar events can be customized to your interests. While some find it distracting, others find it a useful glance at relevant information.
- Microsoft Teams Integration: If you use Teams for work or personal communication, its direct integration into the taskbar provides quick access to chats and calls.
- Android App Support (via Amazon Appstore): Explore the possibility of running your favorite Android apps directly on your PC, expanding your software ecosystem.
- Improved Virtual Desktops: Organize your apps into separate virtual desktops for different tasks (e.g., one for work, one for personal browsing). This helps maintain focus and reduces clutter.
These features, when utilized effectively, can significantly enhance your interaction with your PC, making your digital environment more efficient and enjoyable. This ties into “Technology Trends” by utilizing the latest OS features, and “Productivity” by streamlining workflows.
Fortifying Digital Security
A fresh install offers a prime opportunity to establish robust security habits from the ground up. Beyond installing updates, consider these practices:
- Windows Defender and Firewall: Ensure Windows Defender Antivirus is active and performing regular scans. The Windows Firewall should be enabled to protect against unauthorized network access. These built-in tools are highly effective when kept up-to-date.
- Strong, Unique Passwords & MFA: Implement strong, unique passwords for all your online accounts and enable Multi-Factor Authentication (MFA) wherever possible. A password manager is an invaluable tool for this. This is fundamental for protecting your “online income” streams and “personal finance.”
- Browser Security: Utilize browser extensions for ad-blocking and tracking prevention. Be wary of suspicious links and downloads.
- Regular Backups: Continue your practice of regular data backups, even after the initial restoration. Automated cloud backups (OneDrive, Google Drive) are excellent for continuous protection of your most important files.
- User Account Control (UAC): Keep UAC enabled. It provides a security prompt before major system changes, preventing malicious software from making unauthorized modifications.
Prioritizing digital security protects your personal and financial data, safeguarding your brand reputation and avoiding costly compromises.
Ongoing Performance Tips and Maintenance
To ensure your system remains as fast and responsive as it was on day one, adopt a routine of proactive maintenance.
- Disk Cleanup and Storage Sense: Periodically use the built-in Disk Cleanup tool to remove temporary files. Enable Storage Sense (Settings > System > Storage) to automatically free up space by deleting temporary files and managing your Recycle Bin.
- Manage Startup Programs: Regularly review apps that launch with Windows (Task Manager > Startup tab). Disable unnecessary programs to improve boot times and free up system resources.
- Keep Drivers Updated: While you installed essential drivers post-install, periodically check your hardware manufacturer’s websites for newer driver versions, especially for graphics cards.
- Monitor System Health: Use Task Manager (Ctrl+Shift+Esc) to monitor CPU, RAM, and disk usage. If a process is consistently hogging resources, investigate it.
- Regular Restarts: While Windows 11 is stable, regular restarts can help clear system memory and apply pending updates, contributing to overall system health.
These practices are an investment in the longevity and efficiency of your hardware, directly translating to sustained productivity and potentially saving “money” by extending the useful life of your computer. A well-maintained system is a testament to mindful tech ownership, supporting your “personal brand” as someone who values efficiency and reliability.

Conclusion
A fresh installation of Windows 11 is more than just a technical procedure; it’s a strategic investment in your digital future. By systematically wiping away accumulated clutter and starting anew, you reclaim your system’s peak performance, bolster its security, and establish a pristine foundation for your work and personal computing. From the initial meticulous backup to the final touches of personalization and ongoing maintenance, each step outlined in this guide contributes to creating an environment that is fast, reliable, and tailored to your specific needs.
Embracing this process ensures you leverage the full potential of Windows 11, from its innovative productivity features to its robust security framework. A healthy, responsive PC directly translates to enhanced efficiency, better digital security, and ultimately, a more productive and stress-free experience, whether for professional endeavors, creative pursuits, or simply enjoying your digital life. Remember, maintaining your digital tools is just as important as acquiring them; a fresh install is a powerful reminder of this principle, empowering you to navigate the technological landscape with confidence and optimal performance.
aViewFromTheCave is a participant in the Amazon Services LLC Associates Program, an affiliate advertising program designed to provide a means for sites to earn advertising fees by advertising and linking to Amazon.com. Amazon, the Amazon logo, AmazonSupply, and the AmazonSupply logo are trademarks of Amazon.com, Inc. or its affiliates. As an Amazon Associate we earn affiliate commissions from qualifying purchases.