In the ever-evolving digital landscape, maintaining a swift, secure, and responsive operating system is paramount for both productivity and peace of mind. Over time, even the most robust systems can accumulate digital clutter, corrupted files, and lingering software issues that drag down performance. This is where the power of a fresh install of Windows 11 comes into play, offering a clean slate that can rejuvenate your PC and streamline your digital workflow.
This comprehensive guide will walk you through every step of performing a fresh installation of Windows 11. Whether you’re troubleshooting persistent problems, upgrading an older system, or simply craving the pristine feel of a brand-new OS, this process will ensure your computer runs at its optimal potential. We’ll cover everything from crucial preliminary steps like data backup and system requirements to creating installation media, navigating the setup process, and essential post-installation tasks. By the end, you’ll have a fully functional, optimized Windows 11 system ready to tackle any task, enhancing your digital security, productivity, and overall computing experience.
Why a Fresh Install? Reclaiming Performance and Security
Before diving into the technicalities, it’s essential to understand why a fresh install is often the best solution for many common PC ailments. Unlike simply upgrading or resetting Windows, a fresh install completely wipes your primary drive and reinstalls the operating system from scratch. This radical approach delivers several significant benefits:
Eradicating Digital Clutter and Performance Bottlenecks
Over months or years of use, your Windows installation can become bloated with residual files from uninstalled programs, temporary internet files, outdated drivers, and registry errors. This digital clutter acts like sand in the gears of your system, slowing down boot times, application launches, and overall responsiveness. A fresh install eliminates all this accumulated junk, giving your system a pristine environment to operate in. Think of it as spring cleaning for your PC – everything unnecessary is removed, leaving only what’s essential for peak performance. This can translate directly into increased productivity, as you spend less time waiting for your computer and more time accomplishing tasks.
Resolving Stubborn Software Glitches and System Instabilities
Sometimes, software conflicts, driver issues, or even subtle forms of malware can lead to persistent system crashes, freezes, or unpredictable behavior that no amount of troubleshooting seems to fix. These deeply ingrained problems can be incredibly frustrating and costly in terms of lost work and downtime. A fresh installation acts as a comprehensive reset button, wiping away these underlying issues and providing a stable foundation. It ensures that any lingering corruptions or conflicts are completely removed, giving you a reliable and predictable computing experience. For businesses, this means less time spent on IT support and more consistent operational efficiency.
Enhancing Digital Security from the Ground Up
A fresh install is also an excellent opportunity to bolster your digital security. It guarantees that any hidden malware, rootkits, or other malicious software that might have evaded detection by your antivirus is completely removed. Starting with a clean OS allows you to install fresh security software and configure your system with the latest patches and best practices from day one. This proactive approach significantly reduces your vulnerability to cyber threats, protecting your personal data, financial information, and overall digital integrity. In an era where digital security is paramount, a clean slate provides peace of mind.
Essential Preparations: Setting the Stage for Success
Performing a fresh install is a significant undertaking that, if not approached carefully, can lead to data loss. Therefore, meticulous preparation is key. This phase focuses on safeguarding your valuable information, ensuring your hardware meets the necessary specifications, and creating the bootable media required for the installation.
1. Back Up All Your Critical Data
This is, without a doubt, the most crucial step. A fresh install will erase everything on the drive where Windows 11 is to be installed. Do not skip this step. Identify all files, documents, photos, videos, music, and any other personal data you wish to keep.
- External Hard Drive/USB Drive: The most common and reliable method. Simply drag and drop your important folders (Documents, Pictures, Videos, Music, Desktop) to an external drive.
- Cloud Storage: Services like OneDrive, Google Drive, Dropbox, or iCloud offer convenient ways to back up files, especially for smaller data sets or for files you want to access from multiple devices. Ensure your critical folders are synced before proceeding.
- Disk Imaging Software: For a more comprehensive backup, consider third-party disk imaging tools that can create a complete snapshot of your entire drive. This is useful if you want to restore your old system exactly as it was, though it’s less relevant for a truly “fresh” install where you start from scratch.
- Application-Specific Backups: Remember to back up data from specific applications. For instance, export browser bookmarks, save game progress, back up email archives (PST files for Outlook), or export contact lists. Make a note of any essential software licenses or product keys you might need to reactivate post-installation.
2. Verify Windows 11 System Requirements
Windows 11 has specific hardware requirements that differentiate it from previous versions. Before you begin, ensure your PC meets these:
- Processor: 1 GHz or faster with 2 or more cores on a compatible 64-bit processor or System on a Chip (SoC).
- RAM: 4 GB or greater.
- Storage: 64 GB or greater available storage.
- System Firmware: UEFI, Secure Boot capable.
- TPM: Trusted Platform Module (TPM) version 2.0. This is often the sticking point for older hardware.
- Graphics Card: Compatible with DirectX 12 or later with WDDM 2.0 driver.
- Display: High definition (720p) display that is greater than 9” diagonally, 8 bits per color channel.
- Internet Connection and Microsoft Account: Required for all editions of Windows 11 Home and for initial setup for all editions.
You can download Microsoft’s PC Health Check app to quickly assess your system’s compatibility. If your system doesn’t meet the requirements, especially for TPM 2.0 and Secure Boot, you might need to enable them in your BIOS/UEFI settings, or consider alternative solutions if your hardware is too old.
3. Create a Windows 11 Installation Media (Bootable USB Drive)
To perform a fresh install, you’ll need a bootable USB drive containing the Windows 11 installation files. This is easily done using Microsoft’s official Media Creation Tool.
- Requirements: An empty USB flash drive with at least 8GB of storage.
- Download the Tool: Go to the official Microsoft Windows 11 download page and locate the “Create Windows 11 Installation Media” section. Download the tool.
- Run the Tool:
- Launch the downloaded
MediaCreationTool.exe. - Accept the license terms.
- Choose your language and edition (typically “Windows 11” and the recommended options).
- Select “USB flash drive” as the media to use.
- Choose your USB drive from the list (ensure it’s the correct one, as all data on it will be erased).
- The tool will then download the Windows 11 ISO and write it to your USB drive, making it bootable. This process can take some time depending on your internet speed.
- Launch the downloaded
4. Note Down Your Windows 11 Product Key (If Applicable)
If you have a retail copy of Windows 11, locate your product key. If your Windows 11 license is digitally tied to your Microsoft account (common for upgrades from Windows 10 or purchases through the Microsoft Store), you won’t necessarily need to enter a key during installation; it will activate automatically once you sign in with your Microsoft account. However, having the key on hand is always a good practice. You can often find your product key embedded in the system using third-party tools or by checking your Microsoft account online.
The Installation Process: A Step-by-Step Walkthrough
With your data backed up and your bootable USB drive ready, it’s time to begin the actual installation. This involves configuring your PC’s boot order, initiating the setup, and making crucial decisions about drive partitioning.
1. Adjusting BIOS/UEFI Settings for Boot Order
Your computer needs to be told to boot from the USB drive rather than its internal hard drive.
- Access BIOS/UEFI: Restart your computer and repeatedly press the designated key to enter BIOS/UEFI setup. Common keys include
Del,F2,F10,F12, orEsc. The exact key varies by manufacturer (e.g., Dell, HP, Lenovo, Asus, Acer). Consult your PC’s manual or look for a prompt on the screen during startup. - Set Boot Order: Once in the BIOS/UEFI menu, navigate to the “Boot Options” or “Boot Priority” section. Change the boot order to prioritize your USB drive (it might be listed by its brand name or as “USB HDD”).
- Enable Secure Boot and TPM 2.0 (If Needed): While you’re in the BIOS/UEFI, double-check that Secure Boot is enabled and TPM 2.0 is activated under the “Security” or “Boot” settings. If they were previously disabled and your system didn’t meet the requirements, enabling them now is crucial.
- Save and Exit: Save your changes and exit the BIOS/UEFI. Your computer will restart and should now boot from the USB drive.
2. Starting the Windows 11 Setup
Once your computer boots from the USB drive, you’ll see the Windows 11 setup screen.
- Language, Time, and Keyboard: The first screen asks you to select your language, time and currency format, and keyboard input method. Make your selections and click “Next.”
- Install Now: On the next screen, click “Install now.”
- Product Key: You’ll be prompted to enter your product key. If you have one, enter it. If your license is digital or you plan to activate later, click “I don’t have a product key.” Windows will often activate automatically once connected to the internet and signed into your Microsoft account.
- Edition Selection: If you didn’t enter a product key and your installation media supports multiple editions, you might be asked to select the edition of Windows 11 you want to install (e.g., Home, Pro). Choose the one you are licensed for.
- License Terms: Accept the Microsoft Software License Terms and click “Next.”
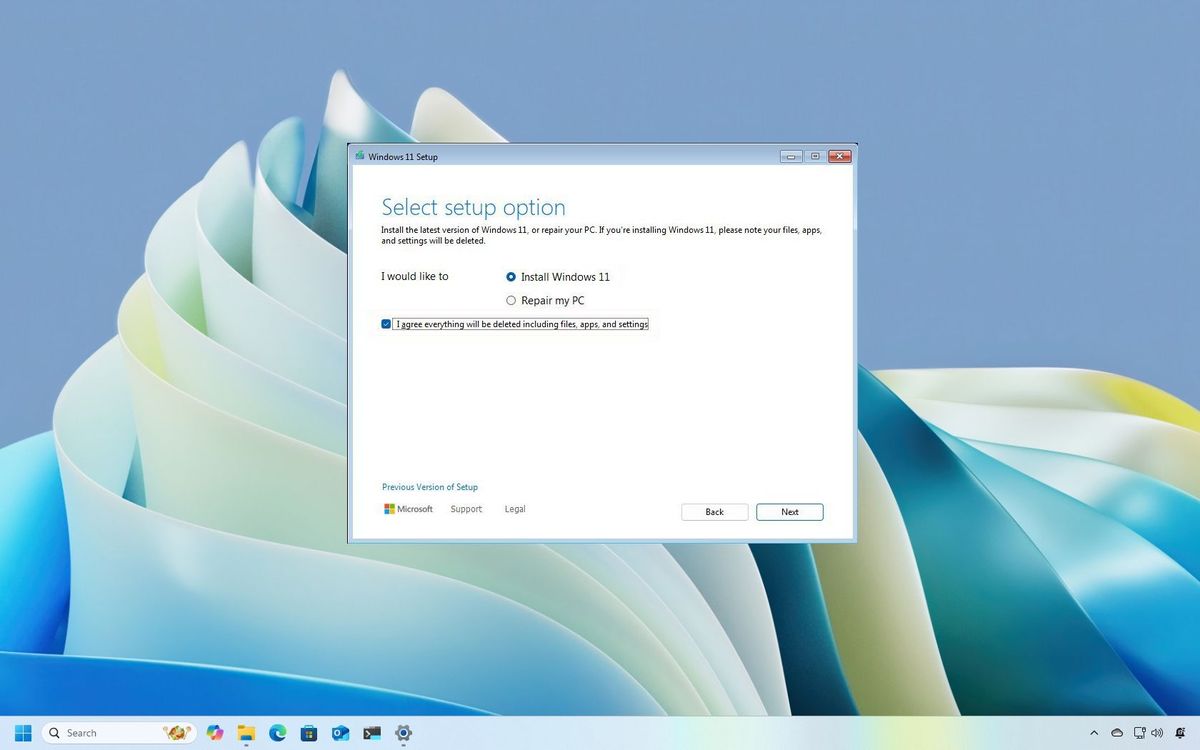
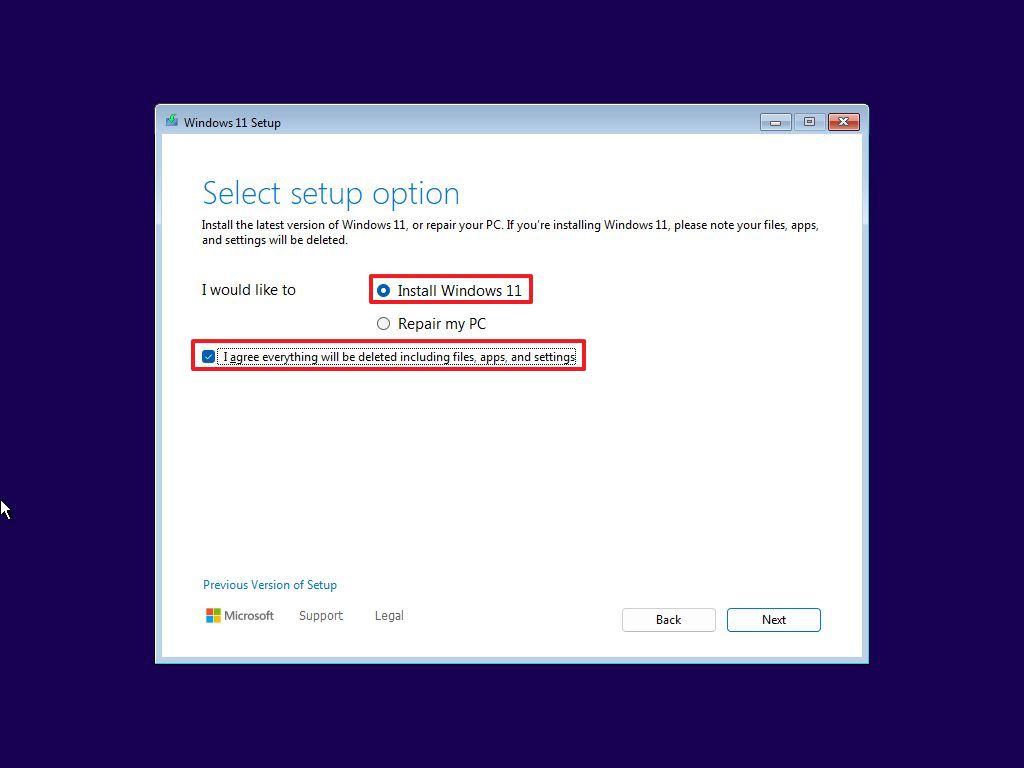
3. Choosing the Installation Type
This is a critical step for a fresh install.
- Which type of installation do you want?: You’ll be presented with two options:
- Upgrade: Install Windows and keep files, settings, and applications. (This is NOT what you want for a fresh install.)
- Custom: Install Windows only (advanced). (This IS what you want for a fresh install.)
- Select “Custom: Install Windows only (advanced).”
4. Partitioning and Drive Selection
This is where you manage your storage drives.
- Delete Existing Partitions: You will see a list of drives and partitions. To perform a truly fresh install, you need to delete all partitions associated with your current Windows installation.
- Carefully identify the drive where your current operating system resides (usually “Drive 0”).
- Select each partition on that drive (e.g., “Drive 0 Partition 1,” “Drive 0 Partition 2,” etc.) and click “Delete.” Confirm when prompted. This will free up all space on that drive.
- WARNING: Deleting partitions will permanently erase all data on them. Ensure your backup is complete. If you have multiple physical drives and only want to reinstall Windows on one, be absolutely sure you are deleting partitions only on the intended drive.
- Select Unallocated Space: Once all partitions are deleted, you’ll be left with “Drive 0 Unallocated Space.” Select this unallocated space.
- Install: Click “Next.” Windows will automatically create the necessary system partitions and begin the installation process.
Windows will now copy files, install features, install updates, and finish up. Your computer will restart several times during this phase. Do not remove the USB drive until after the final restart and the initial setup screens begin.
Post-Installation: Fine-Tuning Your New System
Once Windows 11 has finished installing its core components, your computer will restart, and you’ll be greeted by a series of initial setup screens. After completing these, there are several crucial steps to ensure your system is fully optimized, secure, and ready for use.
1. Initial Windows 11 Setup (OOBE – Out-of-Box Experience)
Follow the on-screen prompts to configure your basic Windows 11 settings:
- Region and Keyboard Layout: Select your country/region and preferred keyboard layout.
- Network Connection: Connect to your Wi-Fi or wired network. An internet connection is often required to proceed.
- Naming Your Device: Give your PC a unique name.
- Microsoft Account or Offline Account:
- Microsoft Account: Sign in with your existing Microsoft account (recommended for full functionality, cloud sync, and digital license activation).
- Offline Account (Local Account): If you prefer not to use a Microsoft account, look for an option like “Sign-in options” or “I don’t have internet” to create a local account. Note that Windows 11 Home typically requires a Microsoft account for initial setup.
- Privacy Settings: Review the privacy settings (location, diagnostic data, tailored experiences, etc.) and choose your preferences.
- Windows Hello: Set up facial recognition, fingerprint, or PIN for faster sign-ins.
- Experience Customization: Choose how you plan to use your device (e.g., gaming, creativity, work) to get personalized recommendations.
2. Update Windows 11
Immediately after reaching your desktop, the first thing you should do is check for and install all available Windows updates. This is crucial for security, stability, and getting the latest features.
- Go to
Settings > Windows Update. - Click “Check for updates” and install everything available. You may need to restart your PC multiple times and repeat this process until no more updates are found. This ensures your system is patched against the latest vulnerabilities and has the most current components.
3. Install Device Drivers
While Windows 11 often installs generic drivers, for optimal performance and functionality, it’s best to install the latest drivers specifically designed for your hardware from the manufacturer’s website.
- Chipset Drivers: Download and install the latest chipset drivers from your motherboard manufacturer’s website (for desktops) or your laptop manufacturer’s website.
- Graphics Card Drivers: If you have a dedicated graphics card (NVIDIA, AMD), download the latest drivers directly from their respective websites. This is critical for gaming performance and display stability.
- Audio Drivers: Update audio drivers from your motherboard or laptop manufacturer.
- Network Drivers: While you likely have basic network connectivity, ensuring you have the latest Wi-Fi and Ethernet drivers can improve performance and stability.
- Other Peripherals: Install drivers for any specialized peripherals like printers, webcams, or external sound cards.
- You can often check for missing or problematic drivers in
Device Manager(search for it in the Start Menu).
4. Install Essential Software and Applications
Now that your system is stable, begin installing the software you need.
- Web Browser: Install your preferred web browser (Chrome, Firefox, Edge, Brave, etc.).
- Security Software: Even with Windows Defender, consider installing a reputable third-party antivirus/anti-malware solution for enhanced protection, if that’s your preference. Ensure your firewall is enabled.
- Productivity Suites: Install Microsoft Office, LibreOffice, or other productivity tools.
- Cloud Storage Clients: Reinstall clients for OneDrive, Google Drive, Dropbox, etc., to resync your cloud files.
- Utility Software: Any essential utilities like file archivers (7-Zip, WinRAR), media players (VLC), or system monitoring tools.
- Gaming Platforms: Install Steam, Epic Games Launcher, GOG Galaxy, etc., if you’re a gamer.
5. Restore Your Data
Once your essential software is installed and everything is up and running smoothly, you can begin restoring your personal data from your backup.
- Copy your documents, pictures, music, and other files back to their respective folders on your C: drive or other designated storage locations.
- Verify that all your important files have been successfully transferred.
6. Optimize and Personalize Windows 11
Finally, take some time to personalize and optimize your new Windows 11 experience.
- Personalization: Set your desktop background, theme, color accents, and Start Menu layout.
- Privacy Settings: Review
Settings > Privacy & securityto fine-tune your preferences. - Storage Sense: Configure Storage Sense (
Settings > System > Storage) to automatically free up space by deleting temporary files and old downloads. - Power Settings: Adjust power plans for performance or energy efficiency (
Settings > System > Power & battery). - Notifications: Tweak notification settings for various apps to minimize distractions.
- Productivity Tools: Explore Windows 11’s built-in productivity features like Snap Layouts, Desktops, and Widgets to enhance your workflow.
Conclusion: Embracing a Renewed Digital Experience
Performing a fresh install of Windows 11 is more than just a technical chore; it’s an investment in your digital future. By meticulously following these steps, you’ve not only resolved potential performance issues and security vulnerabilities but also laid the groundwork for a more efficient and enjoyable computing experience. Your system is now lean, fast, and responsive, free from the digital baggage that can accumulate over time.
This clean slate provides an unparalleled opportunity to rethink your software ecosystem, enhance your security posture, and optimize your workflow for maximum productivity. With a freshly installed Windows 11, you’re empowered to tackle new projects, explore demanding applications, and engage with your digital world with renewed confidence and speed. Enjoy the benefits of a truly optimized system – a testament to the fact that sometimes, the best way forward is to start fresh.
aViewFromTheCave is a participant in the Amazon Services LLC Associates Program, an affiliate advertising program designed to provide a means for sites to earn advertising fees by advertising and linking to Amazon.com. Amazon, the Amazon logo, AmazonSupply, and the AmazonSupply logo are trademarks of Amazon.com, Inc. or its affiliates. As an Amazon Associate we earn affiliate commissions from qualifying purchases.