In the evolving landscape of digital entertainment, streaming services have largely supplanted traditional cable television, offering unparalleled flexibility and a wealth of content. Among these, YouTube TV stands out as a robust live TV streaming service, providing access to dozens of popular channels, a comprehensive on-demand library, and, crucially, an unlimited cloud DVR. This cloud DVR is a game-changer, allowing users to record virtually any show, movie, or sporting event and keep it for up to nine months. While the “unlimited” aspect sounds liberating, effective management of your recorded library remains essential for an optimal viewing experience.
Even with unlimited storage, a cluttered DVR can make finding desired content a chore. Imagine scrolling through hundreds of recordings, many watched, some no longer relevant, to locate that specific episode you’ve been meaning to revisit. Deleting recordings, therefore, isn’t about freeing up space but about decluttering your digital environment, enhancing navigation, and maintaining a streamlined user interface. This comprehensive guide will walk you through the process of deleting recordings on YouTube TV, ensuring your library remains organized, intuitive, and perfectly tailored to your viewing habits.
Understanding YouTube TV’s DVR Functionality
YouTube TV’s approach to digital video recording is distinct from traditional DVRs, offering a cloud-based solution that brings both advantages and unique management considerations. Grasping these fundamentals is the first step towards mastering your viewing library.
The Cloud DVR Advantage
Traditional DVRs store recordings locally on a physical hard drive, which inherently imposes storage limitations. Once that drive is full, you’re forced to make difficult decisions about which cherished shows to sacrifice. YouTube TV, however, leverages cloud technology. This means your recordings aren’t stored on your device but on Google’s remote servers. The primary benefit is “unlimited” storage, which, in YouTube TV’s case, translates to the ability to record as many programs as you like simultaneously without worrying about physical disk space. Every recording is saved for nine months from its broadcast date. This robust capability means you’re unlikely to run out of “space,” but it doesn’t exempt you from the need for organization.
Automatic vs. Manual Management
YouTube TV’s system is designed to be largely hands-off. Once you set a show or series to record, every new broadcast is automatically added to your library. There’s no need to manually select individual episodes unless you only want to record specific instances. This automation is incredibly convenient for ensuring you never miss an episode of your favorite series. However, this also means that if you record a long-running show, your library can quickly become populated with dozens, even hundreds, of episodes. The system does automatically remove recordings after nine months, but for programs you’ve already watched or have no intention of rewatching, waiting nearly a year for them to disappear can lead to significant clutter. This is where manual deletion becomes a vital tool for personalizing your viewing queue.
Storage Limitations and Why Deletion Matters
While the term “unlimited” storage is largely accurate in the context of recording capacity, it’s crucial to understand the subtle implications for user experience. The limitation isn’t about raw gigabytes but about the retention period (nine months) and the sheer volume of content that can accumulate. A vast, uncurated library can become overwhelming. Imagine scrolling through an endless list of watched sports games, outdated news programs, or episodes from a series you’ve long since finished.
Deleting recordings isn’t about making space for new ones – the cloud handles that effortlessly. Instead, it’s about:
- Improving Navigation: A clean library makes it easier to find the shows you actually want to watch or rewatch.
- Reducing Digital Clutter: Just as you organize physical items, managing your digital library reduces mental overhead and creates a more pleasant user interface.
- Personalization: By removing irrelevant content, your “New in your Library” and “Suggested” sections become more accurate and useful, enhancing the overall viewing experience.
- Privacy Considerations: While less common, some users might prefer to delete certain recordings for privacy reasons, especially if the account is shared among family members.
Ultimately, deletion empowers you to curate a YouTube TV library that reflects your current interests and optimizes your entertainment journey.
Step-by-Step Guide to Deleting Recordings
Deleting recordings on YouTube TV is a straightforward process, though the exact steps may vary slightly depending on the device you are using. Whether you’re navigating via a smart TV, a mobile app, or a web browser, the core principle remains consistent.
Deleting from a Smart TV/Streaming Device
Most users interact with YouTube TV on a large screen via smart TVs or streaming devices like Roku, Apple TV, Amazon Fire TV, or Google Chromecast. The interface across these platforms is generally consistent.
- Open YouTube TV: Launch the YouTube TV application on your smart TV or streaming device.
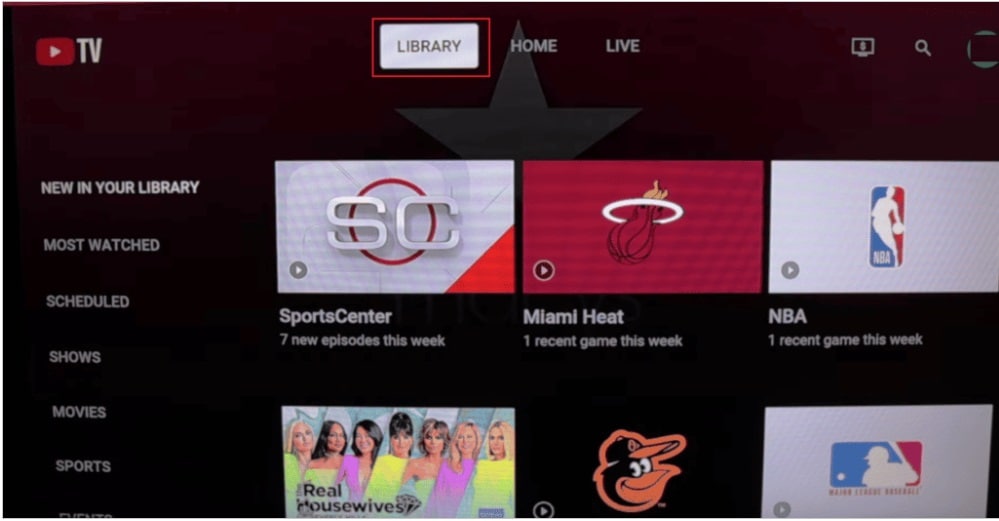
- Navigate to the Library: Using your remote, move to the left-hand navigation menu and select “Library.” This is where all your recorded content resides.
- Find the Recording: Browse through your library. You can usually find sections like “New in your Library,” “Shows,” “Movies,” “Sports,” etc. Select the category or directly locate the show you wish to manage.
- Select the Program: Once you’ve found the show, movie, or sporting event, select it. This will typically take you to its dedicated program page.
- Access Recording Options: On the program page, you’ll see various options. Look for an icon or button related to “Recorded,” “Checkmark,” or “More Options” (often represented by three dots
...). - Remove from Library: Select the option that says “Remove from Library” or “Delete Recording.” You may be asked to confirm your choice.
- Confirm Deletion: Confirm the action. The recording will then be removed from your library.
- For Series: If you’re managing a series, you might see an option to remove all recordings of that series or just specific episodes. If you only want to delete one episode, ensure you navigate to that specific episode’s page first.
Deleting from the YouTube TV Mobile App
Managing your library on the go is easy with the YouTube TV mobile app, available for iOS and Android devices.
- Open the YouTube TV App: Launch the YouTube TV app on your smartphone or tablet.
- Go to Library: At the bottom of the screen, you’ll see a navigation bar. Tap on “Library.”
- Locate the Content: Scroll through your library categories (Shows, Movies, Sports, etc.) or use the search function to find the recording you want to delete.
- Select the Program: Tap on the show or movie. This will open its detail page.
- Access Options: On the program’s detail page, look for the “Recorded” indicator or an icon representing “More Options” (often three vertical or horizontal dots). Tap on it.
- Remove from Library: A pop-up menu will appear. Select “Remove from Library” or “Delete Recording.”
- Confirm: Tap “Remove” or “Delete” again to confirm your decision.
- Series Management: Similar to the TV interface, for series, you might be given the option to delete a specific episode or manage the entire series recording.
Deleting from a Web Browser
For those who prefer managing their digital content from a computer, YouTube TV’s web interface offers a clean and efficient way to delete recordings.
- Go to YouTube TV Website: Open your preferred web browser and navigate to
tv.youtube.com. - Sign In: If prompted, sign in with your Google account associated with your YouTube TV subscription.
- Access Library: On the left-hand sidebar, click on “Library.”
- Find Your Recording: Browse through the content categories or use the search bar to find the recording.
- Hover and Click: When you hover over a program in your library, a “More Options” icon (three vertical dots) will appear. Click on it.
- Select Remove: From the dropdown menu, select “Remove from Library.”
- Confirm: A confirmation prompt will appear. Click “Remove” to finalize the deletion.
- Series Management: When managing a series, you’ll find options to remove individual episodes or stop recording the entire series, which will also remove all existing recordings of that series.
Distinguishing Between Watched and Unwatched Recordings
While YouTube TV doesn’t have a specific “delete watched recordings” button, it does provide visual cues to help you differentiate. Watched episodes usually have a progress bar indicating completion or a “watched” tag. When browsing your library, prioritize deleting content that has been fully watched or is no longer of interest. This manual distinction is crucial for efficient library management. Some users develop a routine of reviewing their “New in your Library” section and clearing out completed shows weekly or monthly.
Managing Your Library: Best Practices and Advanced Tips
An organized YouTube TV library not only enhances your viewing experience but also saves you time and frustration. Adopting certain best practices can transform a potentially overwhelming collection into a perfectly curated personal entertainment hub.
When to Delete: Strategies for DVR Management
Deciding when and what to delete is a personal choice, but a few strategies can streamline the process:
- Post-Watch Deletion: The simplest method is to delete a recording immediately after you’ve finished watching it, especially if you don’t intend to rewatch it. This prevents clutter from accumulating.
- Weekly/Monthly Purge: Set aside a brief period each week or month to review your library. Focus on older recordings, shows you’ve completed, or sports events whose outcomes you already know.
- Event-Specific Deletion: For live events like major sports games or news broadcasts, these often have a short shelf life of relevance. Delete them soon after the event concludes.
- Series Completion: Once you finish a season or an entire series, go into its main page in your library and remove all recorded episodes.
Dealing with Series Recordings
Managing series recordings requires a slightly different approach than one-off programs.
- Stopping a Series Recording: If you no longer wish to record new episodes of a series, go to the series page in your library or search for the series. You’ll typically find a “Recorded” or “Checkmark” icon. Clicking this will reveal an option to “Stop Recording” or “Remove from Library.” Selecting “Stop Recording” will prevent future episodes from being added, and usually gives you the option to remove all existing recordings of that series.
- Deleting Individual Episodes of a Series: If you want to keep recording new episodes but remove older, watched ones, navigate to the specific episode’s page within the series list. From there, you can remove just that single episode without affecting the series recording setting. This allows for granular control over your series backlog.
Troubleshooting Common Deletion Issues
While deleting recordings is generally straightforward, you might occasionally encounter minor hiccups:
- “Recording Won’t Delete”: Ensure you’re selecting the “Remove from Library” or “Delete Recording” option specifically for your recorded version. Sometimes, if a show is also available on-demand, you might mistakenly be trying to remove the on-demand version, which isn’t possible. Double-check that you’re interacting with an item explicitly marked as “Recorded.”
- “Recordings Reappearing”: If deleted recordings seem to reappear, it usually means the series is still set to record, and new instances are being added. Go to the series page in your library and confirm that the “Record” option is deselected if you want to stop recording altogether. Also, verify that you fully confirmed the deletion action in previous steps.
- App Glitch: Occasionally, the app or website might experience a temporary glitch. If you’re consistently having trouble, try clearing your browser cache (for web) or reinstalling the app (for mobile/streaming devices). As a last resort, contacting YouTube TV support can resolve persistent issues.
- Shared Accounts: If you share your YouTube TV account with others, remember that deleting a recording removes it for everyone on that account. Coordinate with other household members to avoid accidentally deleting content someone else is watching or plans to watch.
Reclaiming Storage: The Bigger Picture
While YouTube TV’s unlimited cloud DVR negates the need to delete for “space,” the concept of “reclaiming storage” here translates to reclaiming mental space and interface clarity. By actively managing your recordings, you’re not just deleting files; you’re curating your personal viewing experience. This proactive approach ensures that your library is a reflection of your current interests, free from obsolete or irrelevant content. It’s about optimizing digital real estate, even if that real estate is virtual.
Beyond Deletion: Optimizing Your YouTube TV Experience
Mastering the art of deleting recordings is just one facet of maximizing your YouTube TV subscription. A holistic approach involves understanding and leveraging other features to ensure a seamless and personalized entertainment journey.
Setting Recording Preferences
YouTube TV offers granular control over what gets recorded. When you select a show or movie, instead of just hitting “Record,” delve into the settings. For series, you can often choose:
- New episodes only: This is the default and most common choice, preventing reruns from cluttering your library.
- All episodes: Useful for catching up on a series from the beginning, but be mindful of the rapid library growth.
- Specific channels: If a show airs on multiple channels, you might be able to prioritize or exclude certain channels.
- Stop recording at certain points: While not a direct feature for stopping, understanding the 9-month retention policy allows you to record knowing older content will eventually cycle out.
Proactively setting these preferences ensures that only the most relevant content finds its way into your library, reducing the need for extensive post-recording cleanup.
Exploring On-Demand Content
Many shows available for recording also exist in YouTube TV’s extensive on-demand library. For content that you might want to watch at a later date but don’t necessarily need to “own” as a recording for nine months, the on-demand option can be a superior choice.
- Advantages of On-Demand: On-demand content doesn’t count towards your “recordings” in the same way, and it often includes additional seasons or episodes that might not have aired recently. It also generally doesn’t have the 9-month expiry.
- When to Use On-Demand Instead: If a show is consistently available on-demand and you don’t need to skip commercials (as DVR allows), consider watching it directly from the on-demand library to keep your recorded section uncluttered. This is particularly useful for popular series with dedicated sections.

Future-Proofing Your Entertainment Hub
As streaming services evolve, so too will their features and user interfaces. Staying abreast of YouTube TV updates, experimenting with new features, and regularly reviewing your recording habits will help you maintain an optimized and enjoyable experience. Deleting recordings is not just a chore; it’s a deliberate act of curation that transforms a generic content library into a personalized hub tailored to your specific interests and viewing pace. By embracing these management techniques, you ensure that YouTube TV remains a powerful, user-friendly tool in your digital entertainment arsenal.
aViewFromTheCave is a participant in the Amazon Services LLC Associates Program, an affiliate advertising program designed to provide a means for sites to earn advertising fees by advertising and linking to Amazon.com. Amazon, the Amazon logo, AmazonSupply, and the AmazonSupply logo are trademarks of Amazon.com, Inc. or its affiliates. As an Amazon Associate we earn affiliate commissions from qualifying purchases.