
Keeping your Mac running smoothly and efficiently is a continuous process, and one crucial aspect of this maintenance involves managing the applications you have installed. Over time, you might find yourself with a collection of apps that are no longer needed, taking up valuable storage space, or even causing performance issues. Knowing how to properly delete installed apps on your Mac is therefore an essential skill for any user. This guide will walk you through the various methods, ensuring you can reclaim disk space and declutter your system with confidence.
Understanding the Nuances of App Removal on macOS
When you think about deleting an app, your first instinct might be to drag its icon to the Trash. While this works for some simple applications, it’s often not the most thorough method for removing Mac apps. Many applications install supporting files in various hidden locations on your system, such as preference files, caches, and application support documents. If these components are left behind, they can continue to occupy space and, in some cases, lead to conflicts or minor glitches with other software.
The Standard Method: Using the Applications Folder
The most common and straightforward way to uninstall an application on a Mac is by moving it from the Applications folder to the Trash. This method is generally effective for most applications downloaded from the Mac App Store or those that come as a single application bundle.
Steps:
- Open the Finder: Click on the Finder icon in your Dock (it looks like a blue and white smiley face).
- Navigate to the Applications Folder: In the Finder sidebar, click on “Applications.” You will see a list of all the applications installed on your Mac.
- Locate the App to Uninstall: Scroll through the list to find the application you wish to remove. You can use the search bar in the top-right corner of the Finder window if you have a large number of apps.
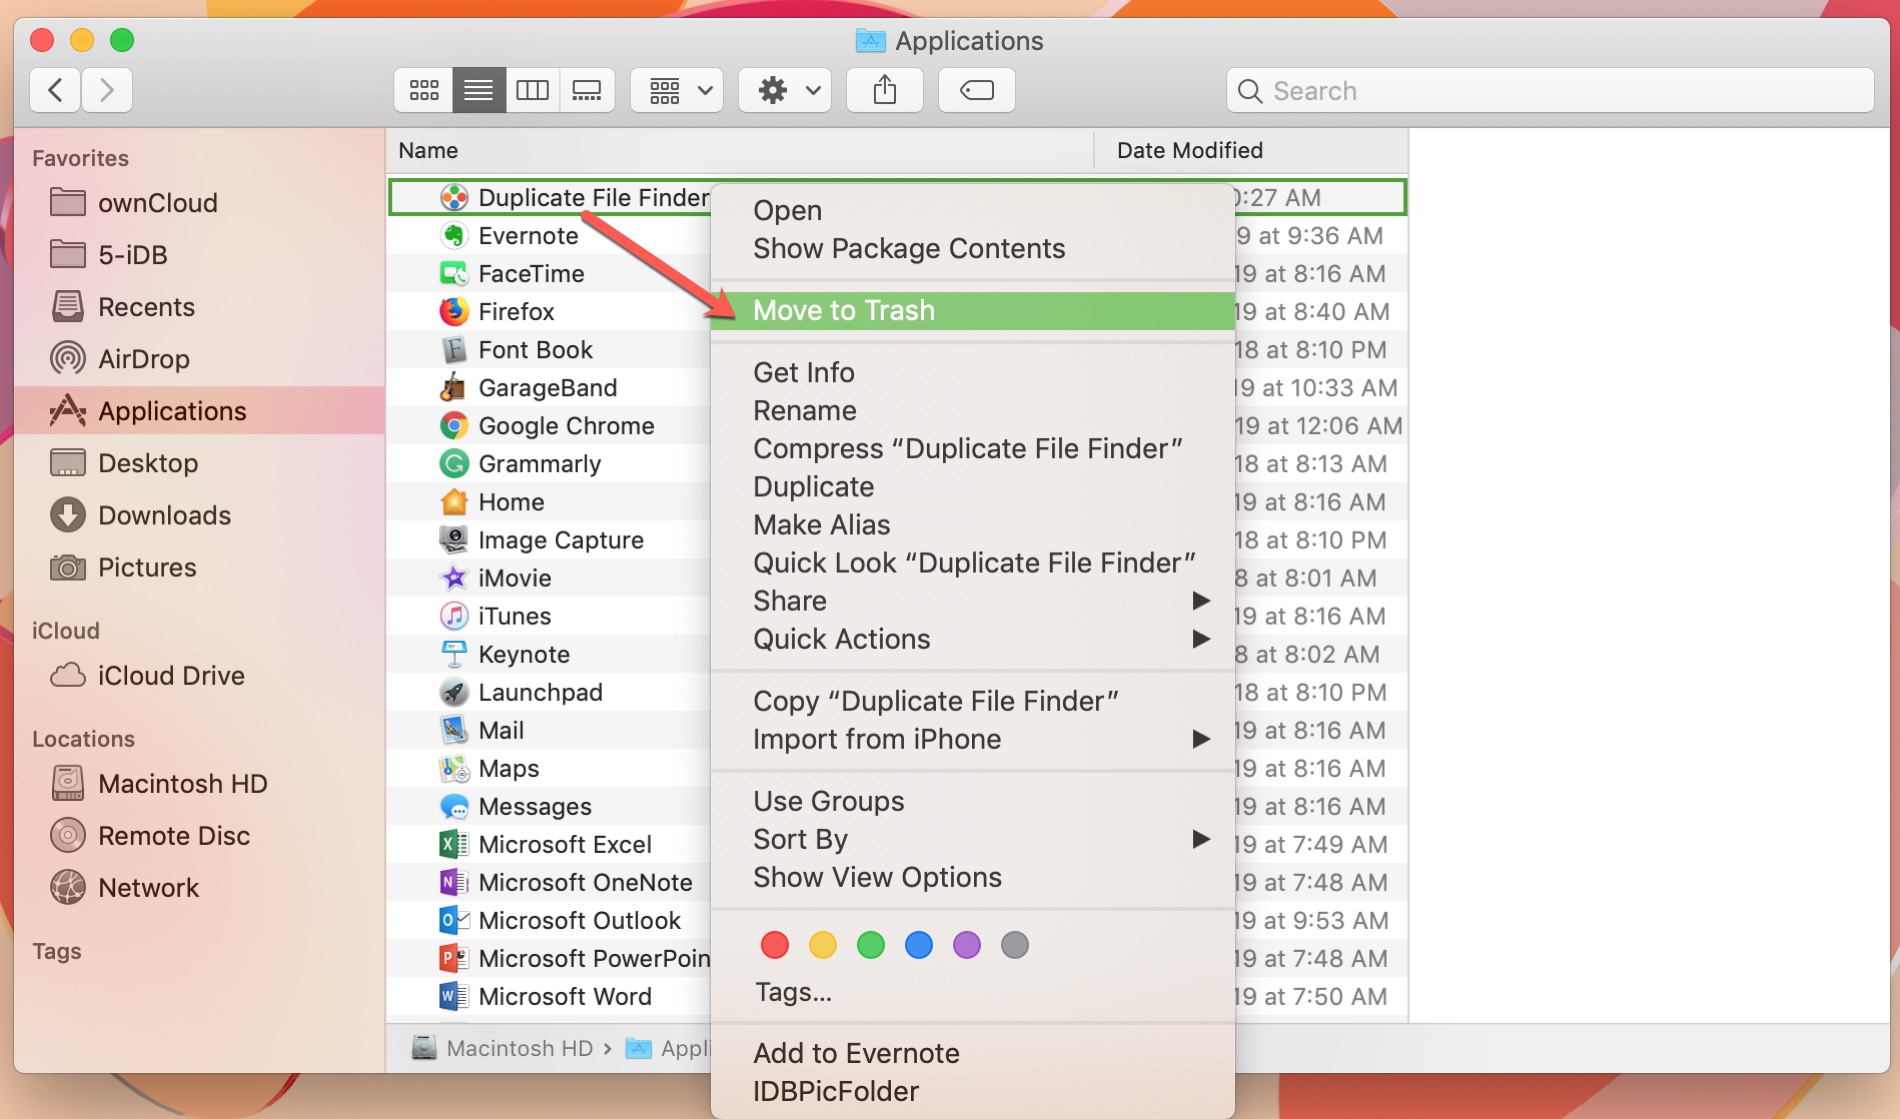
- Drag to the Trash: Click and drag the application icon to the Trash icon located at the end of your Dock. Alternatively, you can right-click (or Control-click) on the app icon and select “Move to Trash” from the contextual menu.
- Empty the Trash: Once you’ve moved the app to the Trash, the Trash icon in the Dock will likely show an icon indicating it contains items. To permanently delete the app and free up disk space, you need to empty the Trash. Right-click on the Trash icon and select “Empty Trash.” You will be prompted to confirm this action.
Important Considerations for the Standard Method:
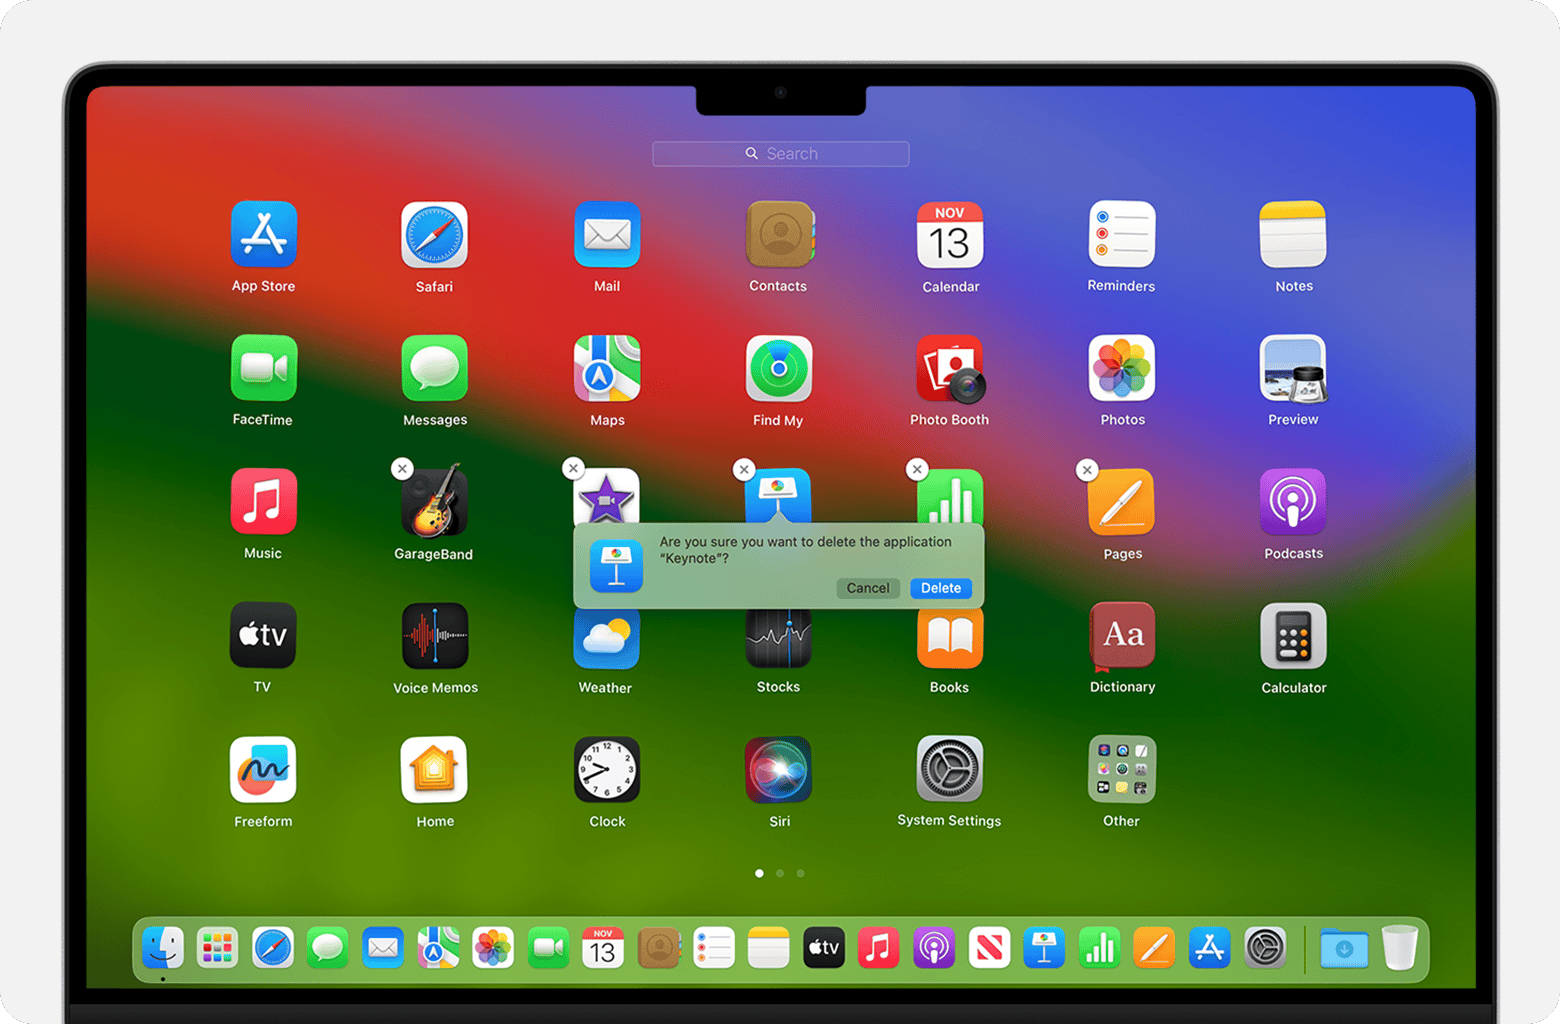
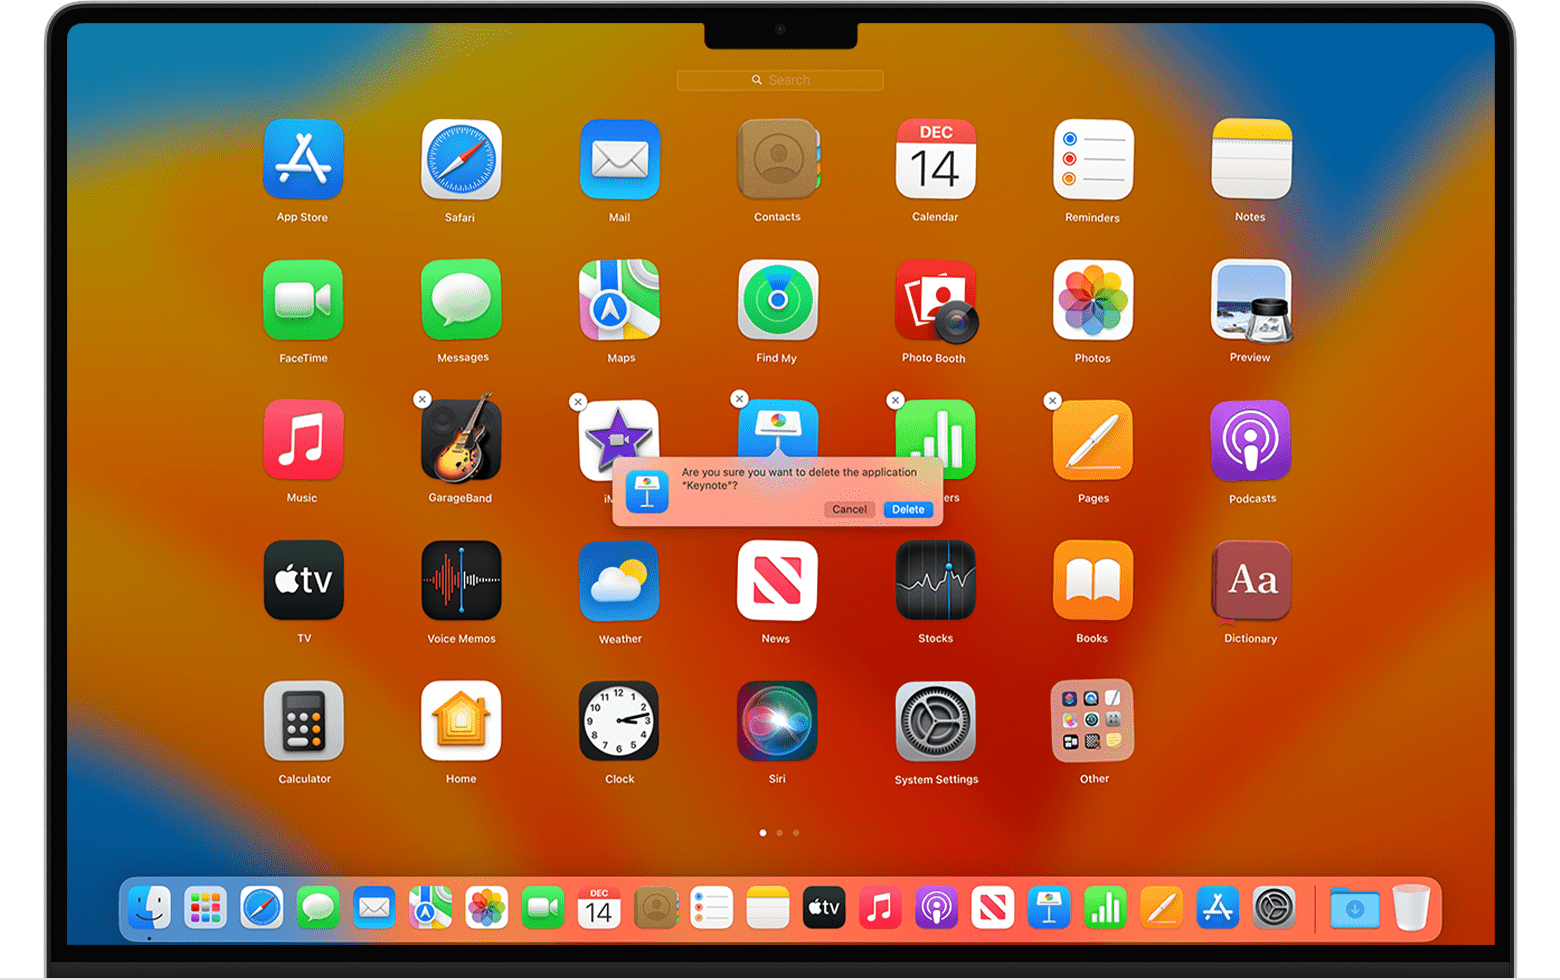
- App Store Apps: Applications downloaded from the Mac App Store can often be deleted directly from the Launchpad. Open Launchpad (click the rocket icon in your Dock or in the Applications folder), click and hold on an app icon until it starts to jiggle, and then click the “X” that appears over the app you want to delete. This method is similar to deleting apps on an iPhone or iPad.
- Apps with Uninstallers: Some applications, particularly those that are more complex or offer extensive features, come with their own dedicated uninstaller. Before resorting to manual deletion, check the application’s folder within the Applications folder. You might find an “Uninstall [App Name]” application. Running this uninstaller is the recommended way to remove such apps, as it’s designed to clean up all associated files.
- Potential Leftovers: As mentioned earlier, this method might not always remove all associated files. Preference files, caches, and support files can remain on your system, consuming space and potentially causing issues. For most users, this is usually not a significant problem, but for those who are meticulous about system cleanliness or are experiencing persistent issues, a more thorough approach might be necessary.
Advanced App Removal: Dealing with Leftover Files
For users who want to ensure a complete removal of applications and all their associated files, or for those encountering problems that might stem from leftover app data, a more advanced approach is recommended. This involves identifying and deleting these hidden support files.
Manually Deleting Application Support Files
This method requires caution and a good understanding of your Mac’s file system. Incorrectly deleting system files can cause serious problems. It’s always a good idea to back up your Mac before undertaking this process.
Common Locations for Application Support Files:
~/Library/Application Support/: This is a primary location where applications store their data, preferences, and other support files. The~symbol represents your user home directory.~/Library/Preferences/: This folder contains.plist(property list) files, which are used by applications to store their settings and preferences.~/Library/Caches/: Temporary files and cached data for applications are stored here.~/Library/Saved Application State/: This folder stores the state of applications, allowing them to resume where you left off.~/Library/Containers/: Sandboxed applications (often those from the App Store) might store their data within this folder.
Steps for Manual Cleanup:
-
Access the Library Folder:
- Open Finder.
- Click on the “Go” menu in the menu bar.
- Hold down the Option (Alt) key. The “Library” option will appear in the dropdown menu.
- Click on “Library.”
-
Locate and Delete App-Specific Folders:
- Navigate into the
Application Support,Preferences,Caches, andSaved Application Statefolders. - Within these folders, look for directories or files that are named after the application you’ve deleted or its developer.
- Be extremely cautious: Only delete files and folders that you are certain belong to the application you are uninstalling. If you are unsure, it’s better to leave them be. For example, if you’re deleting “MyApp,” you would look for folders named “MyApp” or folders named after the developer of “MyApp.”
- Drag any identified application-specific files or folders to the Trash.
- Navigate into the
-
Delete from
~/Library/Containers/(for sandboxed apps):- If the app was from the App Store, it might be sandboxed. In the
~/Libraryfolder, look for theContainersfolder. - Inside
Containers, you’ll find folders with names that often start withcom.developer.AppName. Locate the one corresponding to the app you’re removing and move it to the Trash.
- If the app was from the App Store, it might be sandboxed. In the
-
Empty the Trash: As always, remember to empty the Trash to finalize the deletion and reclaim disk space.
Risks of Manual Cleanup:
- Accidental Deletion: The biggest risk is accidentally deleting crucial system files or files belonging to other applications, which can lead to instability, crashes, or even prevent your Mac from booting.
- Time-Consuming: Manually searching for all associated files can be a tedious and time-consuming process.
Using Third-Party Uninstaller Apps for a Complete Solution
Given the potential complexities and risks associated with manual cleanup, many users opt for third-party uninstaller applications. These tools are specifically designed to automate the process of finding and removing applications and all their associated files, providing a cleaner and more efficient uninstallation experience.
Benefits of Using Uninstaller Apps
- Thorough Removal: These applications are built with extensive databases of application files and their locations, ensuring that most, if not all, leftover files are identified and removed.
- Time-Saving: Instead of manually searching through multiple folders, you can often uninstall an app with just a few clicks.
- User-Friendly Interface: Most uninstallers have intuitive interfaces that make the process simple for users of all technical levels.
- Reduced Risk: By automating the process, these tools significantly reduce the risk of accidental deletion of important system files.
- Additional Features: Some advanced uninstallers offer extra features like duplicate file finders, system junk cleaners, and large file analyzers, which can further help in optimizing your Mac’s performance.
Popular Uninstaller Applications for Mac
While we cannot endorse specific products, several reputable uninstaller applications are available on the market. When choosing one, consider factors like user reviews, features offered, pricing, and the developer’s reputation. Some popular options often mentioned include:
- AppCleaner: A free and popular option that allows you to drag and drop an application to find its related files.
- CleanMyMac X: A comprehensive Mac cleaning and optimization tool that includes a robust uninstaller feature. It’s a paid application with a free trial.
- AppDelete: Another well-regarded paid application that focuses on comprehensive uninstallation.
How to Use a Typical Uninstaller App:
- Download and Install: Download your chosen uninstaller application from the developer’s official website and install it on your Mac.
- Launch the Uninstaller: Open the uninstaller application.
- Select the App to Uninstall: The uninstaller will typically present a list of installed applications. You can either browse the list or use a search function to find the app you want to remove. Some uninstallers allow you to drag the app directly from the Applications folder onto the uninstaller’s interface.
- Initiate the Scan: Once you’ve selected the app, the uninstaller will scan your system for all related files, including preference files, caches, support documents, and more.
- Review and Confirm: Before deleting, the uninstaller will usually show you a list of all the files it intends to remove. Review this list to ensure it looks correct.
- Uninstall: Click the “Uninstall” or “Delete” button to remove the application and all its associated files.
- Empty Trash (if necessary): Some uninstallers automatically remove files, while others might move them to the Trash, requiring you to empty it.
By understanding these different methods, from the basic drag-to-Trash approach to the more thorough manual cleanup and the convenience of third-party tools, you can effectively manage your Mac’s installed applications. Regularly uninstalling unused apps is a simple yet powerful way to maintain optimal performance, free up valuable storage space, and keep your digital workspace tidy and efficient.
aViewFromTheCave is a participant in the Amazon Services LLC Associates Program, an affiliate advertising program designed to provide a means for sites to earn advertising fees by advertising and linking to Amazon.com. Amazon, the Amazon logo, AmazonSupply, and the AmazonSupply logo are trademarks of Amazon.com, Inc. or its affiliates. As an Amazon Associate we earn affiliate commissions from qualifying purchases.