
In the dynamic world of technology, keeping your hardware components running optimally is paramount. For PC enthusiasts, gamers, and professionals who rely on NVIDIA graphics cards, the drivers are the unsung heroes that unlock the full potential of their hardware. While standard driver updates are generally straightforward, sometimes the best course of action is a “clean install.” This process not only installs the latest drivers but also meticulously removes any remnants of previous installations that might be causing conflicts, performance issues, or instability. This guide will walk you through the comprehensive process of performing a clean install of your NVIDIA drivers, ensuring a smoother, more robust, and optimized experience for your graphics card.

Why a Clean Install Matters
Before diving into the “how,” let’s understand the “why.” Graphics drivers are complex pieces of software that interact deeply with your operating system and hardware. Over time, as you update and uninstall various driver versions, small fragments of old files, registry entries, and configuration settings can linger. While often benign, these leftovers can sometimes lead to:
- Performance Degradation: A build-up of old driver data can interfere with the proper functioning of the new drivers, leading to lower frame rates, stuttering, or general sluggishness in applications and games.
- Driver Conflicts: Incompatible or conflicting driver components from different versions can cause system instability, leading to crashes, blue screen errors (BSODs), or display artifacts.
- Installation Failures: Sometimes, existing driver remnants can prevent new drivers from installing correctly, forcing you to troubleshoot installation errors.
- Specific Application Issues: Certain applications or games might behave erratically or fail to launch due to driver-related conflicts that a clean install can resolve.
A clean install effectively wipes the slate clean, removing all previous driver files and settings before installing the fresh, latest version. This ensures that your NVIDIA GPU is running with a pristine driver package, free from potential interference.
Preparation is Key: Before You Begin
Performing a clean install requires a bit of preparation to ensure a smooth and successful process. Rushing into it without taking these steps can sometimes lead to further complications.
1. Identifying Your Graphics Card and Current Driver Version
The first step is to know exactly what hardware you’re working with.
-
Identifying Your Graphics Card:
- Right-click on your Windows desktop and select “Display settings.”
- Scroll down and click on “Advanced display settings.”
- Under “Display information,” you should see your graphics card listed.
- Alternatively, you can open the “Device Manager” (search for it in the Windows search bar), expand “Display adapters,” and your NVIDIA GPU will be listed there.
-
Checking Your Current Driver Version:
- Right-click on your desktop and select “NVIDIA Control Panel.”
- In the NVIDIA Control Panel, look for a “Help” menu or a system information icon, usually in the bottom-left corner.
- Click on “System Information.” This will display details about your GPU, driver version, and other relevant information.
- If you don’t have the NVIDIA Control Panel installed, you can also check the driver version via Device Manager by right-clicking your NVIDIA GPU, selecting “Properties,” and then navigating to the “Driver” tab.
Knowing your GPU model will help you download the correct drivers from NVIDIA’s website. Knowing your current driver version is helpful for comparison and troubleshooting.
2. Downloading the Latest NVIDIA Drivers
NVIDIA’s official website is the sole source for legitimate and up-to-date drivers. Avoid downloading drivers from third-party websites, as they can sometimes bundle malware or outdated versions.
- Navigate to the NVIDIA Driver Download Page: Go to the official NVIDIA driver download portal (usually found by searching “NVIDIA drivers” or by direct URL).
- Select Your Product Type: Choose “GeForce” if you have a consumer-grade card, “Quadro” for professional workstation cards, or “NVS” for business graphics.
- Select Your Product Series and Product: Based on the information you gathered earlier, choose your specific graphics card series (e.g., GeForce RTX 30 Series) and then your exact product model (e.g., GeForce RTX 3070).
- Select Your Operating System: Choose your specific Windows version (e.g., Windows 11, Windows 10 64-bit).
- Select Download Type: For a clean install, you’ll typically want the “Game Ready Driver” for the latest gaming optimizations or the “Studio Driver” for creative applications. Choose the one that best suits your usage.
- Click Search and Download: Once you’ve made your selections, click “Search.” The website will then provide a list of available drivers. Click “Download” for the latest recommended version.
- Save the Installer: Save the downloaded
.exefile to a location you can easily find, such as your Desktop or Downloads folder. Do not run the installer immediately.
3. Disconnecting from the Internet
This is a crucial step for a true clean install. Windows Update can sometimes interfere by automatically downloading and attempting to install its own version of drivers while you’re trying to install the NVIDIA ones.
- Disable Wi-Fi: If you’re using Wi-Fi, click on the network icon in your system tray (bottom-right corner of the screen) and toggle Wi-Fi off.
- Unplug Ethernet Cable: If you’re using a wired connection, physically unplug the Ethernet cable from your computer.
This ensures that no unintended driver installations occur during the process.
The Clean Installation Process: Step-by-Step
With your preparations complete, it’s time to execute the clean install. This involves two main phases: uninstalling the old drivers and installing the new ones.
Heading 2: Uninstalling Previous NVIDIA Drivers
The most effective way to remove old drivers is through the Windows “Apps & features” (or “Add or remove programs”) setting. While there’s also an option within the NVIDIA installer itself to perform a clean install, manually uninstalling first provides a more thorough cleanup.
Heading 3: Using Windows Apps & Features
-
Access Apps & Features:
- Press the Windows key + I to open Settings.
- Click on “Apps.”
- In the left-hand menu, select “Apps & features.”
-
Locate NVIDIA Components:
- In the search bar within “Apps & features,” type “NVIDIA.”
- You will likely see several NVIDIA-related entries. It’s important to uninstall the core driver components. Look for:
- “NVIDIA Graphics Driver” (or similar naming, e.g., “NVIDIA Graphics Driver 472.12”)
- “NVIDIA PhysX System Software”
- “NVIDIA Control Panel” (sometimes bundled, sometimes separate)
- Any other components that are clearly driver-related.
-
Uninstall Each Component:
- Click on each NVIDIA component one by one.
- Click the “Uninstall” button.
- Follow the on-screen prompts. You may be asked to confirm the uninstallation.
- Important: It’s generally recommended to uninstall the “NVIDIA Graphics Driver” first, followed by other components.
-
Restart Your Computer: After uninstalling all identified NVIDIA driver components, it is highly recommended to restart your computer. This allows Windows to fully unload the old drivers and prepare for the new installation.
Heading 3: The Role of Display Driver Uninstaller (DDU)
For an even more aggressive and thorough cleanup, many advanced users opt for a third-party tool called Display Driver Uninstaller (DDU). DDU is a highly respected utility designed specifically to remove all traces of graphics drivers from your system, including files, folders, registry entries, and more.
Using DDU:
- Download DDU: Search for “Display Driver Uninstaller” and download it from its official source (usually Wagnardsoft).
- Extract DDU: DDU is often downloaded as a zipped file. Extract its contents to a folder.
- Boot into Safe Mode: This is crucial for DDU to work effectively.
- Search for “System Configuration” and open it.
- Go to the “Boot” tab.
- Under “Boot options,” check “Safe boot” and select “Network” (this is important if you need to re-enable internet later).
- Click “Apply” and then “OK.” You will be prompted to restart your computer.
- Run DDU in Safe Mode:
- Once your computer restarts in Safe Mode, run the
Display Driver Uninstaller.exefile. - In DDU’s main window, select “GPU” as the device type.
- Select “NVIDIA” as the manufacturer.
- Click the “Clean and restart” button. DDU will then proceed to remove all NVIDIA driver components and restart your computer into normal mode.
- Once your computer restarts in Safe Mode, run the
Note: DDU is a powerful tool. While generally safe and effective, always download it from the official source and follow its instructions carefully. If you are not comfortable with Safe Mode or third-party tools, the Windows Apps & Features method is still very effective.
Heading 2: Installing the New NVIDIA Drivers
Once you have successfully uninstalled the old drivers and restarted your PC, it’s time to install the fresh drivers you downloaded earlier.
Heading 3: The NVIDIA Installer Options
-
Locate and Run the Installer: Navigate to the
.exefile you downloaded from NVIDIA’s website and double-click it to run. -
Agree to the License Agreement: You’ll be presented with NVIDIA’s license agreement. Read through it and click “Agree and Continue.”
-
Choose Installation Options: This is where you select the type of installation.
- Express (Recommended): This option installs all the selected components with default settings. It’s suitable for most users and often includes a driver clean install automatically.
- Custom (Advanced): This option gives you more control. Select this for a definitive clean install. Click “Custom (Advanced)” and then “Next.”
-
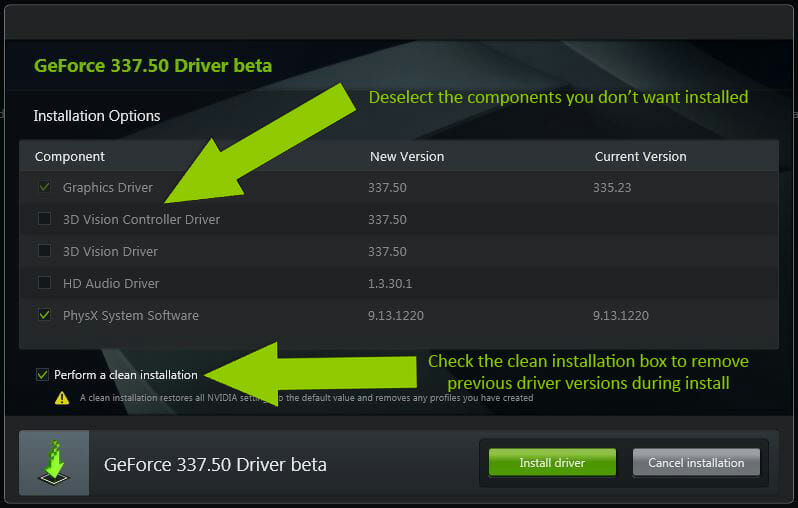
Perform a Clean Installation: In the “Custom Installation Options” screen:
- You will see a list of components to install (Graphics Driver, GeForce Experience, PhysX, etc.).
- Crucially, check the box that says “Perform a clean installation.” This option tells the NVIDIA installer to remove any existing driver files and settings before proceeding with the installation of the new drivers.
- You can also choose which components you want to install. For most users, keeping GeForce Experience is beneficial for driver updates and game optimization features. If you have specific needs or want a minimal installation, you can uncheck components like GeForce Experience or HD Audio Driver if you don’t use HDMI audio from your GPU.
- Click “Next.”
-
Installation Progress: The installer will now begin installing the drivers. This process can take several minutes. During the installation, your screen may flicker or go black temporarily – this is normal as the display driver is being updated. Do not interrupt the process.
-
Restart Your Computer (Again): Once the installation is complete, the NVIDIA installer will prompt you to restart your computer to finalize the changes. Click “Close” and then manually restart your PC.
Heading 3: Verifying the New Installation
After your computer has restarted, it’s a good idea to verify that the new drivers have been installed correctly and are functioning as expected.
-
Check NVIDIA Control Panel:
- Right-click on your desktop and select “NVIDIA Control Panel.”
- Go to “Help” > “System Information.”
- Verify that the “Driver version” listed matches the version you just installed.
-
Test Your Applications/Games:
- Launch a few of your favorite games or demanding applications.
- Pay attention to performance. Are you seeing smoother frame rates? Are there any graphical glitches or crashes that were present before?
- Monitor your system for any unusual behavior or error messages.
Heading 2: Troubleshooting Common Issues
While a clean install typically resolves most driver-related problems, occasionally, you might encounter a hiccup.
- Driver Installation Fails: If the NVIDIA installer fails, it could be due to remaining corrupted files (even after a clean install attempt), or an issue with Windows itself. In this scenario, running DDU in Safe Mode as described earlier is often the most effective solution. Ensure you have reconnected to the internet after the DDU process and before attempting the NVIDIA installer again.
- Screen Flickering or Blackouts After Restart: This can sometimes happen if the driver didn’t install perfectly. Try running the installer again, choosing the “Custom” installation and ticking “Perform a clean installation” once more. If the problem persists, consider using DDU.
- GeForce Experience Not Working: If GeForce Experience has issues, try uninstalling and reinstalling it separately through “Apps & features.” Sometimes, a corrupted GeForce Experience installation can be the culprit.
- Performance Still Lacking: If performance hasn’t improved, the issue might lie elsewhere – perhaps with your CPU, RAM, or even in-game settings. Ensure your Windows is up to date, and that other system drivers (chipset, audio, etc.) are also current.

Conclusion: A Fresh Start for Your NVIDIA GPU
Performing a clean install of your NVIDIA drivers is an essential maintenance task that can significantly improve your PC’s performance, stability, and overall user experience. By systematically removing old driver components and installing a fresh, optimized version, you ensure that your powerful NVIDIA graphics card is operating at its peak potential. Whether you’re a hardcore gamer striving for the highest frame rates, a creative professional working with demanding visual software, or simply a user who wants a smooth and reliable computing experience, a clean driver install is a valuable technique to have in your tech arsenal. Remember to always download drivers from official sources, prepare your system by disconnecting from the internet, and follow the steps carefully. A little bit of effort in maintaining your drivers can go a long way in ensuring your NVIDIA GPU continues to deliver stellar performance.
aViewFromTheCave is a participant in the Amazon Services LLC Associates Program, an affiliate advertising program designed to provide a means for sites to earn advertising fees by advertising and linking to Amazon.com. Amazon, the Amazon logo, AmazonSupply, and the AmazonSupply logo are trademarks of Amazon.com, Inc. or its affiliates. As an Amazon Associate we earn affiliate commissions from qualifying purchases.