In the dynamic world of PC gaming, performance and efficient storage management are paramount. Valorant, Riot Games’ popular tactical shooter, is no exception. As players accumulate games, applications, and digital clutter, the need to reorganize and optimize disk space becomes a common task. Moving an installed game like Valorant from one drive to another, or simply changing its directory, can offer significant benefits, from improved load times to better system organization. This guide delves into the various methods for changing Valorant’s install path, offering step-by-step instructions, essential tips, and insights into the underlying technical considerations.
Understanding Why You Might Need to Relocate Valorant
Before diving into the “how-to,” it’s crucial to understand the “why.” Gamers often face several scenarios that necessitate relocating game files, and Valorant is no different. Recognizing these motivations will help you choose the most appropriate method for your specific needs, all while aligning with best practices in digital security and system optimization, core tenets of modern tech literacy.
Optimizing Performance with SSDs
Perhaps the most common reason for moving Valorant is to leverage the superior performance of Solid-State Drives (SSDs). If you initially installed Valorant on an older Hard Disk Drive (HDD) but have since upgraded to an SSD, moving the game can dramatically reduce loading times, both when launching the game and transitioning between maps or rounds. SSDs offer significantly faster read and write speeds compared to HDDs, translating directly into a smoother, more responsive gaming experience. This isn’t just about convenience; in a fast-paced game like Valorant, even marginal improvements in loading can give you a slight edge or simply reduce frustration. Our focus on tech trends consistently highlights the shift towards SSDs as a fundamental upgrade for any gaming or productivity machine.
Managing Disk Space and Organization
Another primary motivation is effective disk space management. Modern games demand substantial storage, and Valorant, with its regular updates, can consume a fair chunk. Users might find their primary drive (often the C: drive) filling up, prompting the need to move larger applications to a secondary drive with more capacity. This not only frees up critical space on your main system drive – which is vital for operating system performance and temporary files – but also contributes to better overall system organization. A well-organized file system is easier to manage, troubleshoot, and back up, making your digital life more efficient. Moving Valorant to a dedicated “Games” drive or a larger partition ensures that your system remains uncluttered and performs optimally.
Preparing for System Upgrades or Reinstallation
Sometimes, changing an install path is a preparatory step. If you’re planning a major system upgrade, such as reinstalling Windows, replacing your primary drive, or performing a clean sweep to resolve persistent software issues, you might want to temporarily move your Valorant installation. While a clean reinstallation might still be necessary after major system changes, having the game files readily available on a separate drive can expedite the reinstallation process, saving you from redownloading tens of gigabytes of data. This strategic foresight can save hours, especially for users with slower internet connections, underscoring the importance of forward-thinking in digital asset management.
Method 1: The Clean Slate – Reinstalling Valorant to a New Location
For many, the most straightforward and least problematic method to change Valorant’s install path is a complete reinstallation. This approach ensures a fresh, clean installation without the risk of lingering registry entries or corrupted files, making it the recommended method for most users, particularly those less comfortable with advanced system tweaks.
Step-by-Step Guide to Reinstallation
The process is methodical and ensures all old files are removed before new ones are placed.
- Backup Any Custom Settings (Optional but Recommended): While Valorant typically stores account-specific settings server-side, local configuration files (like keybinds or video settings) can sometimes be found in
C:Users[YourUsername]AppDataLocalVALORANTor within your Riot Games folder. It’s a good practice to back up these folders if you have highly customized settings you wish to preserve, although for most players, these are easily reconfigured post-install. - Uninstall Valorant:
- Open the Windows Search bar and type “Add or remove programs.”
- Find “Valorant” in the list of installed applications.
- Click on it and select “Uninstall.”
- Follow the on-screen prompts from the Valorant uninstaller.
- Crucially, uninstall the “Riot Vanguard” anti-cheat software as well. This is often listed separately. Riot Vanguard is deeply integrated with the game and the operating system, and a clean reinstall benefits from removing it entirely.
- After uninstalling, restart your computer to ensure all temporary files and registry entries are cleared.
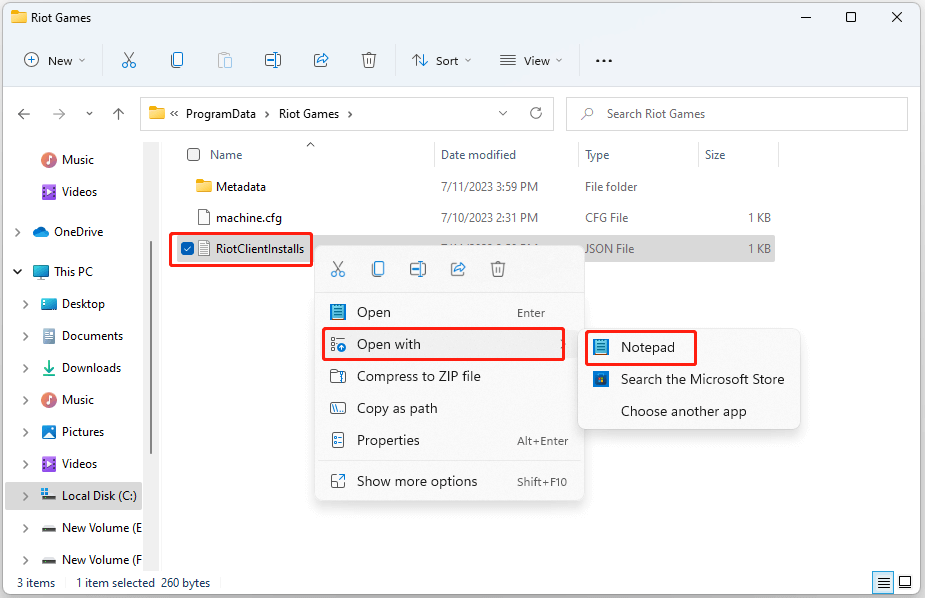
- Delete Residual Files (Optional but Recommended): Even after uninstalling, some residual files or folders might remain.
- Navigate to the common install locations:
C:Riot GamesandC:ProgramDataRiot Games. Delete any remaining Valorant or Riot Games folders. - You might also check
C:Users[YourUsername]AppDataLocalfor any Valorant or Riot Client folders. Deleting these ensures a truly clean slate. Exercise caution when deleting files inAppDataandProgramDataas these directories contain application-specific data, but for a full game removal, it’s generally safe.
- Navigate to the common install locations:
- Download the Valorant Installer: Visit the official Valorant website (
playvalorant.com) and download the latest installer. Always obtain game installers from official sources to avoid security risks, a critical aspect of digital security. - Run the Installer and Choose New Path:
- Run the downloaded installer.
- When prompted to choose an installation directory, click “Advanced Options” or “Customize” (the exact wording may vary).
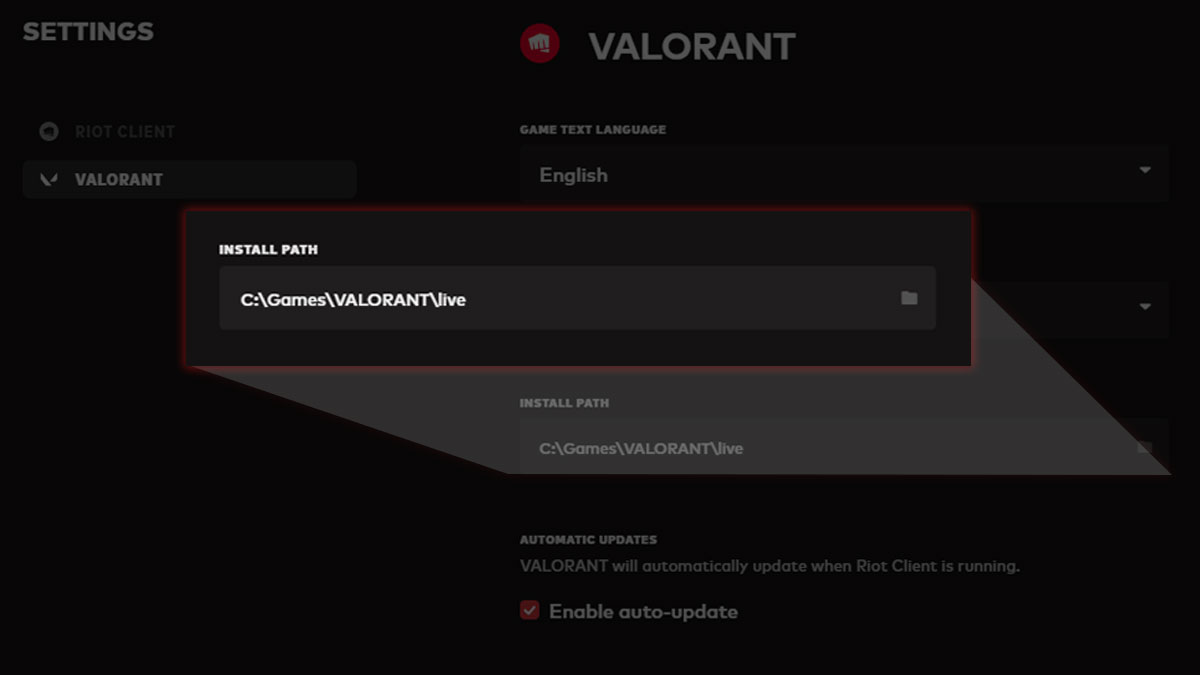
- Browse to your desired new location (e.g.,
D:GamesValorantorE:Riot Games). Create a new folder for Valorant within your chosen drive if one doesn’t exist. - Proceed with the installation. The installer will download the necessary game files and Riot Vanguard to your specified location.
- Verify Installation: Once installed, launch Valorant and ensure it runs correctly from its new location. Log in and check your settings.
Pros and Cons of This Approach
Pros:
- Simplicity and Safety: It’s the most straightforward method, requiring minimal technical expertise.
- Clean Installation: Eliminates potential issues from corrupted files or incorrect registry entries from the previous installation.
- Optimal Performance: Ensures the game is installed correctly to the new drive, potentially maximizing performance benefits.
- Riot Games Approved: This is the method officially supported by Riot Games.
Cons:
- Time-Consuming: Requires downloading the entire game again, which can take hours depending on your internet speed and the game’s current size (often 30+ GB).
- Data Usage: Uses significant internet data, which might be a concern for users with data caps.
Method 2: The Manual Relocation – Moving Game Files and Updating Paths
For those who want to avoid re-downloading the entire game, a manual file transfer is an alternative. However, this method comes with caveats and is generally more complex due to the deep integration of Valorant with the Riot Client and Riot Vanguard. It requires a greater understanding of how software paths and file systems interact.
Prerequisites and Risks
Before attempting a manual move, understand that this method is not officially supported by Riot Games. It carries a risk of breaking the game installation, requiring a full reinstallation anyway. Additionally, Riot Vanguard’s strict anti-cheat measures might flag unusual file movements, potentially leading to temporary bans if not done carefully. Proceed with caution and at your own risk.
- Exit All Riot Processes: Ensure both Valorant and the Riot Client are completely closed. Check your Task Manager (Ctrl+Shift+Esc) to end any related processes (e.g.,
Valorant.exe,RiotClientServices.exe,RiotVanguard.exe,vgc.exe). - Administrator Privileges: You’ll likely need administrator rights to move files between system directories.
Detailed Steps for Manual File Transfer
This process attempts to trick the Riot Client into recognizing the new location.
- Locate Valorant Installation: By default, Valorant is usually installed in
C:Riot GamesValorant. The Riot Client itself is often inC:Riot GamesRiot Client. - Move the “Riot Games” Folder:
- Navigate to the parent folder, typically
C:Riot Games. - Right-click on the “Riot Games” folder (which contains both “Valorant” and “Riot Client” subfolders).
- Select “Cut” (or “Copy” if you want to keep a backup, but ensure you delete the original after verifying the move).
- Navigate to your desired new drive and location (e.g.,
D:Games). - Right-click in the empty space of the target folder and select “Paste.” This will move the entire
Riot Gamesfolder, including Valorant and the Riot Client. This step is critical because the Riot Client needs to be in the same parent directory as Valorant to function correctly.
- Navigate to the parent folder, typically
- Update Shortcuts (Optional but Recommended): Any existing desktop shortcuts for Valorant will still point to the old location.
- Delete the old Valorant shortcut.
- Navigate to the new
Valorantfolder (e.g.,D:GamesRiot GamesValorant). - Find
VALORANT.exe(orVALORANT-Win64-Shipping.exein theshootergamebinarieswin64subfolder). - Right-click on the executable, select “Send to,” then “Desktop (create shortcut).”
Updating Riot Client and Shortcuts
The main challenge with manual moves is updating the Riot Client’s internal knowledge of where Valorant is installed. The Riot Client itself is quite robust, but it can sometimes get confused.
- Launch the Riot Client: Double-click the new shortcut or find
RiotClientServices.exein theRiot Clientfolder within your newRiot Gamesdirectory. - Force Re-detection (If Necessary): The Riot Client might automatically detect the game in its new location, especially if you moved the entire parent “Riot Games” folder. If it doesn’t, you might see an option to “Install” Valorant.
- If it prompts to install, click “Install.” Instead of redownloading, it should detect existing files in the new location and simply verify them, then create necessary registry entries. This verification process is much faster than a full download.
- If it doesn’t recognize the game and tries to download, do not proceed unless you are prepared to redownload.
- Check Registry (Advanced Users Only – Proceed with Extreme Caution): The Riot Client stores game paths in the Windows Registry. Incorrect edits here can destabilize your system.
- Open
regedit(Windows Search ->regedit). - Navigate to
HKEY_LOCAL_MACHINESOFTWAREWOW6432NodeRiot Games. - Look for keys related to Valorant and the Riot Client, specifically
League of Legends(even though it’s Valorant, Riot often reuses keys),Riot Client, andValorant. Check if thePathvalues inside these keys still point to the old location. If they do, you could manually change them to the new path. This is highly risky and not recommended for beginners. One wrong edit can cause serious system issues.
- Open
Potential Pitfalls and Troubleshooting Manual Moves
- “Install” Button Appears: This is the most common issue. The Riot Client isn’t detecting the moved game. Usually, clicking “Install” after moving the files will make it verify instead of redownload.
- Game Not Launching/Error Messages: If you encounter errors, ensure all Riot and Valorant processes are closed, then try launching the Riot Client again. If problems persist, consider Method 1.
- Anti-Cheat Issues: Riot Vanguard might detect unusual file movements. If you experience anti-cheat warnings or cannot launch the game, a clean reinstallation (Method 1) is usually the safest fix.
- Permissions: Ensure you have full read/write permissions for the new game directory. Right-click the new “Riot Games” folder, go to “Properties” -> “Security,” and ensure your user account has full control.
Method 3: The Advanced Approach – Utilizing Symbolic Links for Seamless Migration
For users comfortable with command-line tools and advanced Windows features, symbolic links offer an elegant solution to relocate Valorant without reinstalling or confusing the Riot Client. This method creates a “ghost” folder at the original location that transparently redirects to the new location, making the system believe the files are still where they were.
![]()
What is a Symbolic Link?
A symbolic link (or symlink) is a special type of file in the Windows file system (and other operating systems) that acts as a pointer to another file or directory. When you access the symbolic link, the operating system transparently redirects you to the target location. For all intents and purposes, applications accessing the symlink perceive it as the actual directory it points to. This makes it incredibly useful for moving large applications without breaking their internal paths or requiring registry edits.
There are two main types relevant here:
- Hard Link: A direct pointer to the data itself. Cannot span different volumes/drives.
- Junction (for directories): A link to a directory that can span different volumes. This is what we’ll use.
Creating a Symbolic Link Manually
This method involves using the mklink command in Command Prompt.
- Exit All Riot Processes: As with manual moves, ensure Valorant, Riot Client, and Riot Vanguard are completely shut down via Task Manager.
- Move the Valorant Folder (NOT the whole Riot Games folder):
- Navigate to the default Valorant installation folder, typically
C:Riot GamesValorant. - Cut the
Valorantfolder. - Paste it into your desired new location (e.g.,
D:GamesValorant). - Crucially, leave the
Riot Clientfolder inC:Riot GamesRiot Clientwhere it is. We are only moving the game files, not the client itself, because the client expects Valorant to be in a subfolder of its own parent.
- Navigate to the default Valorant installation folder, typically
- Delete the Original Empty Valorant Folder: After pasting, the
C:Riot GamesValorantfolder will be empty. Delete this empty folder. You should now have an emptyC:Riot Gamesfolder, withRiot Clientremaining in its original spot. No, wait. TheC:Riot Gamesfolder will still exist, and it will contain theRiot Clientfolder, but it will no longer contain theValorantfolder. This is the crucial distinction: we are movingC:Riot GamesValoranttoD:GamesValorant, and then creating a symbolic link atC:Riot GamesValorantthat points toD:GamesValorant.- To be crystal clear:
- Original:
C:Riot GamesValorant(game) ANDC:Riot GamesRiot Client(client) - Move step 1:
C:Riot GamesValorantis CUT and PASTE toD:GamesValorant. - After move:
C:Riot Gamesnow contains onlyRiot Client. TheValorantfolder is gone fromC:Riot Games. - The empty
Valorantfolder itself doesn’t need to be deleted, as it wasCUT. We need to ensure that the pathC:Riot GamesValorantis empty somklinkcan create the link there.
- Original:
- To be crystal clear:
- Open Command Prompt as Administrator: Search for “cmd” in Windows, right-click “Command Prompt,” and select “Run as administrator.” This is essential for creating symlinks.
- Create the Symbolic Link: Use the
mklink /jcommand.- The syntax is:
mklink /j "<Link>" "<Target>" <Link>is the original location where Valorant used to be (and where the Riot Client expects it to be).<Target>is the new location where Valorant now resides.- For example, if Valorant was at
C:Riot GamesValorantand you moved it toD:GamesValorant, the command would be:
mklink /j "C:Riot GamesValorant" "D:GamesValorant" - Press Enter. You should see a message confirming “Junction created for C:Riot GamesValorant <<===>> D:GamesValorant”.
- The syntax is:
- Verify and Launch: Launch the Riot Client and then Valorant. The game should launch as if it never moved, as the operating system transparently redirects all requests to the new location.
Leveraging Third-Party Tools (e.g., Steam Mover concept)
While mklink is built into Windows, several third-party utilities simplify the process of creating symbolic links for games. Tools like “Steam Mover” (though designed for Steam games, the concept can be applied) or more general “Link Shell Extension” provide a graphical interface for creating junctions or symlinks. These tools often integrate into the right-click context menu, making the process more user-friendly. Always download third-party tools from reputable sources.
Advantages and Caveats of Symbolic Links
Advantages:
- No Reinstallation: Avoids the time and data consumption of re-downloading the entire game.
- Seamless Operation: Applications (like the Riot Client) continue to function as if the files were never moved, preventing path-related errors.
- Flexible Storage: Allows games to reside on different drives while maintaining original directory structures.
- Elegant Solution: A cleaner, more permanent solution than simple manual file moving.
Caveats:
- Requires Command Prompt: Can be intimidating for users unfamiliar with the command line.
- Risk of Error: Incorrect
mklinkcommands can create broken links or point to the wrong location, requiring manual cleanup. - Anti-Cheat Perception: While generally safe, deeply integrated anti-cheat systems could theoretically misinterpret symlinks as tampering. However, junctions are a standard OS feature, and most anti-cheats tolerate them for legitimate reasons.
- Deleting Symlink vs. Target: Deleting the symlink itself does not delete the target folder. You must delete the symlink specifically, or the original target folder, independently.
Essential Tips and Best Practices for Game Relocation
Regardless of the method chosen, adhering to general best practices ensures a smooth and secure relocation process for Valorant or any other large application. These tips touch upon aspects of digital security, system performance, and general tech hygiene.
Backup Before You Begin
This cannot be stressed enough. Before making any significant changes to your system’s file structure, especially involving critical game files or system directories, always perform a backup. This could be a full system image, a copy of the specific game folder, or even just your game settings. A backup provides a safety net, allowing you to revert to a working state if something goes wrong. This is a fundamental principle in all tech operations.
Disk Space and Performance Considerations
- Ensure Sufficient Space: Always verify that your target drive has ample free space before initiating a move or reinstallation. A full drive can lead to installation failures or performance bottlenecks.
- SSD vs. HDD: As discussed, moving Valorant to an SSD will yield the most significant performance benefits. If you’re moving from one HDD to another, the performance gain will be negligible; the primary benefit will be space management.
- Fragmentation: While less of an issue with SSDs, HDDs can suffer from fragmentation. Moving large files can sometimes help consolidate space, but it’s generally recommended to defragment HDDs periodically (Windows does this automatically in the background) for optimal performance.
Anti-Cheat Compatibility and Safety
Valorant’s Riot Vanguard anti-cheat is a kernel-level program, meaning it operates with high privileges and is very sensitive to system changes.
- Always Shut Down Processes: Before moving or modifying game files, ensure all Riot Client, Valorant, and Riot Vanguard processes are completely terminated.
- Official Methods are Safest: Reinstallation (Method 1) is always the safest option for anti-cheat compatibility, as it ensures a pristine environment.
- Avoid Unauthorized Tools: Never use third-party tools that claim to “optimize” or “mod” Valorant, as these can easily trigger anti-cheat systems and result in bans. Stick to official methods or well-understood Windows features like
mklink.
Post-Migration Verification
After successfully changing Valorant’s install path, always perform these checks:
- Launch and Play: Launch Valorant and play a custom game or a few rounds to ensure stability.
- Check Settings: Verify that your in-game settings (video, audio, keybinds) are as you expect.
- Performance Monitor: If you moved to an SSD for performance, monitor load times and in-game frame rates to confirm the benefits. Use tools like Task Manager or specialized monitoring software.
- Disk Space Check: Confirm that the space on your original drive has been freed up and that the new drive now accurately reflects Valorant’s file size.
Conclusion: Choosing the Right Method for Your Setup
Changing Valorant’s install path is a common and often beneficial task for PC gamers looking to optimize performance, manage storage, or prepare for system upgrades. Each method presented – reinstallation, manual file transfer, and symbolic linking – offers distinct advantages and disadvantages, catering to different levels of technical comfort and specific needs.
For the vast majority of users, particularly those prioritizing safety and simplicity, Method 1: Reinstallation is the recommended choice. Despite the time investment for redownloading, it guarantees a clean setup and eliminates potential issues with anti-cheat software or corrupted files.
For intermediate users who understand file systems and are willing to troubleshoot, Method 2: Manual Relocation can save download time. However, the risks associated with the Riot Client not recognizing the new path and potential anti-cheat flags make it a less ideal option for beginners.
Method 3: Utilizing Symbolic Links is the most elegant and technically sophisticated solution, offering seamless operation without reinstallation. It’s best suited for advanced users comfortable with the command line and those who regularly manage complex file structures.
Ultimately, the best method depends on your technical expertise, available time, internet speed, and risk tolerance. By following the comprehensive steps and adhering to the best practices outlined in this guide, you can successfully change Valorant’s install path, enhance your gaming experience, and maintain a well-optimized system, contributing to your overall digital productivity and enjoyment.
Frequently Asked Questions
Q1: Will changing the install path affect my in-game progress or account?
A: No, your Valorant progress, skins, rank, and account information are stored on Riot Games’ servers and are tied to your Riot ID. Changing the install path only affects where the game files are located on your local machine, not your account data.
Q2: Is it safe to move Valorant to an external hard drive?
A: While technically possible, it is generally not recommended for performance-intensive games like Valorant. External hard drives, especially those connected via USB, typically have slower data transfer rates and higher latency compared to internal drives. This can lead to longer load times, in-game stuttering, and a less responsive gaming experience. Internal SSDs are always the preferred choice.
Q3: What is Riot Vanguard, and why is it important when moving Valorant?
A: Riot Vanguard is Riot Games’ proprietary anti-cheat software, which is deeply integrated with Valorant and runs at a kernel level on your operating system. It’s crucial for maintaining fair play. Due to its deep integration and security measures, any unusual file movements or modifications to Valorant’s installation directory can potentially trigger Vanguard’s detection, leading to warnings or even temporary bans. This is why official reinstallation is often the safest method.
Q4: Can I change the install path for other Riot Games titles (e.g., League of Legends) using these methods?
A: Yes, the principles outlined in this guide generally apply to other Riot Games titles and many PC games in general. The Riot Client manages all Riot titles, so moving the entire Riot Games folder (containing all titles and the client) or using symbolic links for individual game folders are viable strategies. Always adapt the specific file paths to the game you’re moving.
Q5: What should I do if the game doesn’t launch after moving it?
A: First, restart your computer. If the issue persists, review the steps for the method you chose carefully. Ensure all Riot and Valorant processes are closed. If you performed a manual move, try launching the Riot Client and clicking “Install” to force a file verification. If using a symbolic link, verify the link’s target is correct. If all else fails, a clean reinstallation (Method 1) is the most reliable way to resolve such issues.