
The aspiration to harness the sun’s abundant energy has driven innovation for decades, leading to increasingly accessible and efficient solar technologies. While commercially manufactured solar panels are now commonplace, the prospect of building your own remains a compelling endeavor for tech enthusiasts, DIYers, and those seeking a deeper understanding of renewable energy systems. This guide delves into the intricate yet rewarding process of constructing a photovoltaic solar panel, offering a professional and insightful journey into the heart of solar technology. By assembling a panel yourself, you not only gain a practical skill but also an intimate appreciation for the engineering marvels that convert sunlight into electricity.
Understanding Photovoltaic Fundamentals
Before embarking on the physical construction, a foundational understanding of how solar panels function is crucial. This knowledge empowers you to make informed decisions throughout the build process and troubleshoot potential issues. At its core, a solar panel operates on the principle of the photovoltaic effect, where certain materials produce an electric current when exposed to light.
The Science Behind Solar Cells
Individual solar cells, typically made from silicon, are the building blocks of a solar panel. When photons from sunlight strike the silicon, they excite electrons within the material, dislodging them from their atoms. These free electrons are then directed to flow in a particular direction due to the electric field created by the p-n junction within the silicon, generating a direct current (DC). This conversion of light energy directly into electrical energy is what makes photovoltaic technology so revolutionary. The efficiency of a solar cell, often expressed as a percentage, indicates how much of the incident sunlight it can convert into electricity. Higher efficiency means more power generation from a smaller surface area.
Types of Solar Cells and Their Characteristics
The market offers several types of solar cells, each with distinct characteristics impacting performance, cost, and suitability for DIY projects:
- Monocrystalline Solar Cells: These cells are made from a single, continuous crystal structure of silicon. They are generally the most efficient (15-22%) and have a uniform, dark black appearance. Their higher efficiency makes them ideal for spaces where area is limited, but they are also typically more expensive.
- Polycrystalline Solar Cells: Composed of multiple silicon crystals melted together, polycrystalline cells are less efficient than monocrystalline cells (13-17%) but are more affordable to produce. They have a speckled, bluish appearance. For a DIY project where cost-effectiveness and a slightly larger footprint are acceptable, these are often a popular choice.
- Amorphous Solar Cells (Thin-Film): These are made by depositing a thin layer of photovoltaic material onto a substrate. While flexible and performing well in low-light conditions, they are significantly less efficient (7-10%) and require a much larger area to generate the same power as crystalline cells. They are rarely used for DIY panel construction due to their low power density.
For DIY solar panel construction, crystalline silicon cells (monocrystalline or polycrystalline) are almost exclusively used due to their balance of efficiency and availability. Understanding the specific voltage and current output of your chosen cells is paramount for proper wiring and system design.
Sourcing Components and Preparing Your Workspace
The success of your DIY solar panel hinges on the quality of its components and the meticulous preparation of your workspace. This stage involves carefully selecting the necessary materials and ensuring you have all the tools for a safe and efficient assembly.
Essential Component Checklist
A robust solar panel requires more than just solar cells. Here’s a comprehensive list of what you’ll need:
- Solar Cells: The core of your panel. Purchase high-quality, pre-tabbed (with thin copper strips already soldered on) cells to simplify the wiring process. Ensure they are uniform in size and power output.
- Tabbing Wire & Bus Wire: If your cells aren’t pre-tabbed, you’ll need tabbing wire (flat copper ribbons) to connect individual cells and bus wire (thicker copper wire) to connect strings of cells to the junction box.
- Flux Pen: Essential for clean and strong solder joints, especially with tabbing wire.
- Soldering Iron & Solder: A good quality, temperature-controlled soldering iron (40-60W recommended) and lead-free electrical solder.
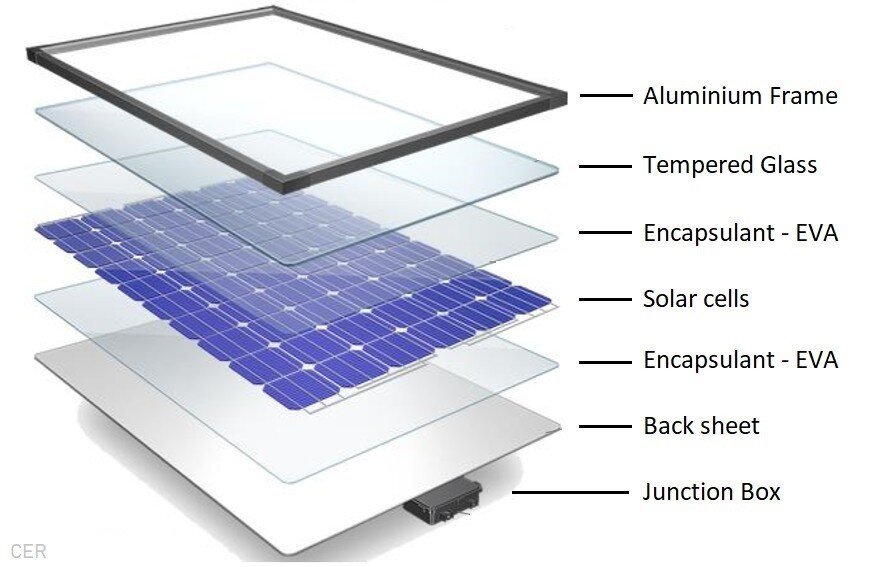
- Backing Material (Tedlar or Equivalent): A durable, weather-resistant sheet that protects the back of the cells and provides electrical insulation.
- Encapsulation Material: EVA (Ethylene Vinyl Acetate) film is commonly used. It melts under heat to create a clear, protective, and adhesive layer over the cells.
- Front Cover (Glass or Plexiglass): Tempered glass is ideal for durability, scratch resistance, and light transmission. Plexiglass (acrylic) is lighter and less fragile but can scratch easily and may yellow over time.
- Aluminum Frame: Provides structural integrity, protection for the edges, and mounting points. Can be custom-built or purchased as a kit.
- Junction Box: A weather-sealed enclosure housing the output cables and bypass diodes.
- Bypass Diodes: Essential for protecting the panel from hot spots caused by shading on individual cells or sections. Typically 10A or 15A Schottky diodes.
- UV-Resistant Sealant (Silicone): For sealing the frame and junction box to prevent water ingress.
- Output Cables (PV Wire): UV-resistant, outdoor-rated cables (e.g., 10 or 12 AWG) for connecting the panel to the rest of your solar system.
- Multimeter: Indispensable for testing individual cells, strings, and the finished panel’s voltage and current.
Required Tools and Workspace Setup
A well-organized and safe workspace is paramount for a successful build:
- Flat, Clean Work Surface: Large enough to accommodate the panel frame.
- Heat Gun (Optional, but recommended): For shrinking heat-shrink tubing and for aiding in the lamination process if using EVA film and no vacuum laminator.
- Wire Strippers & Cutters: For preparing wires.
- Safety Glasses & Gloves: Always protect your eyes and hands.
- Isopropyl Alcohol & Lint-Free Cloths: For cleaning cells and surfaces.
- Pencil/Marker & Ruler: For precise measurements.
- Clamps & Straight Edge: For securing materials during assembly.
- Drill: For mounting the junction box and frame assembly.
Ensure your workspace is well-lit and ventilated, especially when soldering, and free from dust and moisture to prevent contamination of the cells.
Step-by-Step Panel Assembly
With all components and tools ready, the actual construction phase begins. This process requires patience and precision, particularly during the delicate cell wiring stages.
Preparing and Tabbing Solar Cells
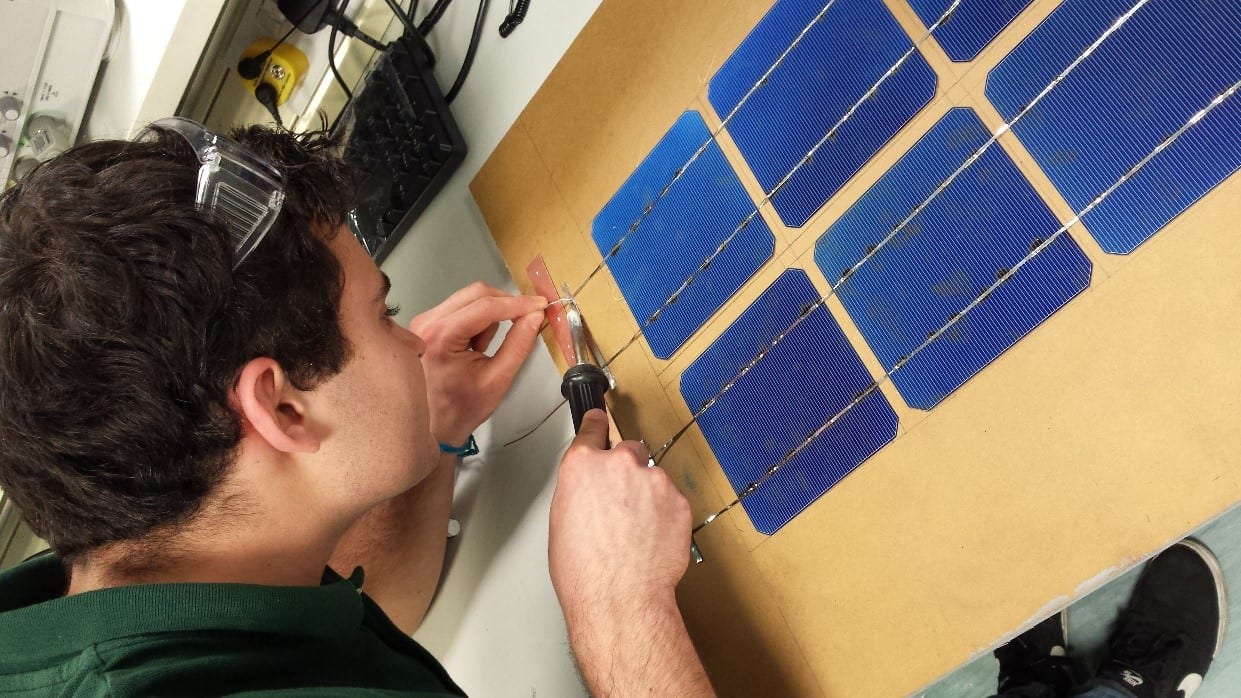
If you purchased untabbed cells, this is the most critical and delicate step. Each cell has a front (blue/dark side) and a back (lighter grid pattern). The front has thin silver lines for current collection, and the back has larger copper pads.
- Clean Cells: Gently clean each cell with isopropyl alcohol to remove any dust or fingerprints. Handle cells by their edges to avoid damage.
- Apply Flux: Use a flux pen to lightly coat the tabbing points on both the front and back of the cells.
- Solder Tabbing Wire:
- Front: Carefully solder two tabbing wires along the front bus bars of one cell. These wires will connect to the back of the next cell in the string.
- Back: Flip the cell over. Take the tabbing wires from the previous cell (or the start of your string) and solder them to the large copper pads on the back of the current cell. Repeat this process, connecting cells in series. Maintain consistent spacing between cells.
- Test Individual Strings: After soldering a string of cells (e.g., 8-10 cells), use your multimeter to check the voltage. For a 0.5V cell, an 8-cell string should read approximately 4V (0.5V x 8). This confirms proper series connection.
Wiring Cells and Constructing the Frame
Once individual strings are assembled, they need to be wired together and housed within a protective frame.
- Arrange Strings: Lay out your solar cell strings on the backing material within the dimensions of your chosen frame. Ensure adequate spacing between strings and around the perimeter.
- Connect Strings (Parallel): Use bus wire to connect the positive terminal of each string to a common positive bus, and the negative terminal of each string to a common negative bus. This connects the strings in parallel, increasing the total current output while keeping the voltage consistent with a single string.
- Prepare Backing and Frame: Secure the backing material (e.g., Tedlar) onto the panel’s base or directly to the aluminum frame. Many DIYers build a simple wooden or aluminum box frame.
- Mount Cells: Carefully place the wired cell array onto the backing material. Some methods involve using silicone adhesive to secure the cells in place before encapsulation.
Encapsulating and Sealing the Panel
Encapsulation is vital for protecting the delicate solar cells from environmental damage and moisture.
- Lay EVA Film: Place a layer of EVA film over the entire array of wired solar cells. Ensure it covers all cells and extends slightly beyond the edges.
- Add Front Cover: Carefully place your tempered glass or plexiglass front cover over the EVA film.
- Laminate (Heat Treatment): This step is crucial for melting the EVA film, expelling air, and bonding the layers.
- Professional Method: A vacuum laminator uses heat and vacuum pressure to create a perfect, bubble-free seal.
- DIY Method (Caution Recommended): For small panels, some attempt to achieve partial lamination using a heat gun, applying even heat and pressure. However, this method is very difficult to execute perfectly and risks damaging cells or leaving air bubbles. A better DIY approach is often to use clear silicone sealant to adhere the glass to the cell array and backing, though this offers less protection than full EVA lamination.
- Install Junction Box and Diodes: Mount the weather-resistant junction box onto the back of the panel. Wire the positive and negative bus wires from your cell array into the junction box. Crucially, install bypass diodes within the junction box. These diodes are wired in parallel across sections of cells (e.g., one diode for every 18-20 cells in series) and allow current to bypass a shaded or damaged section, preventing power loss and “hot spots” that can damage the panel.
- Seal the Edges: Apply a generous bead of UV-resistant silicone sealant around the entire perimeter where the front cover meets the frame, and also around the junction box, to ensure a watertight seal. Allow adequate time for the sealant to cure.
Testing, Installation, and Maintenance
The construction of your solar panel culminates in testing its performance, understanding basic installation principles, and committing to proper maintenance for long-term efficiency.
Post-Assembly Performance Testing
Before connecting your panel to a larger system, it’s essential to verify its functionality and output.
- Open-Circuit Voltage (Voc): Take your multimeter and set it to measure DC voltage. In direct sunlight, connect the positive lead to the panel’s positive output and the negative lead to its negative output, ensuring no load is connected. The reading should be close to the calculated open-circuit voltage for your specific cell configuration. For example, if you used 36 cells (0.5V each) in series, the Voc might be around 18-20V.
- Short-Circuit Current (Isc): Switch your multimeter to measure DC current (ensure it can handle the expected amperage, often 10A or higher). Connect the multimeter directly between the positive and negative terminals of the panel. This effectively “shorts” the panel. The reading will be the short-circuit current. This test should be performed quickly to avoid overheating the meter.
- Power Calculation: While not a perfect measure of maximum power point (Pmax), you can estimate the panel’s potential by multiplying a fraction of the Voc (e.g., 80-90%) by the Isc. A more accurate measurement of Pmax requires specialized equipment or a solar charge controller that tracks the maximum power point.
These tests confirm proper wiring and provide baseline performance data. If readings are significantly lower than expected, re-examine your solder joints, wiring, and check for any damaged cells.
Basic Installation Considerations
While this guide focuses on building the panel, understanding its context within a solar power system is important.
- Mounting: Securely mount the panel in a location that receives maximum unobstructed sunlight throughout the day. South-facing (in the Northern Hemisphere) with an optimal tilt angle (often close to your latitude) is ideal. Use robust, weather-resistant mounting hardware.
- System Integration: Your DIY panel will typically connect to a solar charge controller, which regulates the voltage and current flowing into batteries, preventing overcharging. From the batteries, an inverter converts the stored DC power into usable AC power for household appliances. Ensure all components are correctly sized and compatible with your panel’s output.
- Safety: Always disconnect power sources before working with electrical components. Use appropriate fuses and circuit breakers to protect your system from overcurrents. Consult with a qualified electrician if you are unsure about wiring or system design.

Maximizing Efficiency and Longevity
Regular maintenance will ensure your DIY solar panel operates at peak performance for years.
- Cleaning: Periodically clean the front surface of the panel with water and a soft brush or cloth to remove dust, dirt, bird droppings, and other debris that can reduce light absorption. Avoid abrasive cleaners.
- Inspection: Routinely inspect the panel for any signs of physical damage, such as cracks in the glass, loose wiring, or degradation of the sealant. Check the junction box for moisture ingress or corrosion.
- Shading Mitigation: Even partial shading on one part of the panel can significantly reduce the output of the entire array (especially in series-connected systems). Ensure no new obstructions (trees, antennas, etc.) are casting shadows on your panel. The bypass diodes you installed will help mitigate the impact of unavoidable shading.
Building your own solar panel is a testament to technical curiosity and a practical step towards energy independence. It offers invaluable hands-on experience with renewable energy technology, demystifying the power generation process and providing a tangible connection to sustainable living. With careful planning, precise execution, and a commitment to understanding the underlying technology, you can successfully construct a functional solar panel that powers your projects and illuminates your understanding of the sun’s incredible potential.
aViewFromTheCave is a participant in the Amazon Services LLC Associates Program, an affiliate advertising program designed to provide a means for sites to earn advertising fees by advertising and linking to Amazon.com. Amazon, the Amazon logo, AmazonSupply, and the AmazonSupply logo are trademarks of Amazon.com, Inc. or its affiliates. As an Amazon Associate we earn affiliate commissions from qualifying purchases.