
The Shopify ecosystem has evolved from a simple e-commerce platform into a robust infrastructure that powers millions of businesses worldwide. For developers, this represents a massive opportunity to build tools that solve specific merchant problems. Building a Shopify app in the current landscape requires a deep understanding of modern web technologies, API integration, and the specific architectural constraints of the Shopify platform. This guide provides a technical roadmap for navigating the development process, from environment setup to deployment.
Understanding the Modern Shopify App Architecture
Before writing the first line of code, it is essential to understand the structural shift Shopify has undergone over the last few years. Previously, developers were often left to their own devices regarding tech stacks, but the introduction of the Shopify CLI 3.0 and the adoption of the Remix framework as the primary template has streamlined the process significantly.

The Shift to Remix and the Shopify CLI
The current gold standard for Shopify app development is the Remix-based template. Remix is a full-stack web framework that focuses on web standards and modern user experiences. By using this framework, developers benefit from server-side rendering, built-in routing, and a seamless connection between the front end and the Shopify back end. The Shopify CLI facilitates this by automating the creation of app projects, managing authentication, and handling the deployment of app extensions.
Public vs. Custom Apps
Developers must decide whether they are building a Public app or a Custom app. Public apps are intended for the Shopify App Store and can be installed by any merchant. These require rigorous adherence to Shopify’s design and security standards. Custom apps, conversely, are built for a specific merchant and are not listed publicly. While the core development process is similar, Public apps require a more complex OAuth flow and a robust hosting strategy to handle varied traffic levels.
The Role of App Extensions
Modern Shopify apps are moving away from being simple “iframes” inside the admin panel. Shopify App Extensions allow developers to inject code directly into the Shopify Admin, the Point of Sale (POS), or the storefront. Theme App Extensions, for example, allow developers to add functionality to a merchant’s store without touching their theme code, using Liquid blocks. This is a critical technical requirement for maintaining a high-quality user experience and ensuring app compatibility with different store themes.
Setting Up the Development Environment
A successful build begins with a properly configured local environment. Because Shopify apps interact with external servers and webhooks, the setup is more involved than a standard local web project.
Prerequisites and Tooling
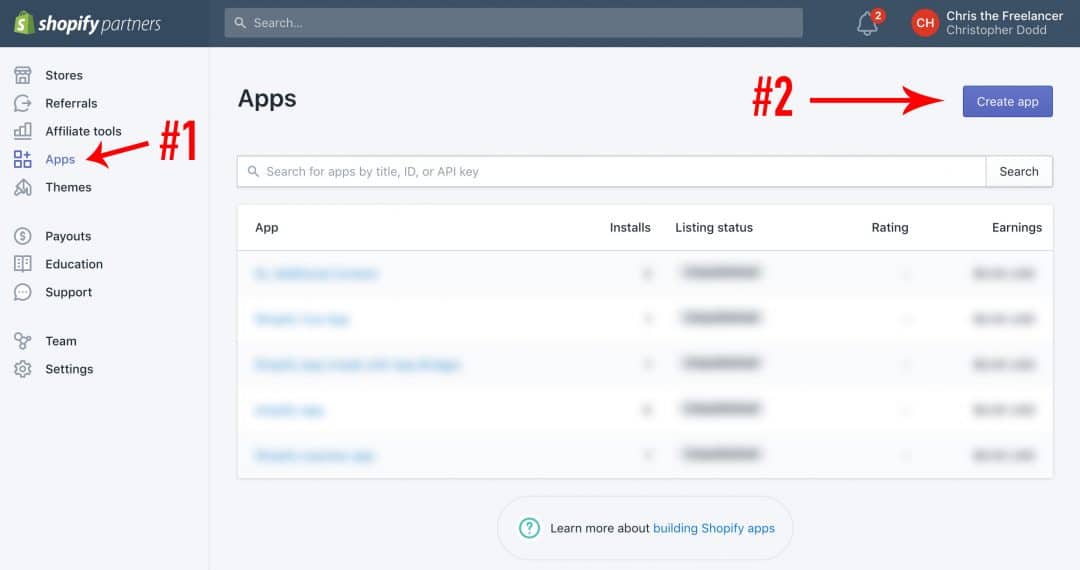
To begin, you need a Shopify Partner account. This is the nerve center where you create your app record, manage API keys, and track installations. On your local machine, you will need Node.js (latest LTS version) and a package manager like npm, pnpm, or Yarn.
The Shopify CLI is the most important tool in your arsenal. It allows you to initialize a project with a single command: npm init @shopify/app@latest. This command scaffolds a complete project structure, including the necessary configuration files like shopify.app.toml, which defines your app’s permissions and settings.
Tunneling for Local Development
Because Shopify needs to communicate with your local server via webhooks and OAuth redirects, your local environment must be accessible via a public URL. Historically, tools like Ngrok were the standard. However, the Shopify CLI now includes built-in tunneling capabilities. This ensures that every time you run npm run dev, a secure tunnel is established, allowing Shopify’s servers to ping your local development instance.
The Shopify Partner Dashboard Configuration
Within the Partner Dashboard, you must configure your App Setup. This includes defining your Redirect URLs for OAuth and setting up your App Status. It is also where you define the “Scopes” your app requires. Scopes are permissions—such as read_products or write_orders. Following the principle of least privilege is vital here; only request the scopes necessary for your app’s core functionality to ensure security and improve the likelihood of passing the App Store review.
Mastering the Shopify API and Data Management
At its heart, a Shopify app is an interface for interacting with Shopify’s data. Understanding how to efficiently query and mutate this data is the hallmark of a high-performance app.
GraphQL vs. REST
While Shopify still supports a REST API, the GraphQL Admin API is the preferred method for modern development. GraphQL allows you to request exactly the data you need and nothing more, reducing payload sizes and improving performance. For example, if you only need a product’s title and ID, GraphQL prevents the over-fetching of images, variants, and descriptions that would occur with a REST call. Mastery of GraphQL fragments and mutations is essential for any developer looking to build a scalable Shopify app.
Handling Webhooks at Scale
Webhooks are asynchronous notifications that Shopify sends when certain events occur, such as orders/create or app/uninstalled. Efficiently handling these is critical. Your server should respond with a 200 OK status immediately upon receiving a webhook and then process the data in a background job. If your app handles a high volume of orders, failing to use a background worker (like BullMQ or Sidekiq) can lead to timeouts and Shopify retrying the webhook, eventually leading to the deactivation of your webhook subscription.
The Mandatory GDPR Webhooks
Every public app must implement three specific webhooks to be compliant with Shopify’s privacy requirements: customers/data_request, customers/redact, and shop/redact. These endpoints do not necessarily need complex logic if your app does not store personal data, but the endpoints must exist and be registered in your app configuration.
Building the User Interface with Polaris and App Bridge
Shopify merchants expect a seamless experience. If an app looks and feels like a foreign tool, adoption rates will drop. To solve this, Shopify provides a design system and a bridge between the app and the admin.
Shopify Polaris: The Design Language
Polaris is a React-based component library that provides the building blocks for the Shopify Admin interface. Using Polaris ensures that your buttons, cards, and data tables match the aesthetic of the rest of the Shopify ecosystem. Beyond aesthetics, Polaris components are built with accessibility in mind, ensuring that your app is usable by all merchants. When building the UI, developers should leverage Polaris to maintain “visual trust” with the user.
Shopify App Bridge
Because most Shopify apps are “embedded” (meaning they run inside an iframe within the Shopify Admin), they cannot directly access certain browser features or the parent window’s URL. App Bridge is a JavaScript library that acts as a communication layer between your app and the Shopify Admin. It allows you to trigger native UI elements like toast notifications, modals, and navigation changes. The latest version of App Bridge is deeply integrated with the Shopify CLI templates, making it easier to manage the “loading” states and “contextual save bars” that characterize a native-feeling app.
Security, Authentication, and Deployment
The final stage of building a Shopify app involves securing the data and moving the code from a local machine to a production server.
OAuth and Session Management
Authentication in Shopify apps is handled via OAuth 2.0. When a merchant installs your app, they are redirected to your server, then back to Shopify to grant permissions. The Shopify Remix template handles much of this “handshake” automatically, managing sessions using a database. It is critical to use a persistent database (like PostgreSQL or MySQL) for session storage in production, as the default SQLite setup used in development is not suitable for multi-user environments.
Security Best Practices
Security is paramount when handling merchant data. Every request coming from Shopify must be verified using the HMAC (Hash-based Message Authentication Code) signature. This ensures that the request actually originated from Shopify and not a malicious actor. Additionally, if you are building a storefront component, you must be wary of Cross-Site Scripting (XSS) and ensure that all user input is sanitized.
Deployment and Hosting
When your app is ready for the world, you must host it on a cloud platform. Popular choices include Vercel, Fly.io, and Heroku. Because Shopify apps often require a persistent server to handle webhooks and background tasks, “serverless” environments can sometimes be tricky but are achievable with the right architecture. Once deployed, you must update your Redirect URLs and App URL in the Shopify Partner Dashboard to point to your live production domain.

The App Store Review Process
If your goal is the Public App Store, you must submit your app for review. Shopify’s review team will test your app for functional bugs, design consistency, and security vulnerabilities. They pay close attention to the “onboarding” experience—how easy it is for a merchant to go from clicking “Install” to seeing value. Ensuring you have a clear, bug-free setup process and a clean UI will significantly speed up your approval time.
Building a Shopify app is a technical challenge that rewards those who follow best practices and leverage the provided tooling. By focusing on a modern stack like Remix, adhering to the Polaris design system, and ensuring robust API management, developers can create powerful tools that integrate seamlessly into the daily workflows of millions of merchants.
aViewFromTheCave is a participant in the Amazon Services LLC Associates Program, an affiliate advertising program designed to provide a means for sites to earn advertising fees by advertising and linking to Amazon.com. Amazon, the Amazon logo, AmazonSupply, and the AmazonSupply logo are trademarks of Amazon.com, Inc. or its affiliates. As an Amazon Associate we earn affiliate commissions from qualifying purchases.