In today’s digital landscape, the security of your website is not just a best practice; it’s an absolute necessity. From safeguarding sensitive user data to building brand trust and even boosting your search engine rankings, an SSL (Secure Sockets Layer) certificate is the foundational element that enables a secure connection between your website and its visitors. If you’ve ever noticed a website address starting with “HTTPS” instead of “HTTP,” or a small padlock icon in your browser’s address bar, you’ve witnessed an SSL certificate in action. This seemingly small detail represents a powerful layer of encryption that protects information exchanged between your server and a user’s browser, making it virtually impossible for malicious actors to intercept and misuse data.
For businesses, securing a website is paramount for maintaining Brand Reputation and ensuring customer confidence. In an era where data breaches are increasingly common, demonstrating a commitment to security can be a significant differentiator. From a Tech perspective, understanding and implementing digital security protocols like SSL is a fundamental skill for anyone managing an online presence. This comprehensive tutorial will guide you through the intricacies of installing an SSL certificate, breaking down the process into manageable steps, whether you’re a seasoned developer or a small business owner navigating the complexities of web security for the first time. We’ll cover everything from choosing the right certificate type to server-specific installation instructions and vital post-installation checks, ensuring your website is fortified against evolving digital threats and operates with the full trust of its audience.
Understanding SSL: Why Security is Paramount
Before diving into the technical steps of installation, it’s crucial to grasp what an SSL certificate is and why its presence is non-negotiable for any modern website. This foundational understanding will underscore the value of your efforts in securing your digital assets.
What is an SSL Certificate?
An SSL certificate is a digital certificate that authenticates the identity of a website and encrypts information sent to the server using SSL/TLS (Transport Layer Security) technology. TLS is the successor to SSL, but the term “SSL certificate” is still widely used. When a web server has an SSL certificate, the connection between a web browser and the server becomes encrypted. This means any data—passwords, credit card numbers, personal information—transferred between the two points is scrambled and protected from eavesdropping.
At its core, an SSL certificate contains:
- Your domain name: It is issued to a specific website and domain.
- Your organization’s name: For certain certificate types, this identifies the legitimate owner.
- Your public key: Used for encryption.
- The issuer’s digital signature: Verifies the authenticity of the certificate.
- The certificate’s validity dates: Specifies when the certificate is active.
When a user visits an HTTPS-enabled website, their browser checks the SSL certificate. It verifies that the certificate is valid, hasn’t expired, and is issued by a trusted Certificate Authority (CA). If everything checks out, the browser establishes an encrypted connection, indicated by the familiar padlock icon and “HTTPS” in the URL bar, assuring the user that their interaction with the site is secure.
The Undeniable Benefits of HTTPS
Migrating your website from HTTP to HTTPS by installing an SSL certificate offers a multitude of benefits that extend far beyond basic data encryption.
-
Enhanced Data Security and Integrity: This is the primary function. SSL/TLS encrypts all data transmitted, protecting sensitive information from being intercepted, tampered with, or stolen by third parties. This is critical for e-commerce sites, online banking portals, and any website collecting personal user data, aligning perfectly with “Digital Security” best practices in the Tech domain.
-
Increased User Trust and Credibility: The padlock icon and “HTTPS” signal to users that your site is secure and trustworthy. Browsers like Chrome now explicitly mark HTTP sites as “Not Secure,” which can deter visitors and damage your Brand Reputation. A secure site builds confidence, encouraging users to interact, share information, and make purchases.
-
Improved Search Engine Rankings (SEO Boost): Google officially announced in 2014 that HTTPS is a ranking signal. Websites secured with SSL are given a slight preference in search results. This means that installing an SSL certificate can contribute to better visibility and organic traffic, directly impacting potential “Online Income” and business growth.
-
Compliance Requirements: Many industry standards and regulations, such as PCI DSS (Payment Card Industry Data Security Standard) for handling credit card information, mandate the use of SSL/TLS. GDPR (General Data Protection Regulation) and other privacy laws also emphasize data protection, making SSL a crucial component of compliance.
-
Faster Performance with HTTP/2: While not directly an SSL feature, HTTP/2 (the latest version of the HTTP protocol) requires an encrypted connection (HTTPS). HTTP/2 offers significant performance improvements, such as multiplexing, header compression, and server push, making your site load faster for users.
-
Protection Against Phishing and Man-in-the-Middle Attacks: SSL certificates make it harder for attackers to create spoofed versions of your site or intercept communications between your site and its users, providing a strong defense against common cyber threats.
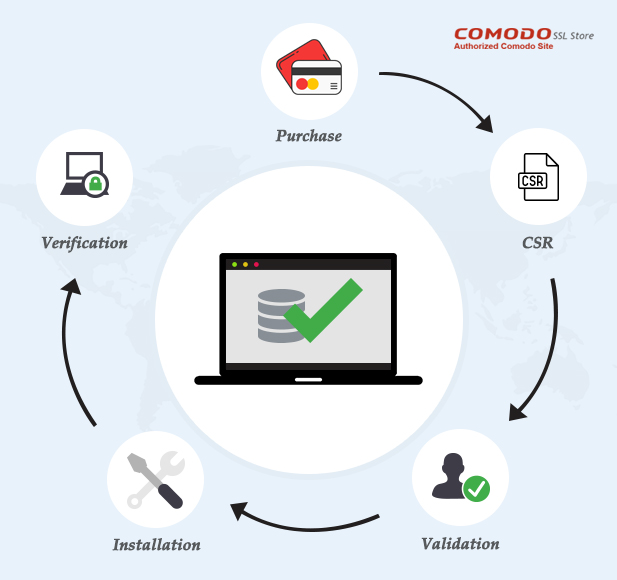
Before You Begin: Essential Prerequisites and Certificate Acquisition
Embarking on the SSL installation journey requires a few preparatory steps. Understanding the different types of certificates and the process of obtaining one are crucial before you touch any server configurations.
Choosing the Right SSL Certificate
SSL certificates are not one-size-fits-all. They come in various types, each offering different levels of validation and features. Selecting the right one depends on your website’s needs, budget, and the level of trust you wish to convey.
-
Domain Validation (DV) SSL:
- Validation Level: Lowest. Only verifies domain ownership (usually via email or DNS record).
- Issuance Time: Fastest, typically minutes to hours.
- Cost: Most affordable, with many free options available (e.g., Let’s Encrypt).
- Use Case: Blogs, personal websites, small businesses, or any site where high-level organizational authentication isn’t critical.
-
Organization Validation (OV) SSL:
- Validation Level: Medium. Verifies domain ownership AND the legitimacy of the organization.
- Issuance Time: A few days, as manual checks are involved.
- Cost: Moderately priced.
- Use Case: E-commerce sites, larger businesses, and organizations that want to demonstrate more trust than a DV certificate offers. The organization’s name appears in the certificate details.
-
Extended Validation (EV) SSL:
- Validation Level: Highest. Rigorous verification of domain ownership, organization identity, and physical existence.
- Issuance Time: Several days to weeks due to extensive manual vetting.
- Cost: Most expensive.
- Use Case: Financial institutions, large enterprises, and websites handling highly sensitive data. Historically, it showed a green address bar with the organization’s name, but modern browsers have largely removed this visual cue, though the high trust level remains in certificate details.
-
Wildcard SSL:
- Covers: A single domain and all its subdomains (e.g.,
*.yourdomain.comsecuresblog.yourdomain.com,shop.yourdomain.com, etc.). - Available for: DV and OV.
- Use Case: Websites with numerous subdomains that need to be secured under one certificate, simplifying management and reducing costs compared to individual certificates for each subdomain.
- Covers: A single domain and all its subdomains (e.g.,
-
Multi-Domain (SAN/UCC) SSL:
- Covers: Multiple distinct domain names (e.g.,
yourdomain.com,anotherdomain.net,yetanother.org). - Available for: DV, OV, and EV.
- Use Case: Companies managing multiple websites or distinct services under different domain names, allowing them to secure everything with a single certificate.
- Covers: Multiple distinct domain names (e.g.,
For most individuals and small to medium-sized businesses, a DV or Wildcard DV SSL certificate (especially free options like Let’s Encrypt) provides ample security and is easy to implement.
Generating Your Certificate Signing Request (CSR)
Once you’ve chosen your certificate type, the next step is to generate a Certificate Signing Request (CSR). A CSR is a block of encoded text that contains information about your domain and organization (e.g., common name, organization name, locality, country). You generate this on your server, and it also includes your public key. The corresponding private key is generated at the same time and stored securely on your server; it should never leave your server.
General steps for CSR generation:
- Access your server: This could be via SSH for Linux servers (Apache, Nginx), or through a control panel like cPanel.
- Use appropriate tools:
- OpenSSL (Linux/macOS):
openssl req -new -newkey rsa:2048 -nodes -keyout yourdomain.key -out yourdomain.csr - cPanel: Navigate to “SSL/TLS” -> “Generate, view, upload, or delete SSL certificate signing requests.”
- IIS (Windows Server): Use the “Server Certificates” feature in IIS Manager.
- OpenSSL (Linux/macOS):
- Provide accurate information: You’ll be prompted for details like Common Name (your exact domain, e.g.,
www.example.com), Organization, City, State, and Country. - Save the CSR and Private Key: The CSR (a text file ending with
.csr) is what you’ll submit to the CA. The private key (ending with.key) must be kept secret and secure on your server.
Purchasing and Validating Your Certificate
With your CSR in hand, you’re ready to acquire the SSL certificate.
- Choose a Certificate Authority (CA): Popular CAs include DigiCert, Sectigo (formerly Comodo), GlobalSign, GeoTrust, and for free certificates, Let’s Encrypt.
- Submit your CSR: Paste the contents of your generated CSR file into the CA’s order form.
- Complete Validation: The CA will perform validation based on the certificate type you chose:
- DV: Usually automated, requiring you to confirm domain ownership via email, DNS record (adding a specific TXT record), or file upload to your website.
- OV/EV: Involves more extensive manual checks, including verifying business registration, phone calls, and legal documents.
- Receive Your Certificate Files: Once validated, the CA will email you the certificate files. These typically include:
- Your primary certificate file (e.g.,
yourdomain.crt,yourdomain.cer). - Intermediate certificate(s) or CA Bundle file (e.g.,
ca-bundle.crt,chain.crt). This file is crucial as it helps browsers trust your certificate by connecting it back to a root CA.
- Your primary certificate file (e.g.,
Download these files and prepare them for upload to your server.
Step-by-Step Installation Guides for Popular Platforms
Now that you have your certificate files, it’s time to install them on your web server. The process varies slightly depending on your server software or control panel. We’ll cover the most common ones: Apache, Nginx, and cPanel.
Installing SSL on Apache Web Server
Apache is one of the most widely used web servers globally. The installation involves editing your virtual host configuration.
Prerequisites:
- Apache web server installed and running.
mod_sslmodule enabled (usuallysudo a2enmod ssl).- Your domain’s primary certificate (
yourdomain.crt). - Your private key (
yourdomain.key). - Your CA Bundle/Intermediate certificate (
ca-bundle.crtorchain.crt).
Steps:
-
Upload Certificate Files: Transfer your
yourdomain.crt,yourdomain.key, andca-bundle.crtfiles to your Apache server. A common location for these files is/etc/ssl/certs/for.crtandca-bundle.crt, and/etc/ssl/private/for.key. Ensure appropriate permissions (e.g.,600for private key) to keep the private key secure. -
Edit Your Virtual Host Configuration:
- Navigate to your Apache configuration directory (e.g.,
/etc/apache2/sites-available/on Ubuntu/Debian or/etc/httpd/conf.d/on CentOS/RHEL). - Open the virtual host file for your domain (e.g.,
yourdomain.conforyourdomain-ssl.conf). If you don’t have an SSL-specific virtual host, create one by copying your existing HTTP virtual host. - Typically, you’ll have a VirtualHost block for port 80 (HTTP) and you need to create or modify one for port 443 (HTTPS).
Here’s an example of an HTTPS VirtualHost block:
“`apache
ServerName yourdomain.com
ServerAlias www.yourdomain.com
DocumentRoot /var/www/yourdomain.com/public_htmlSSLEngine on SSLCertificateFile /etc/ssl/certs/yourdomain.crt SSLCertificateKeyFile /etc/ssl/private/yourdomain.key SSLCertificateChainFile /etc/ssl/certs/ca-bundle.crt # or SSLCACertificateFile for older Apache # Optional: Force HTTP to HTTPS redirection <IfModule mod_rewrite.c> RewriteEngine On RewriteCond %{HTTPS} off RewriteRule ^(.*)$ https://%{HTTP_HOST}%{REQUEST_URI} [L,R=301] </IfModule> # Other configurations like logging, error documents, etc. ErrorLog ${APACHE_LOG_DIR}/yourdomain_error.log CustomLog ${APACHE_LOG_DIR}/yourdomain_access.log combined - Navigate to your Apache configuration directory (e.g.,

# If you also have a port 80 VirtualHost, ensure it redirects to HTTPS
<VirtualHost *:80>
    ServerName yourdomain.com
    ServerAlias www.yourdomain.com
    Redirect permanent / https://yourdomain.com/
</VirtualHost>
```
-
Check Configuration Syntax: Before restarting, verify your Apache configuration for errors:
sudo apachectl configtestorsudo httpd -t
You should see “Syntax OK.” -
Restart Apache: Apply the changes by restarting the web server:
sudo systemctl restart apache2(Ubuntu/Debian)
sudo systemctl restart httpd(CentOS/RHEL)
Installing SSL on Nginx Web Server
Nginx is known for its high performance and efficiency. Installing an SSL certificate on Nginx is also straightforward, similar to Apache.
Prerequisites:
- Nginx web server installed and running.
- Your domain’s primary certificate (
yourdomain.crt). - Your private key (
yourdomain.key). - Your CA Bundle/Intermediate certificate (
ca-bundle.crtorchain.crt).- Note for Nginx: It’s common practice to concatenate your primary certificate and intermediate certificate(s) into a single file for
ssl_certificate.
- Note for Nginx: It’s common practice to concatenate your primary certificate and intermediate certificate(s) into a single file for
Steps:
-
Upload Certificate Files: Transfer
yourdomain.crt,yourdomain.key, andca-bundle.crtto your Nginx server. A typical location is/etc/nginx/ssl/. Ensure correct permissions (600for private key). -
Combine Certificate Files (Optional but Recommended): For Nginx, it’s often best to combine your primary certificate and the intermediate certificate chain into one file.
cat yourdomain.crt ca-bundle.crt > yourdomain_chained.crt
Thisyourdomain_chained.crtwill be used for thessl_certificatedirective. -
Edit Your Server Block Configuration:
- Navigate to your Nginx configuration directory (e.g.,
/etc/nginx/sites-available/or/etc/nginx/conf.d/). - Open or create a server block file for your domain (e.g.,
yourdomain.conf). - Add or modify a
serverblock to listen on port 443 and include the SSL directives.
Here’s an example of an HTTPS
serverblock:server { listen 443 ssl http2; listen [::]:443 ssl http2; # For IPv6 server_name yourdomain.com www.yourdomain.com; root /var/www/yourdomain.com/public_html; index index.html index.htm index.php;ssl_certificate /etc/nginx/ssl/yourdomain_chained.crt; # Use the combined file ssl_certificate_key /etc/nginx/ssl/yourdomain.key; ssl_session_cache shared:SSL:10m; ssl_session_timeout 10m; ssl_protocols TLSv1.2 TLSv1.3; # Modern protocols ssl_ciphers "EECDH+AESGCM:EDH+AESGCM:AES256+EECDH:AES256+EDH"; ssl_prefer_server_ciphers on; ssl_stapling on; ssl_stapling_verify on; resolver 8.8.8.8 8.8.4.4 valid=300s; # Google's DNS for stapling resolver_timeout 5s; # Optional: HTTP to HTTPS redirection # Add this server block for port 80 if not already present if ($scheme != "https") { return 301 https://$host$request_uri; } # Other configurations like logging, PHP processing, etc. location / { try_files $uri $uri/ =404; }}
- Navigate to your Nginx configuration directory (e.g.,
-
Check Configuration Syntax: Test your Nginx configuration for errors:
sudo nginx -t
You should see “syntax is ok” and “test is successful.” -
Reload Nginx: Apply the changes:
sudo systemctl reload nginx(orsudo service nginx reload)
Installing SSL via cPanel
cPanel is a popular web hosting control panel that simplifies many server management tasks, including SSL installation, making it very accessible for less technical users.
Prerequisites:
- Access to your cPanel account.
- Your domain’s primary certificate (
yourdomain.crt). - Your private key (
yourdomain.key) – though you likely generated this in cPanel already. - Your CA Bundle/Intermediate certificate (
ca-bundle.crt).
Steps:
-
Log in to cPanel: Access your hosting account’s cPanel interface.
-
Navigate to SSL/TLS Manager: In the “Security” section, click on “SSL/TLS” (or “SSL/TLS Manager”).
-
Manage Private Keys (if not already done):
- If you generated your CSR within cPanel, your private key is likely already saved.
- If you generated it elsewhere, click “Generate, view, upload, or delete your private keys” and upload your
yourdomain.key.
-
Install and Manage SSL for your Site:
- Go back to the SSL/TLS Manager and click on “Manage SSL sites” under “Install and Manage SSL for your site (HTTPS).”
- Select your domain from the dropdown menu under “Install an SSL Website.”
-
Upload Certificate Files: You will see three text fields:
- Certificate (CRT): Paste the content of your
yourdomain.crtfile here. Click “Autofill by Certificate” – cPanel will often try to populate the other fields. - Private Key (KEY): This should be automatically populated if your private key was already on the server or if you generated the CSR in cPanel. If not, paste the content of your
yourdomain.keyfile. - Certificate Authority Bundle (CABUNDLE): Paste the content of your
ca-bundle.crtor intermediate certificate file here.
- Certificate (CRT): Paste the content of your
-
Click “Install Certificate”: cPanel will process the installation. You should receive a success message.
-
Verify and Redirect (Optional but Recommended):
- Most cPanel installations automatically handle HTTP to HTTPS redirection. If not, you can usually find an option in the “Domains” section of cPanel called “Redirects” or “Force HTTPS Redirect.”
- Alternatively, you can manually edit your
.htaccessfile in your site’spublic_htmldirectory:
RewriteEngine On
RewriteCond %{HTTPS} off
RewriteRule ^(.*)$ https://%{HTTP_HOST}%{REQUEST_URI} [L,R=301]
Verifying Your Installation and Maintaining Security
Installing the SSL certificate is a significant step, but your work isn’t done until you’ve verified its correct implementation and established a plan for ongoing maintenance. This ensures your site remains secure and trusted.
Confirming HTTPS Activation
After installation, it’s crucial to confirm that your SSL certificate is correctly installed and your website is serving content over HTTPS.
-
Browser Check:
- Open your website in a web browser (e.g., Chrome, Firefox, Edge).
- Look for the padlock icon in the address bar. This indicates a secure connection.
- Click on the padlock icon for more details. It should confirm that the connection is secure and show information about your certificate (issuer, expiration date).
- Ensure the URL starts with
https://.
-
Online SSL Checker Tools: Use free online tools like SSL Checker by SSL Shopper, Qualys SSL Labs, or What’s My Chain Cert. These tools perform a deeper analysis:
- They verify the installation, check for correct certificate chain order, and identify common misconfigurations.
- They provide a “grade” (e.g., A+ from SSL Labs) for your SSL configuration, highlighting areas for improvement (e.g., weak cipher suites, old TLS protocols).
- This is an excellent step for “Digital Security” best practices, ensuring robust configuration.
-
Check for Mixed Content Warnings: One common issue after switching to HTTPS is “mixed content.” This occurs when an HTTPS page loads some resources (images, scripts, CSS, fonts) using insecure HTTP links. Browsers will typically block these insecure resources or display a “partially secure” warning, undermining trust.
- Browser developer tools (F12) can help identify mixed content warnings in the Console tab.
- To fix this, ensure all internal links and external resources (CDNs, third-party widgets) are loaded via HTTPS. Update paths in your theme, plugins, or directly in your code.
Common Troubleshooting Tips
Encountering issues during or after SSL installation is common. Here are some solutions to frequently faced problems:
-
Certificate Not Trusted / Invalid:
- Incorrect Chain/CA Bundle: The most common cause. Ensure you’ve installed the full intermediate certificate chain (CA bundle). Browsers need this to verify your certificate against a trusted root CA. For Nginx, ensure it’s correctly concatenated. For Apache, check
SSLCertificateChainFileorSSLCACertificateFile. - Expired Certificate: Double-check the validity dates.
- Wrong Domain: Ensure the certificate is issued to the exact domain you’re installing it on (including
wwwor non-wwwif applicable). - Self-Signed Certificate: If you’re seeing browser warnings about self-signed certificates, it means you’re using a certificate not issued by a publicly trusted CA.
- Incorrect Chain/CA Bundle: The most common cause. Ensure you’ve installed the full intermediate certificate chain (CA bundle). Browsers need this to verify your certificate against a trusted root CA. For Nginx, ensure it’s correctly concatenated. For Apache, check
-
Website Still Shows HTTP / No Redirection:
- Redirection Not Configured: Ensure you’ve set up 301 redirects from HTTP to HTTPS in your web server configuration (Apache
.htaccessor virtual host, Nginx server block) or via your control panel. - Firewall Issues: Check if your server’s firewall (e.g.,
ufw,firewalld) is blocking port 443.
- Redirection Not Configured: Ensure you’ve set up 301 redirects from HTTP to HTTPS in your web server configuration (Apache
-
Private Key Mismatch:
- The private key used for installation must be the exact key generated with the CSR that was used to obtain the certificate. If they don’t match, the installation will fail or cause errors.
- You can verify this using OpenSSL:
openssl x509 -noout -modulus -in yourdomain.crtopenssl rsa -noout -modulus -in yourdomain.key- The modulus values should match.
-
Error Messages: Carefully read any error messages from your server logs or control panel. They often pinpoint the exact problem.
The Importance of SSL Certificate Renewal
SSL certificates are not permanent; they have an expiration date, typically 90 days (for Let’s Encrypt) to one or two years for commercial certificates. Failing to renew your certificate will result in browsers displaying dire “Your connection is not private” warnings, effectively blocking users from accessing your site and severely damaging your Brand Reputation and potentially your Online Income.
- Timely Renewal: Most CAs send reminders before expiration. Pay attention to these notifications.
- Automated Renewal (for Let’s Encrypt): Tools like Certbot can automate the renewal process for Let’s Encrypt certificates, making it a “set and forget” solution. This is a prime example of leveraging “AI Tools” or automation for “Productivity” in digital security.
- Manual Renewal: For commercial certificates, the process involves requesting a new certificate from your CA (often requiring a new CSR) and then installing the new files, similar to the initial installation.
Regularly checking your certificate’s expiration date and having a renewal strategy in place is a critical aspect of ongoing web security maintenance.
Installing an SSL certificate is a fundamental step towards creating a secure, trustworthy, and performant online presence. While the process involves several technical steps, breaking it down into logical sections and utilizing available tools makes it achievable for anyone committed to digital security. By understanding the “why” behind SSL, carefully following the “how-to” steps, and diligently performing post-installation checks and renewals, you ensure your website not only protects its visitors but also strengthens its foundation for future growth and success in the digital realm. Embrace HTTPS; it’s an investment in your site’s future.
aViewFromTheCave is a participant in the Amazon Services LLC Associates Program, an affiliate advertising program designed to provide a means for sites to earn advertising fees by advertising and linking to Amazon.com. Amazon, the Amazon logo, AmazonSupply, and the AmazonSupply logo are trademarks of Amazon.com, Inc. or its affiliates. As an Amazon Associate we earn affiliate commissions from qualifying purchases.