In an increasingly connected world, the pursuit of convenience, security, and peace of mind has driven the remarkable growth of the smart home industry. At the forefront of this revolution stands the Ring Doorbell, a prominent brand that has redefined how we monitor and interact with our home’s entry points. More than just a simple gadget, a Ring Doorbell integrates advanced technology to offer an unparalleled layer of digital security and smart home connectivity. This guide is designed to walk you through the entire process of installing your Ring Doorbell, ensuring a seamless setup from unboxing to enjoying its full range of features. Whether you’re a tech enthusiast eager to expand your smart ecosystem or a homeowner looking for enhanced protection, understanding the installation process is your first step towards a smarter, more secure home. We’ll delve into the technical nuances, provide practical tips, and even touch upon the brand’s place in the market and the financial considerations involved in this upgrade.
Why Integrate a Ring Doorbell into Your Smart Home Ecosystem?
The decision to install a Ring Doorbell goes beyond merely replacing an old chime. It’s an investment in a robust, interconnected security framework that significantly elevates your home’s intelligence and safety profile. Ring, as a leader in the smart home security sector, has built a brand reputation for user-friendly devices coupled with powerful features, making it a compelling choice for many households.
The Unmatched Convenience and Security of Ring
At its core, a Ring Doorbell offers unparalleled convenience and a formidable layer of security. Imagine being able to see and speak to anyone at your front door, no matter where you are in the world, directly from your smartphone. This real-time interaction is made possible through features like two-way talk, live view on demand, and instant motion-activated alerts. Whether it’s a delivery person, a visiting friend, or an unexpected caller, you’re always in control and aware of who’s approaching your property.
From a digital security standpoint, Ring Doorbells are designed to deter potential intruders. The mere presence of a visible smart doorbell can be a deterrent, and its ability to record high-definition video footage serves as crucial evidence in case of an incident. Furthermore, the integration with other Ring devices, such as cameras and alarms, creates a holistic security ecosystem, enhancing overall protection and allowing for centralized monitoring through the intuitive Ring app. This seamless connectivity exemplifies the best of modern technology trends, providing users with sophisticated tools that were once exclusive to professional security systems.
The brand’s commitment to continuous improvement, evidenced by regular software updates and new product releases, ensures your device remains cutting-edge. From a financial perspective, this proactive security measure can offer tangible benefits. Many insurance providers offer discounts for homes equipped with smart security systems, and the peace of mind derived from knowing your home is monitored can be invaluable. It’s a smart investment that pays dividends in both security and personal tranquility.
Choosing the Right Ring Doorbell for Your Needs
Ring offers a diverse range of doorbell models, each tailored to specific installation preferences and feature requirements. Understanding these distinctions is crucial for a successful setup and optimal performance. Generally, Ring Doorbells fall into two main categories: Wired and Battery-Powered.
-
Battery-Powered Models (e.g., Ring Video Doorbell, Video Doorbell 2, 3, 4): These are incredibly popular for their ease of installation, as they don’t require existing doorbell wiring. They are powered by a rechargeable battery pack, offering immense flexibility in placement. Battery life varies depending on usage and settings but typically lasts several weeks to months between charges. These models are ideal for renters, homes without existing doorbell wiring, or anyone prioritizing a quick, fuss-free installation. They often connect directly to your home’s Wi-Fi network.
-
Wired Models (e.g., Ring Video Doorbell Pro, Pro 2, Elite): These models connect to your home’s existing doorbell wiring, providing continuous power and eliminating the need for battery charging. They generally offer more advanced features, such as enhanced Wi-Fi connectivity (often supporting 5GHz bands for faster, more reliable connections), quicker response times, and sometimes higher resolution video or advanced motion detection. The “Elite” models take it a step further, utilizing Power over Ethernet (PoE) for ultimate reliability and network stability, often favored in new constructions or for professional installations. These are best suited for homeowners with existing doorbell wiring who seek a more permanent and feature-rich solution.
When choosing, consider factors like your existing wiring, Wi-Fi signal strength at your door, budget, and desired features (e.g., advanced motion detection, specific video resolution). Each model is a testament to Ring’s commitment to leveraging technology to meet varied consumer needs, ensuring there’s a perfect fit for almost every home.
Essential Preparations Before You Begin Installation
A smooth installation process is often a result of thorough preparation. Before you even think about picking up a screwdriver, there are several crucial steps to take to ensure everything goes according to plan. This phase is critical for safety, efficiency, and ultimately, the successful integration of your new smart gadget into your home.
Gathering Your Toolkit and Assessing Your Environment
No DIY project is complete without the right tools. For a Ring Doorbell installation, you’ll typically need:
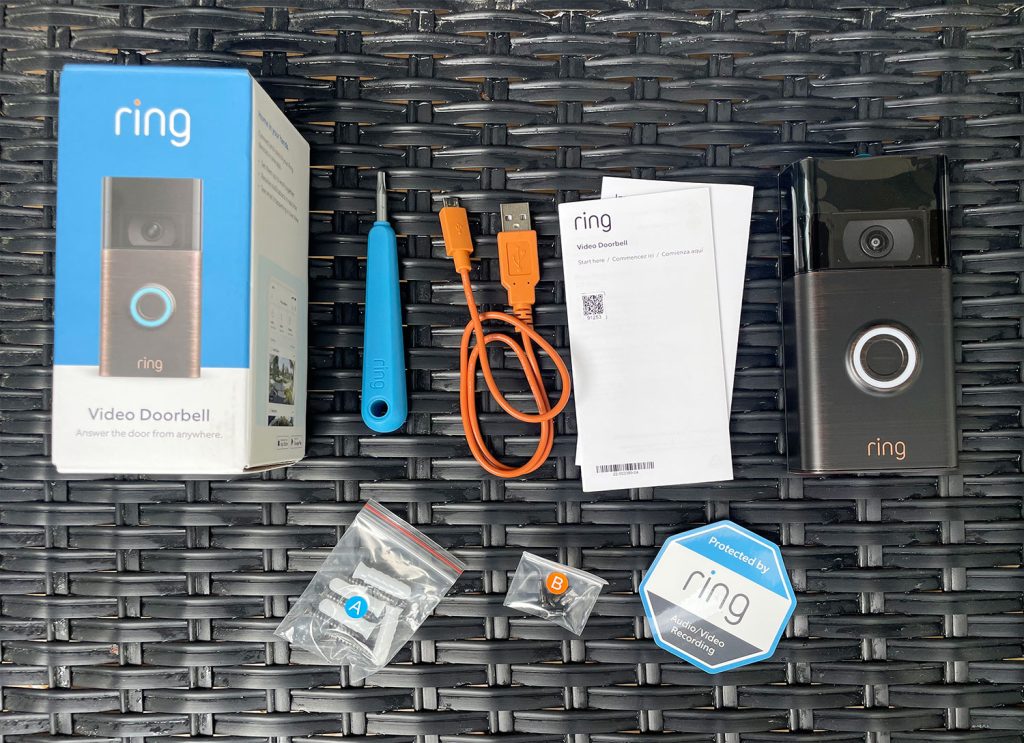
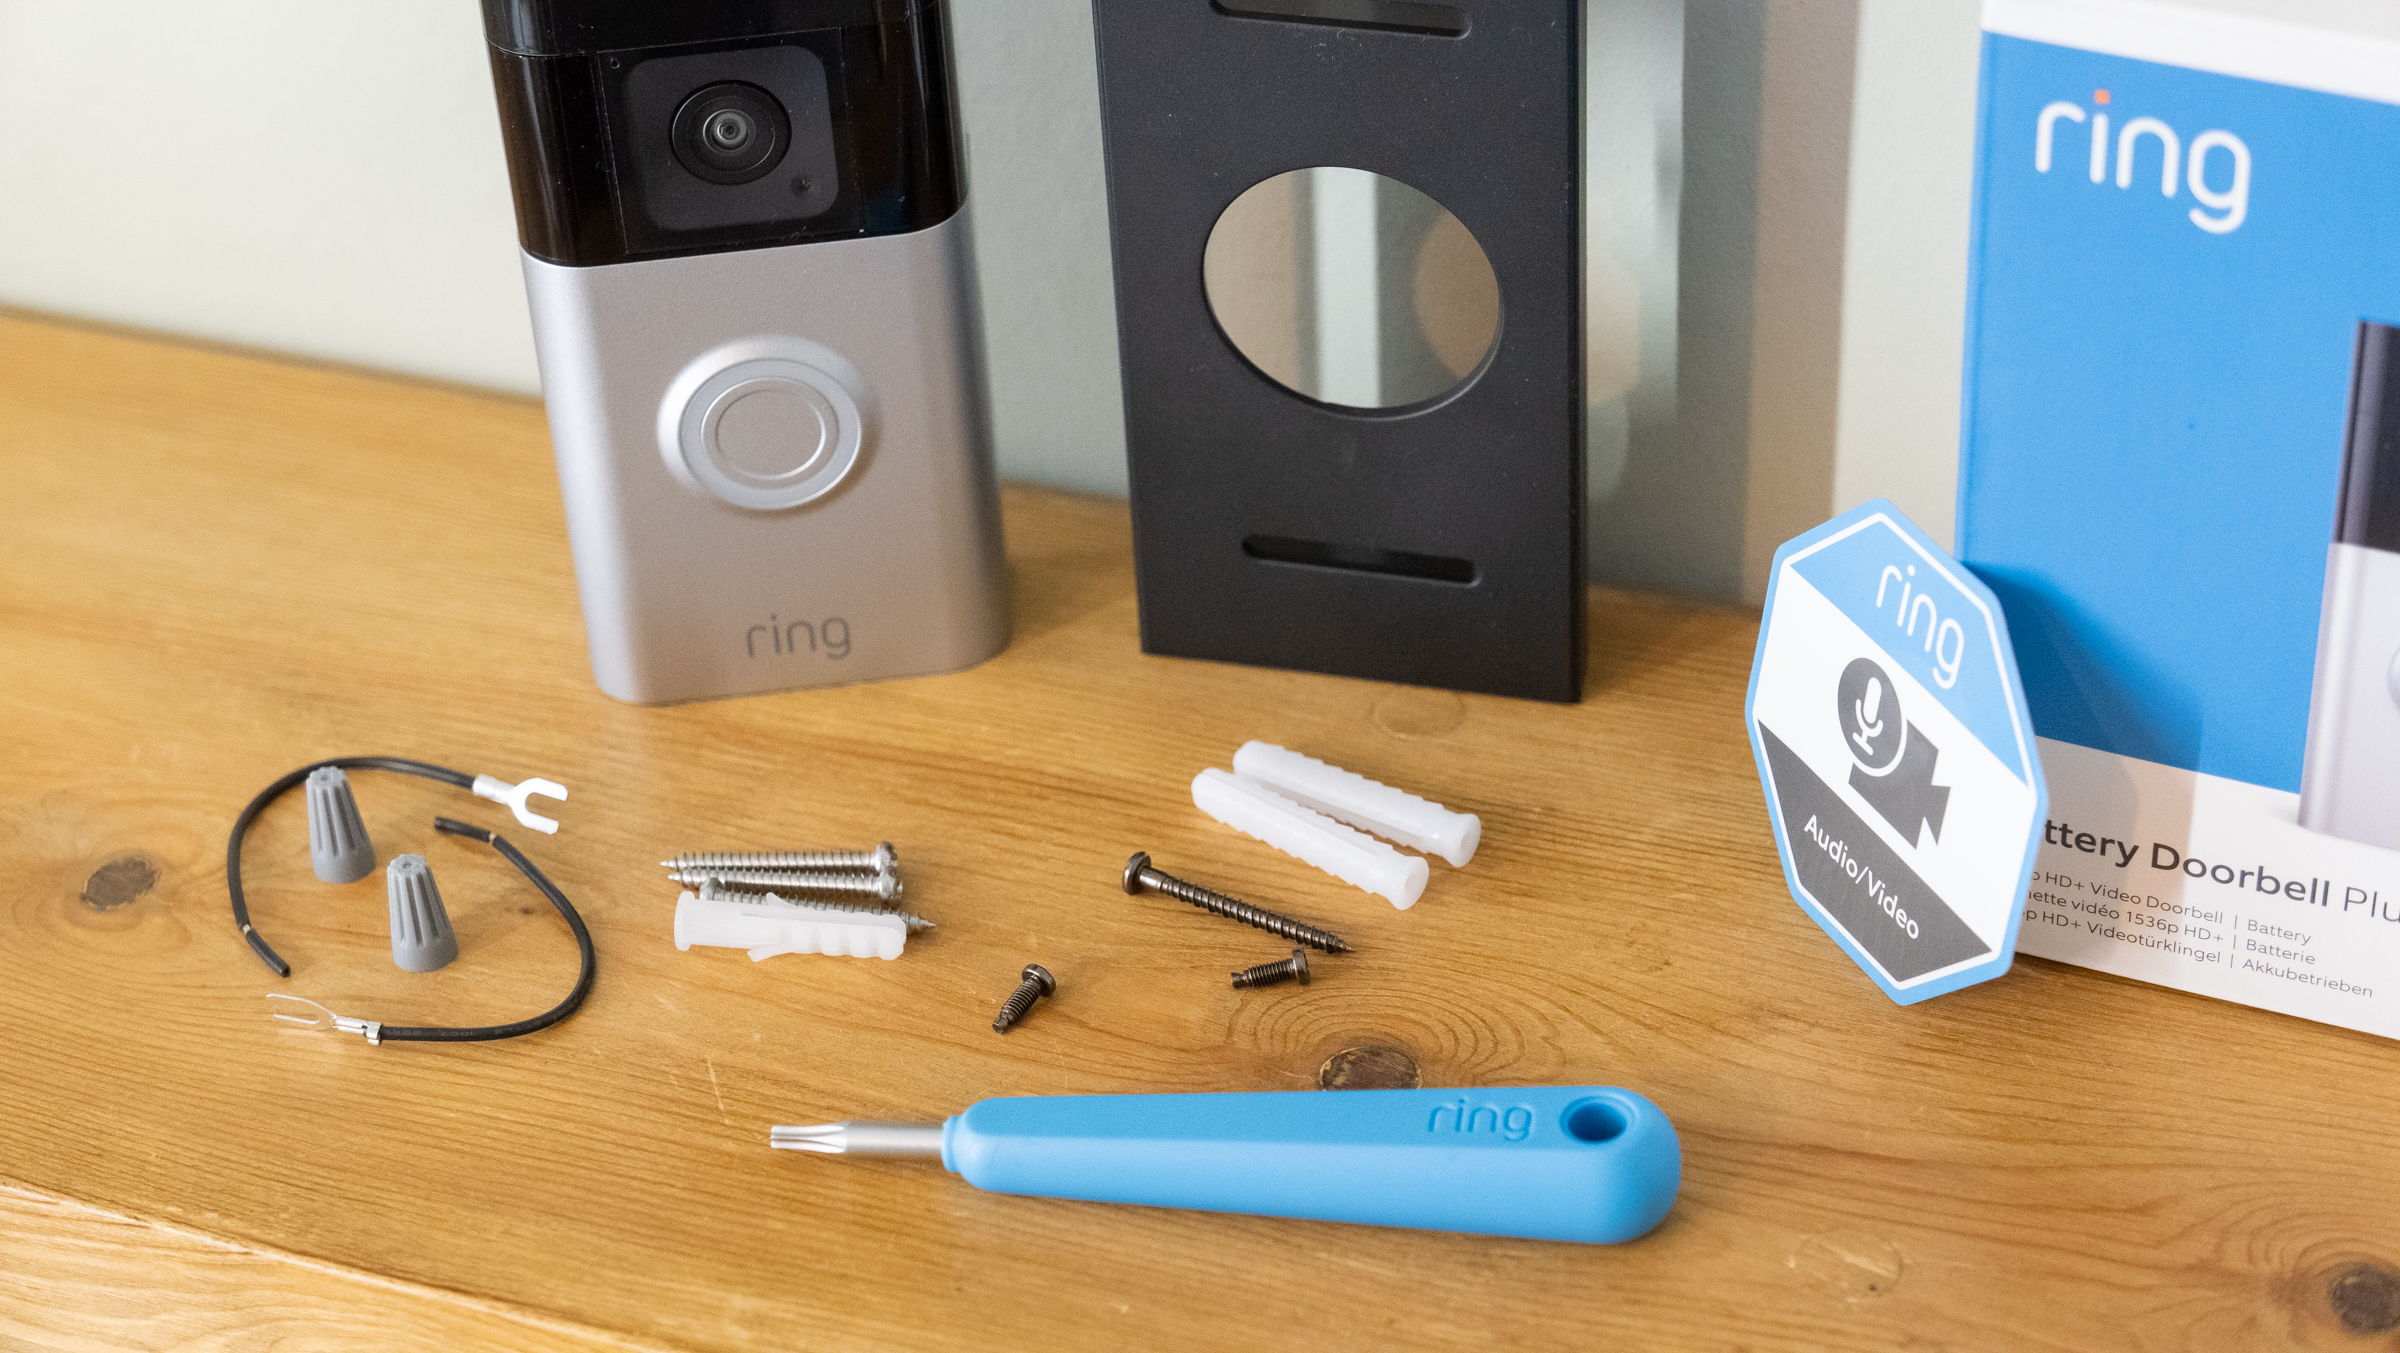
- Your Ring Doorbell Package: This usually includes the doorbell itself, a mounting plate, screws, anchors, a mini-level, and often a screwdriver.
- Power Drill (optional but recommended): For pre-drilling pilot holes, especially on tougher surfaces like brick or stucco.
- Phillips Head Screwdriver: For mounting screws and securing wiring.
- Ladder or Step Stool: If your doorbell is positioned high.
- Pencil: For marking drill holes.
- Multimeter (for wired installations): Useful for testing existing doorbell transformer voltage, ensuring it meets Ring’s requirements (typically 8-24 VAC).
- Existing Doorbell Chime Kit (for wired installations): You might need to install a jumper cable (often included with wired Ring models) to bypass your internal chime.
- Good Wi-Fi Signal: Crucial for connectivity. Test your Wi-Fi strength at your front door using your smartphone. If it’s weak, consider a Wi-Fi extender.
Beyond tools, an environmental assessment is key. For wired installations, locate your existing doorbell and trace its wiring if possible. Note the type of surface you’ll be mounting on (wood, stucco, brick, vinyl siding) as this dictates the type of anchors you’ll use. For all installations, consider the optimal placement for the doorbell: it should be at a height where it can capture faces clearly, typically around 4 feet (1.2 meters) from the ground, and have a clear line of sight. Also, take into account direct sunlight exposure, which can sometimes impact video quality or trigger false motion alerts if not properly accounted for in the app’s settings.
Prioritizing Safety: The Golden Rule of DIY Installations
When dealing with electrical components, safety is paramount. For wired Ring Doorbell installations, you will be working with your home’s electrical system, specifically the low-voltage doorbell circuit.
The most important safety step is to turn off the power to your doorbell transformer at your circuit breaker. This typically involves locating your home’s main electrical panel and switching off the breaker labeled “Doorbell,” “Front Door,” or “Chime.” If unsure, turn off the main breaker to your entire home, though this is usually overkill for a doorbell. To confirm the power is off, press your existing doorbell button – if it doesn’t chime, the power is disconnected. For wired models, a multimeter can be used to double-check that no voltage is present at the doorbell wires.

Always wear appropriate safety gear, such as safety glasses, especially when drilling. Be mindful of hidden wiring or pipes behind walls when drilling. If you’re uncomfortable at any point with electrical work, it is always advisable to consult a qualified electrician. While Ring Doorbells are designed for DIY installation, respect for electrical safety cannot be overstated. Battery-powered installations are much simpler from an electrical safety perspective as they don’t involve household wiring, but general safety practices (e.g., stable ladder use) still apply.
Step-by-Step Installation: Bringing Your Ring Doorbell to Life
With your preparations complete and safety ensured, it’s time to physically install your Ring Doorbell. The process varies slightly between wired and battery-powered models, so we’ll cover both scenarios in detail.
For Existing Wired Doorbell Systems: The Traditional Approach
This method leverages your home’s existing low-voltage doorbell wiring to provide continuous power to your Ring device.
- Remove Your Old Doorbell Button: Carefully unscrew your existing doorbell button from the wall. You’ll usually find two wires connected to it. Gently disconnect these wires, making sure they don’t fall back into the wall. If necessary, temporarily tape them to the wall.
- Install the Jumper Cable (if required): For most wired Ring Doorbell models (like the Pro or Pro 2), you’ll need to install a “jumper cable” or “pro power kit” to bypass your existing indoor doorbell chime. This ensures enough power goes directly to the Ring Doorbell. Locate your indoor chime unit (often in a hallway, near the front door, or in the basement/garage). Open its cover and identify the “Front” and “Trans” terminals. Connect the jumper cable between these two terminals. This effectively removes your old chime from the circuit, as the Ring Doorbell will produce its own digital chime sounds.
- Mount the Mounting Plate: Place the Ring mounting plate against the wall where your old doorbell was. Use the provided mini-level to ensure it’s straight, and mark the screw holes with a pencil. If drilling into brick, stucco, or concrete, use a power drill with an appropriate masonry bit to create pilot holes for the anchors. Insert the anchors into these holes, then secure the mounting plate to the wall with the provided screws.
- Connect the Wires: Carefully connect the two wires from your wall to the terminals on the back of the Ring Doorbell. It typically doesn’t matter which wire goes into which terminal as doorbell wiring is non-polarized. Ensure the wires are securely tightened to prevent loose connections.
- Attach the Ring Doorbell: Line up the Ring Doorbell with the mounting plate and push it firmly into place. It should click or slide securely onto the plate.
- Secure with Security Screw: Once the doorbell is in place, insert the small security screw into the bottom of the device using the star-shaped screwdriver provided. This prevents casual theft.
- Restore Power: Go back to your circuit breaker and turn the power back on. Your Ring Doorbell should light up, indicating it’s receiving power and is ready for setup.
For Battery-Powered Ring Doorbells: Simplicity and Flexibility
Battery-powered models are ideal for locations without existing wiring or for those who prefer a less invasive installation.
- Charge the Battery: Before installation, fully charge the provided rechargeable battery pack using the included USB cable. The indicator light will change (e.g., from red to green) when charging is complete.
- Mount the Mounting Plate: Hold the mounting plate against the wall at your desired height (around 4 feet from the ground is recommended). Use the mini-level to ensure it’s straight, and mark the screw holes. As with wired installations, pre-drill pilot holes and insert anchors if mounting on masonry or stucco, then secure the mounting plate.
- Connect Wires (Optional): Some battery-powered Ring Doorbells offer the option to connect to existing doorbell wires for trickle charging. If you have existing wires and want to utilize this, connect them to the terminals on the back of the doorbell. This will significantly extend the battery life, though it won’t power the internal chime of your home. If not using existing wires, simply skip this step.
- Insert the Battery: Slide the fully charged battery pack into the compartment at the bottom of the Ring Doorbell until it clicks into place.
- Attach the Ring Doorbell: Align the doorbell with the mounting plate and firmly push it into place.
- Secure with Security Screw: Insert the small security screw into the bottom of the device to secure it to the mounting plate.
- Power On: The Ring Doorbell will power on automatically once the battery is inserted, and its light ring will begin to spin, indicating it’s in setup mode.
The Crucial App Setup and Initial Configuration
After the physical installation, the next critical step is connecting your Ring Doorbell to your home’s Wi-Fi network and configuring it via the Ring app. This is where the technology truly comes alive.
- Download the Ring App: If you haven’t already, download the “Ring – Always Home” app from the App Store (iOS) or Google Play Store (Android).
- Create an Account: Open the app and follow the prompts to create a new Ring account or log in if you already have one.
- Set Up a New Device: Tap the “Set Up a Device” option and select “Doorbells.”
- Scan the QR Code: The app will instruct you to scan the QR code located on the back of your Ring Doorbell or on its packaging. This identifies your specific device.
- Name Your Device: Give your Ring Doorbell a unique name (e.g., “Front Door,” “Main Entry”).
- Put Device into Setup Mode: The app will guide you to put your doorbell into setup mode (the light ring will typically spin blue). Press the small button on the side or back of the doorbell if prompted.
- Connect to Ring Wi-Fi Network: Your phone will temporarily disconnect from your home Wi-Fi and connect to a temporary Ring Wi-Fi network (e.g., “Ring-XXXXXX”). Follow the in-app instructions to make this connection.
- Connect to Your Home Wi-Fi: Once connected to the Ring network, the app will ask you to select your home Wi-Fi network from a list and enter its password. Ensure you select your 2.4GHz network for most models, or 5GHz if your specific Ring Doorbell supports it and your router is configured for it.
- Complete Setup: Once connected, the Ring Doorbell will update its firmware (which may take a few minutes) and the light ring will glow solid blue. You’ll receive a confirmation message in the app.
- Test Your Doorbell: Press the doorbell button. You should hear a chime (either from the Ring device itself or a connected Ring Chime), and your phone should receive a notification. Check the live view to ensure the video and two-way audio are working correctly.
Optimizing Performance and Troubleshooting Common Issues
Installing your Ring Doorbell is just the beginning. To truly harness its power, you’ll want to optimize its settings and know how to address common issues that might arise, ensuring long-term reliability and satisfaction.
Fine-Tuning Your Ring Doorbell for Peak Performance
The Ring app offers a wealth of customization options that can significantly enhance your doorbell’s performance and user experience.
- Motion Zones and Sensitivity: This is perhaps the most crucial setting for reducing false alarms. Create custom motion zones that focus on areas of interest (e.g., your walkway, steps) and exclude irrelevant areas (e.g., busy street, neighbor’s yard). Adjust the motion sensitivity to prevent triggers from small animals or passing cars. Experiment with different settings until you find the perfect balance. Some advanced models offer “3D Motion Detection” or “Bird’s Eye View” for even greater precision.
- Privacy Zones: To respect neighbor privacy or exclude areas you don’t wish to monitor, create “Privacy Zones” within the app. These areas will be blacked out in your recordings and live view.
- Notification Settings: Customize how and when you receive alerts. You can differentiate between motion alerts and doorbell presses, and even set quiet hours to avoid disturbances.
- Linked Devices: If you have other Ring devices (cameras, lights, alarms), link them in the app. For example, you can set your outdoor Ring lights to turn on when your doorbell detects motion. This creates a powerful, interconnected smart home security system, amplifying the benefits of the brand’s ecosystem.
- Ring Protect Plan: While not strictly an installation step, considering a Ring Protect Plan is vital for unlocking your doorbell’s full potential. This subscription service (a small monthly or annual fee – a “Money” consideration) enables video recording storage in the cloud, allowing you to review, download, and share recorded events. Without it, you only get live view and real-time alerts. It’s an investment that ensures you capture and retain crucial footage, adding significant value to your digital security setup.
- Frequent Updates: Keep your Ring app and doorbell firmware updated to ensure access to the latest features, security patches, and performance improvements.
Tackling Installation and Connectivity Hiccups
Even with careful preparation, you might encounter minor issues. Here are some common problems and their solutions:
- No Power to Wired Doorbell:
- Check Circuit Breaker: Ensure the breaker for your doorbell is on.
- Verify Transformer Voltage: Use a multimeter to confirm your existing doorbell transformer provides sufficient voltage (8-24 VAC). If it’s too low, you may need a transformer upgrade.
- Inspect Wiring: Make sure wires are securely connected to the Ring Doorbell terminals and not corroded or damaged.
- Jumper Cable: Confirm the jumper cable is correctly installed at your indoor chime unit, if applicable.
- Wi-Fi Signal Issues:
- Weak Signal: If your Wi-Fi signal at the door is weak, consider installing a Wi-Fi extender or a Ring Chime Pro, which doubles as a Wi-Fi extender specifically for Ring devices.
- Incorrect Password: Double-check that you entered the correct Wi-Fi password during setup.
- Router Distance: Your router might be too far from the doorbell. Try repositioning it if possible.
- Network Congestion: Too many devices on your network can slow it down.
- Motion Detection Problems (Too Many/Too Few Alerts):
- Adjust Motion Zones/Sensitivity: As mentioned above, fine-tune these settings within the app.
- Doorbell Placement: Ensure the doorbell isn’t aimed at busy public areas or direct sunlight that could cause false triggers.
- Privacy Zones: Utilize privacy zones to block out irrelevant areas.
- Doorbell Not Chime (Wired Installation):
- Jumper Cable: If you bypassed your indoor chime with a jumper cable, it will no longer ring. You’ll need a Ring Chime or Chime Pro (sold separately) for an indoor audible alert.
- App Settings: Ensure “In-Home Chime” is enabled in the Ring app settings for wired connections if you haven’t bypassed it.
- App Glitches:
- Restart App: Close and reopen the Ring app.
- Restart Phone: Sometimes a device restart can resolve temporary issues.
- Clear Cache: Clear the app cache (Android) or reinstall the app.
- Check for App Updates: Ensure your Ring app is up to date.
By following these troubleshooting steps, you can often resolve most common issues independently, ensuring your Ring Doorbell continues to function as a reliable guardian of your home.
In conclusion, installing a Ring Doorbell is a rewarding DIY project that significantly upgrades your home’s security and convenience. By carefully following the preparation steps, understanding the specific installation process for your model, and diligently configuring its settings, you can seamlessly integrate this powerful piece of technology into your daily life. The Ring brand has established itself as a leader in the smart home space by consistently delivering innovative, user-friendly devices that truly enhance digital security and connectivity. From the initial investment to potential long-term benefits like peace of mind and insurance savings, a Ring Doorbell offers substantial value. Embrace the future of home security and enjoy the added layer of vigilance your new smart doorbell provides, bringing you closer to a fully connected and protected smart home ecosystem.
aViewFromTheCave is a participant in the Amazon Services LLC Associates Program, an affiliate advertising program designed to provide a means for sites to earn advertising fees by advertising and linking to Amazon.com. Amazon, the Amazon logo, AmazonSupply, and the AmazonSupply logo are trademarks of Amazon.com, Inc. or its affiliates. As an Amazon Associate we earn affiliate commissions from qualifying purchases.