Python, celebrated for its clear syntax and extensive libraries, is a cornerstone of modern software development, powering everything from artificial intelligence and data science to web applications and system automation. For users of Ubuntu, a leading Linux distribution known for its stability and developer-friendly environment, setting up Python is often the first step towards building innovative solutions. This guide offers a comprehensive walkthrough of various Python installation methods on Ubuntu, ensuring you establish a robust and efficient development setup.
In today’s fast-paced digital landscape, a well-configured development environment is paramount. It not only boosts productivity and ensures consistency in your technical endeavors (Tech) but also contributes to your professional image and the reliability of your projects (Brand). Furthermore, mastering Python can unlock significant career opportunities, enable efficient automation, and even facilitate lucrative side hustles (Money). By understanding these installation nuances, you’ll be empowered to leverage Python’s full potential on your Ubuntu system.
Initial Setup and Environment Check
Before proceeding with any installation, it’s prudent to ensure your system is prepared and to understand any existing Python installations.
Prerequisites:
- An Ubuntu system (desktop or server).
- A stable internet connection.
- Basic familiarity with the Linux terminal.
sudo(administrative) privileges.
Checking Existing Python Versions:
Ubuntu systems often include a version of Python 3 for internal system tools. It’s essential not to interfere with this default installation to prevent system instability. Open your terminal (Ctrl+Alt+T) and check:
python3 --version
python --version
You’ll likely see a Python 3.x.x output for python3. The python command might point to Python 2 (if installed) or a symlink to python3, or simply indicate it’s not found. This baseline helps inform your installation choices.
1. The Quick and Stable Approach: Installing Python via apt
For most users, especially those new to Python or Ubuntu, using the apt package manager is the simplest and most recommended method. It provides stable, pre-compiled packages directly from Ubuntu’s repositories.
Understanding apt and Its Benefits
apt (Advanced Package Tool) is Ubuntu’s robust command-line utility for managing software packages. Installing Python via apt ensures:
- Simplicity: A few commands install Python with minimal fuss.
- Stability & Security: Packages are thoroughly tested and receive regular security updates through Ubuntu’s update mechanisms.
- System Integration: Seamless integration with your Ubuntu environment.
The main drawback is that the apt version of Python might not be the absolute latest release from python.org.
Step-by-Step apt Installation
1. Update and Upgrade System Packages:
Always start by refreshing your package lists and upgrading existing software to ensure you have access to the latest repository information and a healthy system.
sudo apt update
sudo apt upgrade -y
2. Install Python 3:
While recent Ubuntu versions usually have Python 3, this command ensures the core Python 3 package is present and up-to-date.
sudo apt install python3 -y
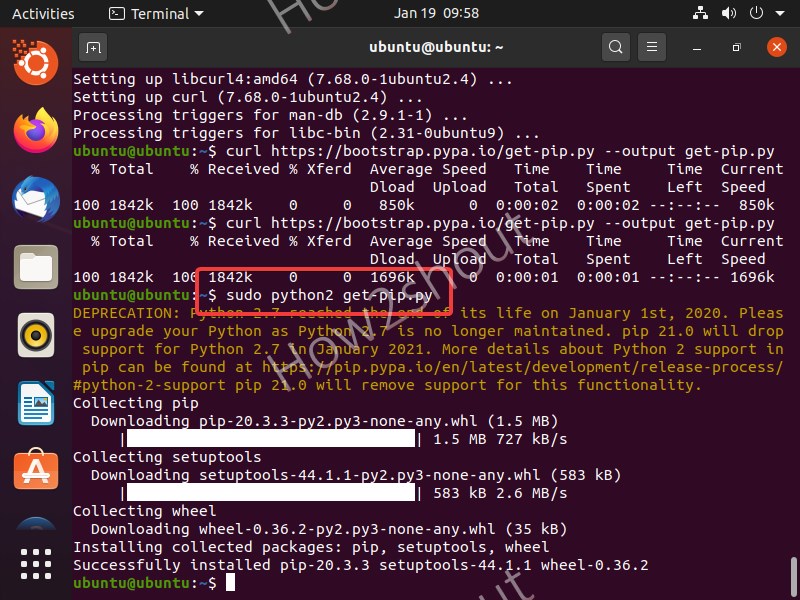
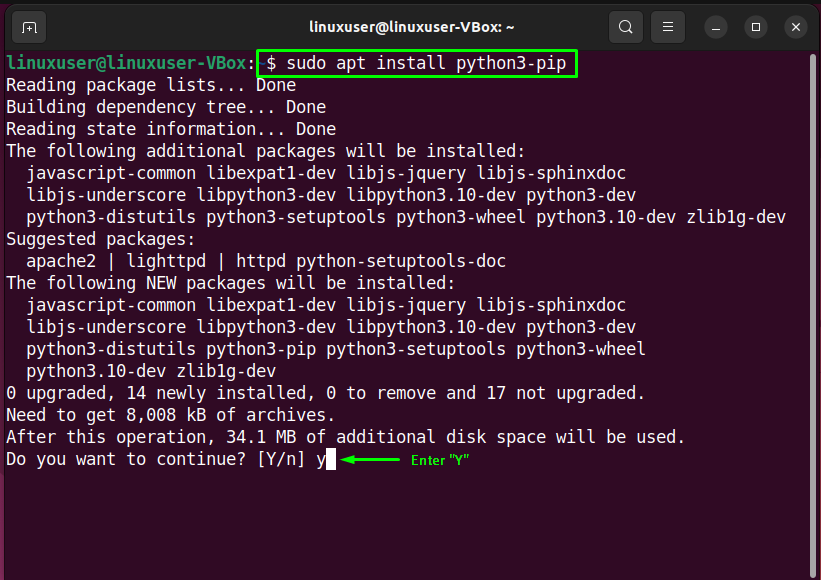
3. Install pip for Python 3:
pip is the standard package installer for Python, crucial for managing third-party libraries.
sudo apt install python3-pip -y
4. Verify the Installation:
Confirm that Python 3 and pip are correctly installed:
python3 --version
pip3 --version
You should see output similar to Python 3.10.x and a pip version. To test further, launch the interactive interpreter by typing python3, then print("Hello, Ubuntu!"), and exit().
2. Precision and Customization: Compiling Python from Source
For developers requiring the absolute latest Python features, specific patch versions, or custom build configurations, compiling Python from its source code provides unparalleled control. This method is more advanced but offers maximum flexibility.
Why Compile from Source?
- Latest Releases: Access to Python versions immediately upon release, before they are available via
apt. - Customization & Optimization: Tailor Python with specific build flags, enabling or disabling features, or optimizing for specific hardware (Tech).
- Isolation: Installs Python in a user-defined location, completely separate from the system’s default Python, minimizing conflicts.
This approach requires more manual effort for dependency management and future updates.
Step-by-Step Source Compilation
1. Install Build Dependencies:
Compiling Python requires several development libraries. Install them first:
sudo apt update
sudo apt install -y build-essential zlib1g-dev libncursesg5-dev libgdbm-dev
    libnss3-dev libssl-dev libreadline-dev libffi-dev libsqlite3-dev
    wget libbz2-dev liblzma-dev tk-dev uuid-dev
These packages provide compilers (like GCC), and essential libraries for features such as SSL, compression, database access, and GUI support.
2. Download and Extract Python Source Code:
Visit python.org/downloads, copy the link for the desired gzipped tarball (.tgz), and download it.
For example, for Python 3.9.7:
wget https://www.python.org/ftp/python/3.9.7/Python-3.9.7.tgz
tar -xf Python-3.9.7.tgz
cd Python-3.9.7
3. Configure, Compile, and Install:
This is the core compilation process:
- Configure: Prepares the build environment.
--enable-optimizationsis recommended for performance.
bash

./configure --enable-optimizations
- Compile: Builds the Python binaries.
make -j $(nproc)utilizes all CPU cores for faster compilation.
bash

make -j $(nproc)
- Install: This crucial step installs the compiled Python. Always use
sudo make altinstallto avoid overwriting your system’s defaultpython3binary.altinstallcreates version-specific executables (e.g.,python3.9,pip3.9) without interfering with system-critical paths.
bash

sudo make altinstall
4. Verify the Installation:
Confirm your newly compiled Python is accessible:
python3.9 --version
pip3.9 --version
You should see the specific version you installed.
3. Mastering Your Environment: Managing Multiple Python Versions with pyenv
As development needs grow, managing multiple Python versions for different projects becomes common. pyenv is an indispensable tool that allows developers to easily switch between various Python versions globally, per user, or on a per-project basis, preventing dependency conflicts and ensuring a clean development workflow.
The Power of pyenv
- Project Isolation (Tech): Seamlessly switch between Python versions (e.g., Python 3.8 for one project, 3.10 for another) without affecting other projects or your system’s Python.
- Cleanliness & Control: Keeps your system’s Python untouched and provides a robust framework for managing different environments.
- Professional Workflow (Brand): Demonstrates best practices in environment management, leading to more reliable and reproducible builds, which is crucial for collaborative projects.
Installing and Configuring pyenv
1. Install pyenv Dependencies:
Like compiling from source, pyenv needs specific build tools to compile various Python versions it manages.
sudo apt update
sudo apt install -y make build-essential libssl-dev zlib1g-dev
    libbz2-dev libreadline-dev libsqlite3-dev wget curl llvm
    libncursesw5-dev xz-utils tk-dev libxml2-dev libxmlsec1-dev libffi-dev liblzma-dev
2. Install pyenv Itself:
The most straightforward method is using the pyenv-installer script:
curl https://pyenv.run | bash
This script clones pyenv into ~/.pyenv and sets up basic shell integration.
3. Configure Your Shell Environment:
Add the following lines to your shell’s configuration file (~/.bashrc for Bash or ~/.zshrc for Zsh) to initialize pyenv on startup:
export PYENV_ROOT="$HOME/.pyenv"
export PATH="$PYENV_ROOT/bin:$PATH"
eval "$(pyenv init --path)"
eval "$(pyenv virtualenv-init -)"
After adding these lines, apply the changes by sourcing your configuration file:
source ~/.bashrc # or source ~/.zshrc
Installing and Setting Python Versions
1. Install Python Versions with pyenv:
You can now install virtually any Python version. For example, to install Python 3.9.7:
pyenv install 3.9.7
This command downloads, compiles, and installs Python 3.9.7 within your ~/.pyenv/versions directory.
2. Set Python Versions:
pyenv offers granular control over which Python version is active:
pyenv global <version>: Sets the default Python version for all your shells.
bash

pyenv global 3.9.7
pyenv local <version>: Sets the Python version specifically for the current directory and its subdirectories. Navigate to your project root and run this; it creates a.python-versionfile.
bash

# cd my_project

pyenv local 3.9.7
pyenv shell <version>: Sets the Python version for the current shell session only.
3. Verify pyenv and Python Installation:
Check which Python versions pyenv manages and which one is active:
pyenv versions
python --version
You should see Python 3.9.7 (or your chosen version) as the active interpreter.
4. Essential Best Practice: Working with Python Virtual Environments
Regardless of your Python installation method, virtual environments are a crucial best practice for any serious Python developer. They create isolated spaces for each project, managing dependencies without conflicts.
Why Virtual Environments Are Crucial
- Dependency Isolation (Tech): Prevent “dependency hell” where different projects require conflicting versions of the same library. Each project gets its own set of packages.
- Cleanliness & Reproducibility: Keep your global Python installation pristine and ensure that project dependencies are precisely defined and easily reproducible across different machines or team members (Brand).
- Avoid
sudo pip install: Eliminate the need to install packages globally withsudo, which can lead to system instability.
Python 3 includes venv, a lightweight module for creating virtual environments.
Practical venv Usage
1. Navigate to Your Project Directory:
Move to the directory where your project code resides. Create one if it doesn’t exist.
mkdir my_new_project
cd my_new_project
2. Create a Virtual Environment:
Use the python3 -m venv command, followed by your desired environment name (e.g., venv or env).
python3 -m venv venv
This creates a venv directory containing a dedicated Python interpreter and pip.
3. Activate the Virtual Environment:
Before working on your project, you must activate its virtual environment. This modifies your shell’s PATH to use the environment’s Python and pip.
source venv/bin/activate
Your shell prompt will change (e.g., (venv) my_new_project $), indicating activation.
4. Install Packages within the Environment:
Once active, pip install commands will install packages only into this isolated environment.
(venv) pip install requests pandas
(venv) pip freeze # Shows packages specific to this venv
5. Deactivate the Virtual Environment:
When you’re done with the project or need to switch environments, simply deactivate it:
(venv) deactivate
Your shell prompt will return to normal.
5. Verifying Your Installation and Charting Your Next Steps
After successfully installing Python and familiarizing yourself with virtual environments, a final check confirms your setup is ready for development.
Final Verification Checks
- Check Python Version: Open a new terminal and verify the
python3 --versionoutput (orpython --versionif usingpyenv). - Check
pipVersion: Confirmpip3 --version(orpip --version) works. - Run a Simple Script:
Create a filetest_script.py:
python

import sys

print(f"Python is running! Version: {sys.version}")
Execute it:
bash

python3 test_script.py # Or python test_script.py if pyenv is active
If using a virtual environment, ensure it’s activated before running the script.
Your Python Journey Continues
With Python ready on Ubuntu, you’re set to embark on exciting projects. Consider these next steps to deepen your engagement:
- Integrated Development Environments (IDEs): Explore powerful IDEs like VS Code or PyCharm for enhanced coding, debugging, and project management.
- Web Development: Dive into frameworks like Django or Flask to build dynamic web applications.
- Data Science & AI: Utilize libraries such as NumPy, Pandas, and TensorFlow for data analysis and machine learning (Tech).
- Automation: Script repetitive tasks to streamline your workflow and boost efficiency (Money).
- Build Your Portfolio: Start developing personal projects to showcase your skills, which is invaluable for career growth and personal branding (Brand).
Conclusion: Empowering Your Development Journey
Installing Python on Ubuntu is a foundational step for any aspiring or seasoned developer. We’ve navigated through three primary installation methods—the straightforward apt approach, precision-driven source compilation, and the versatile pyenv for multi-version management—each offering distinct advantages depending on your needs. Crucially, we underscored the importance of virtual environments as an essential best practice for maintaining clean, reproducible, and conflict-free project setups.
By mastering these installation techniques and adopting robust environment management, you’re not just setting up a programming language; you’re building a highly efficient and professional development ecosystem. This technical proficiency (Tech), adherence to best practices (Brand), and the potential for innovation and financial returns (Money) will undoubtedly empower your journey into the vast and rewarding world of Python development on Ubuntu.
aViewFromTheCave is a participant in the Amazon Services LLC Associates Program, an affiliate advertising program designed to provide a means for sites to earn advertising fees by advertising and linking to Amazon.com. Amazon, the Amazon logo, AmazonSupply, and the AmazonSupply logo are trademarks of Amazon.com, Inc. or its affiliates. As an Amazon Associate we earn affiliate commissions from qualifying purchases.