
Fiber internet represents the pinnacle of modern connectivity, delivering blazing-fast speeds and unparalleled reliability that traditional copper-based connections simply cannot match. Unlike DSL or cable, which transmit data electrically, fiber optic internet uses thin strands of glass or plastic to transmit data as pulses of light. This fundamental difference is what allows fiber to achieve symmetrical speeds, lower latency, and greater bandwidth, making it the preferred choice for bandwidth-intensive activities like 4K streaming, online gaming, cloud computing, and supporting multiple smart devices simultaneously.
For many, the transition to fiber internet is a significant upgrade, promising a smoother, more efficient digital experience. However, the installation process can seem a bit mysterious. Understanding how this cutting-edge technology is brought into your home or business not only demystifies the process but also helps you appreciate the meticulous work involved. This guide will walk you through the comprehensive steps of fiber internet installation, from the initial preparations to the final activation, providing insight into the technological marvel that powers your digital life.
The Fiber Optic Advantage: A Quick Overview
Before diving into the nuts and bolts of installation, it’s beneficial to briefly understand why fiber is such a game-changer. This context helps highlight the precision and care required during its deployment, aligning perfectly with the technological focus of this platform.
Why Fiber? Speed and Reliability
The core advantage of fiber optic internet lies in its ability to transmit data at the speed of light. Data travels through optical cables as light signals, which are far less susceptible to electromagnetic interference, signal degradation over distance, and weather-related issues compared to electrical signals in copper wires. This translates into several key benefits:
- Symmetrical Speeds: Often, fiber connections offer equally fast download and upload speeds, crucial for video conferencing, large file uploads, and cloud backups.
- Lower Latency: The time it takes for data to travel from your device to its destination and back is significantly reduced, which is vital for real-time applications like online gaming and remote work tools.
- Higher Bandwidth: Fiber can carry far more data than traditional cables, future-proofing your home for the increasing demands of smart homes and multiple connected devices.
- Enhanced Reliability: Less prone to outages and performance drops, fiber provides a more consistent and stable internet experience.
Understanding the Core Components
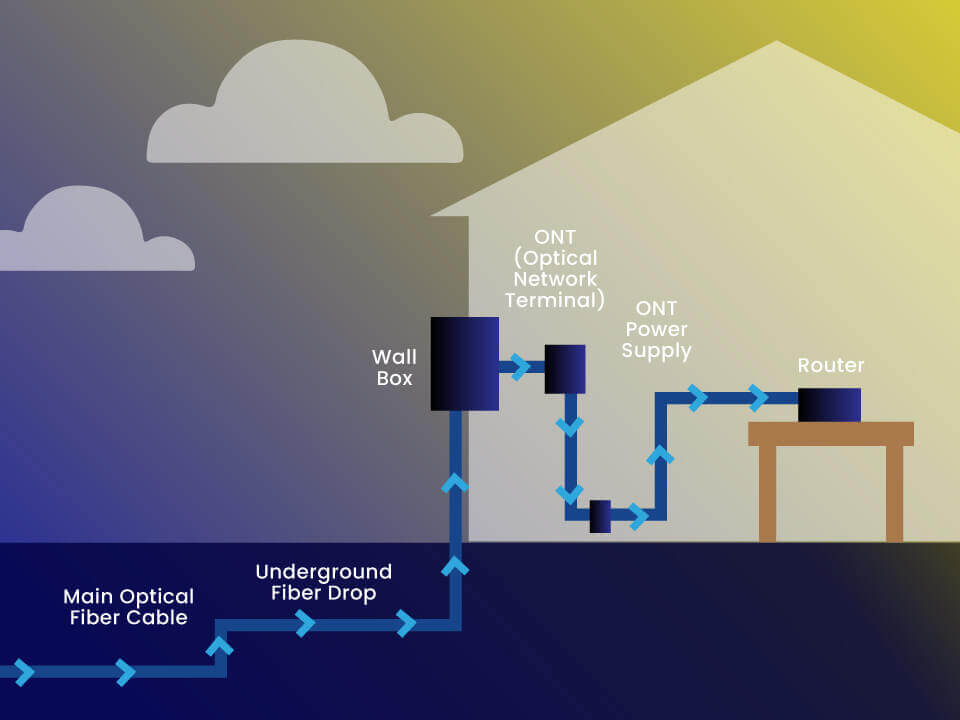
The journey of fiber internet involves several critical components that work in tandem to deliver light-speed data to your devices. These include the optical fiber cables themselves (typically made of incredibly thin glass), specialized connectors, the Optical Network Terminal (ONT) which converts light signals into electrical ones your devices can understand, and your Wi-Fi router which then distributes this connection wirelessly throughout your home. Each component plays a vital role in maintaining the integrity and speed of the fiber signal.
The Pre-Installation Phase: Setting the Stage for Connectivity
The actual physical installation of fiber internet is preceded by a crucial planning and preparation phase. This ensures a smooth process and that your property is ready to receive the high-tech connection.
Service Availability Check
The very first step for any homeowner or business owner interested in fiber internet is to confirm its availability in their area. Fiber optic infrastructure is still expanding, and while major urban centers often have extensive coverage, rural or less densely populated areas might still be waiting. Internet Service Providers (ISPs) typically have online tools or customer service hotlines where you can enter your address to check for service availability. This step is critical because without the necessary infrastructure, installation simply isn’t possible.
Site Survey and Planning
Once availability is confirmed and you’ve chosen a plan, the ISP will often schedule a preliminary site survey. This might involve a technician visiting your property or using satellite imagery and GIS data to plan the most efficient and safe route for the fiber optic cable. During this phase, they will:
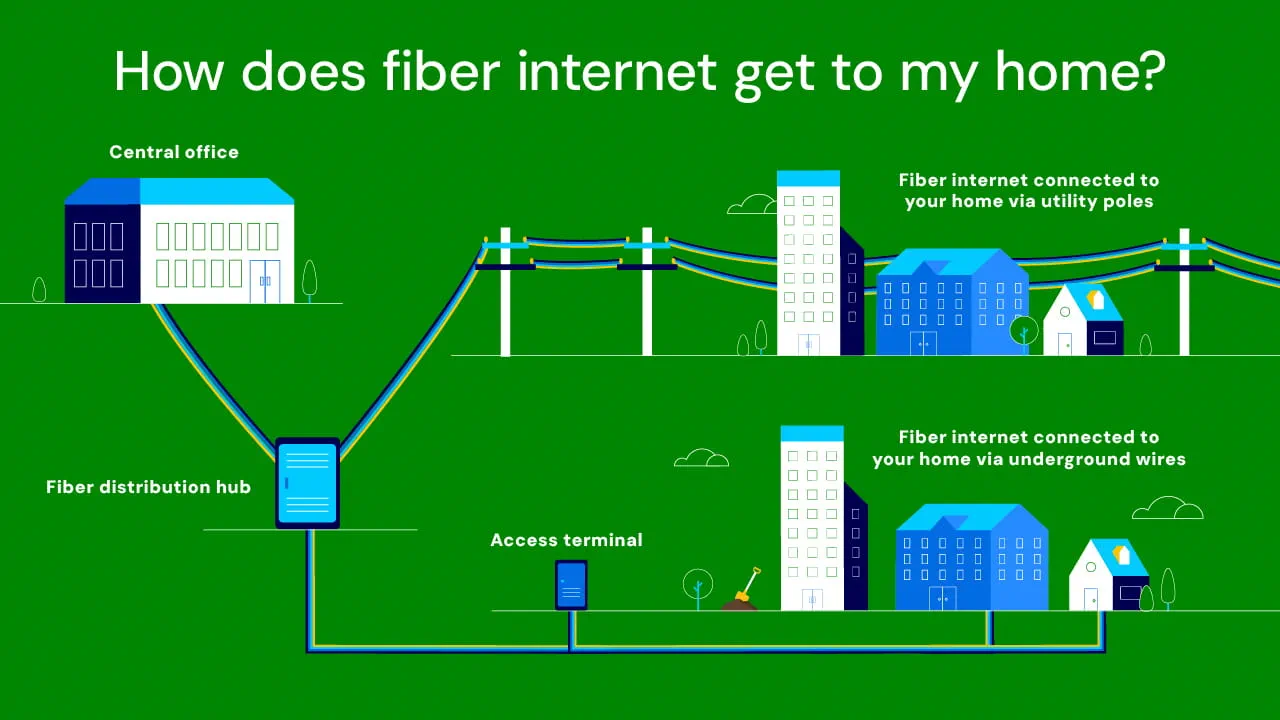
- Identify the nearest fiber distribution point: This could be a utility pole or an underground conduit box in your neighborhood.
- Determine the “last mile” route: How the fiber will travel from the distribution point to your specific address (e.g., aerial drop from a pole or underground trenching).
- Assess potential obstacles: Trees, landscaping, existing utility lines, driveways, or fences that might impede the installation process.
- Plan the entry point: Where the fiber cable will physically enter your home or building, usually near existing utility lines or a convenient wall.
This meticulous planning minimizes disruptions, ensures compliance with local regulations, and optimizes the installation pathway.
Essential Preparations for Homeowners
While most of the heavy lifting is done by the ISP, homeowners can contribute to a smoother installation day.
- Clear the Path: If the installation involves trenching or running cables along a specific route outside, clear any obstacles like garden furniture, planters, or vehicles.
- Ensure Access: Make sure the technician has clear access to utility areas, basements, or crawl spaces where cables might need to be run, as well as the desired location for the ONT and router inside the home.
- Decide on Equipment Placement: Think about where you want the ONT and Wi-Fi router to be located. Optimal placement for a router is typically central in the home, elevated, and away from obstructions to maximize Wi-Fi coverage. The ONT usually requires a power outlet.
- Communicate: Be available to discuss your preferences and answer any questions the technician might have about your property layout or desired setup.
External Installation: Bringing Fiber to Your Doorstep
This is where the physical work of connecting your home to the broader fiber network begins. The “last mile” delivery system is crucial and involves delicate yet robust procedures.
Aerial vs. Underground Installation: The Last Mile Challenge
The method used to bring fiber from the street to your house largely depends on the existing infrastructure in your neighborhood.
Aerial Installation Process
In areas with overhead utility poles, fiber optic cables are typically run aerially.
- Connecting to the Pole: A technician climbs the nearest utility pole that houses the fiber distribution hub. They connect a “drop cable” – a specialized fiber optic cable designed for outdoor use – to a port on the fiber splitter or distribution box.
- Running the Drop Cable: The drop cable is then carefully strung from the utility pole to your house. This often involves attaching it securely to a messenger wire, which provides support and prevents the fiber from sagging or breaking. The cable follows the path of other utility lines (electricity, phone, cable TV).
- Securing to the House: The cable is then attached to the exterior of your house, usually near the existing service entry point or a pre-determined location. This often involves using clamps and brackets to secure the cable neatly and minimize its visibility.
Underground Installation Process
In neighborhoods with underground utilities, the fiber installation process is more involved.
- Trenching or Boring: The technician will need to dig a shallow trench from the nearest underground utility access point (often a green pedestal or handhole) to your house. Alternatively, they might use directional boring to create a tunnel without disturbing the surface extensively, especially for longer runs or under driveways.
- Laying Conduit: A protective conduit (a plastic pipe) is laid in the trench. This conduit shields the delicate fiber optic cable from moisture, pests, and accidental damage.
- Pulling the Fiber: The fiber optic drop cable is then carefully pulled through the conduit from the utility access point to the entry point of your home.
- Backfilling and Restoration: Once the fiber is in place, the trench is backfilled, and the ground is restored as much as possible, though some minor disturbance to landscaping is often unavoidable.

Entry Point and Exterior Wiring
Regardless of whether the fiber comes aerially or underground, it needs a secure and protected entry point into your home.
- Drilling the Entry Hole: A small, neat hole is drilled through an exterior wall, typically in an inconspicuous location, to allow the fiber cable to enter the building. This hole is then sealed with silicone caulk to prevent water ingress and drafts.
- Weatherproof Enclosure: On the exterior wall where the fiber enters, a small, weatherproof fiber termination box or protector box is often installed. This box protects the delicate fiber connection point from the elements, manages excess cable slack, and acts as a demarcation point between the outdoor fiber and the indoor wiring.
The Demarcation Point
The exterior fiber termination box serves as the network demarcation point, or “demarc.” This is the official boundary between the ISP’s network responsibility and your property’s internal network. From this point onward, the fiber connection is routed inside your home.
Internal Installation: Wiring Your Home for Speed
Once the fiber has reached the exterior of your home, the next phase focuses on bringing the connection indoors and setting up the necessary equipment to convert light signals into usable internet for your devices.
Running the Fiber Inside
From the exterior termination box, a specialized indoor fiber optic cable is run through the drilled hole into your home. This cable is often thinner and more flexible than the outdoor drop cable. The technician will route this cable discreetly along baseboards, doorframes, or inside walls to the predetermined location where the Optical Network Terminal (ONT) will be installed. Precision is key here, as fiber optic cables are more fragile than copper and cannot be sharply bent, kinked, or stapled tightly, which could damage the optical core and impair signal transmission.
The Optical Network Terminal (ONT): The Heart of Your Fiber Connection
The ONT is arguably the most crucial piece of equipment in your fiber internet setup.
- Function: The ONT is a small device, typically about the size of a standard modem or router, that serves as the bridge between the fiber optic network and your home’s internal network. Its primary role is to convert the optical (light) signals transmitted over the fiber cable into electrical signals (Ethernet) that your computers and Wi-Fi router can understand. It might also convert signals for voice (VoIP) if you have a fiber phone service.
- Installation: The technician will mount the ONT on an interior wall, typically near a power outlet and close to where you want your Wi-Fi router to be. It usually requires direct power and might have a backup battery depending on the model and service provider.
- Connecting the Fiber: The indoor fiber optic cable is carefully connected to the designated port on the ONT. This connection is highly sensitive and requires specialized tools and expertise to ensure a clean, dust-free, and perfectly aligned optical splice or termination. The technician will use light meters to verify the signal strength and integrity at this point.
Connecting Your Wi-Fi Router
Once the ONT is successfully installed and receiving a strong optical signal, the next step is to connect your Wi-Fi router.
- Ethernet Connection: An Ethernet cable is run from the ONT’s Ethernet port to the WAN (Wide Area Network) or Internet port on your Wi-Fi router. This is the electrical signal that carries the internet data.
- Router Setup: The technician will then power on and configure your Wi-Fi router. This involves:
- Initial Configuration: Setting up basic network parameters.
- Wi-Fi Network Name (SSID) and Password: Often pre-set by the ISP, but customizable.
- Firmware Updates: Ensuring the router’s software is up-to-date for security and performance.
- Testing: Connecting to the Wi-Fi network with a device (laptop, smartphone) to ensure it’s functioning correctly.
- Optimal Placement: As mentioned earlier, the router’s placement significantly impacts Wi-Fi coverage. The technician might offer advice on the best location to maximize signal strength throughout your home, ideally in a central, open area, away from large metal objects or other interfering electronics.
Activation, Testing, and Post-Installation Care
With all the physical connections established, the final steps involve activating the service, verifying its performance, and understanding how to maintain your new high-speed connection.
Activating Your New Service
After the ONT and router are physically installed and connected, the technician will contact the ISP’s central office to provision and activate your service. This involves:
- Remote Activation: The ISP remotely sends activation signals to your ONT, authorizing it to connect to the network.
- IP Address Assignment: Your router receives a public IP address, making your home accessible to the wider internet.
- Service Confirmation: The technician verifies that the service is active and that all lights on the ONT and router indicate a healthy connection.
Speed Tests and Performance Verification
A crucial part of the installation process is verifying that you are receiving the speeds you signed up for.
- Wired Speed Test: The technician will typically perform a speed test on a device directly connected to the router via an Ethernet cable. This provides the most accurate measure of the internet speed delivered to your home, bypassing any potential Wi-Fi interference.
- Wi-Fi Speed Test: They might also conduct a speed test over Wi-Fi to give you an idea of wireless performance, though Wi-Fi speeds can vary based on device, distance from the router, and environmental factors.
- Troubleshooting: If speeds are not up to par, the technician will troubleshoot the connection, checking fiber signal levels, ONT status, and router configuration until optimal performance is achieved.
Maintaining Your Fiber Connection
Fiber optic cables are durable but require some care to ensure longevity and consistent performance.
- Avoid Kinks and Sharp Bends: Fiber cables are designed to be flexible, but severe bends can damage the delicate glass core. Be mindful of their routing when moving furniture or performing renovations.
- Protect Exposed Cables: Ensure any visible indoor fiber cables are not in high-traffic areas where they could be tripped over or damaged.
- Keep Equipment Clean: Dust and debris can interfere with optical connections. Avoid opening the ONT or touching the fiber connectors.
- Power Stability: The ONT requires a stable power source. Consider connecting it to a surge protector.
When to Call for Support
While fiber internet is highly reliable, issues can occasionally arise.
- Loss of Service: If your internet completely goes down and restarting your router/ONT doesn’t resolve it, contact your ISP.
- Significant Speed Drops: If you consistently experience much lower speeds than expected, even with a wired connection, it might indicate a problem with the fiber line or ONT.
- Physical Damage: Never attempt to repair a damaged fiber cable yourself. The glass strands are extremely fine and can cause injury, and specialized equipment is needed for repairs. Contact your ISP immediately.
DIY vs. Professional Installation: Weighing Your Options
Given the intricate nature of fiber optic technology, it’s important to address the feasibility of self-installation.
The Complexities of Fiber Splicing
Unlike traditional copper cables, where connections can often be made with basic tools, fiber optic cables require highly specialized equipment and expertise for termination and splicing.
- Precision and Cleanliness: Fiber connectors must be perfectly clean and precisely aligned to ensure minimal signal loss. Even a speck of dust can significantly degrade performance.
- Splicing: If a cable needs to be joined or repaired, it involves fiber splicing – a process that uses a fusion splicer to precisely melt and join two fiber ends, forming a near-perfect optical connection. These machines are expensive and require extensive training to operate.
- Testing Equipment: Verifying signal integrity requires optical power meters and Optical Time Domain Reflectometers (OTDRs) to detect flaws or breaks in the cable.
Why Professional Installation is Recommended
For virtually all residential and most business fiber internet installations, professional installation by the ISP’s technicians is not just recommended, but often mandatory.
- Specialized Tools and Expertise: Technicians are trained, certified, and equipped with the necessary tools for safe and effective fiber installation, from running cables to making precise connections and testing.
- Safety: Working with utility poles, underground lines, and electrical equipment carries inherent risks that trained professionals are equipped to handle.
- Network Integrity: Improper installation can not only lead to poor service for you but can also negatively impact the wider fiber network, causing issues for other subscribers.
- Warranty and Support: Professional installation ensures your setup is covered under the ISP’s warranty and makes troubleshooting much smoother if problems arise. Attempting DIY installation can void warranties and complicate future support requests.
In conclusion, the journey of bringing fiber internet into your home is a testament to sophisticated engineering and meticulous planning. From the initial survey to the final speed test, each step ensures that you receive a robust, high-speed connection capable of powering today’s demanding digital landscape. Understanding this process demystifies the technology and reinforces the value of professional installation, guaranteeing you can fully leverage the incredible capabilities of fiber optic internet to enhance your tech experience.
aViewFromTheCave is a participant in the Amazon Services LLC Associates Program, an affiliate advertising program designed to provide a means for sites to earn advertising fees by advertising and linking to Amazon.com. Amazon, the Amazon logo, AmazonSupply, and the AmazonSupply logo are trademarks of Amazon.com, Inc. or its affiliates. As an Amazon Associate we earn affiliate commissions from qualifying purchases.