
The Nest Learning Thermostat, a pioneer in smart home technology, has revolutionized how we manage our home’s climate. Beyond its sleek design and energy-saving capabilities, a significant aspect of embracing this smart device is understanding its installation process. While the idea of DIY home improvement can sometimes seem daunting, installing a Nest Thermostat is designed to be accessible, empowering homeowners to take control of their comfort and energy consumption. This guide delves into the intricacies of Nest Thermostat installation, blending technical know-how with practical advice, and touching upon the broader themes of technology integration, brand value, and the financial benefits of smart home investments.

Before You Begin: Preparation and Compatibility Checks
Embarking on your Nest Thermostat installation journey begins with meticulous preparation. This isn’t just about gathering tools; it’s about ensuring compatibility and understanding the foundational aspects of your existing HVAC system. Rushing this phase can lead to unnecessary complications, so a thorough assessment is paramount.
Understanding Your HVAC System: The Foundation of a Successful Installation
At its core, the Nest Thermostat is an intelligent controller for your heating, ventilation, and air conditioning (HVAC) system. Therefore, understanding the basic components and wiring of your current thermostat is the crucial first step.
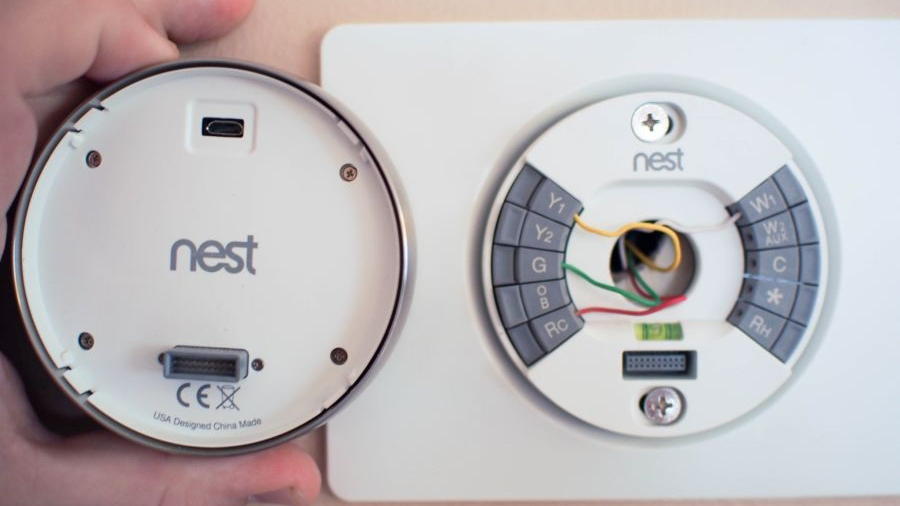
1. Identify Your Current Thermostat’s Wiring: This is perhaps the most critical technical hurdle. You’ll need to remove your existing thermostat’s faceplate to expose the wiring. Take a clear photograph of the wires connected to the terminals. This visual record will be invaluable for several reasons:
* Compatibility Verification: The Nest Thermostat is compatible with most 24V HVAC systems. However, some systems, like proprietary or high-voltage systems, might not be compatible. The wiring configuration provides a direct clue.
* Reference for Installation: Even if compatible, the existing wiring serves as a direct map for where to connect the Nest’s wires.
* Troubleshooting: If you encounter issues during installation or operation, this photograph can be a lifesaver for troubleshooting.
2. Check for a C-Wire (Common Wire): The Nest Thermostat, particularly the latest models, relies on a C-wire for continuous power. This wire provides a stable 24V AC power supply, enabling features like Wi-Fi connectivity and constant operation.
* What is a C-wire? It’s a wire that runs from your HVAC system’s transformer to your thermostat, acting as a return path for power.
* Why is it important? Without a C-wire, the Nest Thermostat might experience power issues, leading to flickering or intermittent operation. Older thermostats often didn’t require a C-wire because they used batteries or drew minimal power.
* How to check: Look for a wire connected to a “C” terminal on your existing thermostat. If you don’t see one, don’t despair. Google Nest offers solutions like the Nest Power Connector, which can often enable C-wire functionality without needing to run new wires through your walls. This is where the “Tech” aspect of our website truly shines, offering innovative solutions to common installation challenges.
3. Nest Thermostat Compatibility Tool: Google Nest provides an excellent online compatibility checker. Before purchasing, or even before removing your old thermostat, use this tool. You’ll typically input the wires you see connected to your existing thermostat, and it will tell you if your system is compatible and if you might need additional accessories (like the Power Connector). This proactive step can save you time, money, and frustration.
Essential Tools and Materials for a Smooth Installation
Having the right tools at hand transforms a potentially fiddly task into a straightforward DIY project. The beauty of the Nest Thermostat is its user-friendly design, but a few common household tools will streamline the process.
- Screwdriver Set: You’ll likely need a Phillips head screwdriver, and possibly a small flathead screwdriver, for removing the old thermostat and attaching the Nest base.
- Wire Strippers/Cutters: If your existing wires are frayed or need a cleaner connection, these are useful.
- Pliers: Can be helpful for manipulating wires.
- Drill with appropriate drill bits: For mounting the Nest base, especially if you need to drill new pilot holes.
- Level: To ensure your Nest Thermostat is mounted straight on the wall.
- Smartphone or Tablet: To download the Nest app and guide you through the setup process.
- Pencil: For marking drill holes.
- Wall Anchors (if needed): If you’re mounting the Nest base into drywall without hitting a stud.
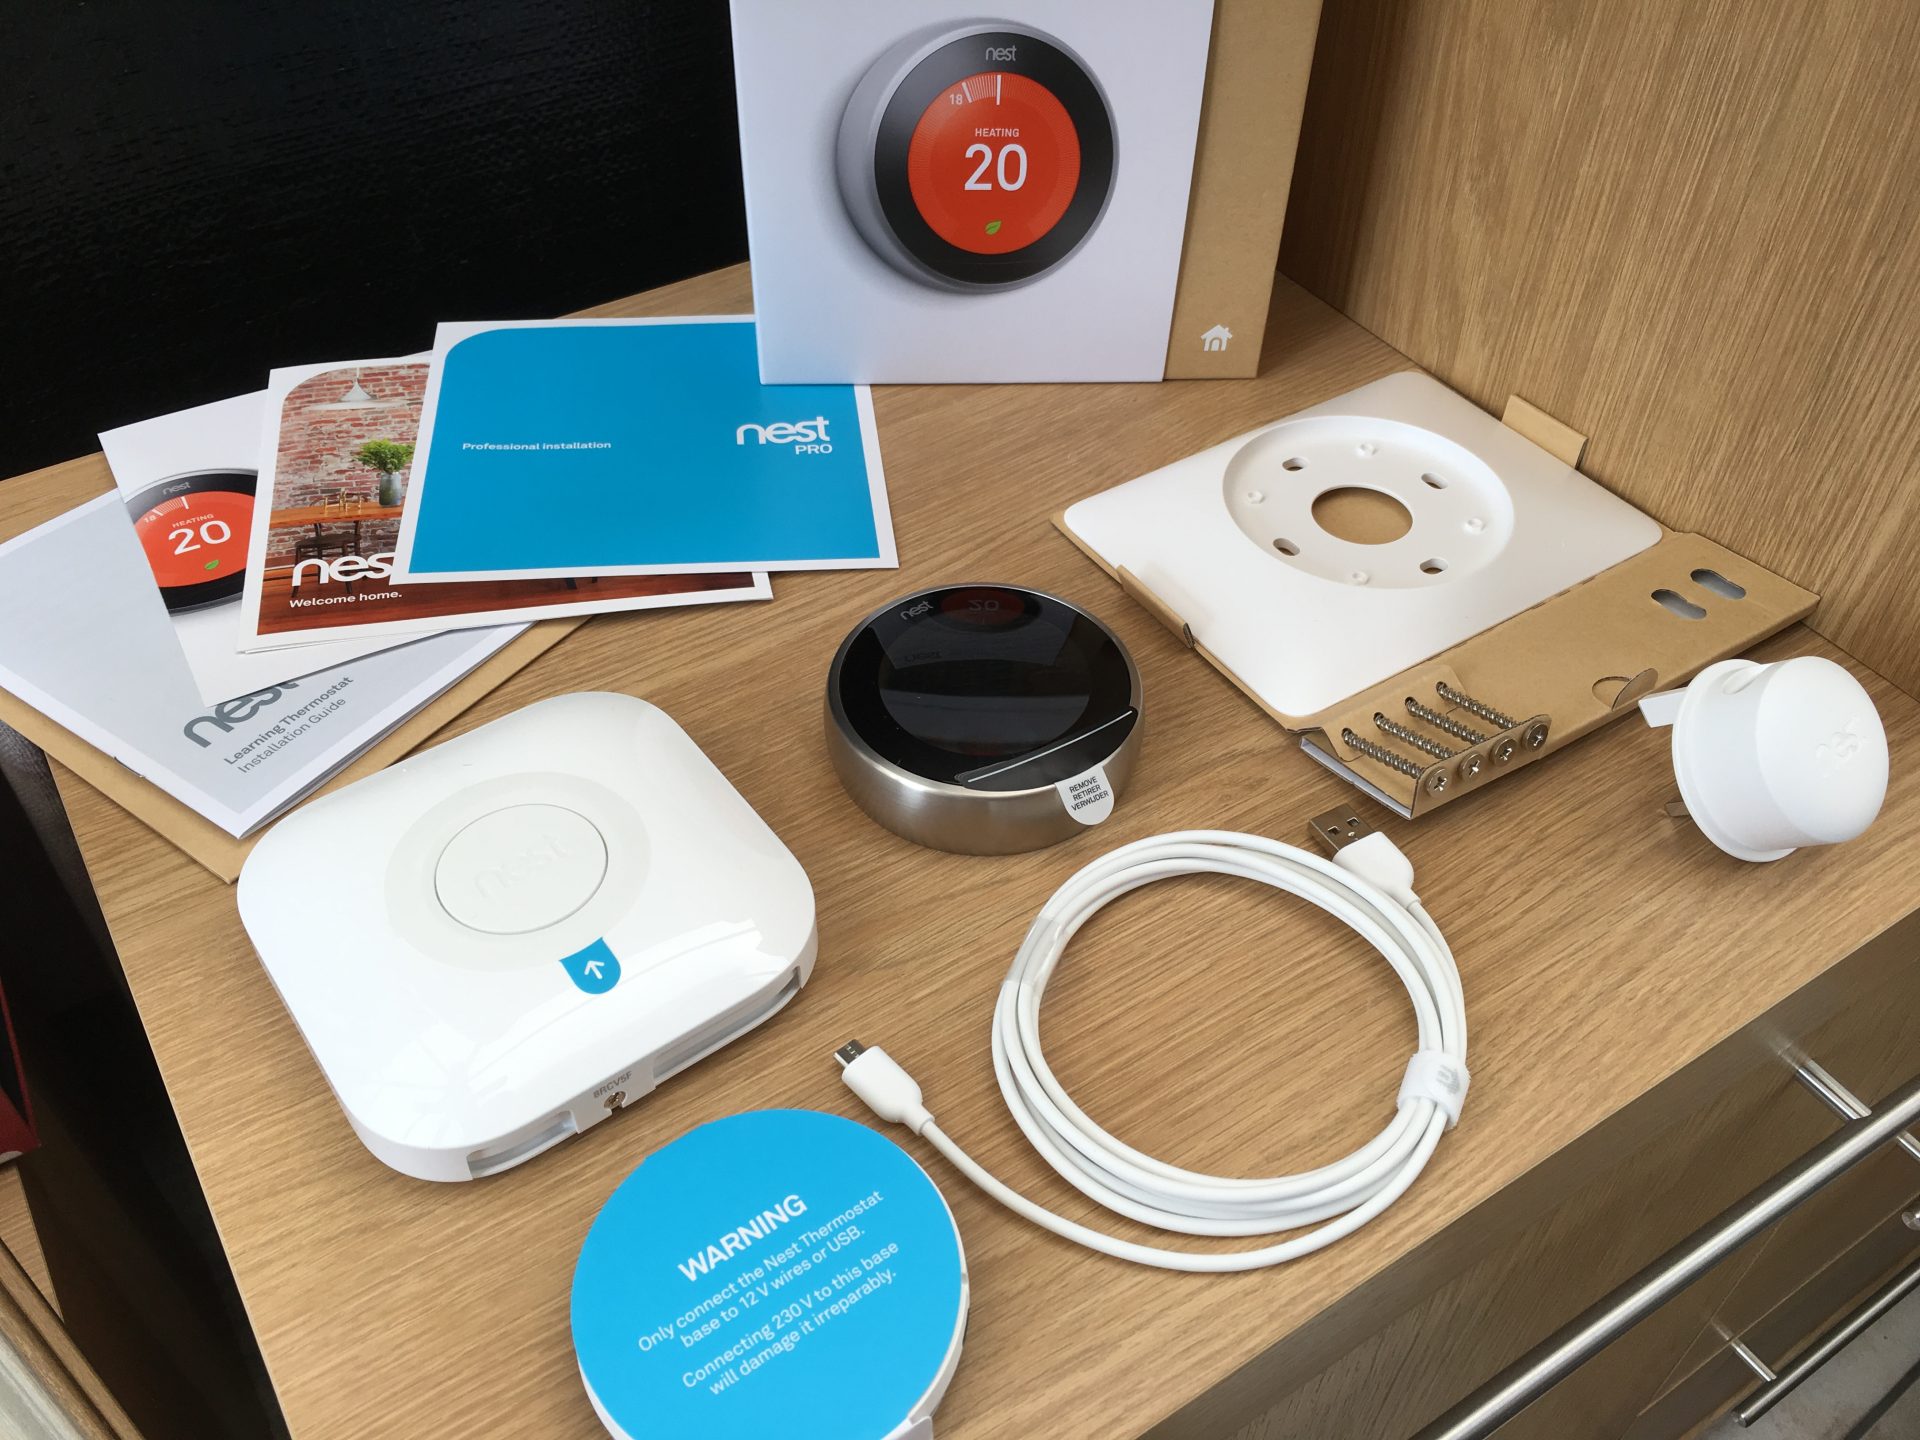
- The Nest Thermostat and its base plate: Of course!
The Step-by-Step Installation Process: From Old to Smart
With your preparation complete and compatibility confirmed, you’re ready to begin the actual installation. This section breaks down the process into manageable steps, demystifying each stage.
Step 1: Power Off Your HVAC System
Safety First! This is a non-negotiable step. Before touching any wires, you must turn off the power to your HVAC system. This is typically done at your home’s electrical panel (breaker box). Locate the breaker that controls your furnace or air conditioner and flip it to the “OFF” position. To be absolutely certain, try to adjust your current thermostat; if the system doesn’t respond, the power is off. This safety precaution is paramount and underscores the importance of understanding basic electrical safety within the “Tech” domain.
Step 2: Remove Your Old Thermostat
Carefully remove the faceplate of your existing thermostat. Most snap off with gentle pressure. Once the faceplate is off, you’ll see the wires connected to terminals.
- Take a Picture: As mentioned earlier, take a clear, well-lit photo of the wiring. Ensure the labels for each terminal (e.g., R, W, Y, G, C) are visible.
- Label the Wires: If your old thermostat doesn’t have clearly labeled terminals, or if you’re unsure, use the small labels provided with your Nest Thermostat (or masking tape and a pen) to label each wire according to the terminal it’s connected to. For example, a wire connected to “W” should be labeled “W.”
- Disconnect the Wires: Gently loosen the screws on the terminals and detach the wires. Be careful not to let the wires fall back into the wall. You can wrap them around a pencil or tape them to the wall to prevent this.
- Remove the Old Base Plate: Unscrew the old thermostat’s base plate from the wall.
Step 3: Mount the Nest Base and Connect the Wires
Now, it’s time to install the Nest ecosystem.
- Install the Nest Base: Position the new Nest base plate on the wall. If you’re using the original screws and mounting holes, you might need to drill pilot holes first. Use a level to ensure it’s straight. Once positioned, secure it to the wall with the provided screws. If you’re mounting it on drywall and the screws don’t hit a stud, use wall anchors for a secure fit.
- Connect the Wires: This is where your photograph and labels come in handy. Refer to the Nest app’s guidance (which will prompt you during setup) and your existing wiring diagram.
- Insert each wire into the corresponding terminal on the Nest base. The Nest system often uses push-in connectors or simple screw terminals, making it intuitive. For example, the wire labeled “W” goes into the “W” terminal.
- Ensure each wire is securely seated in its terminal. If you encounter a wire without a C-wire, the Nest app will guide you on using the Nest Power Connector if you have one.
Step 4: Attach the Nest Display and Power On
Once all the wires are correctly connected and the base is securely mounted:
- Attach the Nest Display: Align the Nest display with the base and gently push it into place. It should click or snap into position.
- Restore Power: Return to your electrical panel and flip the HVAC breaker back to the “ON” position.
Step 5: Nest App Setup and Configuration
Your Nest Thermostat should now power on and initiate its setup process. This is where the “Tech” and “Brand” aspects beautifully converge.
- Download the Nest App: If you haven’t already, download the Google Home app (which now manages Nest devices) on your smartphone or tablet.
- Follow On-Screen Prompts: The Nest Thermostat display will guide you through connecting to your Wi-Fi network, setting your language, and confirming your HVAC system type.
- Nest App Configuration: Within the app, you’ll set your heating and cooling preferences, schedule your desired temperatures, and explore advanced features like Eco temperatures, geofencing (Home/Away Assist), and energy usage reports. This configuration is key to unlocking the full “Money”-saving potential of your Nest Thermostat.
Beyond Installation: Maximizing Your Nest Thermostat’s Potential
Installing the Nest Thermostat is just the beginning. Understanding its capabilities and integrating it into your lifestyle is where you truly reap the benefits.
The Smart Home Ecosystem: Integration and Benefits
The Nest Thermostat is a cornerstone of the modern smart home. Its integration with other smart devices and services can enhance convenience, security, and energy efficiency.
- Voice Control: Connect your Nest Thermostat to Google Assistant or Amazon Alexa for hands-free temperature adjustments. Imagine saying, “Hey Google, set the thermostat to 72 degrees,” without lifting a finger. This seamless integration is a prime example of how technology simplifies our lives.
- Energy Savings and Financial Impact: This is where the “Money” aspect becomes most prominent. The Nest Learning Thermostat learns your habits and preferences, automatically adjusting the temperature when you’re away or asleep to save energy. The Nest app provides detailed energy reports, showing you how much energy you’ve saved and where you can further optimize. Over time, these savings can significantly offset the initial investment, demonstrating the tangible financial return of smart home technology. The brand’s promise of energy efficiency translates into real-world cost reductions.
- Remote Access: Control your thermostat from anywhere using the Nest app. This is invaluable for adjusting the temperature before you arrive home, ensuring comfort, or turning it down if you forget when leaving for vacation. This flexibility enhances peace of mind and prevents unnecessary energy waste.
- Software Updates and Features: Google regularly releases software updates for Nest Thermostats, introducing new features and improving performance. Staying connected ensures you always have the latest technology, showcasing the ongoing value and innovation associated with the Nest brand.
Troubleshooting Common Issues: Staying Ahead of the Curve
While Nest Thermostats are reliable, occasional issues can arise. Understanding common problems and their solutions can save you time and ensure continuous operation.
- No Power or Flickering Display: This is often related to a missing or improperly connected C-wire. Ensure the C-wire is connected on both the thermostat and HVAC system ends, or consider the Nest Power Connector.
- Wi-Fi Connectivity Problems: Check your Wi-Fi network is functioning correctly. Try restarting your router and the Nest Thermostat. Ensure the thermostat is within range of your Wi-Fi signal.
- System Not Responding: Double-check the wiring connections against your photo and the Nest app’s guidance. Ensure the HVAC system power is on.
- Inaccurate Temperature Readings: Ensure the thermostat isn’t exposed to direct sunlight, drafts, or heat sources that could skew its readings.
For more complex issues, Google Nest’s support website and community forums are excellent resources. The brand’s commitment to customer support further solidifies its reputation and the value proposition of its products.
Conclusion: Embracing the Future of Home Climate Control
Installing a Nest Thermostat is more than just a home improvement project; it’s an investment in comfort, efficiency, and a smarter lifestyle. By carefully preparing, following the step-by-step installation process, and understanding the capabilities of your new smart device, you can confidently manage your home’s climate while contributing to energy conservation and potentially significant cost savings. The Nest Thermostat embodies the intersection of cutting-edge technology, thoughtful design, and tangible financial benefits, making it a compelling addition to any modern home. Whether you’re a tech enthusiast eager to embrace the latest gadgets or a homeowner looking to optimize your living space and reduce your energy bills, the Nest Learning Thermostat offers a sophisticated and rewarding solution.
aViewFromTheCave is a participant in the Amazon Services LLC Associates Program, an affiliate advertising program designed to provide a means for sites to earn advertising fees by advertising and linking to Amazon.com. Amazon, the Amazon logo, AmazonSupply, and the AmazonSupply logo are trademarks of Amazon.com, Inc. or its affiliates. As an Amazon Associate we earn affiliate commissions from qualifying purchases.