In the vast landscape of digital expression, fonts are more than just text; they are the silent communicators of style, brand identity, and readability. Whether you’re a graphic designer crafting a logo, a content creator producing engaging visuals, a student compiling a standout presentation, or simply someone who appreciates a personalized touch on their digital interface, the ability to install custom fonts on your PC is a fundamental skill. It unlocks a world of creative possibilities, allowing you to move beyond the standard system fonts and imbue your projects with unique character and professionalism.

This comprehensive guide will demystify the process of installing fonts on your Windows PC, transforming a seemingly technical task into a straightforward endeavor. We’ll delve into the various types of font files, guide you through step-by-step installation methods, offer advice on managing your growing collection, and troubleshoot common issues. By the end, you’ll not only know how to install fonts but also understand why it’s a pivotal skill in today’s visually driven digital ecosystem, touching upon aspects relevant to technology, branding, and even your financial savvy in choosing the right resources.
Unpacking the World of Fonts: Types, Sources, and Their Significance
Before diving into the mechanics of installation, it’s crucial to understand what fonts are, the different file formats they come in, and where to reliably source them. This foundational knowledge empowers you to make informed decisions and ensures a smooth, secure experience.
Understanding Font File Formats
Font files are essentially small software packages that contain all the data needed to display a typeface on your screen and print it. While there are many proprietary and legacy formats, the vast majority of fonts you’ll encounter for PC installation fall into two primary categories, with a third becoming increasingly important for web use:
- TrueType Fonts (TTF): Developed by Apple in the late 1980s and later adopted by Microsoft, TTF files are one of the most common and widely supported font formats. They are known for their scalability and ease of use, making them a staple for everyday design and document creation. Most free fonts you download will likely be in TTF format.
- OpenType Fonts (OTF): A more advanced and versatile format, OpenType was co-developed by Adobe and Microsoft. OTF fonts build upon the TrueType structure but offer enhanced features, such as support for more characters (including ligatures, small caps, old-style figures, and alternative glyphs) and improved typographic controls. These are often preferred by professional designers for their richness and flexibility, especially for branding and high-fidelity print projects.
- Web Open Font Format (WOFF/WOFF2): While primarily designed for web pages to ensure faster loading times and protect font copyrights, you might occasionally encounter WOFF files. These are generally not installed directly onto your PC for use in applications like Word or Photoshop but are worth knowing about in the broader context of digital typography. For PC installation, stick to TTF and OTF.
Choosing between TTF and OTF largely depends on your specific needs. For general use and basic documents, TTF is perfectly adequate. For more sophisticated design work, especially involving complex text layouts and nuanced typography, OTF often provides superior control and a richer character set, crucial for maintaining a strong brand identity.
Where to Find High-Quality Fonts: Free vs. Paid Resources
The internet is brimming with places to download fonts, but not all sources are created equal. Prioritizing reputable websites ensures the fonts are safe, legally licensed, and function correctly.
Reputable Free Font Sources:
For those looking to expand their font library without expenditure, several excellent platforms offer a wide array of free fonts. These can be fantastic for personal projects, quick mock-ups, or exploring new styles.
- Google Fonts: An absolute cornerstone for free, high-quality fonts, primarily developed for web use but fully installable on your PC. It boasts an extensive library, excellent search functionality, and most importantly, all fonts are licensed under open-source agreements, making them free for both personal and commercial use. This is a top recommendation for tech enthusiasts and budget-conscious individuals looking to enhance their digital toolkit.
- DaFont.com & Font Squirrel: These popular sites host thousands of free fonts, often categorized by style. When using these platforms, always pay close attention to the licensing terms. Many fonts are free for personal use but require a commercial license for business applications, which is a critical consideration for those building a brand or generating income from their designs. Font Squirrel, in particular, curates fonts that are typically free for commercial use, making it a reliable choice for professional endeavors.
- Behance & Dribbble: These creative community platforms often feature designers offering free fonts as part of their portfolios. While quality can vary, you can sometimes find unique gems here. Again, always check the specific licensing from the designer.
Investing in Professional Paid Fonts:
For serious designers, businesses, and anyone requiring specific aesthetic control or robust technical features, investing in professional paid fonts is often a necessity. This investment contributes directly to maintaining a unique brand identity and ensures high-quality output.
- MyFonts.com & Fontspring.com: These are industry-leading marketplaces offering an enormous selection of professional typefaces from various foundries. They provide detailed licensing options, allowing you to purchase fonts for desktop use, web use, app embedding, and more, ensuring your brand is legally compliant.
- Adobe Fonts (formerly Typekit): Included with an Adobe Creative Cloud subscription, this service provides access to thousands of high-quality fonts that can be synced directly to your desktop applications. For designers already in the Adobe ecosystem, this offers incredible value and convenience, enhancing productivity and creative consistency across projects.
- Independent Type Foundries: Many individual designers and small studios create and sell their unique typefaces directly. Following specific foundries whose style you admire can lead you to truly distinctive fonts that help your brand stand out.
When acquiring fonts, whether free or paid, always prioritize security. Download from trusted sources to avoid malware or corrupted files that could compromise your PC’s digital security. This careful approach not only protects your system but also ensures the integrity of your creative work.
The Step-by-Step Guide to Installing Fonts on Windows
Installing fonts on a Windows PC is a straightforward process, largely consistent across Windows 10 and Windows 11. There are primarily two methods, both equally effective depending on your preference and the number of fonts you’re installing.
Method 1: Installing Fonts via Windows Settings (Recommended for Single/Few Fonts)
This is the most modern and user-friendly approach, especially when installing one or a handful of fonts.
- Download Your Font File(s): Navigate to your chosen font source and download the font file. Most fonts come compressed in a
.zipor.rararchive. - Extract the Font Files: Before installation, you’ll need to extract the font files from their compressed folder. Right-click the
.zipfile and select “Extract All…” (Windows 10/11) or use a third-party unzipping tool like 7-Zip or WinRAR. Choose a destination for the extracted files, typically your Downloads folder or a dedicated “Fonts” folder you create.- Tip: Inside the extracted folder, you’ll find the actual font files, usually ending in
.ttfor.otf. Sometimes there are multiple variations (e.g., “Regular,” “Bold,” “Italic”) for a single typeface.
- Tip: Inside the extracted folder, you’ll find the actual font files, usually ending in
- Open Windows Settings: Click the Start button and then click the Settings icon (the gear cog).
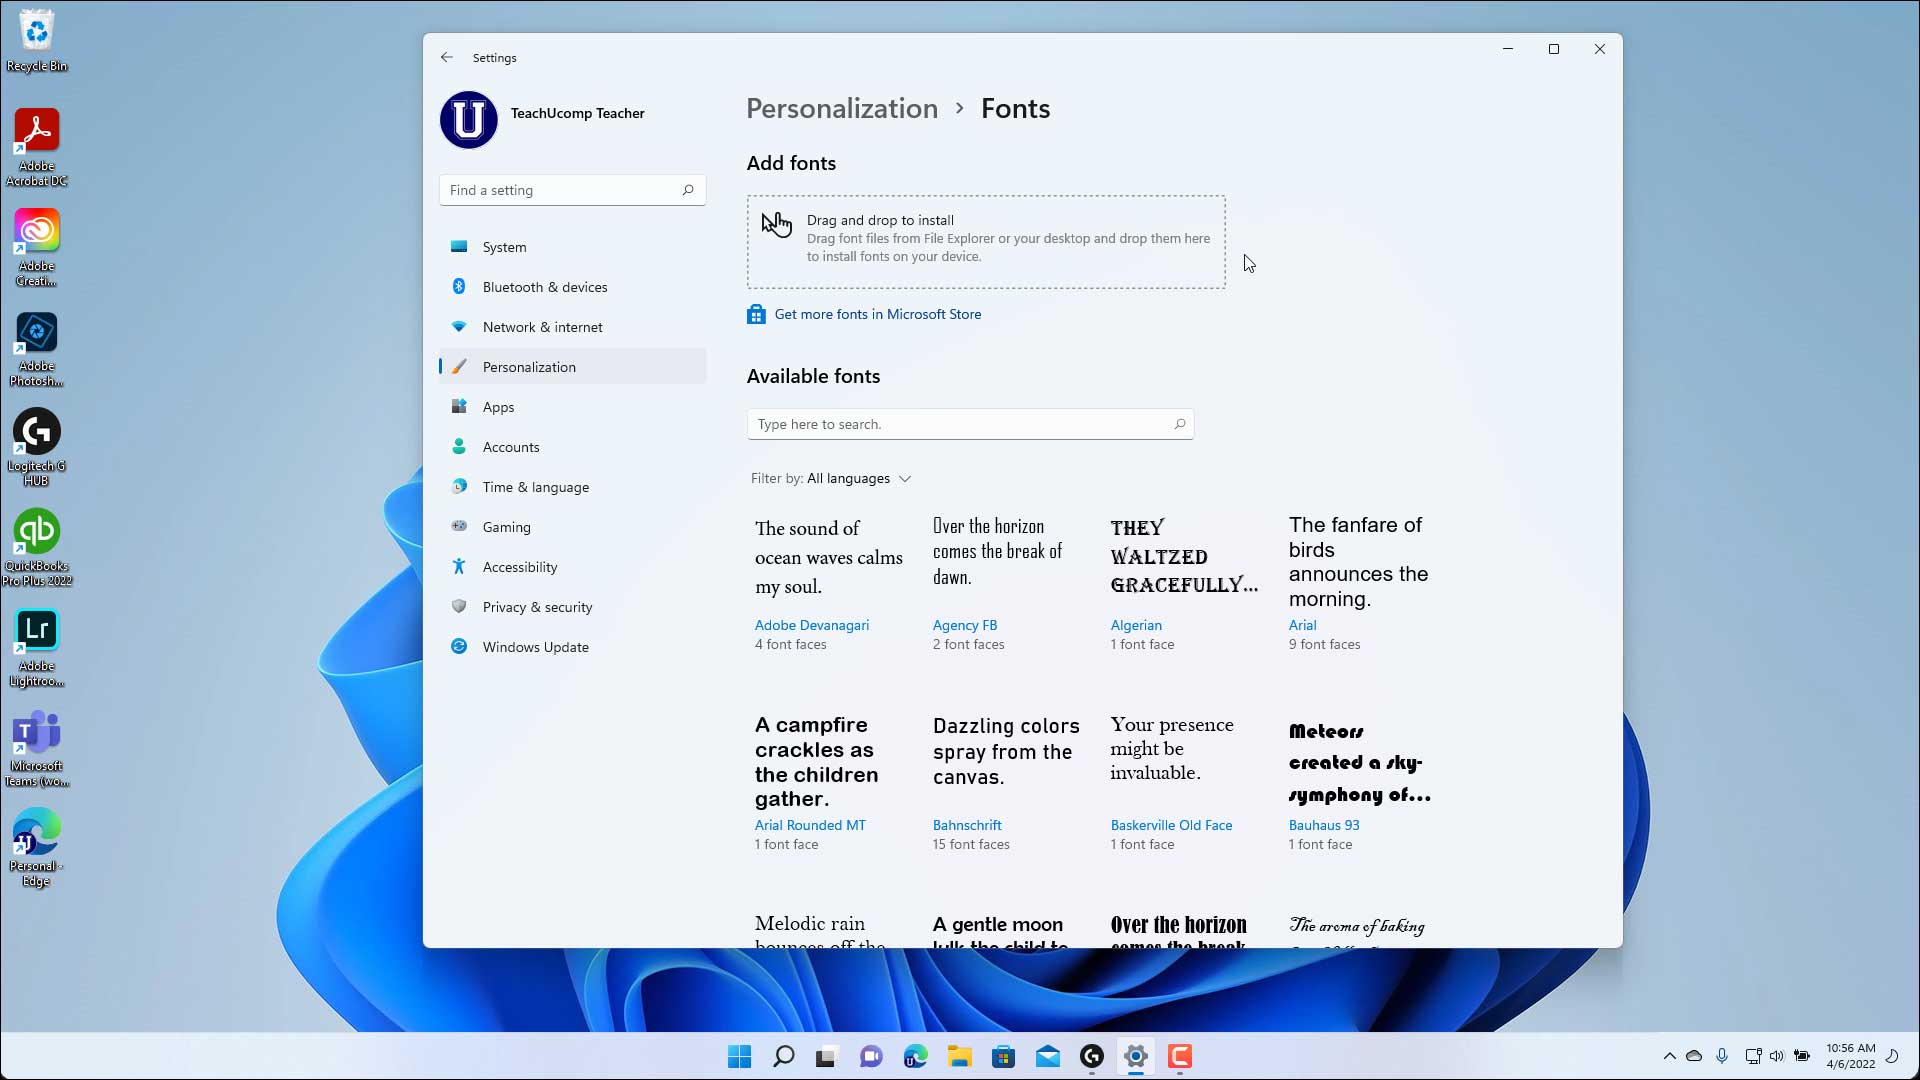
- Navigate to Personalization > Fonts: In the Settings window, click on “Personalization” in the left-hand menu. Then, from the options presented on the right, select “Fonts.”
- Drag and Drop to Install: You’ll see an area at the top of the Fonts settings that says “Drag and drop to install.” Simply drag your extracted
.ttfor.otffont file(s) directly into this box. - Confirm Installation: Windows will automatically install the font(s). You’ll see a brief notification confirming the installation. The new font will then appear in the list of installed fonts below.
That’s it! The font is now available for use in almost all your desktop applications, including Microsoft Office programs (Word, Excel, PowerPoint), Adobe Creative Suite (Photoshop, Illustrator, InDesign), and many other text editors and design software.
Method 2: Installing Fonts via File Explorer (Traditional & Good for Multiple Fonts)
This method involves directly interacting with the font files and is a quick way to install individual fonts or several at once, especially useful if you’re comfortable navigating File Explorer.

- Download and Extract Fonts: Follow steps 1 and 2 from Method 1 to download and extract your font files (
.ttfor.otf). - Locate the Font File(s): Navigate to the folder where you extracted your font files using File Explorer.
- Install a Single Font:
- Double-click: Find the
.ttfor.otffile you want to install and double-click it. This will open a font preview window, displaying the typeface at various sizes. - Click “Install”: In the top-left corner of the preview window, you’ll see an “Install” button. Click it. Windows will then install the font. If the font is already installed, it might prompt you to replace it.
- Double-click: Find the
- Install Multiple Fonts (Bulk Installation):
- Select Files: In your extracted font folder, select all the font files you wish to install. You can click and drag to select multiple files, or hold down the
Ctrlkey and click on each file individually. - Right-click and Install: Right-click on any of the selected font files. From the context menu, choose “Install” or “Install for all users.” “Install for all users” is generally recommended as it makes the font available to all user profiles on that PC, ensuring consistency if multiple people use the machine for collaborative projects or brand work.
- Copy to Fonts Folder (Alternative Bulk Method): Another powerful bulk installation method is to simply copy the selected
.ttfor.otffiles and paste them directly into the Windows Fonts folder. To do this:- Open File Explorer.
- Navigate to
C:WindowsFonts. - Paste your selected font files into this folder. Windows will automatically recognize and install them. You might need administrator privileges to do this.
- Select Files: In your extracted font folder, select all the font files you wish to install. You can click and drag to select multiple files, or hold down the
After installation, it’s a good idea to restart any open applications (like Word or Photoshop) that you intend to use the new fonts with, as they might not detect the newly installed fonts until they are relaunched.
Managing Your Font Collection for Optimal Performance and Productivity
As you install more fonts, managing them becomes crucial for maintaining system performance, keeping your creative assets organized, and ensuring productivity. A cluttered font folder can slow down applications and make finding the right typeface a frustrating experience, impacting your digital workflow and potentially costing you valuable time.
Uninstalling and Hiding Fonts
Sometimes you install fonts for a specific project and no longer need them, or perhaps you just want to declutter your list.
- Uninstalling via Windows Settings:
- Go to Settings > Personalization > Fonts.
- Scroll down to the list of installed fonts.
- Click on the font you wish to uninstall.
- Click the “Uninstall” button. Confirm when prompted.
- Uninstalling via File Explorer:
- Open File Explorer and navigate to
C:WindowsFonts. - Locate the font file(s) you wish to remove.
- Right-click on the font and select “Delete.” Confirm when prompted.
- Caution: Be careful not to delete system fonts essential for Windows to display correctly. Standard fonts like Arial, Calibri, Times New Roman, etc., should generally be left untouched.
- Open File Explorer and navigate to
For fonts you might use again but don’t want clogging up your application menus, some font management tools (discussed below) offer the ability to temporarily disable or hide fonts without fully uninstalling them.
Organizing Your Digital Typography Assets
A well-organized font library is a hallmark of an efficient digital creative.
- Dedicated Font Folder: Create a central folder (e.g.,
C:My Fontsor within yourDocumentsfolder) where you store all your downloaded font.zipfiles and extracted.ttf/.otffiles before installation. This makes it easy to back up your collection and reinstall fonts if needed. - Categorization: Within your dedicated font folder, consider organizing fonts by style (e.g., “Serif,” “Sans-Serif,” “Script,” “Display”) or by project.
- Font Management Software: For professionals or anyone with a large font collection, investing in or utilizing free font management software can be a game-changer. Tools like Adobe Fonts (as part of Creative Cloud), FontBase (free and paid versions), or NexusFont (free) allow you to:
- Preview fonts efficiently without installing them.
- Activate and deactivate fonts on demand, preventing system slowdowns.
- Organize fonts into collections.
- Identify duplicate or problematic fonts.
This level of organization is vital for brand consistency, allowing quick access to specific brand-approved typefaces while keeping your system lean.
Font Caching and Performance Considerations
Every installed font consumes a small amount of system resources. While modern PCs can handle hundreds or even thousands of fonts without significant issues, an excessively large and constantly loaded font library can slightly impact the startup time of applications that scan for fonts. It can also, in rare cases, contribute to slower system boot times or longer loading times for graphics-intensive software.
Font management tools help mitigate this by allowing you to only activate fonts when you need them, keeping your active font list streamlined. Regularly reviewing and uninstalling unused fonts is also a good practice for general PC maintenance and digital hygiene, similar to decluttering your hard drive.
Troubleshooting Common Font Installation Issues and Best Practices
While installing fonts is generally straightforward, you might occasionally encounter hiccups. Knowing how to troubleshoot these common issues can save you time and frustration, maintaining your productivity.
Common Error Messages and Solutions
- “The requested font file could not be installed.” or “This is not a valid font file.”:
- Cause: The file might be corrupted, incomplete, or not a true font file (e.g., you’re trying to install a
.zipfile instead of an extracted.ttfor.otf). - Solution: Re-download the font from a trusted source. Ensure you’ve properly extracted the font files from any compressed archives. Try opening the font file with a font viewer (like the default Windows font preview) to see if it renders correctly.
- Cause: The file might be corrupted, incomplete, or not a true font file (e.g., you’re trying to install a
- “The font is already installed.”:
- Cause: You’re trying to install a font that already exists on your system.
- Solution: You can choose to replace it if you’re installing an updated version, or simply cancel the installation if you realize you already have it. If you suspect an issue with the existing version, uninstall it first, then re-install the new one.
- Font Doesn’t Appear in Applications:
- Cause: The application was open during the font installation and hasn’t refreshed its font list.
- Solution: Close and restart the application (e.g., Word, Photoshop, Google Chrome). In some cases, a full PC restart might be necessary, especially if the font is system-critical or you’ve installed a large batch.
- Font Doesn’t Look Right or Has Missing Characters:
- Cause: The font file might be damaged, poorly designed, or you’re using an older version of the font with an application that expects newer features. This can also happen with certain free fonts that lack comprehensive character sets.
- Solution: Re-download from the original source. If using a professional font, check for updates from the foundry. For free fonts, consider if a different typeface would serve your needs better. This often relates to the “Money” aspect of investing in reliable, professionally designed typefaces for critical branding elements.
Best Practices for Font Usage in Creative and Professional Contexts
Effective font management goes beyond mere installation; it extends to how you integrate typography into your work.
- Licensing Awareness: Always be mindful of font licensing. Free fonts often have restrictions (e.g., “personal use only”), and commercial fonts come with specific terms for desktop, web, or app usage. Using a font without the proper license can lead to legal issues, which directly impacts your “Money” and “Brand” reputation.
- Consistency for Branding: For businesses and personal brands, consistency in font usage across all platforms (website, social media, print materials, presentations) is paramount. It builds recognition and strengthens your visual identity. A dedicated font folder with approved brand fonts is an excellent “Tech” solution for “Brand” consistency.
- Readability and Accessibility: While custom fonts add flair, ensure they remain legible. Overly decorative fonts can hinder readability, especially for long passages of text or for users with visual impairments. Prioritize clear communication over novelty in critical applications.
- Font Pairing: Mastering font installation is the first step; learning to pair fonts effectively is the art. Combining complementary typefaces enhances visual hierarchy and aesthetic appeal, elevating the professionalism of your “Brand” materials. There are many online resources and guides to help with this creative “Tech” skill.
- Backup Your Fonts: If you’ve invested time and potentially “Money” into curating a font collection, ensure you back it up regularly. Store your original font files (the
.ttfor.otffiles) in a cloud service or external drive. This safeguards your creative assets against data loss and is a crucial aspect of digital security and productivity.
Conclusion: Empowering Your Digital Canvas
Installing fonts on your PC is a gateway to unlocking a higher level of personalization, creativity, and professional polish in your digital endeavors. From enhancing your personal documents to crafting compelling marketing materials that embody your “Brand,” the ability to choose and utilize custom typography is an indispensable skill in the modern “Tech” landscape.
By understanding the different font types, knowing where to source them safely and legally, mastering the simple installation steps, and adopting effective management strategies, you transform your PC from a generic canvas into a bespoke workspace tailored to your unique vision. Whether you leverage free resources to save “Money” or invest in premium typefaces for unparalleled quality and brand distinction, the power of typography is now firmly in your hands. So go forth, experiment, create, and let your words take on a form that truly speaks volumes.
aViewFromTheCave is a participant in the Amazon Services LLC Associates Program, an affiliate advertising program designed to provide a means for sites to earn advertising fees by advertising and linking to Amazon.com. Amazon, the Amazon logo, AmazonSupply, and the AmazonSupply logo are trademarks of Amazon.com, Inc. or its affiliates. As an Amazon Associate we earn affiliate commissions from qualifying purchases.