World of Warcraft, a game synonymous with vast worlds and intricate gameplay, often benefits immensely from a user interface (UI) that is both functional and aesthetically pleasing. For many players, the default UI, while serviceable, can feel cluttered and uninspired, hindering their ability to track vital information during intense raids or dungeons. This is where ElvUI steps in. ElvUI is a highly customizable and comprehensive UI overhaul for World of Warcraft, designed to streamline your interface, enhance your situational awareness, and provide a cleaner, more organized gaming experience. But for those new to addon customization, the question of “how do you install ElvUI?” can seem daunting.
This guide aims to demystify the process, breaking down the installation and initial setup of ElvUI into manageable steps. Whether you’re a seasoned WoW player looking to upgrade your UI or a newcomer eager to optimize your gameplay from the start, this tutorial will equip you with the knowledge to get ElvUI up and running smoothly. We’ll explore not just the “how” of installation, but also touch upon why ElvUI is such a popular choice and what you can expect after its implementation.
Understanding ElvUI: Beyond a Simple Addon
Before diving into the installation, it’s important to understand what ElvUI truly offers. It’s not just a cosmetic change; ElvUI is a complete replacement for many of WoW’s default UI elements. This includes:
- Action Bars: Completely redesigned and highly configurable action bars, allowing for precise placement and styling.
- Unit Frames: Enhanced unit frames for your character, target, party, and raid members, providing crucial health, mana, and status effect information at a glance.
- Nameplates: Overhauled nameplates that are more informative and less intrusive.
- Chat Windows: Customizable chat windows with improved readability and filtering options.
- Bags and Inventory: Streamlined bag management for easier item organization.
- Minimap: A cleaner, more functional minimap.
- Tooltips: Enhanced tooltips that provide more relevant information.
Beyond these core components, ElvUI also integrates with a range of powerful ElvUI Plugins. These plugins extend ElvUI’s functionality, allowing for even deeper customization. Some popular examples include:
- ElvUI_Config: This is the core configuration addon that provides the graphical interface for tweaking all of ElvUI’s settings.
- ElvUI_S&L (Shadow & Light): A popular addon that adds many extra features and customization options not found in the base ElvUI.
- ElvUI_BenikUI: Another extensive addon that builds upon ElvUI with its own unique features and styling.
The beauty of ElvUI lies in its all-in-one nature. Instead of downloading and configuring dozens of individual addons to achieve a similar effect, ElvUI provides a cohesive and integrated solution. This simplifies the process and reduces the potential for addon conflicts.
Step-by-Step Installation of ElvUI
Installing ElvUI is a straightforward process, but it requires careful attention to detail. It’s crucial to ensure you’re downloading the addon from a reputable source to avoid malware or outdated versions.
1. Downloading ElvUI
The official and safest place to download ElvUI is from its dedicated page on Warcraft Addons (Wago.io). Avoid downloading from unofficial or third-party websites, as these may host corrupted or malicious files.
- Navigate to Wago.io: Open your web browser and go to
https://wago.io/. - Search for ElvUI: In the search bar, type “ElvUI” and press Enter.
- Select the Official ElvUI: Look for the ElvUI addon with the most downloads and a clear indication that it is the official version. You’ll typically find several related addons like ElvUI_S&L or BenikUI, which are optional but highly recommended to download alongside ElvUI itself. For this guide, we will focus on the core ElvUI and its primary configuration addon.
- Download the Latest Version: Click on the ElvUI addon page. You will usually find a “Download” button or a link to download the
.zipfile. Ensure you download the version compatible with the latest version of World of Warcraft.
2. Installing the Addon Files
Once you have downloaded the .zip file, you need to extract and place the addon folders in the correct location within your World of Warcraft installation directory.
-
Locate Your World of Warcraft Folder: The default installation path for World of Warcraft varies depending on your operating system and where you installed the game.
- Windows: Typically, it’s located in
C:Program Files (x86)World of WarcraftorC:Program FilesWorld of Warcraft. If you use the Battle.net app, you can find the game’s location by opening the Battle.net app, selecting World of Warcraft, clicking on “Options” (the gear icon), and then “Show in Explorer.” - macOS: It’s usually found in
/Applications/World of Warcraft/.
- Windows: Typically, it’s located in
-
Find the Addons Folder: Inside your World of Warcraft installation folder, navigate to the
_retail_subfolder (for the current expansion) and then to theInterfacefolder. Inside theInterfacefolder, you’ll find anAddOnsfolder. If theAddOnsfolder doesn’t exist, you can create it. -
Extract and Place the Files:
- Open the downloaded
.zipfile using a file extraction program (like 7-Zip, WinRAR, or the built-in Windows extractor). - Inside the
.zipfile, you’ll find folders namedElvUIandElvUI_Config. - Extract these folders directly into your
World of Warcraft_retail_InterfaceAddOnsdirectory. Do not extract them into another folder. The structure should look like this:World of Warcraft_retail_InterfaceAddOnsElvUIWorld of Warcraft_retail_InterfaceAddOnsElvUI_Config
- Open the downloaded
-
Optional Plugins: If you downloaded ElvUI_S&L or BenikUI, extract their respective folders into the same
AddOnsdirectory.
3. Launching World of Warcraft and Initial Setup
With the addon files in place, it’s time to launch the game and begin the initial configuration.
-
Start World of Warcraft: Launch the game through your Battle.net app.
-
Character Selection Screen: Upon reaching the character selection screen, you’ll notice your UI might look slightly different or even a bit broken. This is normal.
-
Log into a Character: Select a character and log into the game world.
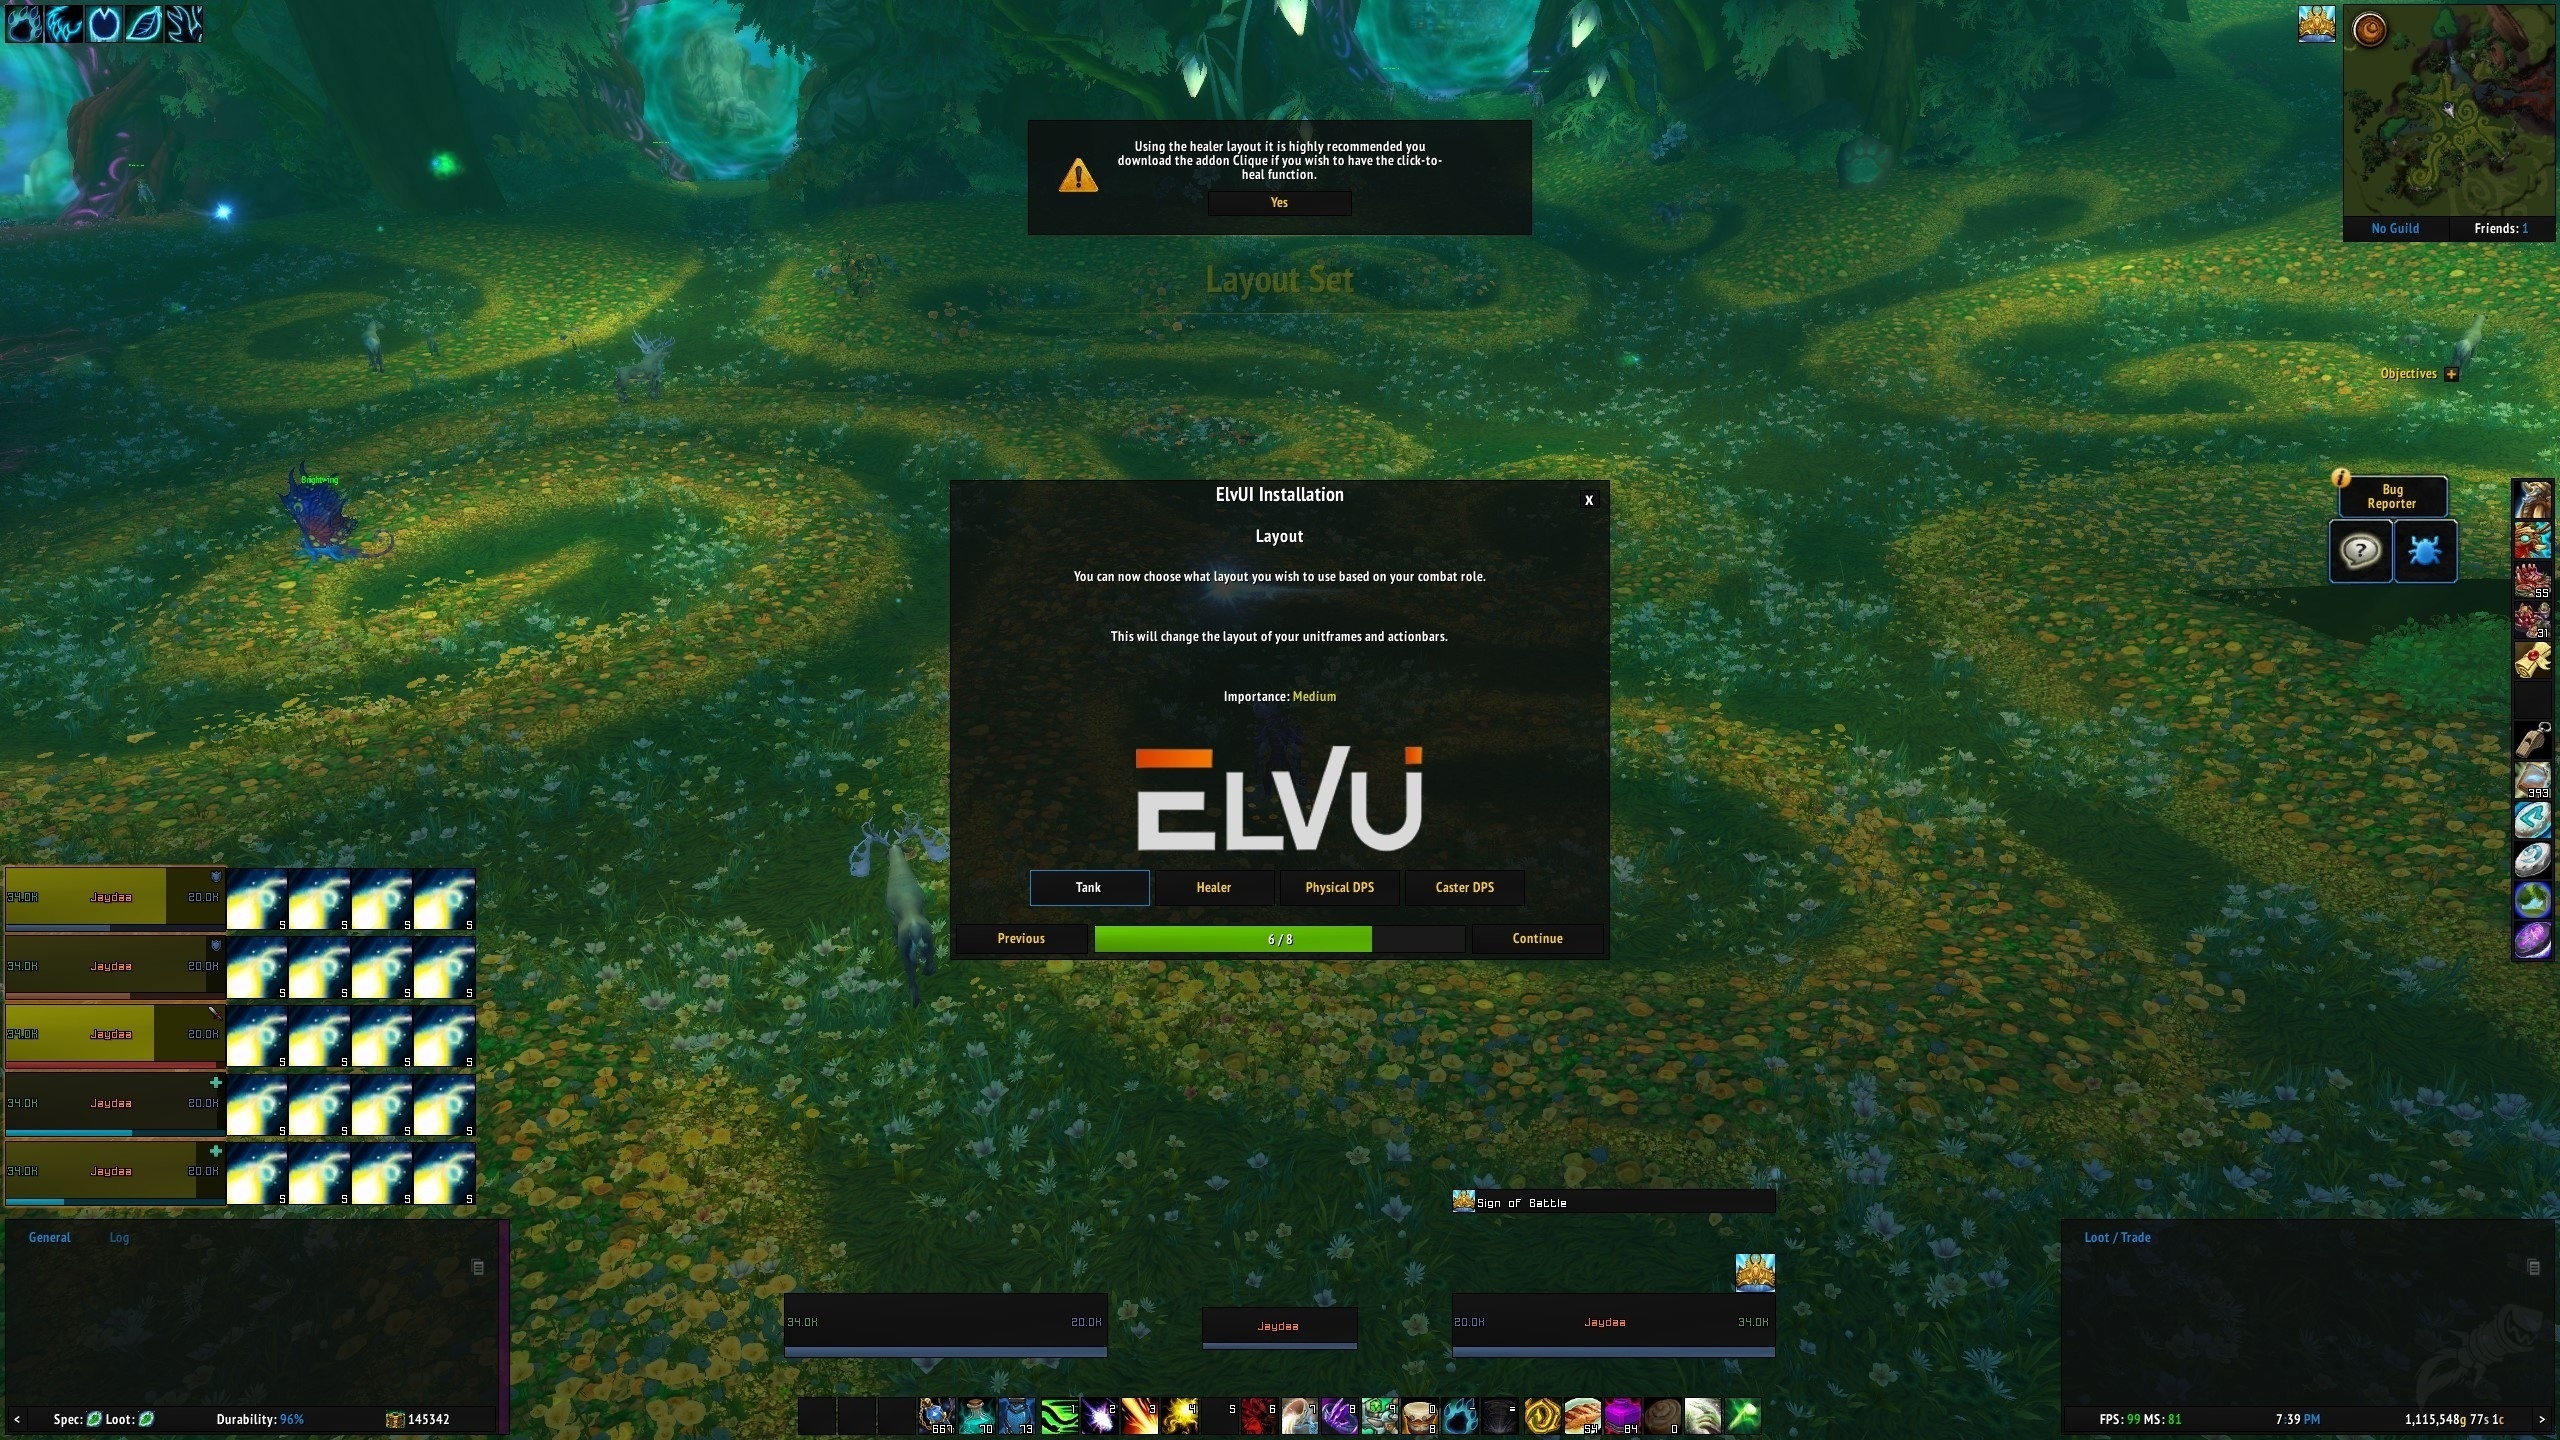
-
ElvUI Setup Window: As soon as you log in, a configuration window for ElvUI should automatically pop up. This is the ElvUI Setup Assistant. If it doesn’t appear, you can manually open it by typing
/elvuiin the chat window and pressing Enter, then selecting “Setup Assistant.” -
Follow the Setup Assistant: The Setup Assistant will guide you through the essential initial configurations. This typically includes:
- Profile Selection: You can choose a pre-made profile (e.g., for raiding, questing) or start with a clean slate. For your first installation, starting with a default or basic profile is often recommended.
- Information Display: ElvUI will ask about your preferred information display for things like unit frames, buffs, and debuffs.
- Chat Settings: Basic chat window configurations.
- Action Bar Layout: Initial setup for your action bars.
- Loot and Other Settings: Various other core settings.
Take your time to read through each step and make choices that align with your playstyle. You can always change these settings later.
Customizing ElvUI: Tailoring Your Interface
The true power of ElvUI lies in its extensive customization options, accessible through the ElvUI configuration panel. This is where you can fine-tune every aspect of your UI to perfection.

1. Accessing the ElvUI Configuration Panel
After the initial setup, you can access the full ElvUI configuration panel by typing /elvui in the chat window and pressing Enter. This will open a comprehensive menu with numerous tabs and sub-options.
2. Key Configuration Areas
Here are some of the most important areas you’ll want to explore within the ElvUI configuration:
2.1. General Settings
This tab houses overarching settings that affect the entire UI.
- Profiles: As mentioned, you can manage different UI profiles for various situations (e.g., raiding, PvP, solo questing). This allows you to quickly switch between optimized layouts.
- Media: Here you can customize fonts, textures, and the overall visual style of your UI. This is where you can really personalize the look and feel.
- Action Bars: This is a critical section. You can:
- Enable/Disable Bars: Control which action bars are visible.
- Positioning: Drag and drop bars to any location on your screen.
- Size and Spacing: Adjust the size of buttons and the gaps between them.
- Columns and Rows: Configure the layout of your bars.
- Visibility Rules: Set conditions for when specific bars should appear or disappear (e.g., only show extra bars when in combat or mounted).
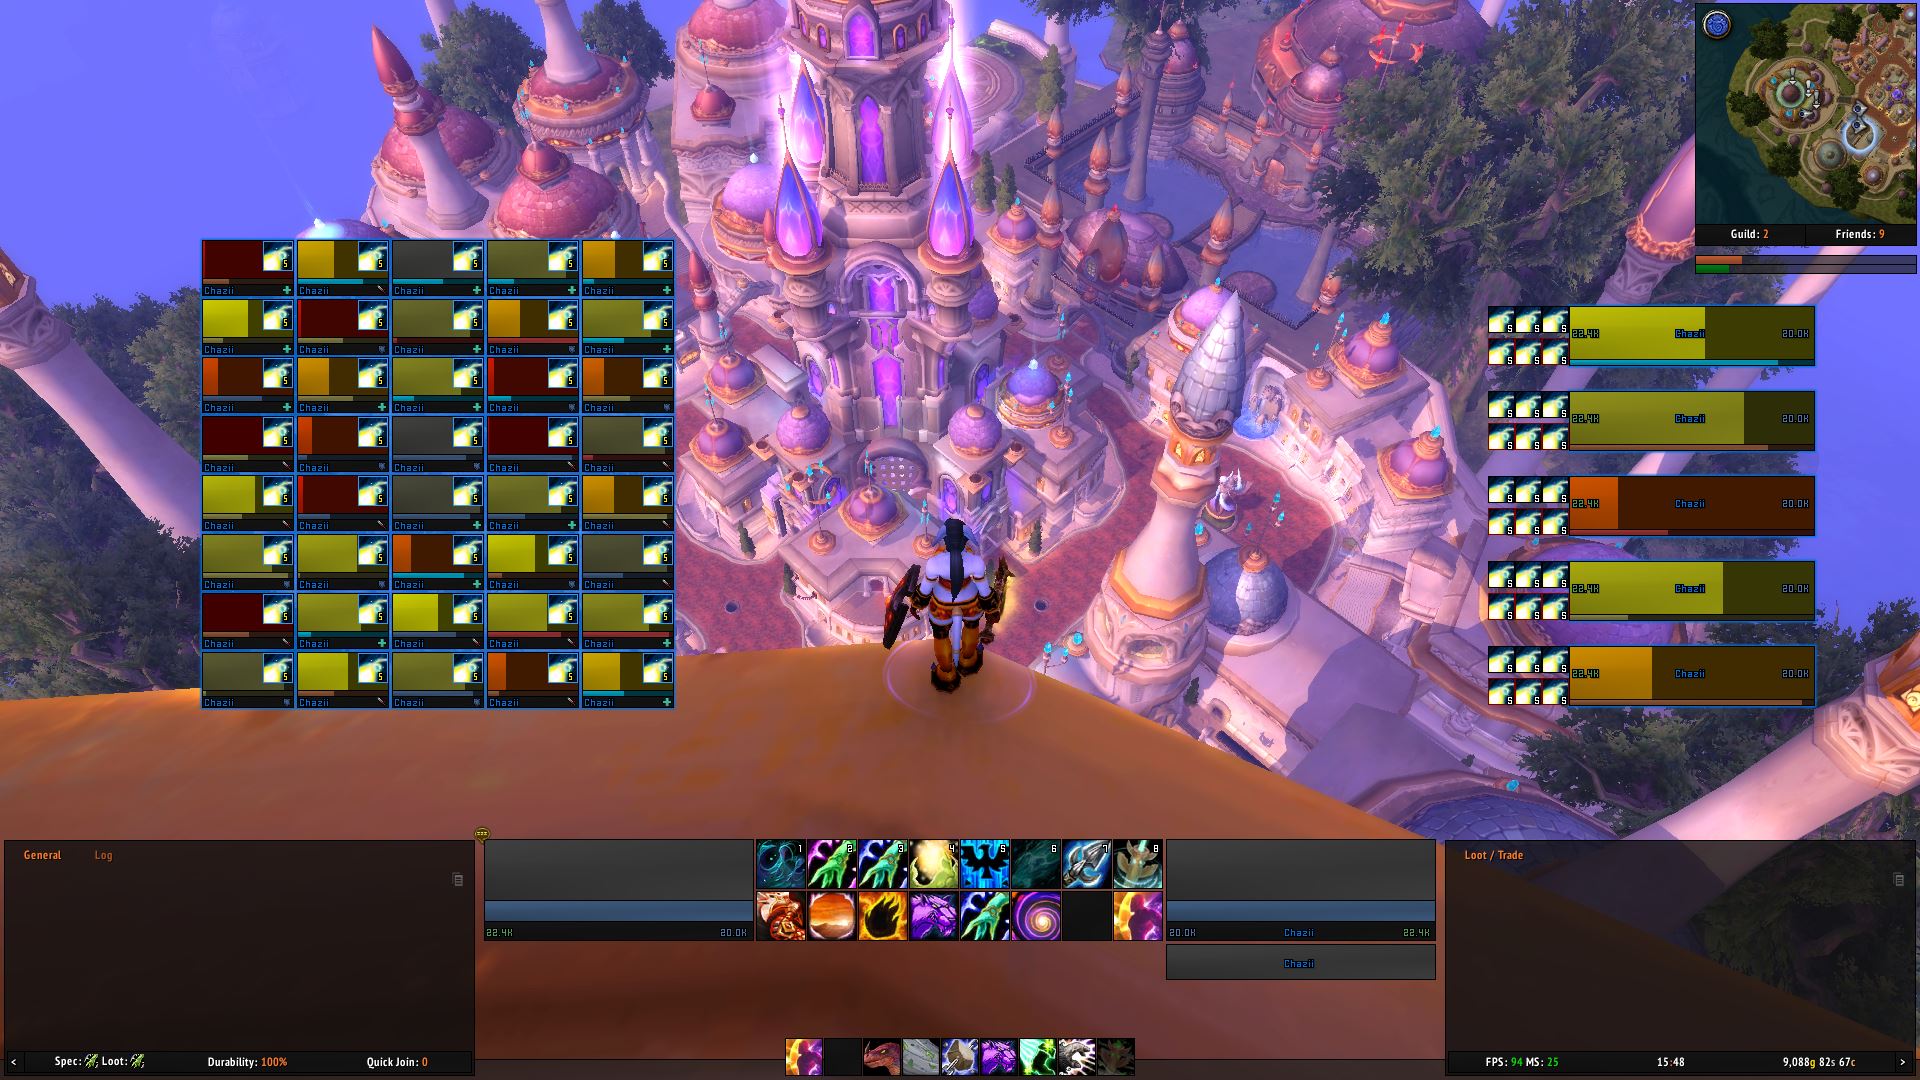
- Unit Frames: This is where you’ll spend a lot of time if you want to optimize your character and enemy information.
- Player Frame: Customize its size, position, and what information is displayed (e.g., health, mana, buffs, debuffs).
- Target Frame: Similar to the player frame, but for your current target.
- Raid/Party Frames: Crucial for group content. You can configure their appearance, size, and how they display information like incoming heals, debuffs, and dispellable debuffs.
- Auras: Control which buffs and debuffs are displayed on unit frames and their visibility rules.
- Nameplates: Adjust the appearance and information displayed on enemy nameplates, including health, buffs, debuffs, and threat indicators.
- Chat: Customize your chat windows, including their size, transparency, font, and filters to reduce clutter.
2.2. Plugins and Extensions
If you installed optional addons like ElvUI_S&L or BenikUI, they will have their own configuration sections, often integrated into the main ElvUI panel or accessible through separate commands. These plugins offer a wealth of additional features, such as:
- Enhanced Buff/Debuff Tracking: More detailed and customizable aura management.
- Tooltip Enhancements: Showing additional game data in tooltips.
- Quest Helper Improvements: Better quest tracking and information.
- Unit Frame Additions: More options for unit frame styling and information.
- Datatext Panels: Customizable panels that display various in-game information like FPS, latency, durability, and current zone.
2.3. Tooltips
ElvUI allows you to significantly enhance your tooltips. You can choose to display more detailed information about items, spells, and characters. This can be invaluable for understanding mechanics and optimizing your gameplay.
3. Tips for Effective Customization
- Start Small: Don’t try to configure everything at once. Focus on the most critical elements first, like your action bars and unit frames.
- Use Profiles: Create different profiles for different activities. For example, a combat-focused profile with larger unit frames and a more relaxed exploration profile.
- Experiment: Don’t be afraid to try out different settings. You can always reset individual modules or the entire UI if you make a mistake.
- Consult Online Resources: If you’re stuck or want to achieve a specific look, search for ElvUI setup guides and screenshots online. Wago.io also hosts many pre-made ElvUI profiles that you can import.
- Backup Your Settings: Periodically back up your ElvUI configuration. You can do this by copying the
ElvUIandElvUI_Configfolders from yourWorld of Warcraft_retail_InterfaceAddOnsdirectory to a safe location. This will save you a lot of time if you ever need to reinstall or move your settings to a new computer.
Troubleshooting Common Issues
While ElvUI is generally stable, you might encounter a few hiccups during installation or customization.
1. Addon Not Loading
- Check File Placement: Ensure the
ElvUIandElvUI_Configfolders are directly inside theAddOnsfolder. - Verify Addon Enabled: On the character selection screen, click the “AddOns” button at the bottom left. Make sure ElvUI and ElvUI_Config are checked and enabled.
- Restart Game: Sometimes, a simple game restart can resolve loading issues.
2. ElvUI Setup Window Not Appearing
- Manual Command: Type
/elvuiin the chat window and press Enter. Then, select “Setup Assistant.” - Corrupted Installation: If the setup window still doesn’t appear, your installation might be corrupted. Try deleting the ElvUI folders from your AddOns directory and redownloading/reinstalling them.
3. Interface Issues or Glitches
- Conflicting Addons: If you have many other addons installed, they might conflict with ElvUI. Try disabling all other addons and see if the issue persists. If it resolves, re-enable your addons one by one to identify the culprit.
- Outdated Addons: Ensure you are using the latest versions of ElvUI and all its components, especially if a new World of Warcraft patch has recently been released.
- Resetting Modules: Within the ElvUI configuration panel, you can often reset individual modules or even the entire UI to default settings. This can fix persistent glitches.
Conclusion
Installing and configuring ElvUI might seem like a significant undertaking for new users, but by following these steps, you can transform your World of Warcraft interface into a powerful, efficient, and personalized tool. ElvUI’s comprehensive nature and deep customization options empower you to tailor your gameplay experience to your exact needs, whether you’re a hardcore raider optimizing for performance or a casual player seeking a cleaner, more aesthetically pleasing environment. Remember to download from trusted sources, follow the installation instructions carefully, and don’t be afraid to experiment with the vast array of customization options. With a little patience and practice, ElvUI will become an indispensable part of your World of Warcraft adventure.
aViewFromTheCave is a participant in the Amazon Services LLC Associates Program, an affiliate advertising program designed to provide a means for sites to earn advertising fees by advertising and linking to Amazon.com. Amazon, the Amazon logo, AmazonSupply, and the AmazonSupply logo are trademarks of Amazon.com, Inc. or its affiliates. As an Amazon Associate we earn affiliate commissions from qualifying purchases.