In an era where our digital footprint is constantly tracked, harvested, and analyzed, the importance of digital security has moved from the niche interest of tech enthusiasts to a fundamental necessity for every internet user. A Virtual Private Network (VPN) is no longer just a corporate tool for remote work; it is a vital layer of protection that shields your data from prying eyes, prevents ISP tracking, and secures your identity on public networks.
However, for many, the hurdle isn’t understanding why they need a VPN, but rather the technical execution of how to install one. While modern software has become increasingly user-friendly, the nuances of cross-platform installation, protocol selection, and network-level configurations can still be daunting. This guide provides a comprehensive technical walkthrough for installing and optimizing a VPN across various ecosystems, ensuring your data remains encrypted and your connection remains private.
1. Understanding the Architecture: How a VPN Secures Your Connection
Before diving into the installation steps, it is essential to understand what is happening under the hood of the software you are about to install. A VPN functions as an encrypted tunnel between your device and a remote server operated by the VPN provider.
When you install a VPN client, you are essentially installing a network driver that intercepts your outgoing internet traffic. This traffic is encrypted (typically using AES-256 standards) before it even leaves your device. Once it reaches the VPN server, it is decrypted and sent to its final destination. To the outside world, your traffic appears to originate from the VPN server’s IP address, effectively masking your physical location and identity.
From a technical standpoint, the installation process involves three core components:
- The Client Software: The user interface where you manage settings and server locations.
- The Virtual Network Adapter: A software-based driver that routes traffic through the encrypted tunnel.
- The Protocol: The set of rules (such as WireGuard, OpenVPN, or IKEv2) that determines how the data is packaged and sent.
2. Desktop Installation: Securing Windows and macOS
Installing a VPN on a desktop or laptop is usually the most straightforward process, as most premium providers offer “native” applications that handle the heavy lifting of configuration automatically.
Windows Installation: Navigating the Setup Wizard
Windows remains the most targeted operating system for malware, making a VPN a critical component of a Windows security suite. To install a VPN on Windows:
- Download the Installer: Visit your chosen provider’s website and download the
.exeor.msiinstallation file. - Administrative Rights: Launch the installer. You will likely see a User Account Control (UAC) prompt. You must have administrative privileges to install the virtual network drivers required for the VPN to function.
- The Installation Process: Follow the prompts. The installer will place the application in your Program Files and install the “TAP” or “TUN” adapters. These are the virtual drivers that allow Windows to recognize the VPN connection as a network interface.
- Initial Launch and Login: Once installed, open the app and log in. Most modern apps will automatically select the best protocol for your network (often WireGuard for its speed/security balance).
macOS Installation: Granting System Permissions
Installing a VPN on macOS is similar to Windows but involves the specific security architecture of Apple’s operating system.
- DMG and Applications Folder: Download the
.dmgfile, open it, and drag the VPN application into your “Applications” folder. - System Extensions: When you first launch the VPN on macOS, the system will prompt you to “Allow” the application to add VPN configurations. This is a security feature of macOS to prevent unauthorized apps from redirecting your traffic.
- Keychain Access: You may be asked to provide your Mac’s system password to allow the VPN to store its credentials in the Apple Keychain, ensuring a seamless login experience.
3. Mobile Security: Deploying VPNs on iOS and Android
Mobile devices are frequently connected to unsecured public Wi-Fi networks in coffee shops, airports, and hotels, making them the most vulnerable points in a user’s digital life.
Using the App Store and Play Store
The most efficient way to install a VPN on mobile is through the official app stores.
- Search and Download: Locate your provider on the Apple App Store or Google Play Store.
- Profile Configuration: After logging in, the app will ask for permission to “Set up a VPN connection.” On iOS, this triggers a system pop-up that says, “VPN would like to add VPN configurations.” On Android, you will see a request to monitor network traffic.
- Biometric Integration: Many mobile VPN apps allow you to lock the app behind FaceID or TouchID, adding an extra layer of security if your phone is ever accessed by someone else.
Manual Configuration for Advanced Users
In some scenarios—such as in countries with heavy internet censorship where app stores are restricted—you may need to configure a VPN manually. Both Android and iOS have built-in VPN settings. You will need the server address, your credentials, and the “Remote ID” provided by your VPN service. While this doesn’t provide the “Kill Switch” features of a dedicated app, it provides basic encryption without needing third-party software.
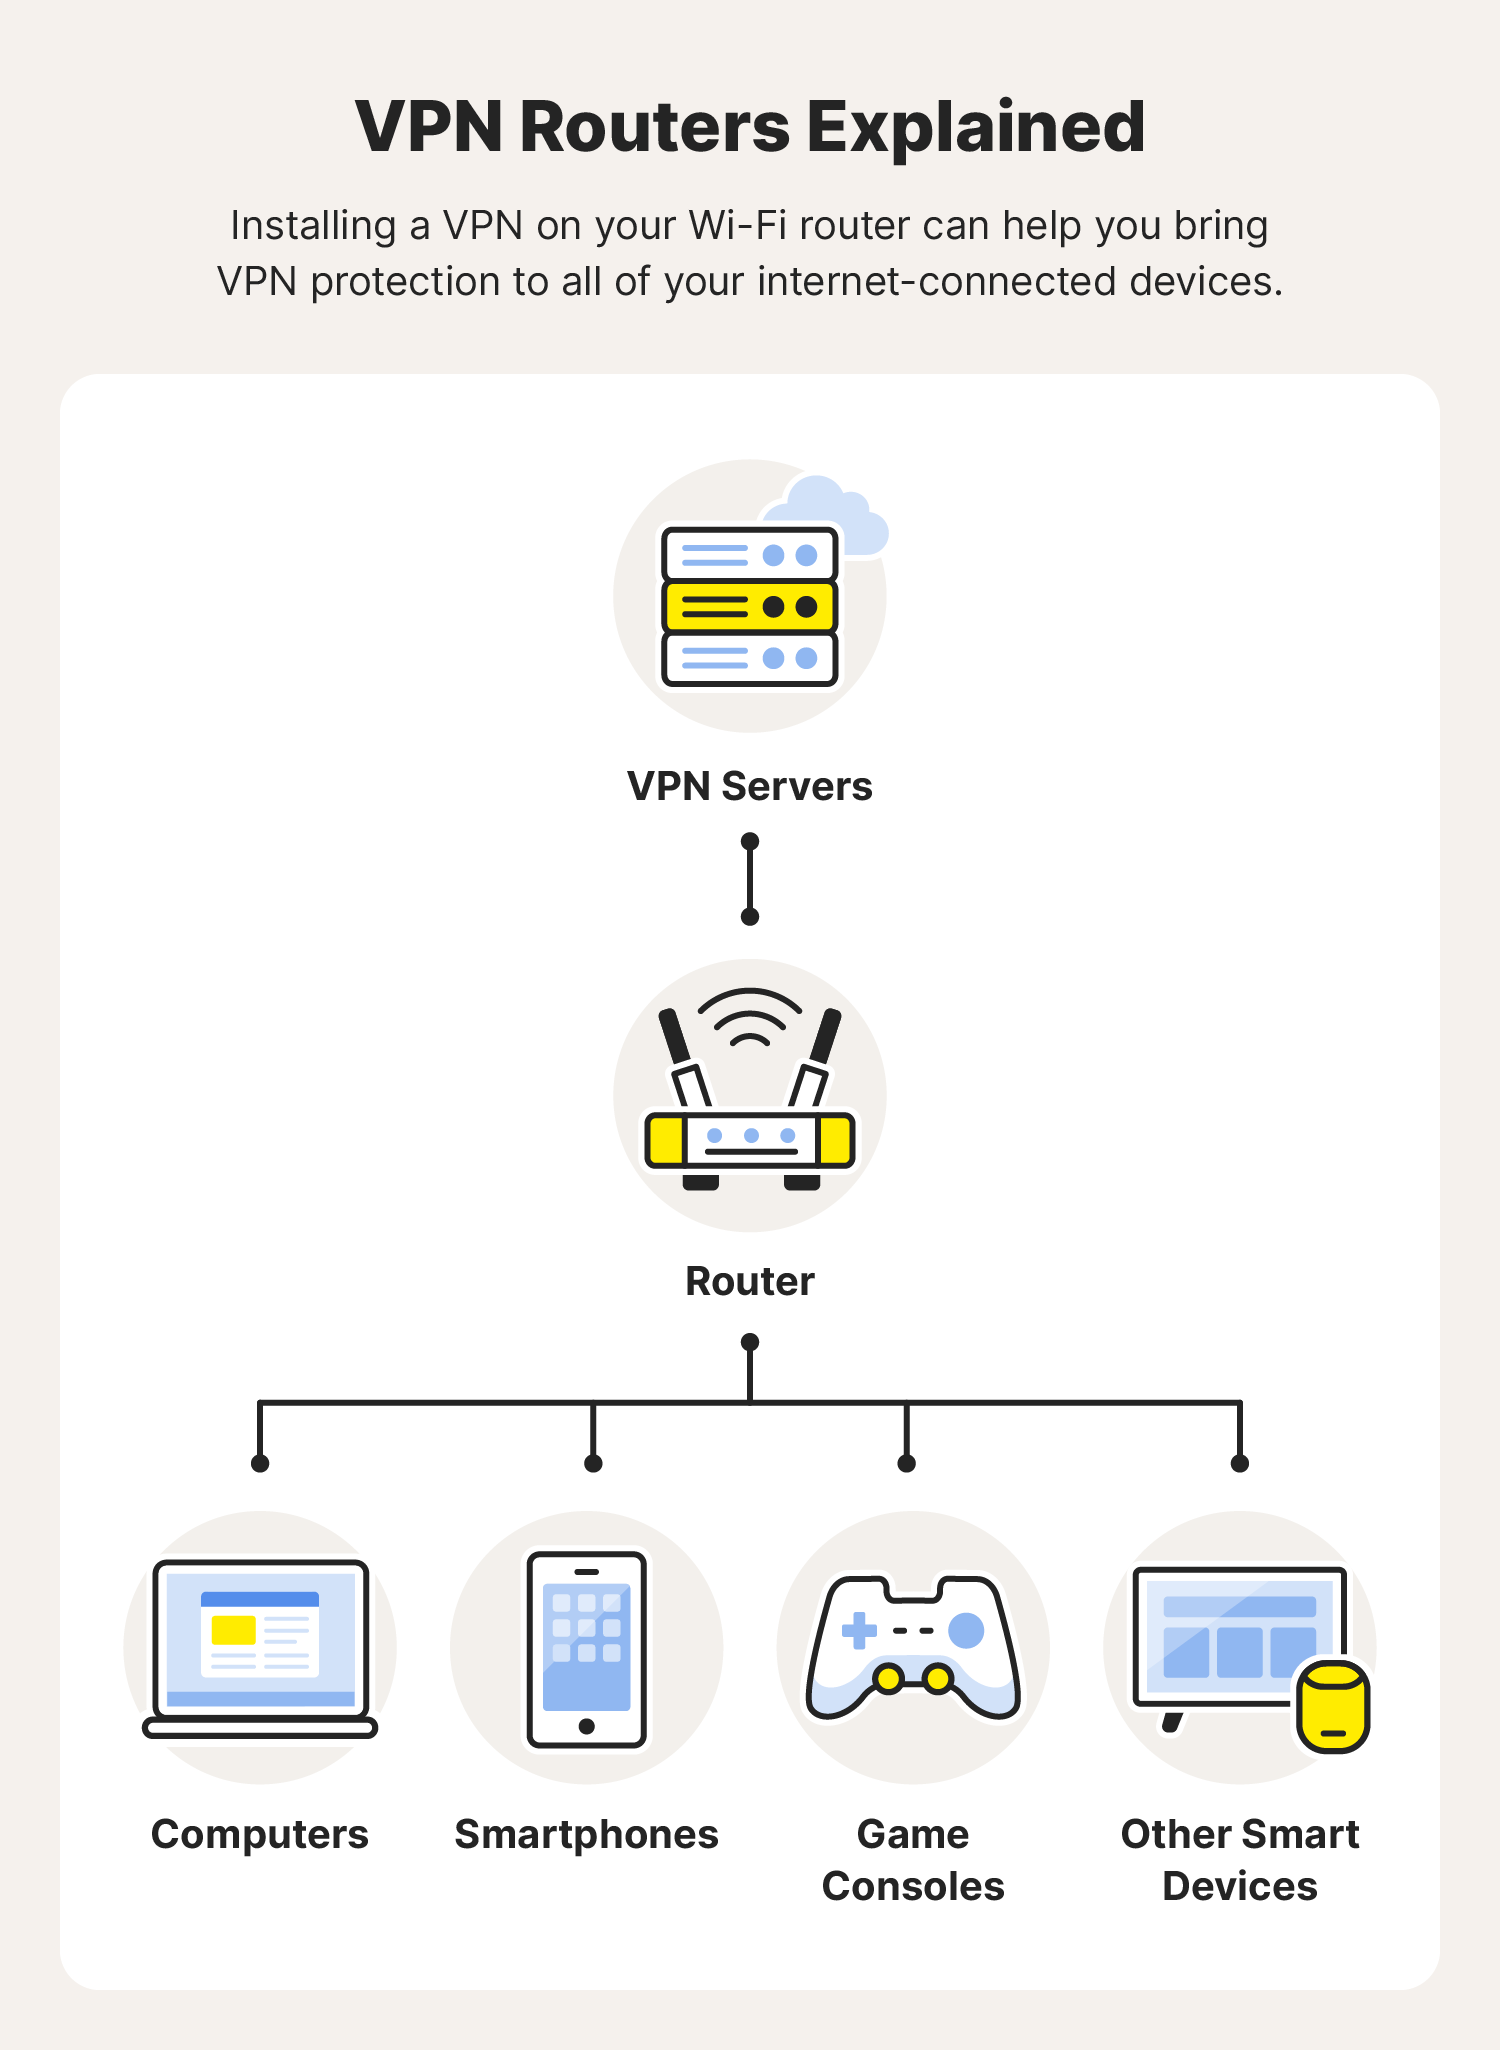
4. Network-Level Protection: Installing a VPN on Your Router
For those who want to protect every device in their home—including smart TVs, gaming consoles, and IoT devices that don’t natively support VPN apps—installing the VPN directly on the router is the ultimate tech solution.
Checking Compatibility and Firmware
Not all routers support VPN installation. Generally, you need a router that supports “OpenVPN Client” mode or one that can be flashed with custom firmware like DD-WRT or Tomato.
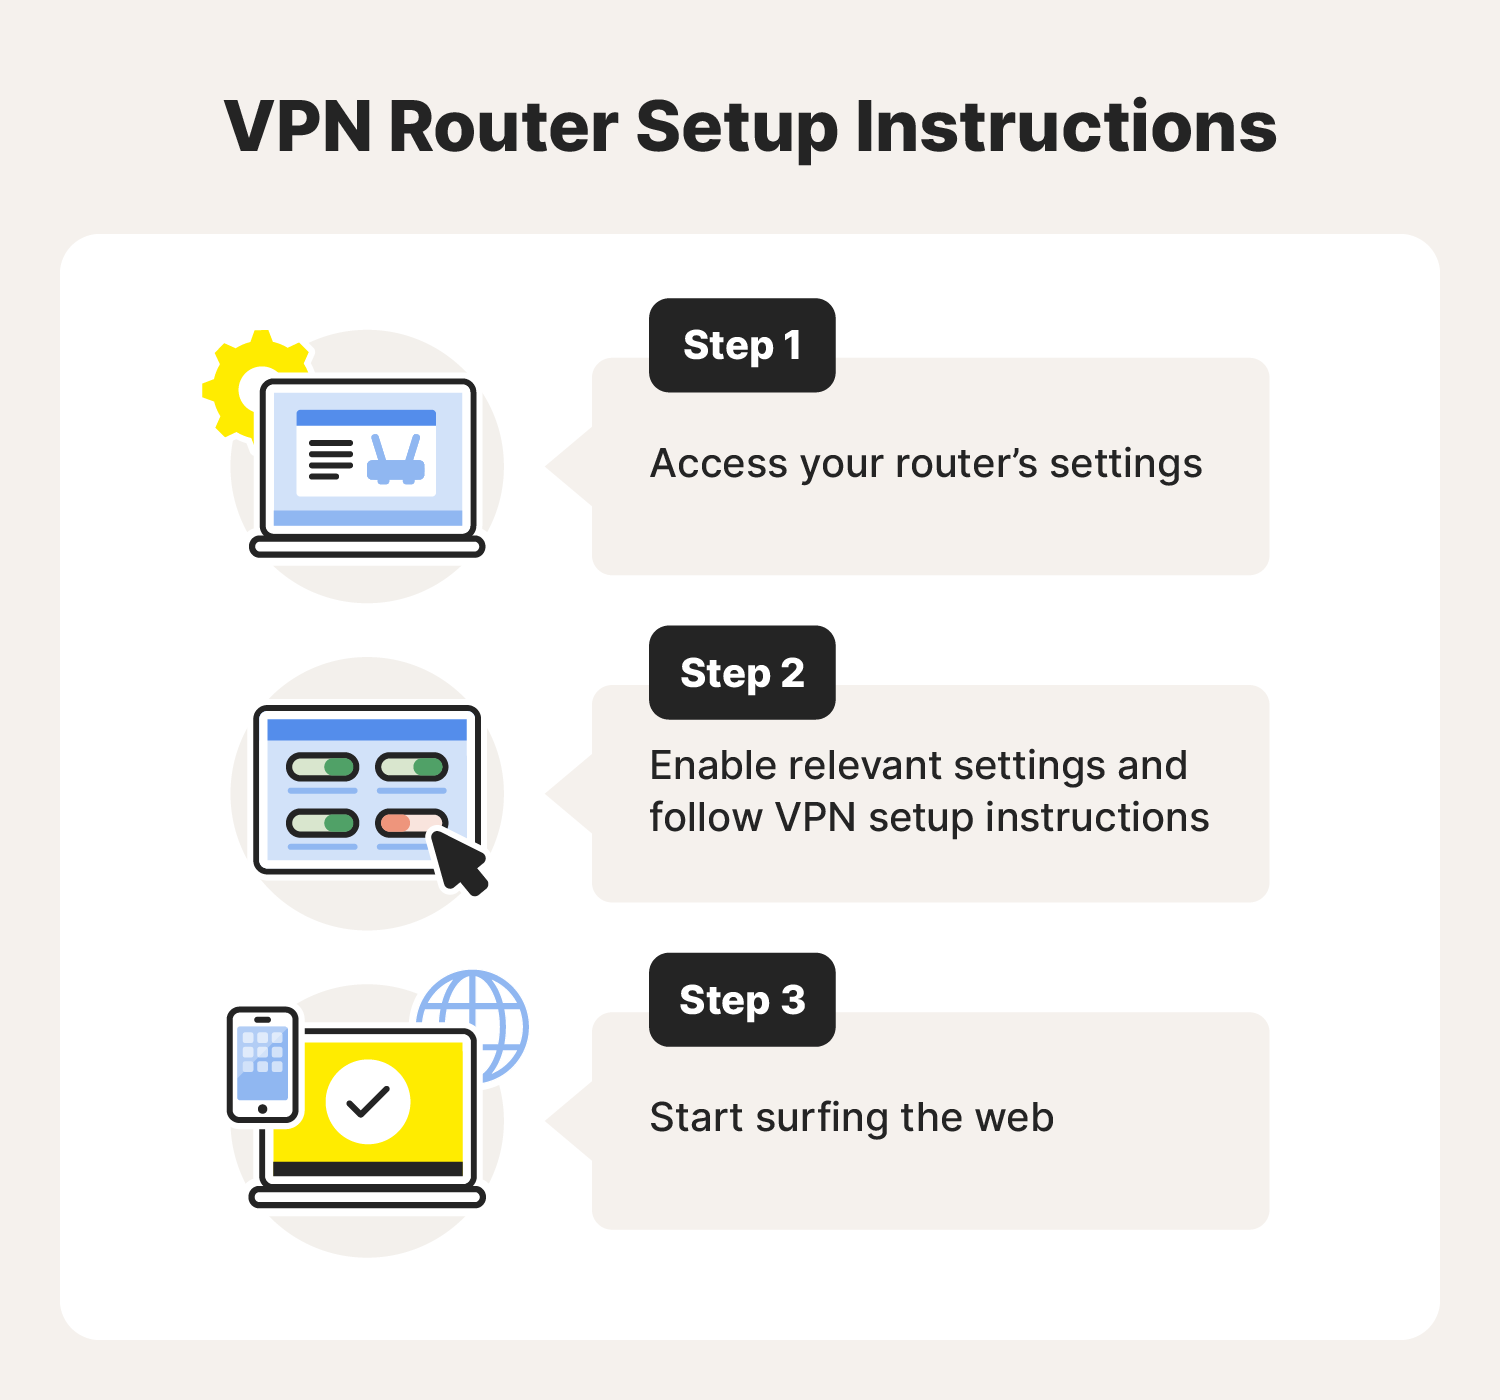
- Access the Router Dashboard: Enter your router’s IP address (usually 192.168.1.1) into a browser.
- Locate VPN Settings: Look for a tab labeled “VPN” or “Advanced Settings.” If your router only shows “VPN Passthrough,” it cannot run a VPN; it can only allow VPN traffic to pass through it.
Step-by-Step Router Configuration
- Obtain Configuration Files: Log into your VPN provider’s website on a computer and download the
.ovpn(OpenVPN) or WireGuard configuration files for the server locations you want to use. - Upload to Router: In the router’s VPN client menu, upload these files.
- Enter Credentials: Routers often require a specific “Service Username” and “Service Password” which is different from your account login.
- Activate: Once configured, toggle the VPN to “On.” Now, every device connected to your home Wi-Fi is automatically encrypted, counting as only “one device” under your VPN subscription limit.
5. Optimizing Your VPN Experience After Installation
Simply installing the software is only the first step. To ensure you are getting the highest level of digital security, you must configure the software correctly.
Selecting the Right Protocols (WireGuard vs. OpenVPN)
During or after installation, you will often find a “Protocol” setting.
- WireGuard: The modern standard. It uses state-of-the-art cryptography and is significantly faster and more battery-efficient than older protocols. It is highly recommended for streaming and gaming.
- OpenVPN (UDP/TCP): The battle-tested veteran. While slightly slower than WireGuard, it is excellent for bypassing firewalls and is highly configurable.
Enabling the “Kill Switch” and DNS Leak Protection
The most critical feature to enable after installation is the Kill Switch. This is a security mechanism that immediately shuts down your internet connection if the VPN drops unexpectedly. Without a Kill Switch, your device might revert to a standard unencrypted connection without you noticing, exposing your real IP address.
Additionally, ensure DNS Leak Protection is active. This ensures that your DNS queries (the “phonebook” of the internet) are sent through the VPN tunnel rather than to your ISP’s servers. If your DNS leaks, your ISP can still see which websites you are visiting, even if they can’t see the specific data you are exchanging.
Conclusion
Installing a VPN is a transformative step in reclaiming your digital privacy. Whether you are using a simple “one-click” installer on your smartphone or flashing custom firmware on a high-end router, the goal remains the same: creating a secure, encrypted environment for your data. By understanding the underlying technology—from virtual adapters to encryption protocols—you can move beyond basic installation and truly optimize your digital security. In an age of constant connectivity, a correctly installed and configured VPN is not just an option; it is an essential component of a modern, secure technological lifestyle.
aViewFromTheCave is a participant in the Amazon Services LLC Associates Program, an affiliate advertising program designed to provide a means for sites to earn advertising fees by advertising and linking to Amazon.com. Amazon, the Amazon logo, AmazonSupply, and the AmazonSupply logo are trademarks of Amazon.com, Inc. or its affiliates. As an Amazon Associate we earn affiliate commissions from qualifying purchases.