The modern home office and professional workspace rely heavily on the seamless integration of hardware and software. Among the most essential peripherals is the inkjet printer, a device that has evolved from a simple output tool into a sophisticated piece of technology capable of high-resolution photo printing and complex document management. However, even the most advanced HP printer requires routine maintenance, the most frequent of which is the replacement of ink cartridges. While the process may seem straightforward, a technical understanding of the hardware mechanics, software calibration, and troubleshooting protocols is essential to ensure device longevity and optimal print quality.

This guide provides an in-depth exploration of how to install ink cartridges in an HP printer, covering everything from initial preparation to advanced software alignment.
Pre-Installation: Preparation and Technical Requirements
Before attempting to replace an ink cartridge, it is vital to understand the technological environment of your printer. HP utilizes a variety of cartridge delivery systems, ranging from two-cartridge systems (black and tri-color) to individual high-capacity ink tanks. Proper preparation ensures that the delicate electronic components within the printer remain undamaged.
Identifying the Correct Cartridge Specifications
Every HP printer model is engineered to work with specific ink formulations and cartridge dimensions. Using the wrong cartridge can lead to hardware rejection or, worse, physical damage to the printhead carriage. To identify your requirements, check the label inside the printer’s cartridge access door or consult the HP Smart app. HP typically categorizes cartridges by a numerical series (e.g., HP 63, HP 902, or HP 952). Additionally, users must choose between Standard (A) and High Yield (XL) versions; both fit the same slot, but the XL variants contain more ink for high-volume tech environments.
Power Management and Carriage Positioning
The installation process must be performed while the printer is powered on. This is a critical technical requirement because the internal logic board must signal the printhead carriage to move into the “access position.”
- Ensure the printer is plugged into a stable power source.
- Power on the device and wait for the initialization sequence to complete.
- Open the exterior door and the internal cartridge access door.
- Wait for the carriage to slide to the center of the device and become silent. Attempting to force the carriage manually can strip the timing belt and cause mechanical failure.
Handling Sensitive Electronic Components
Ink cartridges are not merely plastic reservoirs; they are complex electronic components. On the back or bottom of each cartridge, you will find a series of copper-colored contacts and, in many models, the integrated printhead nozzles.
- Avoid Touching Contacts: Static electricity or oils from your skin can interfere with the electrical signals between the printer and the cartridge, leading to “Cartridge Not Recognized” errors.
- Nozzle Care: Touching the nozzle area can cause clogs or cross-contamination of colors.
The Step-by-Step Installation Process
Once the printer is prepared and the correct supplies are at hand, the physical installation can begin. Following a methodical approach ensures that the airtight seal of the new cartridge is maintained until the moment of use.
Removing the Depleted Cartridges
The method for removing an old cartridge varies slightly depending on the HP model.
- Snap-in Style: In many DeskJet and Envy models, you must press down lightly on the cartridge to release it from its slot.
- Latch Style: In OfficeJet Pro models, there is often a plastic latch that must be lifted, or the cartridge must be pushed inward to trigger a spring-release mechanism.
Once released, slide the cartridge out and set it aside for recycling. HP provides a robust “Planet Partners” program for the sustainable disposal of tech waste.
Preparing the New Hardware
New HP cartridges are vacuum-sealed to prevent the ink from drying or leaking during transit.
- Remove the cartridge from its plastic wrap.
- The Orange Pull-Tab: Most cartridges feature a bright orange plastic tab. This must be pulled to remove the protective tape covering the vent hole. If this tape is not removed, a vacuum will form inside the cartridge, and no ink will flow.
- The Protective Cap: Some cartridges come with a plastic orange cap over the nozzle. Twist or snap this off carefully. Do not attempt to reattach it once removed, as this can damage the internal seals.
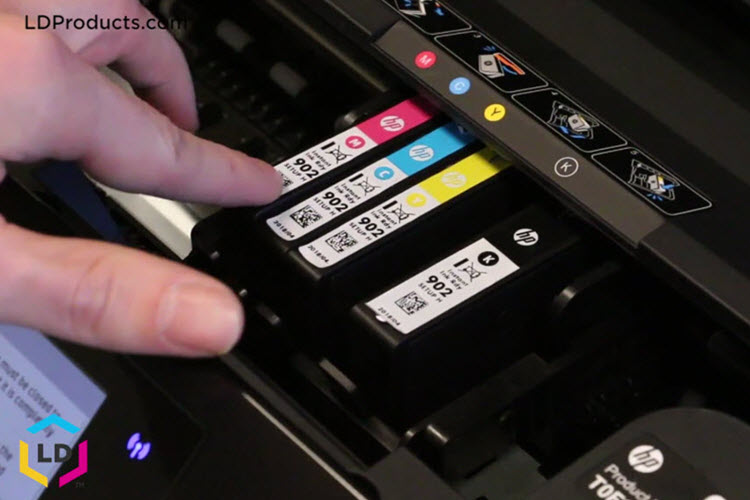
Seating the Cartridge Correctly
Insert the new cartridge into the empty slot, holding it at a slight upward angle. Ensure the label is facing up and that the icons (Circle for color, Triangle for black) match the symbols on the carriage.
- Push the cartridge forward until it clicks into place.
- If your printer uses a latch, lower the latch to lock the cartridge down.
- Close the cartridge access door and the exterior door. The printer’s internal sensors will now detect the new hardware and initiate a “Checking Printer” sequence.

Software Alignment and Calibration
The installation of the physical hardware is only half the process. For a printer to produce crisp text and accurate colors, the software must synchronize with the physical position of the new printheads.
The Automatic Alignment Page
Most modern HP printers will automatically print an “Alignment Page” immediately after a new cartridge is detected. This page contains a series of patterns—grids, lines, and color blocks—that allow the printer to calibrate the distance between the nozzles and the paper.
- Scanning the Page: If your printer has a built-in scanner, you may need to place the alignment page on the scanner glass and press the “Scan” button. The printer’s firmware analyzes the printed pattern to adjust its internal coordinates. This ensures that the black and color inks align perfectly, preventing “ghosting” or blurry text.
Utilizing the HP Smart App
In the current tech landscape, printer management has moved to the cloud. The HP Smart app serves as a digital hub for cartridge installation. Through the app, users can:
- Monitor Ink Levels: View real-time telemetry of ink consumption.
- Run Clean Cycles: If the initial test print is streaky, the app can trigger a “Printhead Cleaning” routine, which uses a small burst of ink to clear the nozzles.
- Update Firmware: HP frequently releases firmware updates that improve cartridge recognition and security. Ensuring your printer’s software is up to date prevents many common installation errors.
Troubleshooting Common Installation Errors
Even with a careful approach, technical glitches can occur. Understanding the underlying causes of these errors can save time and prevent unnecessary hardware returns.
“Cartridge Not Communicating” or “Incompatible”
This is the most frequent error encountered after installation. It usually stems from a communication breakdown between the cartridge’s chip and the printer’s logic board.
- Solution 1 (Clean Contacts): Use a lint-free cloth and a tiny amount of distilled water to gently wipe the copper contacts on the cartridge and the matching pins inside the carriage.
- Solution 2 (Hard Reset): Unplug the printer while it is still on, wait 60 seconds, and plug it back in. This clears the printer’s temporary memory (RAM) and forces a fresh hardware handshake.
Ink Leaks or Poor Print Quality
If the printer is producing faded images despite a new cartridge, the issue is likely related to the ink delivery system.
- Vent Obstruction: Ensure the orange pull-tab was completely removed. If the vent hole is blocked, gravity cannot pull the ink down to the nozzles.
- Air Bubbles: Sometimes, air can get trapped in the printhead during installation. Running a “Second Level Clean” from the printer’s maintenance menu can usually purge these bubbles.
Maximizing Print Efficiency and Tech Longevity
Installing ink cartridges is an ongoing part of the technology lifecycle. To get the most out of your HP hardware, consider the following professional tips for efficiency.
Choosing Between Original HP and Third-Party Ink
From a technical standpoint, Original HP ink is formulated to match the thermal properties of the HP printhead. While third-party “remanufactured” cartridges are more affordable, they can sometimes have inconsistent chip firmware, leading to error messages. If you use third-party ink, ensure the vendor provides a “chip-ready” guarantee to avoid compatibility lockouts.
The Role of HP Instant Ink
For users who want to automate their tech maintenance, HP’s Instant Ink service uses the printer’s internet connection to monitor levels. When the printer detects a low-ink threshold, it autonomously orders a replacement. This “Internet of Things” (IoT) approach ensures that you never run out of ink mid-project and that the cartridges provided are always the most current version for your firmware.
Proper Storage of Spare Cartridges
If you purchase ink in bulk, store it in a cool, dry place in its original sealed packaging. Storing cartridges upright is preferred to keep the ink settled near the nozzles, ensuring they are ready for immediate use when the current set eventually expires.
By approaching the installation of HP ink cartridges as a vital technical procedure rather than a simple chore, users can significantly extend the life of their devices. Precision in handling, diligence in software calibration, and proactive troubleshooting are the hallmarks of maintaining a high-performing digital printing environment.
aViewFromTheCave is a participant in the Amazon Services LLC Associates Program, an affiliate advertising program designed to provide a means for sites to earn advertising fees by advertising and linking to Amazon.com. Amazon, the Amazon logo, AmazonSupply, and the AmazonSupply logo are trademarks of Amazon.com, Inc. or its affiliates. As an Amazon Associate we earn affiliate commissions from qualifying purchases.